In this tutorial, we’ll talk about what is MS Word Ribbon. As you go over, you will learn and understand their parts and uses.
The Ribbon is an important part of how Word works. It is where most of Word’s commands live, and it is also where settings are made. These things look like buttons, text fields, and menus.
Table of contents
What is Ribbon in Microsoft Word ?
The Ribbon in Microsoft Word is the window’s uppermost bar. Additionally, it is a part of the user interface that was added to Microsoft Office 2007 by Microsoft. It is between the Title Bar and the Quick Access Toolbar. It provides a number of tab-organized tools for editing and formatting documents.
The ribbon is a set of toolbars at the top of the window in Office programs designed to help you quickly find the commands that you need to complete a task.
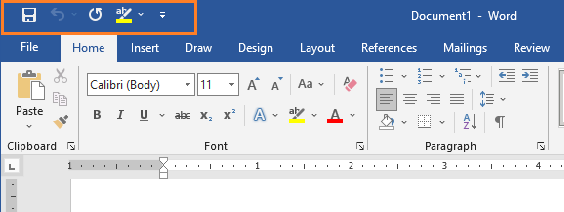
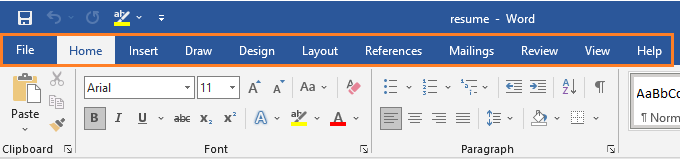
It has ten tabs: Home, Insert, Draw, Layout, References, Mailing, Review, View and Help. Each tab has a set of commands that work together. It makes it easy to get to the commands you use most often and need to finish a task.
Parts of Ribbon in Microsoft Word
A MS Word Ribbon has five main parts: the Quick Access Toolbar, the tabs, the command buttons, the groups of command buttons, and the dialog launchers.
1. MS Word Quick Access Toolbar
The Quick Access Toolbar, is a set of the most-used commands that are always available, no matter what MS Word Ribbon command set is being used. By default, the QAT comes with three commands: Quick Save, Undo, and Redo. But many people change the QAT to add print, copy, and paste to the default commands.
2. MS Word Ribbon Tabs
The Tabs of MS word 2019 are like the old way of making menus. But instead of a list of menus, when you switch Tabs, you’ll see a different set of commands on the Ribbon. Along the top of Word 2019, there are 11 tabs: File, Home, Insert, Draw, Layout, References, Mailings, Review, View and Help.
3. Ribbon Groups
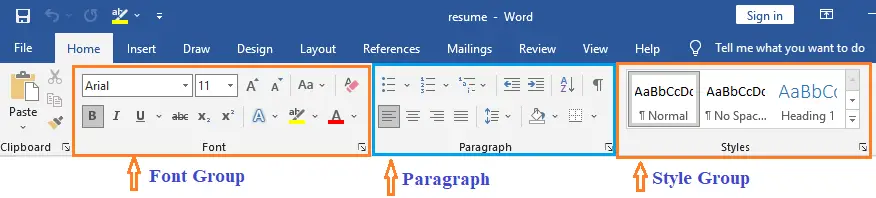
Each tab on the Ribbon has many command groups as we’ve notice. When selecting the Home tab in Word, for instance, the following groups are displayed: Clipboard, Font, Paragraph, Styles, and Editing.
Each group contains the most frequently used command buttons for that category; for instance, the Font group contains the Bold, Italic, and Underline command buttons.
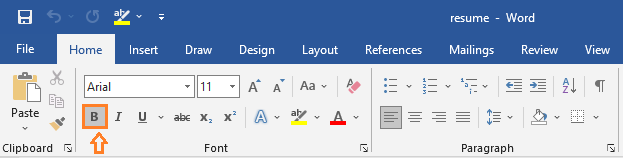
4. Command Buttons
The command buttons are the components that are responsible for doing all of the work. If you want certain words to stand out more, for instance, you would use the Bold button to make that change.
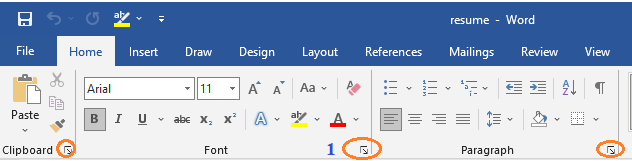
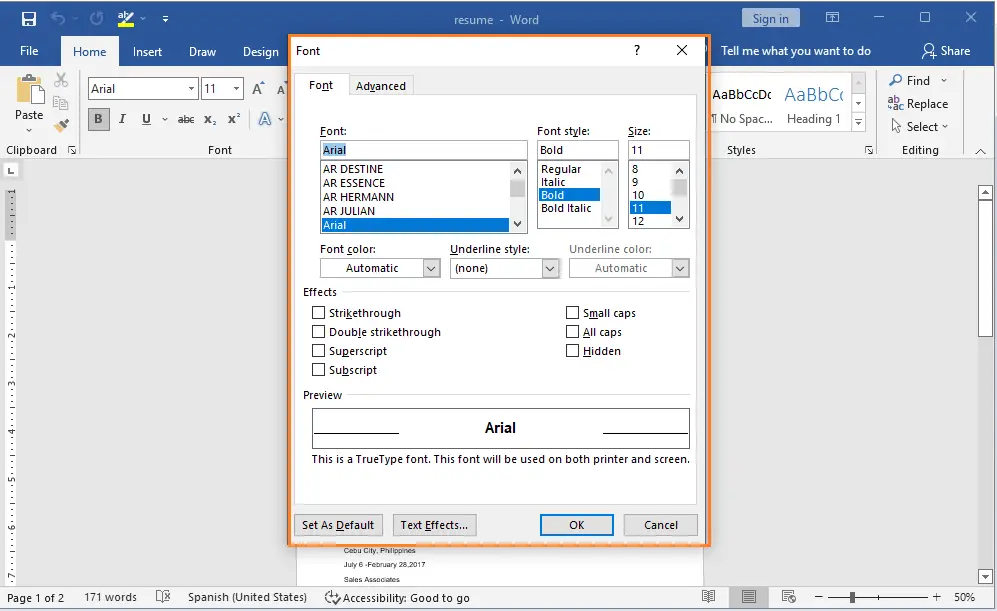
5. Dialog Launcher of MS Word Ribbon
Dialog Launcher is a set of command buttons that cannot fit on the Ribbon due to lack of space. If there is an additional command set, an arrow in the bottom right corner of the group will be visible, which will allow you to see the complete command set.
Microsoft Word Ribbon Tabs and Commands
Here are the Microsoft Word Ribbon Tabs and Commands.
| Ribbon Tab Name | Command Groups | Dialog Box Shortcut Key |
| Home | Clipboard, Font, Paragraph, Styles, and Editing | Ctrl+D (Font) Alt+Ctrl+Shift+S (Styles) |
| Insert | Pages, Tables, Illustrations, Add-ins, Media, Links, Comments, Header & Footer, Text, and Symbols | |
| Draw | Tools, Pens, and Convert | |
| Design | Document Formatting and Page Background | |
| Layout | Page Setup, Paragraph, and Arrange | |
| References | Table of Contents, Footnotes, Research, Citations & Bibliography, Captions, Index, and Table of Authorities | |
| Mailings | Create, Start Mail Merge, Write & Insert Fields, Preview Results, and Finish | |
| Review | Proofing, Speech, Accessibility, Language, Comments, Tracking, Changes, Compare, Protect, and OneNote | |
| View | Views, Immersive, Page Movement, Show, Zoom, Window, Macros, and SharePoint |
What is Ribbon tab in MS Word?
The MS Word Ribbon Tabs are composed of groups of closely related commands designed to help users quickly find desired commands, and each ribbon has a bar line across the page.
Further, it allows users to quickly access all of the program’s features and commands with a minimal number of mouse clicks. The main tabs are in Word are File, Home, Insert, Design, Page Layout, References, Mailings, Review, View, and Help.
List of the Names of the Tabs on the Ribbon
Here are the list of the names of tabs on the ribbon.
1. Home Tab
The Home tab commands are put together in groups called Clipboard, Font, Paragraph, and Styles. There is a vertical line between these parts that you can see. Under some of these areas, there are more options that can be chosen from a drop-down menu.

2. Insert Tab
Using the Insert tab you can add pictures, shapes, pages, symbols, and other things to a document. These choices are shown with icons and text. Most of these choices have a drop-down menu where you can find more options. Pages, Tables, Illustrations, Add-ins, Media, Links, Comments, Header and Footer, Text, and Symbols are the groups of commands that make up the Insert menu.

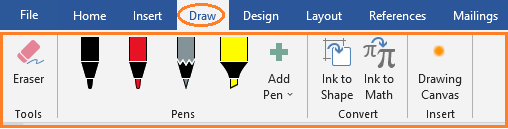
3. Draw Tab
With the Draw tab ribbon, you can draw in a Word document. The draw tab is part of Office 365, and if it’s not on your ribbon, it may need to be added. On the Draw tab, you can choose what you want to do (draw or erase), what kind of pen tool you want to use, and if you want to draw with the trackpad.
4. Design Tab
The design tab lets you change your document’s format, background, color scheme, page borders, etc. If the Design tab is not in your ribbon and you want it to be, go to File > Options > Customize Ribbon and check the box next to Design.

5. Layout Tab
The Layout tab permits the user to customize the page orientation, margins, etc. The Layout options are categorized into Page Setup, Margins, and Arrangement commands.

6. References Tab
The Reference tab allows the user to enter document sources and citations, create a table of contents, and add an index, among other things. The Reference tab is organized by the following groups of commands: Table of Contents, Footnotes, Research, Citations, Captions, Index, and Table Authorities are included.

7. Mailings Tab
The Mailings Tab allows the user to merge emails, write and insert different fields, etc., and is the least frequently used tab. This commands on the Mailings tab are arranged into the following groups: Address, Start Mail Merge, Insert Fields, Preview, Merge Range, and Finish.

8. Review Tab
The Review Tab allows users to proofread, add or remove comments, track changes, enable Read Aloud, verify accessibility, etc.

9. View Tab
The View tab lets users to toggle between several document views, such as viewing multiple pages, boundaries, grids, and rulers. Focus, Immersive Reader, and Zoom are now available in the View Tab’s accessibility options. The View Tab of Word ribbon contains commands divided into the following categories: Document View, Accessibility, Show/Hide, Zoom, Window, and Macros.
The Focus option will hide everything at the top of the Word document, leaving just the blank (or written text) on the page. Focus mode was designed to remove any distractions from the document so that students can focus on their writing (or reading). When in Word and using a Mac, Control + Shift + Command + F will toggle Focus on and off.

10. Help tab

- Help – Gets help with Microsoft Word.
- Contact Support – Gets help from a Microsoft support agent.
- Feedback – Provides feedback to Microsoft.
- Show Training – Shows online training and learning content.
- What’s New – Showcases the latest upgrades from Microsoft.
How to Show or Hide MS Word Ribbon
Time needed: 1 minute
Here, I’ll talk about how to hide or show the Word ribbon. When editing a long document on a small laptop with Microsoft Word, the ribbon can take up almost half of the content area. Try these tips if you want to get rid of the ribbon area to make more space.
- Shortcut Key
By pressing [Ctrl] + [F1], you can hide or show the ribbon.
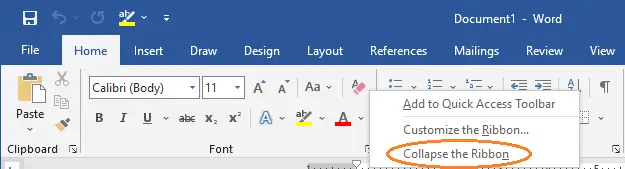
- Shortcut Menu
Just right-click anywhere on the ribbon and choose Collapse the Ribbon in the dialog box.

- Double Click Any Tab
Just double-click any tab on the ribbon. For this example, I’ll choose “Insert.”

- Command Button
To do so, simply select the arrow in the right-hand corner of the ribbon. This way, only the tab titles will be displayed.

- Ribbon Display Options
Just click the button in the top right corner of the ribbon and choose either Auto-hide Ribbon or Show Tabs.


Summary
In summary, we’ve talked about the MS word ribbon as well as what those terms mean, their parts, and their uses. Also, we learn how to use the components of MS Word Ribbon. We also gain insight into why it’s important to familiarize commands with ribbon tabs in creating documents.
Furthermore, we also picked up some skills on what the shortcut keys are to hide and show the ribbons if we have a small space on our screen.
We hope this tutorial helps you as you plan to create a document in MS Word.
PREVIOUS
Featured guides worth reading next
Frequently Asked Questions
What is the MS Word Ribbon and what does it do?
How many tabs does the MS Word Ribbon have in 2026?
How do I hide or show the MS Word Ribbon?
Ctrl+F1 to toggle the Ribbon between collapsed (only tab names) and expanded (full commands) states. You can also double-click any tab name for the same effect, or use the Ribbon Display Options arrow at the top-right of the Title Bar for three modes: Auto-hide Ribbon, Show Tabs only, or Show Tabs and Commands. To pin the Ribbon open after temporarily expanding it, click the pin icon at the bottom-right of the Ribbon.How do I customize the MS Word Ribbon?
What is the difference between the Ribbon and the Quick Access Toolbar?
What is the new Copilot tab in Word 365?
Why are some commands on my Ribbon greyed out?
How do I restore the Ribbon to its default settings?
How do I save and transfer my custom Ribbon configuration?
What are contextual tabs on the Word Ribbon?
Continue learning MS Office
- Parts of MS Word Window, the complete window guide (Title Bar, status bar, rulers, Copilot pane)
- Headers & Footers in MS Word, sibling guide for the Insert tab’s Header & Footer group
- Parts of Excel Window, the Excel companion to this Ribbon guide
- Parts of PowerPoint Window, the PowerPoint companion
- All MS Word Tutorials, browse the full Word category
- Best Laptops for Students (2026), recommended hardware for Word + Office workloads
Final Recommendation
The MS Word Ribbon stopped being controversial about a decade ago, it’s now simply how Microsoft Word works. Whether you’re a BSIT student typing your first capstone proposal or an office worker formatting your hundredth client report, every command you’ll ever need is one of the ~600 buttons spread across the Ribbon’s eleven tabs. The trick isn’t memorizing them all; it’s knowing which tab to look on.
If you take three habits from this guide, make them: (1) customize your Quick Access Toolbar with your 5-7 most-used commands so you stop hunting; (2) learn the Home tab cold: it covers 80% of everyday Word work; and (3) export your Ribbon configuration after any major customization so you can restore it on the next machine or after the next Word update.
And if you’re on Word 365 with a Copilot license, spend an afternoon experimenting with the new Copilot tab: Draft with Copilot for a first-draft email, Summarize for a long PDF, Rewrite for tone polishing. It’s the most genuinely useful Ribbon addition since the Ribbon itself.
- Open Word right now and click through each tab from Home to Help, see where every group sits in your build
- Customize your QAT with your 5-7 most-used commands (File → Options → Quick Access Toolbar)
- Export your Ribbon configuration via Customize Ribbon → Import/Export → save to OneDrive
- If you have Copilot, open the Copilot tab and try Draft / Summarize / Rewrite on a real document
- Read the companion guide on the parts of the MS Word window for full interface coverage
- Browse the full MS Word tutorial series for deeper dives on each tab
Stuck on a specific Ribbon tab or command not covered here? Drop a comment with your version of Word and what you’re trying to do, we’ll help.

Glay Eliver
Programmer & Technical Writer at PIES IT Solution
Glay Eliver is a programmer and writer at PIES IT Solution, author of over 600 tutorials at itsourcecode.com. Specializes in JavaScript tutorials, Microsoft Office how-tos (Excel, Word, PowerPoint), and Python error debugging covering ImportError, TypeError, AttributeError, ModuleNotFoundError, and JavaScript ReferenceError. Authored several of the site’s highest-traffic Excel and MS Office reference articles.
Expertise: JavaScript · MS Excel · MS Word · MS PowerPoint · Python · Python ImportError · Python TypeError · Python AttributeError · ModuleNotFoundError · JavaScript ReferenceError · Pygame · View all posts by Glay Eliver →