In this chapter, we’ll talk about how to resize tables in MS Word. You can change the size of a table in Microsoft Word to make it bigger or smaller, depending on what you need.
Table of contents
What is Resize Table in MS Word?
With the resize table command, you can enter a range to change the size of the table. It lets you change the size of a table to make it smaller or bigger, depending on what you need.
Using a table in Microsoft Word, you can organize parts of your document or add information in a clear way. Once you add your table, you might want to think about making it automatically change size to fit the document or the table’s contents.
In Word, you can change the size of a table by dragging a corner or edge. But Word’s AutoFit feature makes the table the right size for you, saving you some work.
How To Resize Table in MS Word
The following steps will help you resize a table available in a Word document.
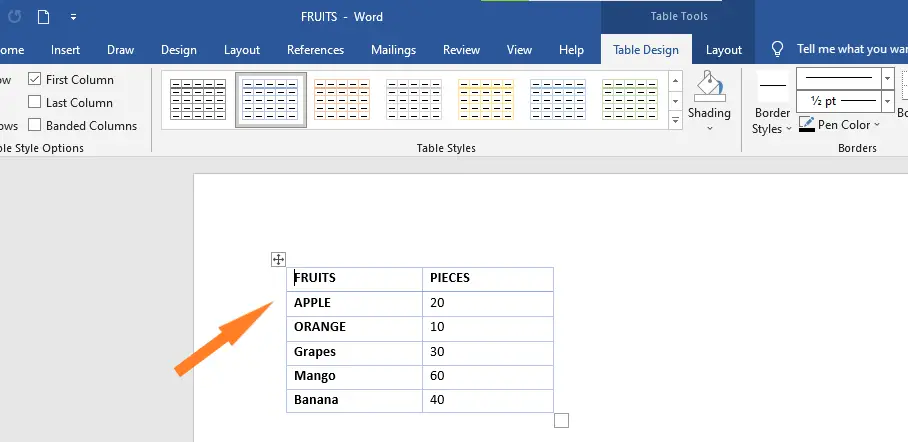
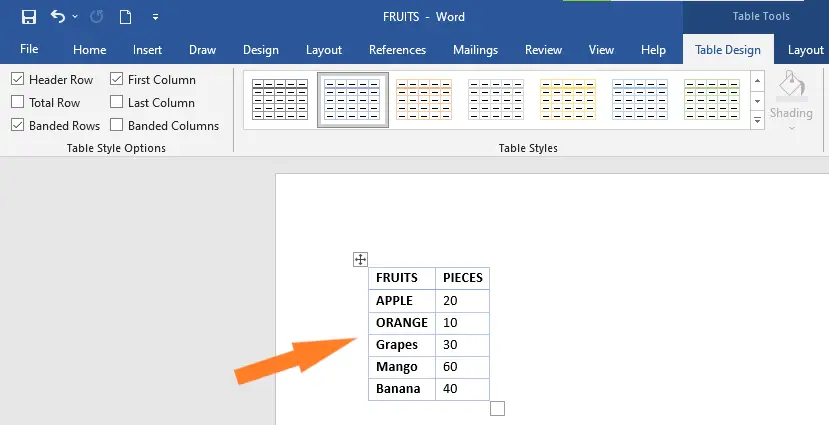
- Step 1 − Move the mouse pointer over the table you want to change the size of.
As soon as you move your mouse pointer inside the table, a small Cross Icon will appear in the top-left corner and a small Resize Icon will appear in the bottom-right corner, as shown below.

- Step 2 −Move the mouse pointer over the Resize Icon until it changes into a double-sided diagonal arrow. When it does, press and hold the left mouse button while you resize the table.
Move the table up or down to make it shorter or longer. You can change the table’s width and height at the same time by dragging it diagonally.

How to Automatically Resize a Table in Microsoft Word
You can set your table to automatically change its size to fit the page or what’s on it. You can also use AutoFit either before or after you add the data to the table.
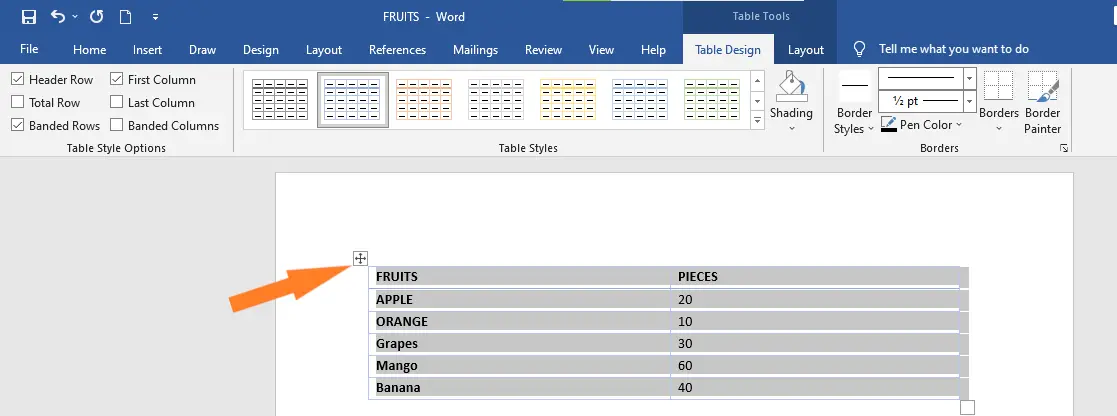
Click on the table in your document. You can do this by moving your cursor over the table and clicking the table handle (a four-sided arrow) in the top left corner. This makes the table stand out as a whole.
Click the right mouse button and move the cursor to the AutoFit option in the shortcut menu. Then, choose “AutoFit to Contents” or “AutoFit to Window” from the menu that appears.
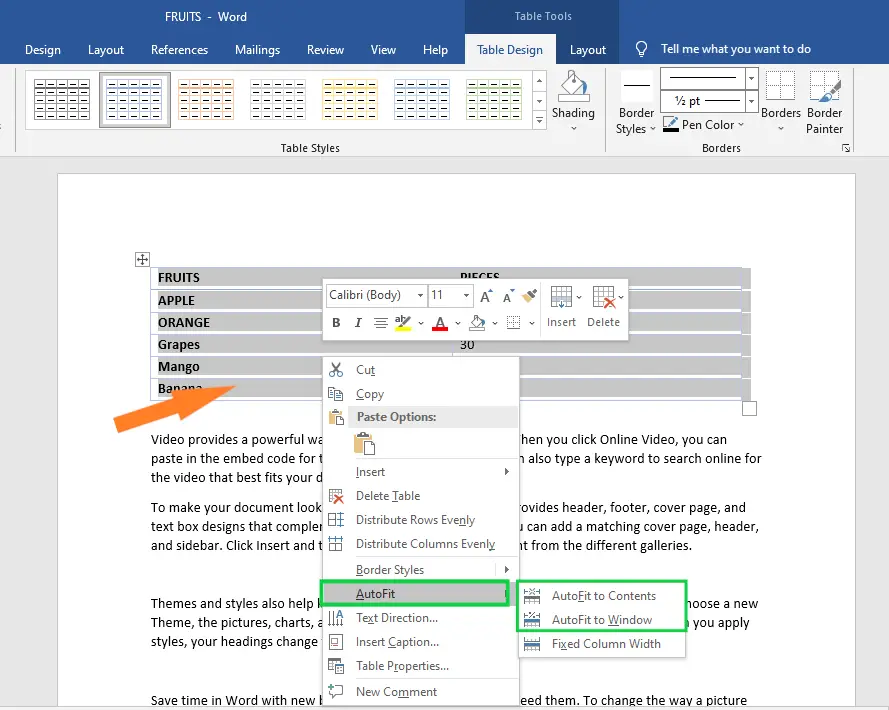
You can also click the drop-down arrow next to AutoFit in the floating toolbar to make your choice.
If you choose “AutoFit to Content,” the table will automatically fill the entire window, with each column taking up the same amount of space.
There is also a Fixed Column Width option in the AutoFit menu. After you change the size of the table to make it fit the window, you can use this option to keep the columns at their new sizes.
Adjusting a Table For Newer Versions of MS Word
The only big change for people who keep using Microsoft Office after 2011 is that they can change the size of columns and rows right in the ribbon.
- Just click on your table, and new tabs will show up alongside the usual ones.
- By clicking on Layout on the ribbon, you can change the size.
- To change the size of individual columns or rows, click on the cell and then use the up and down arrows in the ribbon to change the height and width of the column or row. You can also type in the length by hand if you’d rather.
- To change the size of more than one row or column, select the rows or columns and click on Distribute Columns or Distribute Rows.
To Change the Row Height
- Click the View tab and then choose Print Layout or Publishing Layout from the menu ribbon.
- Click the table that needs to be changed.
- Put your cursor on the edge of the row and wait for the icon to appear.
- Move the row’s edge until it’s at the height you want.
To Change the Column Width
- Click the View tab and then choose Print Layout or Publishing Layout from the menu ribbon.
- Click the table that needs to be changed.
- Put your cursor at the edge of the column until the icon shows up.
- Move the column’s edge until it’s the width you want.
Multiple columns or rows the same size
Here are the ways to make multiple columns or rows the same size.
| TO SELECT | DO THIS |
|---|---|
| The entire table | Place the pointer over the table until the handle for moving the table shows up, and then click the handle for moving the table. |
| A row or rows | Click to the left of the row. |
| A column or columns | Click the column’s top gridline or border. |
| A cell | Click the left edge of the cell. |
Summary
In the end, we’ve learned How To Resize Table in MS Word and what those terms mean. We also know that there are different ways to resize a table, which we can use in our document to make it look more professional and presentable.
Meanwhile, if you want to learn more about working on tables, see the previous tutorial on how to move tables and how to create tables in Microsoft Word. You can browse those guides if you are having a hard time working with your tables in a document
We hope this tutorial helps you as you format your documents in MS Word.
PREVIOUS


Glay Eliver
Programmer & Technical Writer at PIES IT Solution
Glay Eliver is a programmer and writer at PIES IT Solution, author of over 600 tutorials at itsourcecode.com. Specializes in JavaScript tutorials, Microsoft Office how-tos (Excel, Word, PowerPoint), and Python error debugging covering ImportError, TypeError, AttributeError, ModuleNotFoundError, and JavaScript ReferenceError. Authored several of the site’s highest-traffic Excel and MS Office reference articles.
Expertise: JavaScript · MS Excel · MS Word · MS PowerPoint · Python · Python ImportError · Python TypeError · Python AttributeError · ModuleNotFoundError · JavaScript ReferenceError · Pygame · View all posts by Glay Eliver →