What is Blank Page in MS Word?
In this tutorial, we’ll go through how to insert and remove blank pages in MS Word. The term “blank page” refers to a page empty of any text or other content. In addition, you will learn how to remove a blank page from a Microsoft Word document in this section.
Table of contents
Insert Blank Pages
Inserting Blank Pages is a user’s method used to make projects or documents. Most of the time, you’ll need more than one page. Sometimes, when you’re making changes to your project or document, you’ll need to insert pages in between. It’s easy to add a page in the middle or anywhere else you want. With the help of pictures and instructions, we will learn step-by-step how to add a blank page in MS-Word.
A user has to put a page in different places, depending on what they need. So, basically, there are three common situations or conditions that can happen:
- To add a new page to the beginning of a document,
- To insert a page in the middle of a document, between any two pages.
- To put a page at the end of a document.
How to Insert blank page in MS Word
The following are instructions on how to insert blank pages in a document.
- Put your cursor where you want the blank page to go.
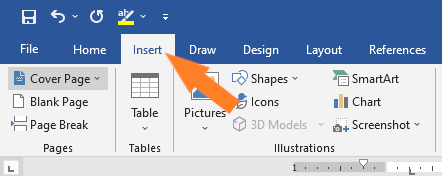
- Select Insert from the ribbon.

- Click Blank Page in the Pages group.
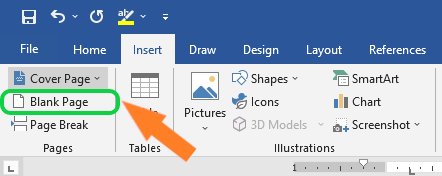
Your document’s blank page should be inserted.
Insert Blank Page in the middle of a Document
Here are the steps to insert blank page in the middle of a document.
- Step 1: Launch MS Word on your computer.
- Step 2: Now, open or create the document in which you wish to insert a blank page.
- Step 3: Now, if you want to insert a page at the end of a document. For example, if you want a new page between the second and third page of your document, place the cursor on the last typed line of page two.

- Step 4: Insert a new page like previously
- Step5: Lastly, a new page is inserted at the end of the document.
This way, we can quickly insert a new blank page at any desired location.
How to Remove a Blank Page in MS Word
These steps show how to delete a blank page inserted using the steps above. If this method doesn’t work for you, please see the bonus section below for two additional deletion methods.
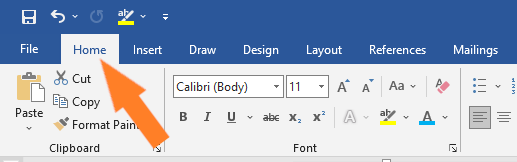
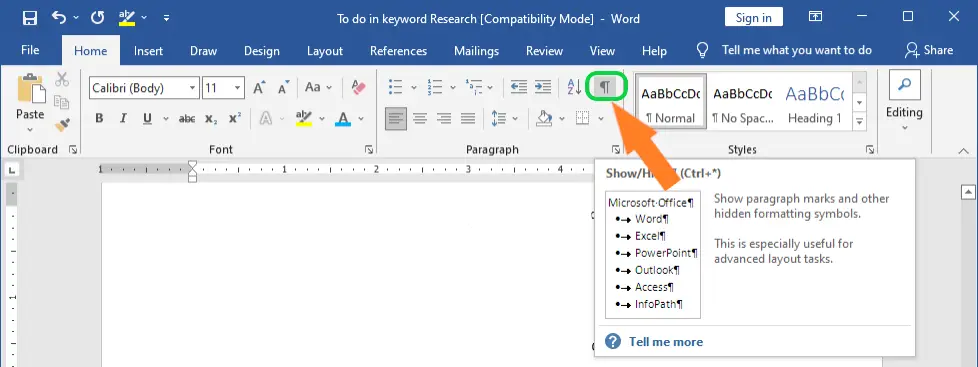
- Select the Home tab in the ribbon.

- Click the Show/Hide button in the Paragraph group to see the hidden formatting marks in your document

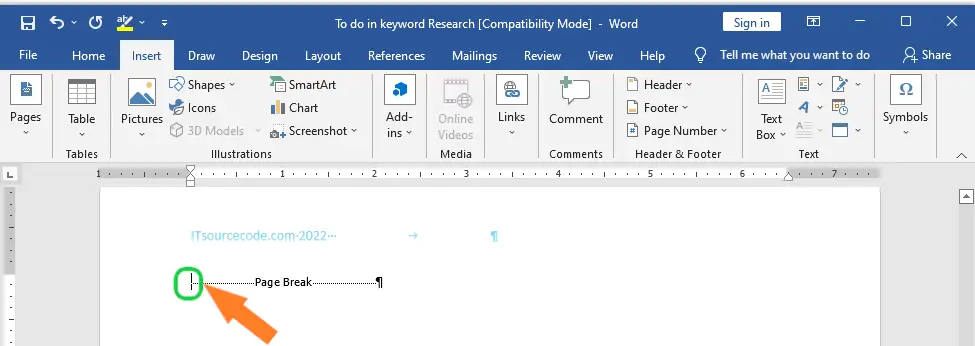
- Place your cursor at the beginning of the page break that was made automatically when you put in the blank page.
Reminder: If you want to get rid of a page break on a Mac, you may have to put your cursor at the end of the break instead of the beginning.

- Press the Delete key on your keyboard, to get rid of the page break
- If your blank page was put between other pages instead of at the end of your document, you can also delete the page break that was automatically made after the other pages.
Your blank page should be deleted.
Two Extra Methods for Deleting Blank Pages
There are various more causes of blank pages, including leftover section breaks and needless paragraph markings.
Delete Blank Pages Created by Section Breaks
If a section break made the blank page you don’t want, you must delete the section break to get rid of the blank page.
- Click the Show/Hide button on the Home tab to find the section break, .
- Put your cursor where the break will start and press the Delete key on your keyboard.
Mac users may need to put their cursor at the end of the break to delete it.
Delete Blank Pages Created by Paragraph Marks
Unnecessary paragraph markers might generate blank pages.
- Select the Show/Hide button on the Home tab to identify the paragraph markings.
- Select the paragraph mark or position the cursor exactly in front of it, and then press the Delete key on your keyboard to eliminate the blank page.
If you delete the right word page by accident, you can get it back by pressing “Ctrl+Z” on Windows or “Command+Z” on a Mac. Unless you’ve already closed the Word file.
Summary
In summary, we’ve learned how to insert and remove blank pages in MS Word as well as what those terms mean. In addition, we know what different ways in removing extra pages and inserting blank pages to make our document presentable and appear more professional.
Meanwhile, if you want to learn more about formatting pages, see the previous tutorial on how to check and change lines and paragraphs as well as how to adjust page margin in Microsoft Word, which are still part of formatting your documents. You can browse those guides if you are having a hard time exploring your documents.
We hope this tutorial helps you as you format your documents in MS Word.
PREVIOUS
NEXT
Official documentation

Glay Eliver
Programmer & Technical Writer at PIES IT Solution
Glay Eliver is a programmer and writer at PIES IT Solution, author of over 600 tutorials at itsourcecode.com. Specializes in JavaScript tutorials, Microsoft Office how-tos (Excel, Word, PowerPoint), and Python error debugging covering ImportError, TypeError, AttributeError, ModuleNotFoundError, and JavaScript ReferenceError. Authored several of the site’s highest-traffic Excel and MS Office reference articles.
Expertise: JavaScript · MS Excel · MS Word · MS PowerPoint · Python · Python ImportError · Python TypeError · Python AttributeError · ModuleNotFoundError · JavaScript ReferenceError · Pygame · View all posts by Glay Eliver →