In this article, we will explore the Slide Master in Powerpoint feature in depth and discuss how it can be used to improve the overall look and feel of your presentations.
Slide Master in PowerPoint is a powerful tool that allows users to create a consistent and professional look for their presentations. It is a feature that is often overlooked by many PowerPoint users, but it can be a game changer when it comes to creating engaging and effective presentations.
Moving along, let’s get more in-depth into what is this slide master…
What is slide Master in PowerPoint?
The Slide Master is a special type of slide in PowerPoint that acts as a template for all the other slides in your presentation. It contains all of the design elements, such as background colors, fonts, and logos, that will be used throughout the presentation.
Furthermore, Slide Master is where you can make changes to the design elements, and then have those changes automatically reflected on all of the other slides in the presentation.
Where is slide Master in PowerPoint?
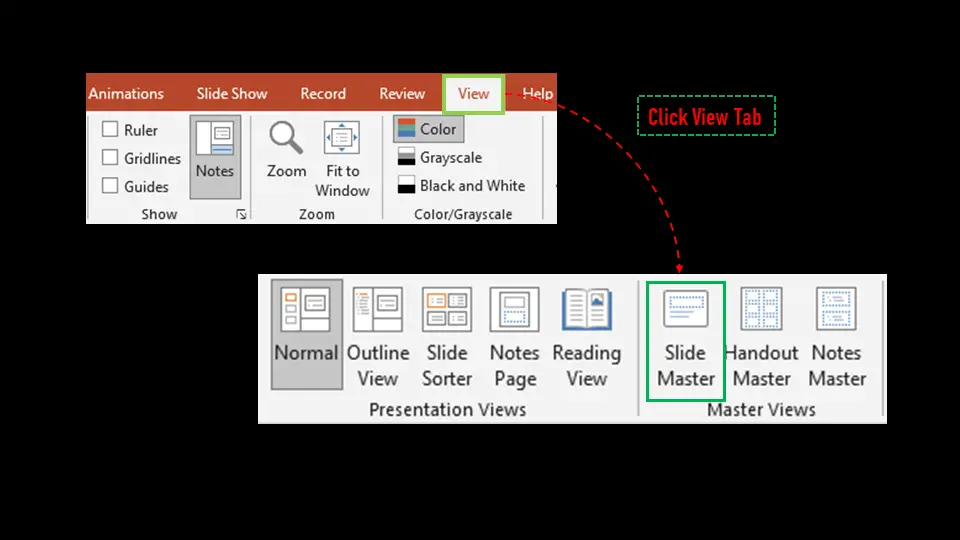
The Slide Master in PowerPoint can be found by going to the “View” tab in the PowerPoint ribbon, and clicking on “Slide Master.” This will open the Slide Master view, where you can make changes to the design elements for all the slides in your presentation.
Understanding Slide Master in Powerpoint
Common options and commands you may encounter in slide master are listed and described below. Let’s get ready to understand the following:
| Slide Master Options | Description |
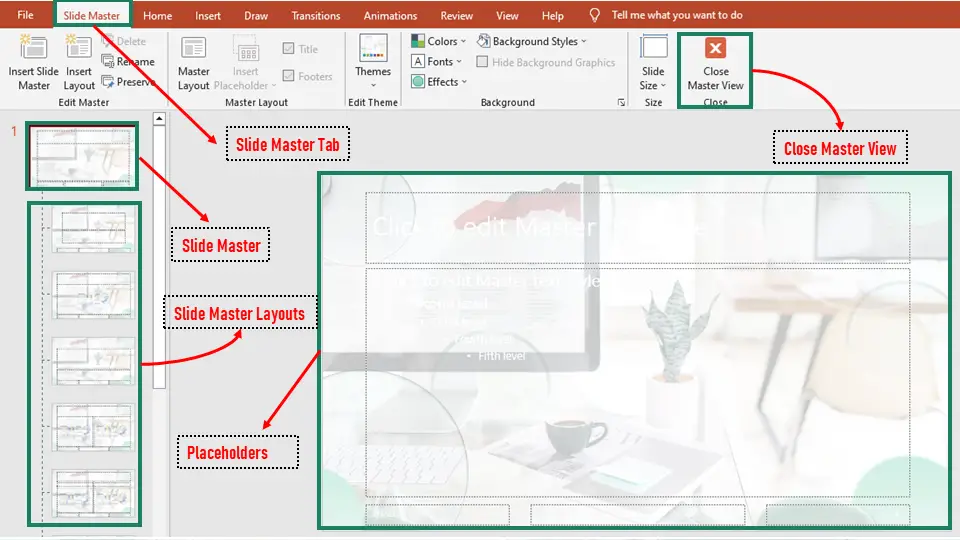
| Slide Master tab | Contains the commands used to alter the slide master and layouts. |
| Slide Master | Controls all of the slide layouts below it. Changes you make to the placeholders or formatting on the slide master will be changed in the other layouts as well. |
| Slide layouts | Changes made to layout slides will affect any presentation slides created from that layout. Slide layouts are dependent on the theme chosen. |
| Placeholders | Allow you to add, remove, or edit placeholders or make formatting changes just like you would in Normal view. |
| Close Master View | Closes Slide Master view. |
So now, we are going to begin creating a master slide in our presentation.
How to create Master slide PowerPoint
Here are the steps to create a Master Slide in PowerPoint:
- Open your presentation and go to the “View” tab in the PowerPoint ribbon.
- Click on “Slide Master” to open the Slide Master view.
- In the Slide Master view, you will see a series of slides, with the first slide being the Master Slide.
- To create a new Master Slide, click on the “New Slide Master” button in the “Slide Master” section of the “View” tab.
- A new slide will appear, and you can now format and design it as you wish. You can add or remove elements, such as a footer or logo, change the background color or add a watermark.
- To apply your changes to all the slides in your presentation, click on “Close Master View” in the “Slide Master” section of the “View” tab.
How to edit Master slide in PowerPoint
To edit the master slide in PowerPoint:
- Go to the “View” tab and select “Slide Master.”
- The Slide Master view will show all the slides with the same layout. It allows you to edit the overall design of all slides at once.
- Make any desired changes to the text, images, shapes, and theme of the slide master.
- Once you have made your changes. Click on the “Close Master View” button in the “Slide Master” tab to return to the normal presentation view.
Note: Changes made in the Slide Master will affect all slides with the same layout in your presentation.
Tips for Using the Slide Master
Here are a few tips for using the Slide Master effectively:
1. Start with a blank Slide Master: When you create a new presentation, start by creating a blank Slide Master. This will ensure that your presentation has a consistent look and feel. Thus, will make it easier for you to make changes to the design elements later on.
2. Keep it simple: When it comes to the design elements in the Slide Master, less is often more. Choose a simple background color, and limit the number of logos and images you use. This will help to keep your presentation looking professional and uncluttered.
3. Experiment with different design elements: While it’s important to keep your presentation simple, it can also be helpful to experiment with different design elements to see what works best for your presentation.
For example, you might try using different font styles, or changing the background color to see what works best for your particular presentation.
Conclusion
In conclusion, Slide Master in PowerPoint is a powerful tool that can help you to create professional and engaging presentations. By using the Slide Master, you can ensure that your presentations have a consistent look
Thank you for reading 🙂

Glay Eliver
Programmer & Technical Writer at PIES IT Solution
Glay Eliver is a programmer and writer at PIES IT Solution, author of over 600 tutorials at itsourcecode.com. Specializes in JavaScript tutorials, Microsoft Office how-tos (Excel, Word, PowerPoint), and Python error debugging covering ImportError, TypeError, AttributeError, ModuleNotFoundError, and JavaScript ReferenceError. Authored several of the site’s highest-traffic Excel and MS Office reference articles.
Expertise: JavaScript · MS Excel · MS Word · MS PowerPoint · Python · Python ImportError · Python TypeError · Python AttributeError · ModuleNotFoundError · JavaScript ReferenceError · Pygame · View all posts by Glay Eliver →