In this article, we’ll show you how to add, copy, and delete text boxes in PowerPoint, and customize it to suit your presentation needs. Whether you’re a beginner or an experienced user, this guide is designed to help you master the process of adding text to your presentations.
PowerPoint is one of the most widely used presentation software programs in the world. It’s a versatile tool that enables users to create professional-looking presentations with ease.
PowerPoint is a powerful tool for creating presentations, and text boxes play an important role in adding content to slides.
Without further ado, let’s do the steps on how to add a text box.
How to Add a Text box in PowerPoint
So here are the steps on how to add text box in presentations in Powerpoint. Along with short clips on how to do it.
- Open your presentation in PowerPoint.
- Select the slide where you want to add text.
- Select the “Insert” tab from the ribbon at the top of the screen.
As an alternative, you can press Alt + N to go to the Insert tab and then Alt + X to create a text box.
- A text box will appear on your slide.
Now, click and drag to draw a text box. Release the mouse button when you’re happy with the size of the text box.
- Enter the text that you want.
Click inside the text box to start typing your text.
- Now you can edit the text
Once you have entered your text, you can format it using the options in the “Home” tab on the ribbon, such as font size, color, and alignment.
- To move the text box, click and drag it to a new location on the slide.
You can move the text box around. Select it and, when the pointer becomes a four-headed arrow, drag it to its new placement.
- To save the changes, click the “File” menu and select “Save”.
And now let’s proceed with customizing your textbox in Powerpoint.
Customizing Your Text Box
The following are options you can utilize to customize your
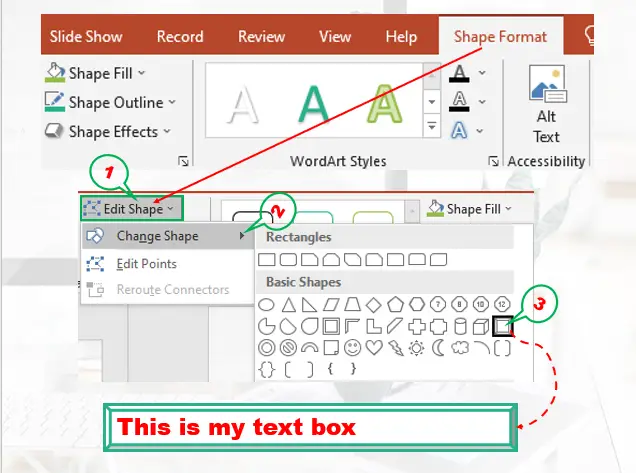
Change the Text Box Shape
By default, the text box in PowerPoint will be a rectangle shape, but you can change it to any shape you like. To do this, go to the Shape Format tab and select “Shape Options”. From there, you can choose the shape that you want.
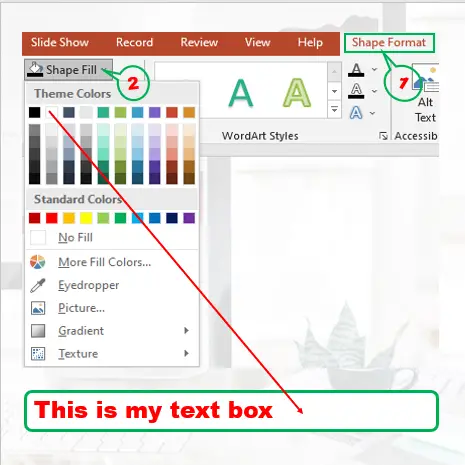
Change the Text Box Color
You can also change the color of your text box in PowerPoint. To do this, go to the “Format” tab and select “Shape Fill”. From there, you can choose the color that you want.
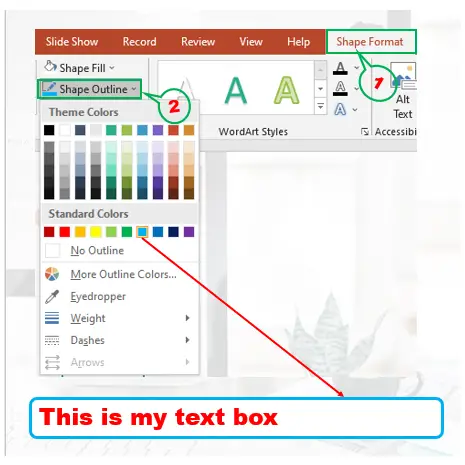
Change the Text Box Border
In addition to changing the shape and color of your text box, you can also change its border. To do this, go to the “Format” tab and select “Shape Outline”. From there, you can choose the color and style of the border that you want.
Making Your Text Box Engaging
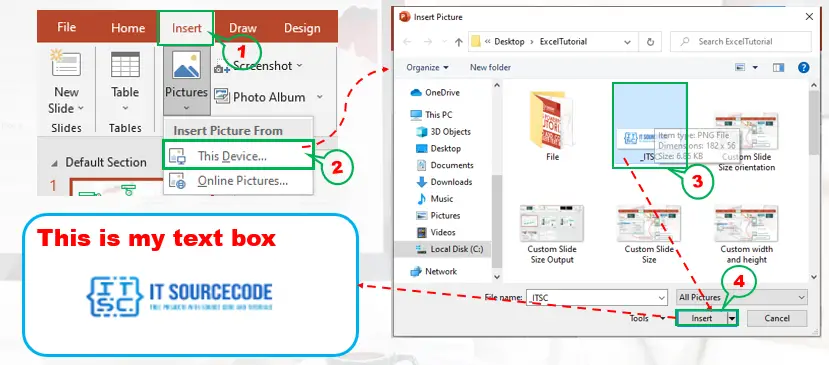
Add an Image
To make your text box more engaging, you can add an image. To do this, go to the “Insert” tab and select “Picture”. From there, you can choose an image from your computer.
Add a Hyperlink
You can also add a hyperlink to your text box in PowerPoint. To do this, highlight the text that you want to be a hyperlink and go to the “Insert” tab. From there, select “Hyperlink”.
Add a Table
If you have a lot of information to present, you can add a table to your text box in PowerPoint. To do this, go to the “Insert” tab and select “Table”. From there, you can choose the number of rows and columns that you want.
Copying and Pasting a Text Box
- Any text box can be copied and pasted elsewhere. To do this, first choose the text box you wish to copy, then click Copy on the Home tab. You can also hit Control + C as an option.
- Now select the slide where you want to paste it and, on the Home tab, click Paste. As an alternative, you can press Control + V.
How to delete a Text box in Powerpoint
In deleting text boxes in PowerPoint there are two simple ways to complete a task.
Delete Textbox Using the Keyboard Key
- Click on the text box to select it
- Press the “Delete” key on your keyboard
Delete Textbox Using Context Menu
- Right-click the selected text box and select “Cut” or “Delete” from the context menu
- Go to the “Home” tab in the ribbon and click the “Cut” or “Delete” button in the “Clipboard” section.
Note: Make sure you select the text box and not the text inside before pressing Delete. Otherwise, you’ll just delete the text inside, not the box.
Conclusion
Adding, copying, and deleting text boxes in PowerPoint is a straightforward process. By following the steps outlined in this guide, you’ll be able to create effective presentations that are organized and easy to read. Whether you’re a beginner or an experienced user, this guide is designed to help you master the process of adding text boxes to your presentations.
For more Powerpoint tutorials like this don’t hesitate to visit our website.
Thank you for reading 🙂

Glay Eliver
Programmer & Technical Writer at PIES IT Solution
Glay Eliver is a programmer and writer at PIES IT Solution, author of over 600 tutorials at itsourcecode.com. Specializes in JavaScript tutorials, Microsoft Office how-tos (Excel, Word, PowerPoint), and Python error debugging covering ImportError, TypeError, AttributeError, ModuleNotFoundError, and JavaScript ReferenceError. Authored several of the site’s highest-traffic Excel and MS Office reference articles.
Expertise: JavaScript · MS Excel · MS Word · MS PowerPoint · Python · Python ImportError · Python TypeError · Python AttributeError · ModuleNotFoundError · JavaScript ReferenceError · Pygame · View all posts by Glay Eliver →