Image classification capstones are some of the most fun to defend. The panel watches you upload a photo, the screen lights up with the correct class and a confidence score, and you’ve already won half the room.
But most student CNN projects fail before they ever reach the defense.
They fail because the team tried to train a convolutional neural network from scratch with 200 images and a regular laptop, got 38% accuracy, and ran out of time to fix it.
The model never learned. The chapter 4 numbers were embarrassing. The panel asked why precision was so low and there was no good answer.
This guide skips that whole disaster. You will use transfer learning (the standard professional approach in 2026) and have a working classifier with real accuracy in a single afternoon. Customize it for any domain: crop diseases, fruit quality, waste sorting, Filipino dishes, whatever your capstone is.
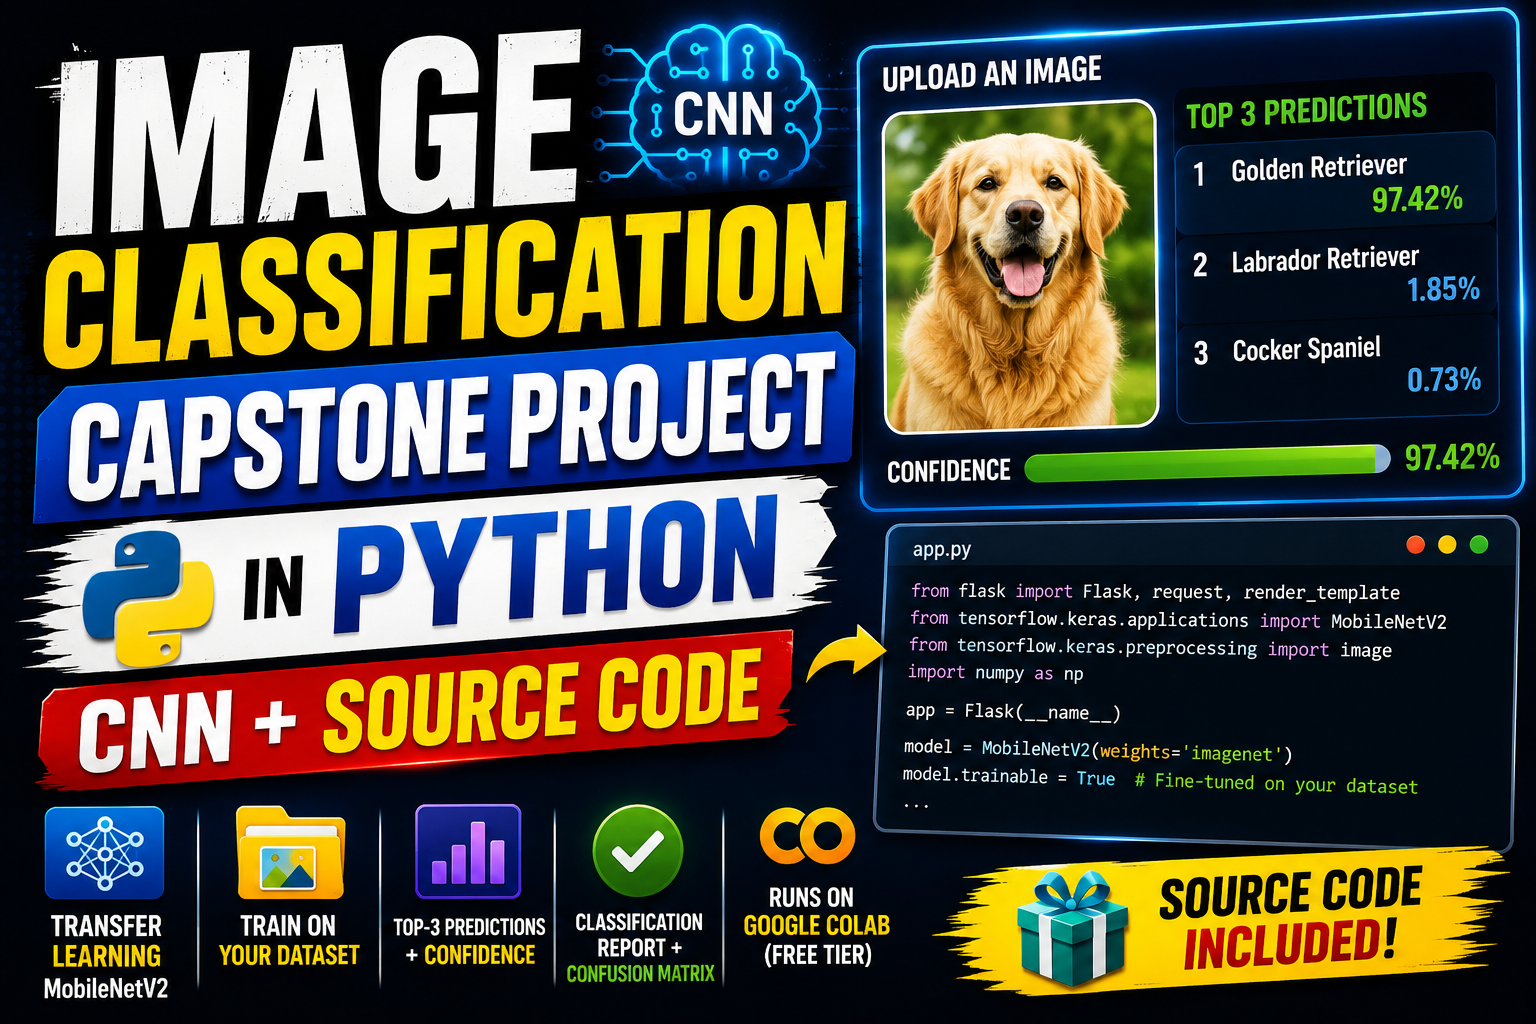
What you’ll build
A small Flask web app where the user uploads an image and the model returns the top 3 predicted classes with confidence scores. Under the hood, it is a fine-tuned MobileNetV2: a real CNN, just smarter about how it learns from your dataset.
Features
- Transfer learning with MobileNetV2 (pretrained on millions of images, then specialized to your dataset)
- Train on your own folder of labeled images
- Flask upload-and-predict web interface
- Top-3 predictions with confidence scores
- Classification report and confusion matrix you can drop straight into Chapter 4
- Runs comfortably on Google Colab’s free tier (or a regular 8GB-RAM laptop)
Tech stack
- Python 3.10 or higher
- TensorFlow / Keras
- MobileNetV2 (pretrained, fine-tuned by us)
- Flask (the web server)
- Pillow (image preprocessing)
- About 120 lines of code total
You don’t need a paid API. You don’t need an NVIDIA GPU at home. The whole thing runs on what you already have.
Why transfer learning, not training from scratch
A CNN trained from scratch on a small student dataset is the AI capstone equivalent of trying to win a marathon by sprinting the first 100 meters. It looks ambitious, it ends badly.
Here’s what transfer learning actually means. MobileNetV2 has already been trained by Google on 1.4 million images across 1000 categories. The lower layers of that network already know how to detect edges, textures, shapes, and patterns common across most photos. We take that network, freeze those lower layers, and only train a small new classifier on top using your dataset.
Result: instead of needing 100,000 images, you can get strong accuracy with 100 to 500 images per class. Instead of training for 10 hours, it takes 5 to 15 minutes on Colab.
Why MobileNetV2 specifically? It’s small enough to run on a phone, fast enough to train on free Colab, and accurate enough to defend in front of any panel. Bigger models like ResNet50 or EfficientNet exist, but for a student capstone they’re overkill and slower.
When the panel asks “did you train this yourself?”, the honest answer is “we used MobileNetV2 as a feature extractor and trained our own classifier on top using a dataset we collected.” That’s a real technical contribution, and it’s exactly how working ML engineers approach the same problem.
Before you start
You need:
- Python 3.10 or newer (
python --versionto check) - Either Google Colab access (free, recommended for speed) or a local machine with at least 8GB RAM
- A dataset of labeled images (at minimum 100 per class, with 3 or more classes)
- About 60 to 90 minutes for the first full run
If you’re on a low-spec laptop, do training in Colab and download the saved model. You only need your laptop to run the Flask web app afterwards, which is light.
The dataset: the part most students mess up
You can have the best code in the world. If your dataset is bad, your model is bad. There’s no fixing that with more epochs.
A few rules:
At least 100 images per class. More is better. For a serious capstone, aim for 300 to 500 per class.
At least 3 classes. Binary classification (yes/no) is too easy for a capstone-grade panel. Three to five classes is the sweet spot.
Class balance matters. If you have 800 images of healthy leaves and 60 of diseased ones, the model will just predict “healthy” all the time and look 93% accurate. Aim for roughly equal counts per class.
Where to get images:
- Kaggle has hundreds of image datasets (search “image classification” and filter by domain)
- Collect your own. Walk to a market with your phone and photograph 200 fruits in three ripeness states. Walk through campus and photograph 200 plants in three species. This sounds like grunt work (and it is), but “we collected the dataset ourselves” is the most defensible sentence you can put in Chapter 3.
- Partner. Ask a farm, clinic, or school if you can photograph their inventory. Bring snacks.
The code below expects this folder structure:
dataset/
├── class_1/
│   ├── img001.jpg
│   ├── img002.jpg
│   └── ...
├── class_2/
│   └── ...
└── class_3/
    └── ...
Folder names become your class names. Image filenames can be anything. The code handles JPEG, PNG, and most common formats.
Project file structure
image-classifier-capstone/
├── train.py
├── classifier.py
├── app.py
├── requirements.txt
├── dataset/
│   ├── class_1/
│   ├── class_2/
│   └── class_3/
├── model/
│   ├── model.keras
│   └── class_names.json
├── templates/
│   └── index.html
└── static/
    ├── style.css
    └── uploads/
Create this folder structure. Drop your images into the right dataset/class_X/ folders.
Step 1: Install the dependencies
In your terminal, inside the project folder:
pip install tensorflow flask pillow numpy scikit-learn matplotlibIf you are on Colab, only Flask and Pillow are missing. The rest come preinstalled.
Create requirements.txt:
tensorflow==2.15.0
flask==3.0.0
pillow==10.2.0
numpy==1.26.0
scikit-learn==1.4.0
matplotlib==3.8.0
Step 2: Train the model (train.py)
Create train.py:
import os
import json
import numpy as np
import tensorflow as tf
from tensorflow.keras.applications import MobileNetV2
from tensorflow.keras.applications.mobilenet_v2 import preprocess_input
from tensorflow.keras.layers import GlobalAveragePooling2D, Dense, Dropout
from tensorflow.keras.models import Model
from tensorflow.keras.preprocessing.image import ImageDataGenerator
from sklearn.metrics import classification_report, confusion_matrix

DATASET_DIR = 'dataset'
MODEL_DIR = 'model'
IMG_SIZE = (224, 224)
BATCH_SIZE = 32
EPOCHS = 10

os.makedirs(MODEL_DIR, exist_ok=True)

train_gen = ImageDataGenerator(
    preprocessing_function=preprocess_input,
    validation_split=0.2,
    rotation_range=20,
    width_shift_range=0.1,
    height_shift_range=0.1,
    horizontal_flip=True,
    zoom_range=0.1
)

train_data = train_gen.flow_from_directory(
    DATASET_DIR,
    target_size=IMG_SIZE,
    batch_size=BATCH_SIZE,
    subset='training',
    class_mode='categorical'
)

val_data = train_gen.flow_from_directory(
    DATASET_DIR,
    target_size=IMG_SIZE,
    batch_size=BATCH_SIZE,
    subset='validation',
    class_mode='categorical',
    shuffle=False
)

class_names = list(train_data.class_indices.keys())
print("Classes:", class_names)

base_model = MobileNetV2(input_shape=IMG_SIZE + (3,), include_top=False, weights='imagenet')
base_model.trainable = False

x = base_model.output
x = GlobalAveragePooling2D()(x)
x = Dropout(0.3)(x)
x = Dense(128, activation='relu')(x)
output = Dense(len(class_names), activation='softmax')(x)

model = Model(inputs=base_model.input, outputs=output)
model.compile(optimizer='adam', loss='categorical_crossentropy', metrics=['accuracy'])

history = model.fit(train_data, validation_data=val_data, epochs=EPOCHS)

val_data.reset()
preds = model.predict(val_data)
y_pred = np.argmax(preds, axis=1)
y_true = val_data.classes

print("\nClassification Report:")
print(classification_report(y_true, y_pred, target_names=class_names))
print("\nConfusion Matrix:")
print(confusion_matrix(y_true, y_pred))

model.save(os.path.join(MODEL_DIR, 'model.keras'))
with open(os.path.join(MODEL_DIR, 'class_names.json'), 'w') as f:
    json.dump(class_names, f)

print("\nModel saved to model/model.keras")
Run it:
python train.pyYou’ll see TensorFlow load, then training progress per epoch. Expect 30 seconds to 2 minutes per epoch depending on your hardware. After 10 epochs, you’ll get a classification report showing precision, recall, and F1 score per class.
Screenshot that report. That’s your Chapter 4 evidence.
Step 3: Build the classifier wrapper (classifier.py)
Create classifier.py:
import json
import numpy as np
import tensorflow as tf
from tensorflow.keras.applications.mobilenet_v2 import preprocess_input
from PIL import Image

class ImageClassifier:
    def __init__(self, model_path='model/model.keras', class_names_path='model/class_names.json'):
        self.model = tf.keras.models.load_model(model_path)
        with open(class_names_path, 'r') as f:
            self.class_names = json.load(f)

    def predict(self, image_path, top_k=3):
        img = Image.open(image_path).convert('RGB').resize((224, 224))
        arr = np.array(img, dtype=np.float32)
        arr = preprocess_input(arr)
        arr = np.expand_dims(arr, axis=0)

        probs = self.model.predict(arr, verbose=0)[0]
        top_indices = np.argsort(probs)[::-1][:top_k]

        return [
            {'class': self.class_names[i], 'confidence': round(float(probs[i]), 3)}
            for i in top_indices
        ]
Three lines do the heavy lifting: open and resize the image, preprocess it the same way training data was preprocessed, get the model’s prediction. Then sort and return the top 3.
Step 4: Build the Flask app (app.py)
Create app.py:
import os
from flask import Flask, request, render_template, jsonify
from werkzeug.utils import secure_filename
from classifier import ImageClassifier

app = Flask(__name__)
app.config['UPLOAD_FOLDER'] = 'static/uploads'
os.makedirs(app.config['UPLOAD_FOLDER'], exist_ok=True)

classifier = ImageClassifier()

@app.route('/')
def index():
    return render_template('index.html')

@app.route('/predict', methods=['POST'])
def predict():
    if 'image' not in request.files:
        return jsonify({'error': 'No image uploaded'}), 400

    file = request.files['image']
    filename = secure_filename(file.filename)
    save_path = os.path.join(app.config['UPLOAD_FOLDER'], filename)
    file.save(save_path)

    predictions = classifier.predict(save_path)
    return jsonify({
        'predictions': predictions,
        'image_url': '/' + save_path.replace('\\', '/')
    })

if __name__ == '__main__':
    app.run(debug=True, port=5000)
Step 5: Build the upload UI
Create templates/index.html:
<!DOCTYPE html>
<html lang="en">
<head>
  <meta charset="UTF-8" />
  <title>Image Classifier Capstone</title>
  <link rel="stylesheet" href="/static/style.css" />
</head>
<body>
  <div class="container">
    <header>
      <h1>Image Classifier</h1>
      <p>Upload an image and see what the model predicts.</p>
    </header>

    <form id="upload-form" enctype="multipart/form-data">
      <label for="image" class="file-label">Choose an image</label>
      <input id="image" type="file" name="image" accept="image/*" required />
      <button type="submit">Predict</button>
    </form>

    <div id="result" class="result hidden">
      <img id="preview" src="" alt="Uploaded image" />
      <ul id="predictions"></ul>
    </div>
  </div>

  <script>
    const form = document.getElementById('upload-form');
    const result = document.getElementById('result');
    const preview = document.getElementById('preview');
    const predictionsList = document.getElementById('predictions');

    form.addEventListener('submit', async (e) => {
      e.preventDefault();
      const formData = new FormData(form);

      const res = await fetch('/predict', { method: 'POST', body: formData });
      const data = await res.json();

      preview.src = data.image_url;
      predictionsList.innerHTML = '';
      data.predictions.forEach(p => {
        const li = document.createElement('li');
        li.textContent = p.class + ': ' + (p.confidence * 100).toFixed(1) + '%';
        predictionsList.appendChild(li);
      });

      result.classList.remove('hidden');
    });
  </script>
</body>
</html>
Create static/style.css:
* { box-sizing: border-box; }
body {
  font-family: system-ui, -apple-system, sans-serif;
  margin: 0;
  background: #fafafa;
  color: #2c3e50;
}
.container {
  max-width: 640px;
  margin: 40px auto;
  background: white;
  border-radius: 12px;
  box-shadow: 0 4px 20px rgba(0,0,0,0.06);
  padding: 28px;
}
header h1 {
  margin: 0 0 4px;
  color: #1F3A5F;
}
header p {
  margin: 0 0 24px;
  color: #5a6a7a;
}
form {
  display: flex;
  flex-direction: column;
  gap: 12px;
}
.file-label {
  font-weight: 600;
  color: #1F3A5F;
}
input[type="file"] {
  padding: 8px;
  border: 1px dashed #C9A961;
  border-radius: 8px;
  background: #fdfaf2;
}
button {
  background: #1F3A5F;
  color: white;
  border: none;
  padding: 12px;
  font-size: 16px;
  border-radius: 8px;
  cursor: pointer;
}
button:hover { background: #163049; }
.result {
  margin-top: 24px;
  padding-top: 24px;
  border-top: 1px solid #eee;
}
.result.hidden { display: none; }
.result img {
  max-width: 100%;
  border-radius: 8px;
  margin-bottom: 16px;
}
#predictions {
  list-style: none;
  padding: 0;
  margin: 0;
}
#predictions li {
  background: #f0f3f7;
  padding: 10px 14px;
  border-radius: 8px;
  margin-bottom: 8px;
  font-weight: 500;
}
#predictions li:first-child {
  background: #C9A961;
  color: #1F3A5F;
}
Step 6: Run the classifier
Train (only when your dataset changes):
python train.pyRun the server:
python app.pyOpen http://localhost:5000. Choose an image from your test set. Click Predict. The model returns the top 3 classes with confidence scores.
Try uploading something completely outside your training set, like a cat photo to a fruit classifier. Notice how the confidence drops. That’s a defense-friendly behavior: the model doesn’t pretend to know things it doesn’t.
How to defend this in your panel
Four questions every CV capstone panel asks.
“Did you train this from scratch?” No. We used MobileNetV2 as a feature extractor, freezing its convolutional base, then trained our own classifier head on top using our custom dataset of X classes and Y images. That is transfer learning: the standard professional approach.
“How big was your dataset?” Be specific. Have a per-class table ready. “Class 1: 312 images, Class 2: 287 images, Class 3: 305 image, Total: 904 images, collected over 3 weeks from [source].” Specific beats vague every time.
“What’s the accuracy?” Don’t say “94%” by itself. Say “Overall validation accuracy is 91%. Per-class F1 scores: 0.93 for class 1, 0.89 for class 2, 0.92 for class 3. We have the confusion matrix in our appendix.” Show that you know which class is weakest and why.
“What if a user uploads something not in your dataset?” The model returns probabilities across all known classes, with confidence. Out-of-distribution images get spread-out probabilities (no class gets above 0.5), so we can show “Low confidence: image may not belong to any known class” instead of guessing. Demo this live by uploading something off-topic.
If you can answer those four calmly, you’ll pass.
How to customize this for your domain
The code stays the same. Only your dataset/ folder changes.
- Crop disease detection: class folders for healthy, early blight, late blight, leaf rust. Panel-friendly agri-tech angle.
- Fruit quality grading: ripe, unripe, overripe, spoiled. Easy to dataset yourself with a phone.
- Waste sorting: biodegradable, recyclable, residual. Sustainability angle.
- Filipino dish classifier: adobo, sinigang, kare-kare, pancit, lechon. Cultural angle, easy to defend.
- Plant species identifier: partner with a botany class.
- Skin lesion pre-screening: benign, suspicious. Add disclaimers loudly.
- Currency recognition for visually impaired: 20, 50, 100, 200, 500, 1000 peso bills. Inclusion angle.
- Manufacturing defect detection: partner with a local factory.
Common errors and how to fix them
ImportError: No module named 'tensorflow': install with pip install tensorflow. On Apple Silicon Macs, use pip install tensorflow-macos.
Out of memory during training: switch to Google Colab (free GPU), or reduce BATCH_SIZE to 16 or 8 in train.py.
ValueError: Input 0 of layer ... is incompatible with the layer: image size mismatch. Make sure IMG_SIZE matches in both train.py and classifier.py.
Model predicts the same class for everything: class imbalance in your dataset. Count images per class and rebalance.
Validation accuracy stuck at 33% with 3 classes (random): model isn’t learning. Either too few images per class (under 50) or augmentation parameters too aggressive. Lower rotation and zoom range.
Predictions look random after deploy: you forgot to load class_names.json or the order shifted. The classifier loads class names in the order Keras assigned them during training, which is alphabetical by folder name.
How to extend this project
Once the basic version works, here are Chapter 5 (Recommendations) extensions:
- Mobile deployment. Convert the trained model to TensorFlow Lite and bundle it inside a Flutter or Android app. Panels love seeing the classifier work offline on a phone.
- Real-time webcam classification. Add OpenCV to classify frames live. Looks impressive in defense.
- Multi-label classification. One image can belong to multiple classes (e.g., an image of multiple diseases). Change the final layer activation from
softmaxtosigmoid. - Active learning. When confidence is low, save the image and ask the user to label it. Retrain weekly with new data.
- Cloud deployment. Push to Render, Railway, or Hugging Face Spaces. Demo from a public URL during defense.
- Object detection upgrade. When you want to find where something is in the image (not just what), switch to YOLOv8.
Free download: source code
UML diagrams you’ll need for documentation
Most schools require these for an AI capstone:
- Use Case Diagram. user uploads, model predicts, user sees result
- Activity Diagram. the upload → preprocess → predict → display flow
- Sequence Diagram. request from browser, through Flask, into classifier, back to browser
- Class Diagram. the ImageClassifier class, Flask app structure
- DFD Level 0 and Level 1. Image data flow from upload through model to UI
We have detailed guides on each. Use them as templates and adapt to this project.
Official documentation
Frequently Asked Questions
Is image classification a good capstone project for IT students in 2026?
Do I need a GPU to train a CNN for my capstone?
How many images do I need for an image classification capstone?
Can I use transfer learning instead of building a CNN from scratch?
What dataset should I use for my image classification capstone?
We are hoping this guide helps you build a defensible image classification capstone with transfer learning and your own dataset. If you hit a TensorFlow, training accuracy, or Flask serving bug while building yours, drop the error in the comments below and we will help you debug it. Thank you for reading itsourcecoders.
Train it tonight. Defend it next month.
The biggest gap between students who pass image classification capstones and students who fail isn’t the code. The code is here. You can copy it. The gap is the dataset.
If you have 500 labeled images by the end of next week, your capstone is on track. If you don’t, the code won’t save you.
For more AI capstone source code to study before you start, browse our Python projects library. If you haven’t picked your capstone topic yet, the full list of options is in 150 Best Capstone Project Ideas for IT Students 2026. And for the UML diagrams your documentation will need, our UML guides cover every diagram type panels ask about.
Now close this tab. Open your camera. Start collecting images.
- Face Recognition System Class Diagram
- Face Mask Detection System DFD Levels 0, 1, and 2
- Handwritten Digit Recognition In Python With Source Code
- Use Case Diagram
- Sequence Diagram
More capstone project ideas to browse
Looking for more ideas to pitch your panel? Browse our capstone idea collections:

Adrian Mercurio
Full-Stack Developer at PIES IT Solution
Specializes in building complete capstone projects with full documentation. Strong background in PHP/MySQL development and database design. Has personally built and tested over 30 capstone-ready projects with ER diagrams, DFDs, and chapter-by-chapter thesis documentation.
Expertise: PHP · Laravel · Database Design · Capstone Projects · C# · C · C++ · Python · AI Projects · View all posts by Adrian Mercurio →