
The Handwritten Digit Recognition In Python was developed using Python Deep Learning, we are going to implement a handwritten digit recognition app using the MNIST dataset.
We will be using a special type of deep neural network a Convolutional Neural Network. In the end, we are going to build a GUI in which you can draw the digit and recognize it straight away.
Handwritten Digit Recognition is the ability of computers to recognize human handwritten digits. It is a hard task for the machine because handwritten digits are not perfect and can be made with many different flavors.
The handwritten digit recognition is the solution to this problem which uses the image of a digit and recognizes the digit present in the image.
This Python Project also includes a downloadable Project With Source Code for free, just find the downloadable source code below and click to start downloading.
By the way, if you are new to Python programming and don’t know how to use Python IDE, I have here a list of the Best Python IDE for Windows, Linux, and Mac OS that will suit you.
I also have here How to Download and Install the Latest Version of Python on Windows.
To start executing Handwritten Digit Recognition In Python With Source Code, make sure that you have installed Python 3.9 and PyCharm on your computer.
Handwritten Digit Recognition using Python With Source Code: Steps on how to run the project
Time needed: 5 minutes
These are the steps on how to run Handwritten Digit Recognition In Python With Source Code
- Step 1: Download the given source code below.
First, download the given source code below and unzip the source code.

- Step 2: Import the project to your PyCharm IDE.
Next, import the source code you’ve downloaded to your PyCharm IDE.

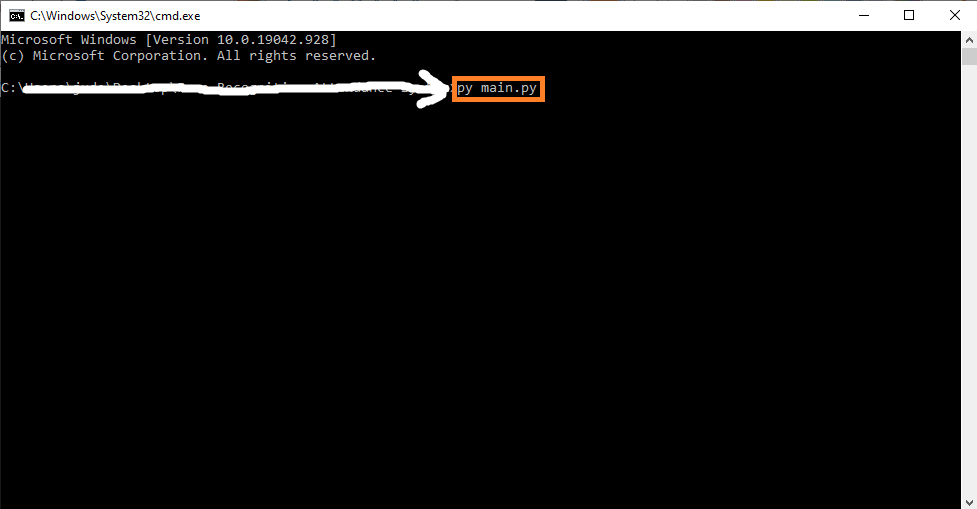
- Step 3: Run the project.
Lastly, run the project with the command “py main.py”


Installed Libraries
from keras.models import load_model
from tkinter import *
import tkinter as tk
import win32gui
from PIL import ImageGrab, Image
import numpy as np
Complete Source Code
from keras.models import load_model
from tkinter import *
import tkinter as tk
import win32gui
from PIL import ImageGrab, Image
import numpy as np

model = load_model('mnist.h5')

def predict_digit(img):
    #resize image to 28x28 pixels
    img = img.resize((28,28))
    #convert rgb to grayscale
    img = img.convert('L')
    img = np.array(img)
    #reshaping to support our model input and normalizing
    img = img.reshape(1,28,28,1)
    img = img/255.0
    #predicting the class
    res = model.predict([img])[0]
    return np.argmax(res), max(res)

class App(tk.Tk):
    def __init__(self):
        tk.Tk.__init__(self)

        self.x = self.y = 0

        # Creating elements
        self.canvas = tk.Canvas(self, width=300, height=300, bg = "white", cursor="cross")
        self.label = tk.Label(self, text="Draw..", font=("Helvetica", 48))
        self.classify_btn = tk.Button(self, text = "Recognise", command = self.classify_handwriting)
        self.button_clear = tk.Button(self, text = "Clear", command = self.clear_all)

        # Grid structure
        self.canvas.grid(row=0, column=0, pady=2, sticky=W, )
        self.label.grid(row=0, column=1,pady=2, padx=2)
        self.classify_btn.grid(row=1, column=1, pady=2, padx=2)
        self.button_clear.grid(row=1, column=0, pady=2)

        #self.canvas.bind("<Motion>", self.start_pos)
        self.canvas.bind("<B1-Motion>", self.draw_lines)

    def clear_all(self):
        self.canvas.delete("all")

    def classify_handwriting(self):
        HWND = self.canvas.winfo_id()  # get the handle of the canvas
        rect = win32gui.GetWindowRect(HWND)  # get the coordinate of the canvas
        a,b,c,d = rect
        rect=(a+4,b+4,c-4,d-4)
        im = ImageGrab.grab(rect)

        digit, acc = predict_digit(im)
        self.label.configure(text= str(digit)+', '+ str(int(acc*100))+'%')

    def draw_lines(self, event):
        self.x = event.x
        self.y = event.y
        r=8
        self.canvas.create_oval(self.x-r, self.y-r, self.x + r, self.y + r, fill='black')

app = App()
mainloop()
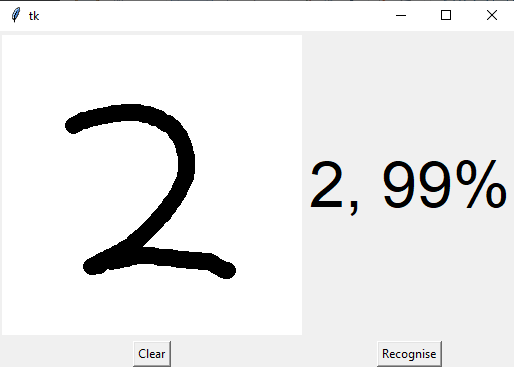
Output:
Download the Source Code below
Summary
In this article, we have successfully built a Python deep-learning project on a handwritten digit recognition app.
We have built and trained the Convolutional neural network which is very effective for image classification purposes.
Later on, we build the GUI where we draw a digit on the canvas then we classify the digit and show the results.
Related Articles
- Code For Game in Python: Python Game Projects With Source Code
- Best Python Projects With Source Code FREE DOWNLOAD
- How to Make a Point of Sale In Python With Source Code
- Python Code For Food Ordering System | FREE DOWNLOAD
- Inventory Management System Project in Python With Source Code
Inquiries
If you have any questions or suggestions about Handwritten Digit Recognition In Python With Source Code, please feel free to leave a comment below.
Technology stack and requirements
To run this Python project on your development machine, you need:
- Python 3.10 or higher. Download from python.org or install via Anaconda if you prefer bundled packages.
- pip package manager. Comes with Python. Used to install project dependencies from requirements.txt.
- Virtual environment. Use venv or conda to isolate project dependencies from your global Python install.
- VS Code or PyCharm. Free code editors with Python syntax highlighting, IntelliSense, and debugging.
- Git. For version control and cloning source code repositories.
Installing the source code
- Download or clone the repository. Get the ZIP archive from the download link on this page and extract it.
- Create a virtual environment. Open a terminal in the project folder and run: python -m venv venv, then activate it (venv\Scripts\activate on Windows or source venv/bin/activate on Mac/Linux).
- Install dependencies. Run pip install -r requirements.txt to install all libraries the project needs.
- Configure environment variables. If the project uses API keys (OpenAI, Anthropic, database), create a .env file and set the required keys.
- Run the project. Follow the run command in the README (usually python main.py or streamlit run app.py).
Using this project for your BSIT capstone
- Chapter 1 (Introduction). Discuss the real-world problem this system solves. Cite Philippine or international use cases where the manual process could be automated.
- Chapter 2 (RRL). Compare your project against 5-10 similar published works. Cite ACM, IEEE, or arXiv papers for academic-standard sources.
- Chapter 3 (Methodology). Document the model architecture, training data, hyperparameters, and evaluation metrics used.
- Chapter 4 (Results). Report accuracy, precision, recall, F1-score, and confusion matrix. Screenshot the running app on real inputs.
- Chapter 5 (Conclusion). Identify features for Version 2: better model, larger dataset, mobile deployment, or REST API.
Modules typical of Handwritten Digit Recognition
- Core Python logic. Main functions implementing the business logic of the system.
- Data storage. SQLite for simple projects, PostgreSQL or MongoDB for larger data.
- User interface. Tkinter for desktop, Streamlit for data dashboards, or Flask/FastAPI for web.
- Input validation. Type checking and range validation before processing user data.
- Reports. CSV or PDF export using pandas.to_csv() or ReportLab.
- Testing. pytest unit tests covering core functions.
Common enhancements for capstone review
- Add REST API. Convert desktop app to FastAPI service for mobile or web front-ends.
- Multi-user support. Add login, roles, and per-user data isolation.
- Cloud deployment. Deploy to Render, Railway, or Fly.io for public access.
- Docker containerization. Package the app in Docker for portable deployment.
Official documentation
Frequently Asked Questions
How does handwritten digit recognition work in this project?
The model is trained on the MNIST dataset (60,000 labeled 28×28 grayscale digit images) using a CNN architecture (Conv2D + MaxPool + Dense layers). At inference, OpenCV captures a region of interest, resizes to 28×28, normalizes pixel values, and feeds it to the trained model which returns the predicted digit 0-9. Typical accuracy is 99%+ on clean digits.
What OpenCV version do I need to run this project?
Use OpenCV 4.5 or newer. Install with pip install opencv-python (the standard build for desktop projects). Some projects also need opencv-contrib-python which adds extra modules (SIFT, SURF, advanced trackers). The pip install command auto-downloads pre-built wheels so no compilation is needed on Windows, Mac, or Linux.
How do I install OpenCV and the dependencies for this project?
Open a terminal, then: pip install opencv-python numpy. Most projects also need one of these: mediapipe (for face / hand / pose detection), pyzbar (for barcode and QR), pytesseract (for OCR), Pillow (for image manipulation), pyautogui (for screen capture). Pin Python version to 3.10, 3.11, or 3.12 for maximum library compatibility.
Can I use this OpenCV project for a BSIT or CSE capstone?
Yes, but extend it. A single OpenCV demo (face detection alone, lane detection alone) is too narrow for full capstone scope. Combine it with a real domain (attendance system using face recognition, traffic monitoring system using lane detection, fitness coach app using pose detection), add a database to log results, build a simple Tkinter or Streamlit UI, and document the whole pipeline in Chapter 3.
Why am I getting AttributeError or ImportError when running this code?
Three most common causes: (1) You installed opencv-python but the code needs opencv-contrib-python (extra modules like xfeatures2d). Reinstall with pip install opencv-contrib-python. (2) You are on Python 3.13 but some wheels (mediapipe) lag behind, downgrade to Python 3.11 or 3.12. (3) NumPy version mismatch, pin numpy to a version your other libraries support.
Where do I find more OpenCV and Machine Learning project ideas?
Browse our Machine Learning Projects hub for 23+ OpenCV demos with source code. For capstone-scale AI ideas (RAG, NLP, recommendation systems), see 100+ AI Capstone Project Ideas. For broader Python project ideas, our Python Projects library has 250+ working capstones.

Angel Jude Suarez
Full-Stack Developer at PIES IT Solution
Focuses on Python development, machine learning, and AI integration. Has built production AI systems including OpenAI Whisper integration for medical transcription and GPT-4o-powered diagnosis assistance. Strong background in pandas, scikit-learn, and TensorFlow.
Expertise: Python · PHP · Java · VB.NET · ASP.NET · Machine Learning · AI Integration · OpenCV · Django · CodeIgniter
· View all posts by Angel Jude Suarez →
This handwriting digit recognition is under the machine learning or not? If yes then how?
Why always the model predict the same digit? It is how the model does not trained at all or it is stacked. Can you help me please?