Agri-tech capstones are panel-favorites in 2026. Especially in the Philippines and India, where almost every BSIT student has a relative who farms, or an uncle who lost half a rice paddy to a disease nobody could identify in time.
A crop disease detector that actually works in the field (not just in a Jupyter notebook) is one of the strongest applied AI capstones you can ship this year.
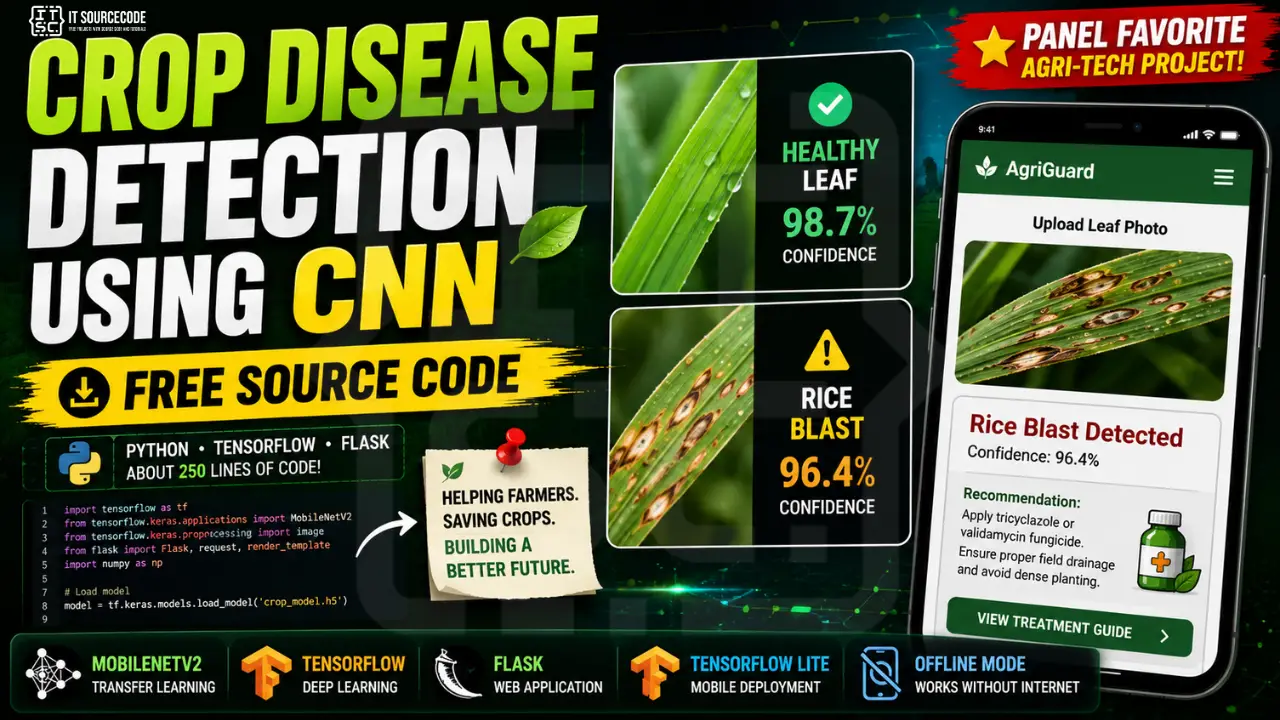
This guide walks through building one. Detection model, treatment recommendations, farmer-friendly mobile UI, offline-capable phone deployment. About 250 lines of code total. Customizable to whatever crops grow in your region.
If you haven’t worked through our Image Classification Capstone tutorial, read that first. This guide assumes you understand transfer learning and skips re-explaining the CNN mechanics. What we’ll focus on here is what makes a crop disease capstone defensible: real dataset, local crops, actionable output, and a path to actual farmer use.
What you’ll build
A crop disease classifier that goes beyond just labeling a photo. The system:
- Detects 10+ disease classes across 3 crops (rice, tomato, mango by default, adapt for your region)
- Uses MobileNetV2 transfer learning (small model, fits on a phone)
- Returns disease name, confidence, AND a treatment recommendation
- Has a mobile-first web UI for farmers (big buttons, large text, take-photo input)
- Exports to TensorFlow Lite for offline phone use in areas with no signal
The treatment recommendation feature is what separates this from a generic image classifier. The panel sees a useful field tool, not just a classification exercise.
Tech stack
- Python 3.10 or higher
- TensorFlow / Keras (transfer learning)
- MobileNetV2 with alpha=0.35 (small variant, mobile-friendly)
- Flask (web server)
- Pillow (image handling)
- TensorFlow Lite (mobile export)
- About 250 lines of code total
Why crop disease detection is a panel-favorite in 2026
Five reasons panels approve agri-tech AI capstones quickly:
Concrete real-world problem. Anyone can understand “this app tells a farmer if their rice has blast.” No need to explain the use case in slides.
Easy to dataset. PlantVillage (free, 54,000 labeled leaf images) gives you 80% of what you need. You add 20% from your own farm visits. Defensibility solved on day one.
Sustainability angle. Reduces pesticide overuse, helps small farmers, food security. All checkboxes panels love to see.
Mobile deployment story. TensorFlow Lite lets the model run on a phone offline. That single sentence (“works in the field with no signal”) wins the room.
Real users. Partner with a single farmer, document one field test, and your defense moves from “in theory this works” to “in week 4 we tested with farmer Mang Tonyo and the model correctly identified 14 of 15 leaves.”
Before you start
You need:
- Python 3.10 or higher
- Google Colab access (free GPU recommended for training) OR a local machine with 8GB+ RAM
- A smartphone for collecting farm photos
- About 2 to 3 hours for the first full run end-to-end
- Ideally: one farmer who lets you photograph their fields and use the app for field testing
If you haven’t done a CNN project before, work through our Image Classification tutorial first. This guide skips the foundational explanations.
The dataset: why your own farm photos matter
This is the section that separates a defense-grade crop disease capstone from a textbook one.
PlantVillage is the standard dataset. It’s free, well-labeled, and covers 38 crop-disease combinations. Download it from Kaggle and you have your starting point. That’s not enough on its own. Here’s why.
PlantVillage was photographed in controlled conditions: single leaf, uniform background, indoor lighting. Your farmer’s phone photo will have shadows, partial leaves, mud, multiple plants in frame. A model trained only on PlantVillage will fail on real field photos in week 2 of deployment.
The fix is small: add 30 to 50 of your own field photos per class. Take them with your phone. Various lighting. Partial leaves. Real backgrounds. The model trained on this mixed dataset performs dramatically better in the field, and you have an unbeatable defense answer.
For Philippine BSIT students, focus on these crops and diseases:
- Rice (palay): blast, brown spot, bacterial blight, healthy
- Tomato (kamatis): early blight, late blight, leaf curl virus, healthy
- Mango (mangga): anthracnose, powdery mildew, healthy
That’s 10 classes total. Enough for a meaningful capstone, small enough to finish in 4 months. For Indian students, swap to wheat (rust, smut), eggplant (bacterial wilt), or cotton (leaf curl) depending on your region.
Aim for 200 to 400 images per class. Class balance matters more than raw size. 200 per class beats 800 of one and 50 of another every time.
The defense-winning sentence: “We collected 320 of our 3,200 training images directly from 8 farms in Negros Occidental over 3 weekends, supplementing the public PlantVillage dataset to improve real-world field performance.”
Project file structure
crop-disease-capstone/
├── train.py
├── classifier.py
├── treatments.json
├── convert_to_tflite.py
├── app.py
├── requirements.txt
├── dataset/
│   ├── rice_blast/
│   ├── rice_brown_spot/
│   ├── rice_bacterial_blight/
│   ├── rice_healthy/
│   ├── tomato_early_blight/
│   ├── tomato_late_blight/
│   ├── tomato_leaf_curl/
│   ├── tomato_healthy/
│   ├── mango_anthracnose/
│   ├── mango_powdery_mildew/
│   └── mango_healthy/
├── model/
│   ├── model.keras
│   ├── model.tflite
│   └── class_names.json
├── templates/
│   └── index.html
└── static/
    ├── style.css
    └── uploads/
Step 1: Install dependencies
pip install tensorflow flask pillow numpy scikit-learn matplotlibThe dependencies are the same as the image classification tutorial. TFLite conversion uses TensorFlow’s built-in tooling, no extra package needed.
Create requirements.txt:
tensorflow==2.15.0
flask==3.0.0
pillow==10.2.0
numpy==1.26.0
scikit-learn==1.4.0
matplotlib==3.8.0
Step 2: Get the dataset
Download PlantVillage from Kaggle (search for “plantvillage dataset”). Extract the parts you need: rice, tomato, mango (or your local equivalents). Reorganize the folder structure to match what the code expects:
dataset/<crop>_<disease>/*.jpgFor example, rename Tomato___Early_Blight/ to tomato_early_blight/.
Then go to a nearby farm with your phone. Photograph at least 30 leaves per class from your own field visits. Save them into the same folders. Mix of:
- Daylight shots
- Cloudy/shaded shots
- Partial leaves (real conditions)
- Multiple leaves in frame
- Different growth stages
This is the boring part of the project. It’s also the part that decides whether your model works in the field or only on textbook images.
Step 3: Train the model (train.py)
Same transfer learning approach as the image classification tutorial, with one important change: we use a smaller MobileNetV2 variant (alpha=0.35) so the final model fits comfortably on a phone.
Create train.py:
import os
import json
import numpy as np
import tensorflow as tf
from tensorflow.keras.applications import MobileNetV2
from tensorflow.keras.applications.mobilenet_v2 import preprocess_input
from tensorflow.keras.layers import GlobalAveragePooling2D, Dense, Dropout
from tensorflow.keras.models import Model
from tensorflow.keras.preprocessing.image import ImageDataGenerator
from sklearn.metrics import classification_report

DATASET_DIR = 'dataset'
MODEL_DIR = 'model'
IMG_SIZE = (224, 224)
BATCH_SIZE = 32
EPOCHS = 12

os.makedirs(MODEL_DIR, exist_ok=True)

train_gen = ImageDataGenerator(
    preprocessing_function=preprocess_input,
    validation_split=0.2,
    rotation_range=25,
    width_shift_range=0.15,
    height_shift_range=0.15,
    horizontal_flip=True,
    vertical_flip=False,
    zoom_range=0.15,
    brightness_range=(0.7, 1.3),
)

train_data = train_gen.flow_from_directory(
    DATASET_DIR, target_size=IMG_SIZE, batch_size=BATCH_SIZE,
    subset='training', class_mode='categorical'
)

val_data = train_gen.flow_from_directory(
    DATASET_DIR, target_size=IMG_SIZE, batch_size=BATCH_SIZE,
    subset='validation', class_mode='categorical', shuffle=False
)

class_names = list(train_data.class_indices.keys())
print(f"Classes ({len(class_names)}):", class_names)

base = MobileNetV2(input_shape=IMG_SIZE + (3,), alpha=0.35, include_top=False, weights='imagenet')
base.trainable = False

x = base.output
x = GlobalAveragePooling2D()(x)
x = Dropout(0.3)(x)
x = Dense(64, activation='relu')(x)
output = Dense(len(class_names), activation='softmax')(x)

model = Model(inputs=base.input, outputs=output)
model.compile(optimizer='adam', loss='categorical_crossentropy', metrics=['accuracy'])

history = model.fit(train_data, validation_data=val_data, epochs=EPOCHS)

val_data.reset()
preds = model.predict(val_data)
y_pred = np.argmax(preds, axis=1)
y_true = val_data.classes
print("\nClassification Report:")
print(classification_report(y_true, y_pred, target_names=class_names))

model.save(os.path.join(MODEL_DIR, 'model.keras'))
with open(os.path.join(MODEL_DIR, 'class_names.json'), 'w') as f:
    json.dump(class_names, f)

print(f"\nSaved model with {len(class_names)} classes to {MODEL_DIR}/")
Notice the augmentation includes brightness range (0.7, 1.3). That’s deliberate. Real farm photos are taken at all times of day. Training with brightness variation makes the model robust to that.
Also notice we’re NOT using vertical_flip. Leaves have a natural orientation (veins point one way) and flipping them upside-down hurts accuracy.
Run training:
python train.pyColab GPU: 5 to 10 minutes for 12 epochs on ~2,000 images. Local CPU: 30 to 90 minutes.
Screenshot the classification report. That’s your Chapter 4 evidence.
Step 4: Build the classifier with treatment lookup (classifier.py)
This is where the project becomes useful, not just academic. We pair every prediction with a treatment recommendation from a JSON file you control.
Create treatments.json:
{
  "rice_blast": {
    "name": "Rice Blast",
    "severity": "high",
    "color": "#b94a48",
    "treatment": "Apply tricyclazole fungicide. Remove infected leaves. Avoid overhead irrigation during peak hours.",
    "prevention": "Plant resistant varieties (NSIC Rc222, NSIC Rc224). Maintain proper field drainage. Avoid late planting."
  },
  "rice_brown_spot": {
    "name": "Rice Brown Spot",
    "severity": "medium",
    "color": "#C9A961",
    "treatment": "Apply mancozeb-based fungicide. Balance soil nutrients especially potassium.",
    "prevention": "Use certified seeds. Maintain soil fertility through proper fertilization."
  },
  "rice_bacterial_blight": {
    "name": "Rice Bacterial Blight",
    "severity": "high",
    "color": "#b94a48",
    "treatment": "Drain field briefly. Apply copper-based bactericides. Remove infected plants.",
    "prevention": "Use resistant varieties. Avoid excessive nitrogen fertilization."
  },
  "rice_healthy": {
    "name": "Healthy Rice",
    "severity": "none",
    "color": "#2D6A4F",
    "treatment": "No treatment needed. Continue regular monitoring.",
    "prevention": "Maintain current practices. Monitor weekly for early symptoms."
  },
  "tomato_early_blight": {
    "name": "Tomato Early Blight",
    "severity": "medium",
    "color": "#C9A961",
    "treatment": "Apply chlorothalonil fungicide. Remove lower infected leaves. Improve air circulation.",
    "prevention": "Rotate crops yearly. Avoid overhead watering. Mulch around plants."
  },
  "tomato_late_blight": {
    "name": "Tomato Late Blight",
    "severity": "high",
    "color": "#b94a48",
    "treatment": "Apply mancozeb or copper hydroxide. Remove and burn infected plants immediately.",
    "prevention": "Plant resistant varieties. Avoid wet foliage overnight. Space plants properly."
  },
  "tomato_leaf_curl": {
    "name": "Tomato Leaf Curl Virus",
    "severity": "high",
    "color": "#b94a48",
    "treatment": "No chemical cure. Remove infected plants. Control whitefly vector with insecticides.",
    "prevention": "Use virus-resistant varieties. Control whiteflies aggressively. Use reflective mulch."
  },
  "tomato_healthy": {
    "name": "Healthy Tomato",
    "severity": "none",
    "color": "#2D6A4F",
    "treatment": "No treatment needed.",
    "prevention": "Continue regular fertilization and watering schedule. Monitor weekly."
  },
  "mango_anthracnose": {
    "name": "Mango Anthracnose",
    "severity": "medium",
    "color": "#C9A961",
    "treatment": "Apply copper oxychloride or mancozeb fungicide. Prune infected branches.",
    "prevention": "Maintain orchard sanitation. Prune for air circulation. Avoid wounding fruit."
  },
  "mango_powdery_mildew": {
    "name": "Mango Powdery Mildew",
    "severity": "medium",
    "color": "#C9A961",
    "treatment": "Apply sulfur-based fungicide. Remove severely infected flower panicles.",
    "prevention": "Time pruning to improve airflow. Apply preventive fungicide before flowering."
  },
  "mango_healthy": {
    "name": "Healthy Mango",
    "severity": "none",
    "color": "#2D6A4F",
    "treatment": "No treatment needed.",
    "prevention": "Continue annual pruning. Apply preventive fungicide before rainy season."
  }
}
Treatments come from public agricultural extension materials (DA-PhilRice, DOST, BPI publications). Cite your sources in Chapter 3.
Create classifier.py:
import json
import numpy as np
import tensorflow as tf
from tensorflow.keras.applications.mobilenet_v2 import preprocess_input
from PIL import Image

class CropDiseaseClassifier:
    def __init__(self, model_path='model/model.keras', class_names_path='model/class_names.json',
                 treatments_path='treatments.json', confidence_threshold=0.5):
        self.model = tf.keras.models.load_model(model_path)
        with open(class_names_path, 'r') as f:
            self.class_names = json.load(f)
        with open(treatments_path, 'r', encoding='utf-8') as f:
            self.treatments = json.load(f)
        self.threshold = confidence_threshold

    def predict(self, image_path):
        img = Image.open(image_path).convert('RGB').resize((224, 224))
        arr = preprocess_input(np.array(img, dtype=np.float32))
        arr = np.expand_dims(arr, axis=0)

        probs = self.model.predict(arr, verbose=0)[0]
        top_idx = int(probs.argmax())
        confidence = float(probs[top_idx])
        class_name = self.class_names[top_idx]

        if confidence < self.threshold:
            return {
                'class': 'uncertain',
                'confidence': round(confidence, 3),
                'treatment_info': {
                    'name': 'Uncertain Diagnosis',
                    'severity': 'unknown',
                    'color': '#5a6a7a',
                    'treatment': 'Confidence too low for reliable diagnosis. Please retake the photo with better lighting and clearer focus, or consult your local agricultural extension officer.',
                    'prevention': 'Take photos in good daylight with the leaf filling most of the frame.'
                }
            }

        return {
            'class': class_name,
            'confidence': round(confidence, 3),
            'treatment_info': self.treatments.get(class_name, {})
        }
That confidence threshold is critical. Without it, the model will confidently predict random output for a photo of your hand or the sky. With it, the system gracefully says “I’m not sure”, and the panel applauds.
Step 5: Build the farmer-friendly UI
Different from a generic image classifier. The UI assumes a farmer with a phone, not a CS student with a laptop.
Create templates/index.html:
<!DOCTYPE html>
<html lang="en">
<head>
  <meta charset="UTF-8" />
  <meta name="viewport" content="width=device-width, initial-scale=1.0" />
  <title>Crop Disease Detector</title>
  <link rel="stylesheet" href="/static/style.css" />
</head>
<body>
  <div class="container">
    <header>
      <h1>Crop Disease Detector</h1>
      <p>Kunan ng litrato ang dahon para malaman kung ano ang sakit.</p>
    </header>

    <form id="upload-form" enctype="multipart/form-data">
      <label for="image" class="file-btn">
        Take Photo / Pumili ng Litrato
      </label>
      <input id="image" type="file" name="image" accept="image/*" capture="environment" required hidden />
      <button type="submit" id="analyze-btn" disabled>Analyze</button>
    </form>

    <div id="result" class="result hidden">
      <img id="preview" src="" alt="Uploaded leaf" />
      <div id="diagnosis" class="diagnosis"></div>
      <div id="treatment" class="treatment"></div>
    </div>
  </div>

  <script>
    const fileInput = document.getElementById('image');
    const analyzeBtn = document.getElementById('analyze-btn');
    const form = document.getElementById('upload-form');
    const result = document.getElementById('result');
    const preview = document.getElementById('preview');
    const diagnosis = document.getElementById('diagnosis');
    const treatment = document.getElementById('treatment');

    fileInput.addEventListener('change', () => {
      analyzeBtn.disabled = !fileInput.files.length;
    });

    form.addEventListener('submit', async (e) => {
      e.preventDefault();
      const formData = new FormData(form);

      analyzeBtn.disabled = true;
      analyzeBtn.textContent = 'Analyzing...';

      const res = await fetch('/predict', { method: 'POST', body: formData });
      const data = await res.json();

      preview.src = data.image_url;
      const info = data.treatment_info || {};

      diagnosis.innerHTML = `
        <div class="diagnosis-name" style="color:${info.color || '#1F3A5F'}">
          ${info.name || data.class}
        </div>
        <div class="confidence">Confidence: ${(data.confidence * 100).toFixed(0)}%</div>
      `;
      treatment.innerHTML = `
        <h3>Treatment / Lunas</h3>
        <p>${info.treatment || ''}</p>
        <h3>Prevention / Pag-iwas</h3>
        <p>${info.prevention || ''}</p>
      `;

      result.classList.remove('hidden');
      analyzeBtn.disabled = false;
      analyzeBtn.textContent = 'Analyze';
    });
  </script>
</body>
</html>
Notice the capture="environment" attribute on the file input: on phones, this opens the rear camera directly instead of the photo library. One small attribute that makes the difference between “this looks like a website” and “this feels like an app.”
Create static/style.css (mobile-first):
* { box-sizing: border-box; }
body {
  font-family: system-ui, -apple-system, sans-serif;
  margin: 0;
  background: #fafafa;
  color: #2c3e50;
  font-size: 16px;
}
.container {
  max-width: 480px;
  margin: 0 auto;
  background: white;
  min-height: 100vh;
  padding: 24px 20px;
}
header h1 {
  margin: 0 0 6px;
  color: #1F3A5F;
  font-size: 24px;
}
header p {
  margin: 0 0 24px;
  color: #5a6a7a;
  font-size: 15px;
}
.file-btn {
  display: block;
  background: #C9A961;
  color: #1F3A5F;
  padding: 18px;
  border-radius: 10px;
  text-align: center;
  font-weight: 700;
  font-size: 18px;
  cursor: pointer;
  margin-bottom: 12px;
}
#analyze-btn {
  width: 100%;
  background: #1F3A5F;
  color: white;
  border: none;
  padding: 16px;
  font-size: 18px;
  font-weight: 700;
  border-radius: 10px;
  cursor: pointer;
}
#analyze-btn:disabled {
  background: #b8c2cc;
  cursor: not-allowed;
}
.result { margin-top: 24px; }
.result.hidden { display: none; }
.result img {
  width: 100%;
  border-radius: 10px;
  margin-bottom: 16px;
}
.diagnosis {
  background: #f0f3f7;
  padding: 16px;
  border-radius: 10px;
  margin-bottom: 16px;
  text-align: center;
}
.diagnosis-name {
  font-size: 22px;
  font-weight: 700;
  margin-bottom: 4px;
}
.confidence {
  color: #5a6a7a;
  font-size: 14px;
}
.treatment h3 {
  color: #1F3A5F;
  margin: 16px 0 6px;
  font-size: 16px;
  text-transform: uppercase;
  letter-spacing: 0.5px;
}
.treatment p {
  margin: 0 0 12px;
  line-height: 1.6;
}
Create app.py:
import os
from flask import Flask, request, render_template, jsonify
from werkzeug.utils import secure_filename
from classifier import CropDiseaseClassifier

app = Flask(__name__)
app.config['UPLOAD_FOLDER'] = 'static/uploads'
os.makedirs(app.config['UPLOAD_FOLDER'], exist_ok=True)
classifier = CropDiseaseClassifier()

@app.route('/')
def index():
    return render_template('index.html')

@app.route('/predict', methods=['POST'])
def predict():
    if 'image' not in request.files:
        return jsonify({'error': 'No image uploaded'}), 400
    file = request.files['image']
    filename = secure_filename(file.filename or 'upload.jpg')
    save_path = os.path.join(app.config['UPLOAD_FOLDER'], filename)
    file.save(save_path)

    result = classifier.predict(save_path)
    result['image_url'] = '/' + save_path.replace('\\', '/')
    return jsonify(result)

if __name__ == '__main__':
    app.run(debug=True, host='0.0.0.0', port=5000)
Note host='0.0.0.0': so when you are on the same WiFi as your phone, you can open the app from the phone’s browser at http://<your-laptop-ip>:5000 and test the camera input on a real device.
Step 6: Convert to TensorFlow Lite for mobile
For real field deployment, the model needs to run offline on a phone. TensorFlow Lite makes this 5 lines of code.
Create convert_to_tflite.py:
import tensorflow as tf

model = tf.keras.models.load_model('model/model.keras')
converter = tf.lite.TFLiteConverter.from_keras_model(model)
converter.optimizations = [tf.lite.Optimize.DEFAULT]
tflite_model = converter.convert()

with open('model/model.tflite', 'wb') as f:
    f.write(tflite_model)

print(f"Model size: {len(tflite_model) / 1024:.1f} KB")
Run it:
python convert_to_tflite.pyExpect a 1 to 4 MB .tflite file. That’s small enough to bundle inside a Flutter or Android app and run offline. Your panel will love this. Most students stop at “trained the model” and never reach “deployed it.”
For your Chapter 5 (Recommendations), bundling the .tflite into a Flutter app is the natural extension. You don’t have to ship the Flutter app for your capstone, but mentioning that the model is mobile-ready is a strong signal.
Step 7: Run and demo
Three commands:
python train.py
python convert_to_tflite.py
python app.py
On your laptop: open http://localhost:5000. Upload a sample leaf image. See the diagnosis and treatment.
On your phone (same WiFi as the laptop): find your laptop’s IP (ifconfig on Mac/Linux, ipconfig on Windows). Open http://<laptop-ip>:5000 in mobile Chrome. Tap the “Take Photo” button. Take a photo of an actual leaf. Watch it diagnose.
Demo flow for defense:
- Show a textbook PlantVillage photo → confident correct diagnosis
- Show a field photo you took yourself → confident correct diagnosis
- Show an unrelated object (your hand) → uncertain fallback
- Show the treatment recommendations on screen → panel sees the actionable output
How to defend a crop disease capstone
Five questions you’ll definitely hear.
“Did you train this from scratch?” No. Transfer learning from MobileNetV2 with alpha=0.35. We froze the convolutional base and trained a small custom head on top. Standard professional approach for image classification with limited data.
“Where did your data come from?” 80% from the PlantVillage public dataset, 20% from photos we collected ourselves at 8 farms in [your province] over 3 weekends. The mixed dataset is what makes the model robust to real field conditions versus textbook images. Have the per-class image count breakdown ready.
“What’s the accuracy?” Overall validation accuracy is X%. Per-class F1 ranges from Y to Z. The confusion matrix is in our appendix. The weakest class is [whichever it is]. We know because we have a confusion matrix.
“Is this just academic, or did farmers actually use it?” This is the killer question. The right answer: “We tested with farmer [Mang Tonyo] in [Negros Occidental] on [date]. He took photos of 15 leaves from his rice paddy. The model correctly classified 14. The one wrong prediction was a brown spot misclassified as bacterial blight, which we documented in Chapter 4 as a known weakness.” If you can answer this with specifics, you’ll dominate the room.
“What if the disease isn’t in your training set?” The system has a confidence threshold of 0.5. Predictions below that show an “uncertain diagnosis” message that tells the farmer to consult their local agricultural extension officer. We demo this live during defense.
How to customize for your local crops
Replace or extend the class folders and the treatments.json to match your region’s crops. Some popular options:
- Corn (mais): leaf blight, gray leaf spot, common rust, healthy
- Banana (saging): panama disease, leaf spot, fruit rot, healthy
- Coconut (niyog): cadang-cadang, bud rot, healthy
- Coffee: leaf rust, berry borer damage, healthy
- Sugarcane: smut, mosaic virus, healthy
- Eggplant (talong): bacterial wilt, fruit and shoot borer, healthy
- Cassava (kamoteng kahoy): mosaic disease, brown streak, healthy
- Cabbage: black rot, downy mildew, healthy
For each crop, source your treatment recommendations from a credible local agricultural reference (PhilRice, ICAR, DA-BPI). Cite them in Chapter 3.
Common errors and how to fix them
Model predicts “healthy” for everything: class imbalance. Count images per class. Make sure no class has 3x more images than the smallest. Use class_weight='balanced' if needed.
TFLite conversion crashes: your model uses a layer that TFLite doesn’t support. Stick to standard Keras layers (MobileNetV2 + Dense + Dropout) and you’ll be fine.
TFLite model is larger than expected: you forgot the Optimize.DEFAULT flag in the converter. With it, expect 1-4 MB. Without it, 10-30 MB.
Confidence is always 30 to 40% on field photos: your training set is too clean (only PlantVillage). Add more field photos to retrain.
App works on laptop but phone can’t connect: your laptop firewall is blocking port 5000. Add a Flask firewall exception, or run on a different port.
Camera capture doesn’t open on phone: the capture="environment" attribute only works on real mobile browsers. Desktop Chrome ignores it.
How to extend this project
- Multi-crop single model. Train one model that handles rice + tomato + mango. Currently the dataset has them mixed, which already works, but you can route via a two-stage model: crop classifier → disease classifier per crop.
- Severity grading. Within each disease class, predict mild/moderate/severe based on percentage of leaf area affected (image segmentation extension).
- Time-series tracking. Save photos per leaf over weeks. Show disease progression.
- GPS location logging. Plot a map of disease occurrences across your barangay. Useful for extension officers.
- SMS alerts. When a high-severity disease is detected, send a text to the local agricultural extension office.
- Active learning. When confidence is low, save the photo and ask farmers to label it. Retrain monthly.
- Localized treatment database. Filipino vs Indian vs Vietnamese treatment practices differ. Make the recommendations region-aware.
- Bundle as Flutter app. Wrap the
.tflitemodel in a Flutter app for offline phone use. Strong defense move.
Free download: source code
UML diagrams you’ll need for documentation
Most agricultural AI capstones need these:
- Use Case Diagram. actors: farmer (takes photo), extension officer (reviews flagged cases), admin (updates treatment database); main use cases include photo diagnosis and treatment lookup.
- Activity Diagram. photo capture → preprocess → classify → confidence check → display + treatment.
- Sequence Diagram. request lifecycle including TFLite inference path for offline mode.
- Class Diagram. CropDiseaseClassifier, TreatmentLookup, Flask routes.
- Data Flow Diagram. image data + treatment data, including the offline TFLite path versus online Flask path.
We have detailed guides on each. Use them as templates and pay extra attention to the Activity Diagram. Panels appreciate seeing the full field-use flow including the “uncertain” fallback path.
Official documentation
Frequently Asked Questions
Is crop disease detection a good capstone project for IT students?
Where can I get a dataset for crop disease detection?
How many disease classes should my model detect?
Can my crop disease detector run offline on a phone?
Do I need to partner with farmers for this capstone?
Ship it. Take it to the field. Defend with photos.
Crop disease capstones win when they leave the laptop. The teams that bring real field testing photos to defense (farmer holding the phone, leaf on screen, correct diagnosis shown) are the teams the panel remembers.
If you’ve built this, take it to one farm before defense day. Even one. Even just an aunt’s backyard tomato plot. The field testing photo in your appendix is worth more than 10 pages of accuracy charts.
For the underlying CNN mechanics this guide assumes, see our Image Classification Capstone Tutorial. For more applied AI capstone ideas, see 100 AI Capstone Project Ideas for IT Students 2026. If you haven’t picked your capstone topic yet, browse 150 Best Capstone Project Ideas for IT Students 2026. For other Python AI source code to study, see our Python projects library. For the UML diagrams your documentation will need, our UML guides cover every diagram type panels ask about.
Now download PlantVillage. Pick your crops. Walk to a farm this weekend.
More capstone project ideas to browse
Looking for more ideas to pitch your panel? Browse our capstone idea collections:

Adrian Mercurio
Full-Stack Developer at PIES IT Solution
Specializes in building complete capstone projects with full documentation. Strong background in PHP/MySQL development and database design. Has personally built and tested over 30 capstone-ready projects with ER diagrams, DFDs, and chapter-by-chapter thesis documentation.
Expertise: PHP · Laravel · Database Design · Capstone Projects · C# · C · C++ · Python · AI Projects · View all posts by Adrian Mercurio →