
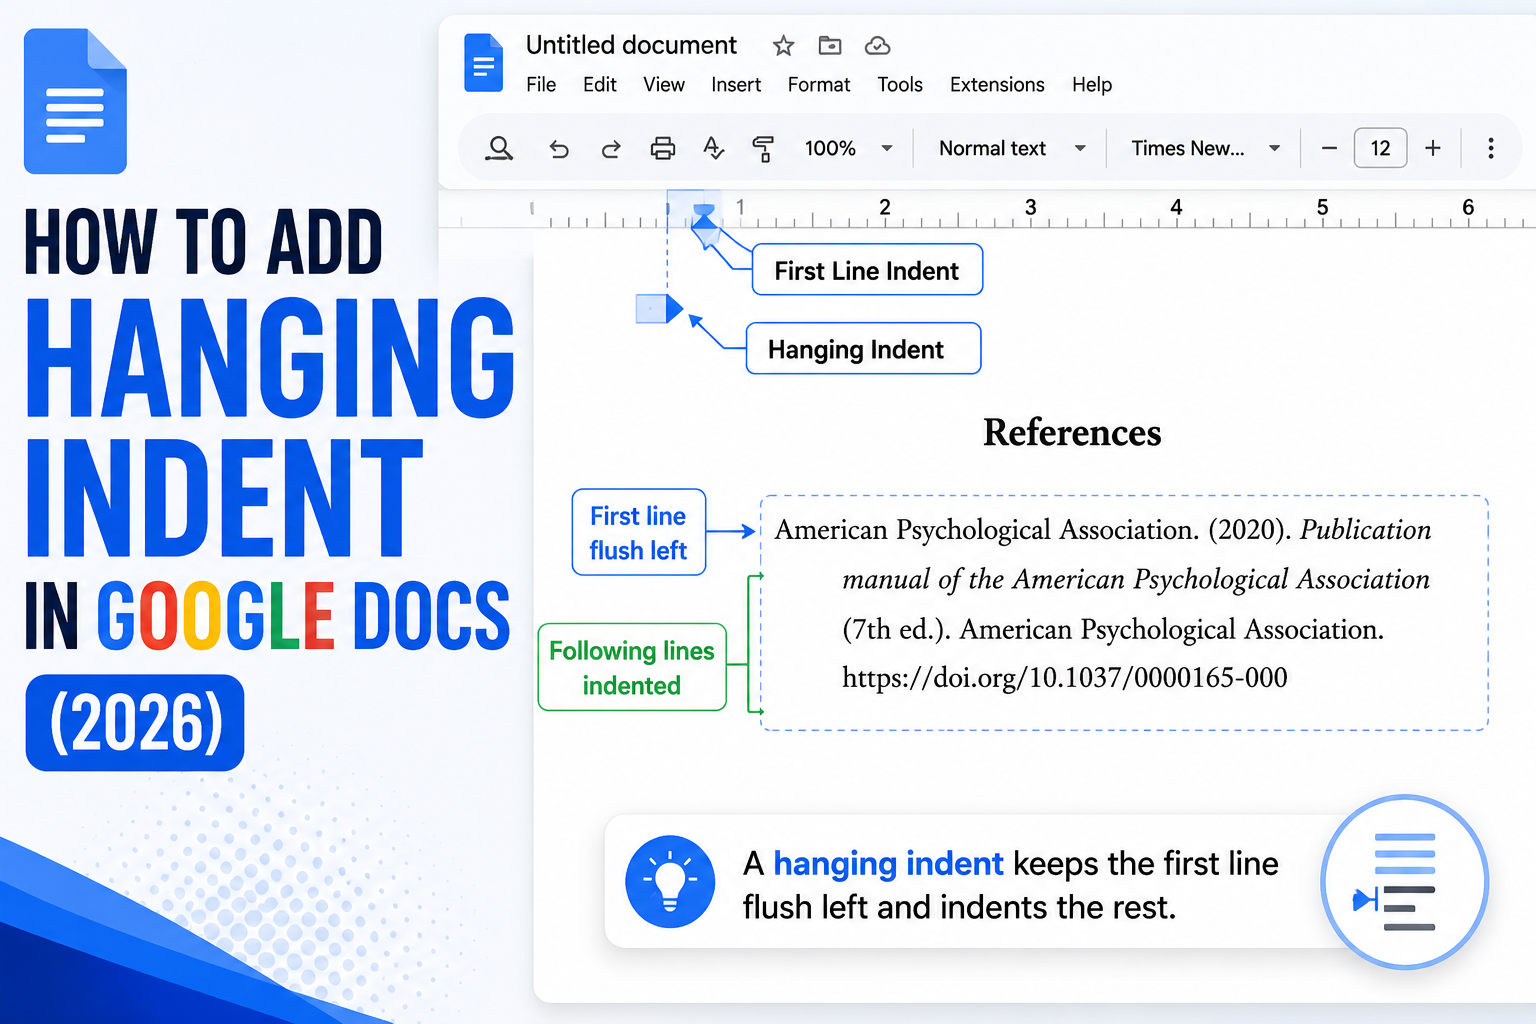
A hanging indent leaves the first line flush against the margin while indenting all following lines. It is required for APA, MLA, and Chicago-style bibliographies and reference lists. Google Docs supports hanging indents via the ruler, Format menu, or a keyboard workaround. This 2026 tutorial shows every method.
What is a hanging indent?
Regular paragraph:
    First line indented, rest at margin.
Rest of lines start at the left margin.

Hanging indent:
First line at the left margin.
    All subsequent lines indented by 0.5".
    Common for reference lists in APA/MLA.
Method 1: Add hanging indent via Format menu
- Select the paragraph(s) that need hanging indent.
- Go to Format > Align & indent > Indentation options.
- Under “Special indent” dropdown, pick Hanging.
- Set the value (0.5″ for APA/MLA standard).
- Click Apply.
Method 2: Add hanging indent via the ruler
- Enable ruler: View > Show ruler.
- Select the paragraphs.
- On the ruler at the top, you see two blue markers on the left:
- Top triangle (First line indent), controls just the first line.
- Bottom triangle (Left indent), controls all lines after the first.
- Drag the bottom triangle right by 0.5″ (to the 0.5 mark).
- Drag the top triangle back to 0.
Result: first line at 0, remaining lines at 0.5″.
Hanging indent for APA references
APA 7th edition requires:
- Hanging indent of 0.5″ (default).
- Applied to every reference entry.
- Double-spaced within and between entries.
- Alphabetical order by author last name.
Example APA reference with hanging indent:

Smith, J. A. (2023). Understanding hanging indents in academic
    writing: A comprehensive guide. Journal of Formatting
    Studies, 45(2), 123-145. https://doi.org/10.xxxx
Hanging indent for MLA works cited
MLA 9th edition requires:
- Hanging indent of 0.5″.
- Applied to every entry in Works Cited page.
- Double-spaced.
- Alphabetical by author last name.
Apply hanging indent to all references at once
- Select ALL your references (click before the first, Shift+Ctrl+End to select to bottom).
- Format > Align & indent > Indentation options.
- Special indent > Hanging > 0.5″.
- Apply.
All entries get the same hanging indent in one step. Much faster than doing them individually.
Set hanging indent as default style
For long documents with many references:
- Create a paragraph with hanging indent applied.
- Format > Paragraph styles > Normal text > Update Normal text to match.
- All new “Normal” paragraphs use hanging indent.
Warning: this changes all Normal text, including body paragraphs. Use only for reference-heavy documents where hanging indent should be everywhere.
Remove a hanging indent
- Select the paragraph.
- Format > Align & indent > Indentation options.
- Special indent > pick None.
- Apply.
Or drag the ruler triangles back to their original position.
Hanging indent on Google Docs mobile
- Open the doc in the app.
- Tap and hold to select paragraph.
- Tap the format button (“A” with lines).
- Scroll to Paragraph section > Indent options.
- Set hanging indent value.
Slightly clunky on mobile. Recommend desktop web for reference-heavy work.
Common hanging indent issues
- Only first paragraph indented: didn’t select all references. Select the whole list, then apply.
- All lines indented (not hanging): you set Left indent, not Hanging. Redo in Indentation options.
- Ruler triangles not visible: enable View > Show ruler.
- Value keeps resetting to 0: some paragraph styles override. Reapply after selecting text.
- Extra bullet appears: check that Format > Bullets and numbering is set to None.
Common Google Docs mistakes to avoid
Even experienced users hit the same pitfalls with document formatting and collaboration. Being aware of these traps saves hours of debugging and rework.
- Not checking sharing permissions before sending. A file shared with “Anyone with the link” behaves differently from “Restricted.” Always verify who can access before you share externally.
- Working on a shared file without version history awareness. Google Workspace keeps version history, but collaborators can overwrite your work. Use File > Version history > See version history to review changes.
- Ignoring the auto-save indicator. The “All changes saved in Drive” indicator confirms your work is persisted. If it says “Saving…” for too long, your connection may be unstable.
- Forgetting to check on mobile. Some formatting and features render differently on the Google Workspace mobile apps. Test on your phone before sending important content.
- Not using keyboard shortcuts. Google Workspace has extensive shortcuts (press Ctrl+/ or Cmd+/ to see them all). Learning the top 5-10 shortcuts saves significant time.
Power-user tips for Google Docs
Once the basics are solid, these techniques let you work faster and with more control.
- Use templates as starting points. Google Workspace includes free templates for common documents. Access via File > New > From template gallery. Customize once, reuse forever.
- Master search operators inside Drive. Search operators like
type:document,owner:me, andbefore:2025-01-01narrow results dramatically. Combine multiple operators for precise filters. - Use offline mode when your connection is unreliable. Enable offline access in Drive settings so you can keep working during network outages. Changes sync automatically when you reconnect.
- Set up Google Workspace apps on desktop. Drive for Desktop syncs files to your local machine and integrates with File Explorer or Finder. Works better than the web interface for large files.
- Bookmark important documents. Star files in Drive to see them at the top of your Home view. Great for daily reference documents.
Real-world workflow examples
Concrete scenarios where these features solve everyday problems:
For students and BSIT capstone teams: Use shared Google Docs for capstone documentation, with real-time collaboration replacing back-and-forth email attachments. Version history preserves an audit trail of who wrote what.
For freelancers and consultants: Combine Google Drive folders (per client) with shared permissions for smooth handoffs. Clients can view or comment without needing separate accounts.
For small teams: A shared Drive folder plus a linked Google Sheet as project tracker gives structured collaboration without paying for enterprise tools.
Best practices summary
The pattern that works across nearly every Google Workspace use case:
- Start simple, add complexity when needed. A basic Doc or Sheet solves 90 percent of cases. Only add scripts, add-ons, or complex formulas when the simple version breaks.
- Version history is your safety net. Every serious edit should be reversible via File > Version history.
- Share thoughtfully. Restricted sharing beats Anyone-with-link for anything sensitive. Add specific emails for tighter control.
- Mobile-check before sending. A quick preview on your phone catches layout issues that never show up on desktop.
- Learn keyboard shortcuts. The top 10 shortcuts save 30 minutes a week if you use Workspace daily.
Official documentation
Recommended academic writing resources
The links below are affiliate links. We may earn a commission at no extra cost to you when you buy or sign up. See our affiliate disclosure.
Frequently Asked Questions
What size hanging indent for APA?
0.5 inches (1.27 cm). Same for MLA and Chicago style. Apply to every reference in your bibliography.
Is there a keyboard shortcut for hanging indent?
No direct shortcut. Workaround: use Format > Align & indent > Increase indent (Ctrl+]), then place cursor at start of first line and press Shift+Tab to bring only the first line back.
Why is my hanging indent uneven?
Each reference is a separate paragraph. If some entries don’t have the setting, select ALL entries at once and reapply Format > Align & indent > Indentation options > Hanging.
Does hanging indent transfer to Word (.docx)?
Yes. When you File > Download > Microsoft Word (.docx), hanging indent settings preserve. Word displays and edits them correctly.
Can I use hanging indent for bullet lists?
Bulleted lists already have a hanging-indent-like structure automatically. For custom lists without bullets that behave like hanging indent, use Format > Align & indent > Indentation options.