

A Progress Bar In PHP is a graphical control element that shows how far along a long computer process, like a download, file transfer, or installation, Sometimes the picture is accompanied by text that shows the progress as a percentage.
About the Project
The Progress Bar was developed using PHP, HTML, CSS, jQuery, AJAX and JavaScript.
This Dynamic Progress Bar is use when we are uploading any file type in our system or websites.
During the Upload With Progress Bar PHP, we are going to show the progress bar if it is done already.
And, also, we have to use the jQuery and AJAX function to do this functionally.
In this tutorial you will learn on How To Make Progress Bar in an easy way and a short period of time. and also this tutorial is easy to understand the codes and process that are good for the beginners or the students.
So, lets start the tutorial..
To start executing this Simple Project makes sure that you have sublime or any platform of PHP and MySQL installed in your computer.
Project Information’s
| Project Name: | Dynamic Progress Bar In PHP With Source Code |
| Language/s Used: | PHP |
| PHP version (Recommended): | 5.6.3, 7.4.12 |
| Database: | MySQL |
| Type: | Website, Web Application |
| Developer: | IT SOURCECODE |
| Updates: | 0 |
Steps on how to create the Progress Bar in PHP with Source Code
Time needed: 5 minutes
These are the steps on how to create Progress Bar in PHP with Source Code.
- Create folder.
First, create a folder from your “xampp” folder under “htdocs” folder and name it.

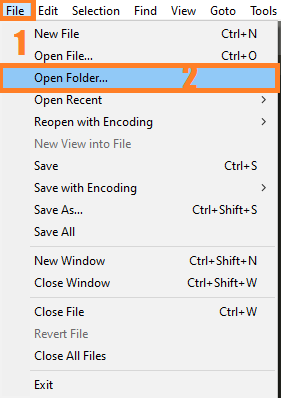
- Open folder.
Second, open “sublime text” and open the project folder you’ve created.

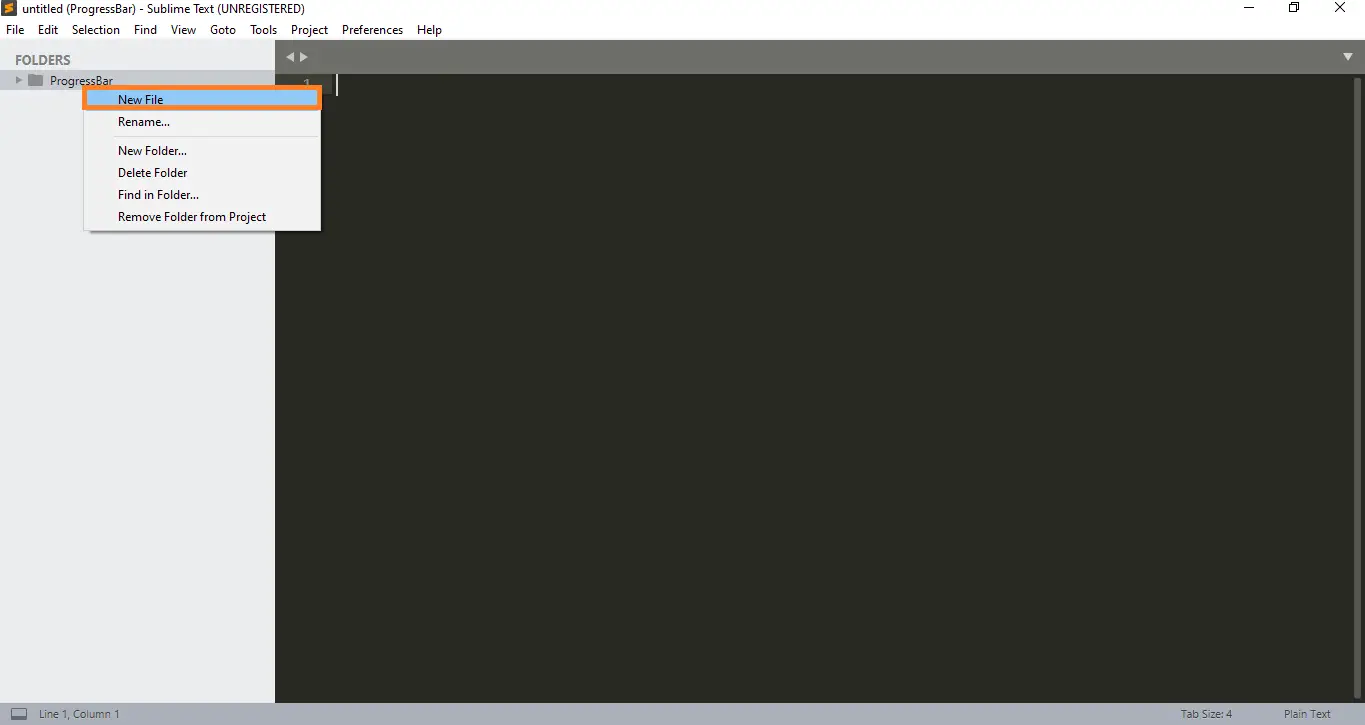
- Create a php file.
Third, create the php file under your project folder and name it into “index.php“.

- Paste the code given below.
Final, paste all the codes or the complete source code given below into your php file.

How To Create A Progress Bar In PHP?
HTML Form
– The code given below which is the html form of this simple project, you can also copy the codes given below and paste it into your file.
<center&amp;amp;amp;amp;gt; <form style="background-color: #B4FD0B" id="upload_container" action="upload.php" method="post"> <div> <label>Upload Image File:</label> <input name="userImage" id="userImage" type="file" class="demoInputBox" /> </div> <br /> <div><input type="submit" id="btnSubmit" value="Submit" class="btnSubmit" /></div> <div id="progress-div"><div id="progress-bar"></div></div> <div id="targetLayer"></div> </form> <div id="loader-icon" style="display:none;"><img src="loading.gif" /></div> </center>
jQuery Script
– The code given below which is the jQuery Script of this simple project, you can also copy the codes given below and paste it into your file.
<script src="js/code_js.js" type="text/javascript"></script>

<script src="js/code_js1.js" type="text/javascript"></script>

<script type="text/javascript">
$(document).ready(function() {
	 $('#upload_container').submit(function(e) {
		if($('#userImage').val()) {
			e.preventDefault();
			$('#loader-icon').show();
			$(this).ajaxSubmit({
				target:   '#targetLayer',
				beforeSubmit: function() {
				  $("#progress-bar").width('0%');
				},
				uploadProgress: function (event, position, total, percentComplete){
					$("#progress-bar").width(percentComplete + '%');
					$("#progress-bar").html('<div id="progress-status">' + percentComplete +' %</div>')
				},
				success:function (){
					$('#loader-icon').hide();
				},
				resetForm: true
			});
			return false;
		}
	});
});
</script>
CSS Style
– The code given below which is the CSS design of this simple project, you can also copy the codes given below and paste it into your file.
<style type="text/css">
#upload_container {
border-top:#F0F0F0 2px solid;
background:#FAF8F8;
padding:10px;
width:600px;
}
#upload_container label {
margin:2px;
font-size:1em;
font-weight:bold;
}
.demoInputBox {
padding:5px;
border:#F0F0F0 1px solid;
border-radius:4px;
background-color:#FFF;
}
#progress-bar {
background-color: skyblue;
height:20px;color: #FFFFFF;
width:0%;
-webkit-transition: width .3s;
-moz-transition: width .3s;
transition: width .3s;
}
.btnSubmit {
background-color:azure;
padding:10px 40px;
color:blue;
border:skyblue 1px solid;
border-radius:4px;
}
#progress-div {
border:blue 2px solid;
padding: 5px 0px;
margin:30px 0px;
border-radius:4px;
text-align:center;
}
#targetLayer {
width:100%;
text-align:center;
}
#targetLayer img {
border:red 2px solid;
padding:8px;
border-radius:8px;
}
</style&gt;</pre>Progress Bar Complete Source Code
<!DOCTYPE html&amp;amp;amp;amp;gt;
<html>
<head>
<title>
File Upload With Progress Bar Using PHP
</title>
<style type="text/css">
#upload_container {
border-top:#F0F0F0 2px solid;
background:#FAF8F8;
padding:10px;
width:600px;
}
#upload_container label {
margin:2px;
font-size:1em;
font-weight:bold;
}
.demoInputBox {
padding:5px;
border:#F0F0F0 1px solid;
border-radius:4px;
background-color:#FFF;
}
#progress-bar {
background-color: skyblue;
height:20px;color: #FFFFFF;
width:0%;
-webkit-transition: width .3s;
-moz-transition: width .3s;
transition: width .3s;
}
.btnSubmit {
background-color:azure;
padding:10px 40px;
color:blue;
border:skyblue 1px solid;
border-radius:4px;
}
#progress-div {
border:blue 2px solid;
padding: 5px 0px;
margin:30px 0px;
border-radius:4px;
text-align:center;
}
#targetLayer {
width:100%;
text-align:center;
}
#targetLayer img {
border:red 2px solid;
padding:8px;
border-radius:8px;
}
</style>
<script src="js/code_js.js" type="text/javascript"></script>
&lt;script src="js/code_js1.js" type="text/javascript"></script>
<script type="text/javascript">
$(document).ready(function() {
$('#upload_container').submit(function(e) {
if($('#userImage').val()) {
e.preventDefault();
$('#loader-icon').show();
$(this).ajaxSubmit({
target: '#targetLayer',
beforeSubmit: function() {
$("#progress-bar").width('0%');
},
uploadProgress: function (event, position, total, percentComplete){
$("#progress-bar").width(percentComplete + '%');
$("#progress-bar").html('<div id="progress-status">' + percentComplete +' %</div>')
},
success:function (){
$('#loader-icon').hide();
},
resetForm: true
});
return false;
}
});
});
</script>
</head>
<body>
<center>
<form style="background-color: #B4FD0B" id="upload_container" action="upload.php" method="post">
<div>
<label>Upload Image File:</label>
<input name="userImage" id="userImage" type="file" class="demoInputBox" />
</div>
<br />
<div><input type="submit" id="btnSubmit" value="Submit" class="btnSubmit" />&lt;/div>
<div id="progress-div"><div id="progress-bar"></div></div>
<div id="targetLayer"></div>
</form>
<div id="loader-icon" style="display:none;"><img src="loading.gif" /></div>
</center>
</body>
</html>Download Source Code below
Anyway, if you want to level up your programming knowledge, especially PHP, try this new article I’ve made for you Best PHP Projects With Source Code Free Download.
Summary
This Simple Project With Source Code was developed using PHP, HTML, CSS, jQuery, AJAX and JavaScript.
In this tutorial you will learn on How To Make Progress Bar in an easy way and a short period of time. and also this tutorial is easy to understand the codes and process that are good for the beginners or the students.
Official documentation
Frequently Asked Questions
How does this PHP project work?
Built with vanilla PHP (no framework) and MySQL backend. Standard structure: form HTML, PHP script handlers, MySQL via PDO or mysqli, sessions for auth, Bootstrap for responsive layout. Ready to extend for BSIT capstone scope.
What PHP and MySQL versions does this project require?
Most projects in this batch run on PHP 7.4 to PHP 8.2 with MySQL 5.7+ or MariaDB 10+. A few older projects need PHP 5.6 (deprecated, use XAMPP 7.x). To run: install XAMPP / WAMP / Laragon, extract project to htdocs, import the included .sql file via phpMyAdmin, edit the connection file (usually config.php or db_connect.php) with your DB credentials, browse to the project URL in your browser.
How do I set up the database for this PHP project?
Open phpMyAdmin (http://localhost/phpmyadmin/ on XAMPP), create a new empty database with the name specified in the project’s config.php. Click the Import tab, choose the included .sql file, click Go. Then edit config.php (or includes/connection.php) with: ‘localhost’, your MySQL username (usually ‘root’), your MySQL password (usually blank for XAMPP), and the database name.
Can I use this PHP project for a BSIT capstone or thesis?
Yes, but extend it. A bare CRUD app is too narrow for full capstone scope. Add: user roles via session checks, reports/dashboards (Chart.js + AJAX), PDF exports (TCPDF library), email notifications (PHPMailer), real domain extension (analytics, audit log, multi-branch support). Pair with Chapter 1-5 documentation matching your panel’s rubric.
Why am I getting ‘connection error’ or ‘undefined function mysqli_connect’?
Three common PHP issues: (1) Connection error: Apache + MySQL services not running in XAMPP control panel, OR database name in config.php does not match what you created in phpMyAdmin. (2) ‘undefined function mysqli_connect’: MySQL extension not enabled, in php.ini uncomment extension=mysqli (then restart Apache). (3) ‘No such file or directory’: MySQL socket path wrong, use 127.0.0.1 instead of localhost in the connection string.
Where can I find more PHP projects with source code?
Browse the PHP Projects hub for the full library (300+ vanilla PHP systems). For modern PHP MVC alternatives see Laravel Projects (74 systems) or CodeIgniter Projects (32 systems). For BSIT-focused capstone idea lists see 150 Best Capstone Project Ideas.
Related PHP Projects
- POS In PHP With Free Source Code
- Qr Code Generator In PHP With Source Code
- Message System In PHP With Source Code
- Image Crop In PHP With Source Code
- Image Editor In PHP With Source Code
- Drag And Drop In PHP With Source Code
Inquiries
If you have any questions or suggestions about Progress Bar in PHP with Source Code , please feel free to leave a comment below.

Angel Jude Suarez
Full-Stack Developer at PIES IT Solution
Focuses on Python development, machine learning, and AI integration. Has built production AI systems including OpenAI Whisper integration for medical transcription and GPT-4o-powered diagnosis assistance. Strong background in pandas, scikit-learn, and TensorFlow.
Expertise: Python · PHP · Java · VB.NET · ASP.NET · Machine Learning · AI Integration · OpenCV · Django · CodeIgniter · View all posts by Angel Jude Suarez →
you forgot the php file
what do you mean forgot the php file?