

Image Editor In PHP With Source Code
The Image Editor in PHP With Source Code is developed using HMTL, CSS, PHP, JavaScript.
This image editor using php and jQuery project is used to edit a user-selected image.
A image edit in php is suitable for newbie to the field of photography. This image editor php script can be used by small children who are computer literate.
When you run the photo editor php script project, you can choose from a palette of colors.
You may also adjust the brush size. Then you can begin to create your artwork.
With the aid of this edit image using php project, you will undoubtedly gain a better understanding of Object Oriented Programming and how to apply it to projects.
This image editor php jQuery project can also be used by IT students who need to complete their assignments.
It’s great for incorporating into other projects or for personal use, among other things.
To run this photo editor php code make sure that you have Sublime Text and XAMPP installed in your PC(for Windows) to run this project.
How to run the Project Image Editor in PHP?
Time needed: 5 minutes
Here are the steps on how to run Image Editor in PHP With Source Code
- Step 1: Download
First, download the source code given below.

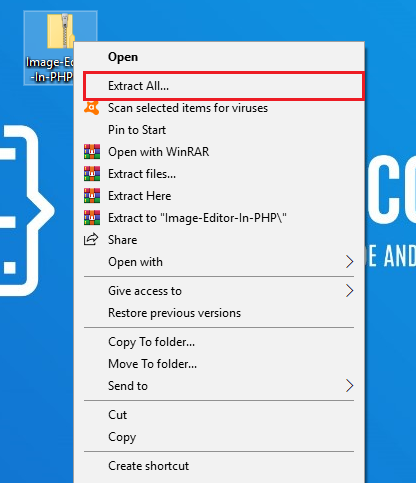
- Step 2: Extract file.
Second, after you finished download the source code, extract the zip file.

- Step 3: Copy project folder.
Third, copy the project folder and paste it into the xampp/htdocs folder.

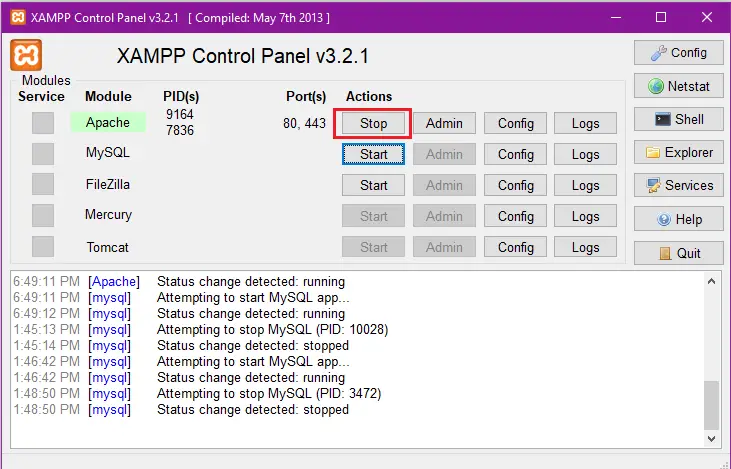
- Step 4: Open xampp.
Fourth, open xampp and start the Apache.

- Step 5: Open browser and type folder name.
Fifth, Open a browser and go to URL “http://localhost/editors/”.




Downloadable Source Code
Conclusion
This text editor with image upload in php is only a project made for school requirement purposes only.
You can download this edit image in php code project and modify it to suit your client requirements, since this is a student project it means you cannot really expect 100% functionality from this.
Technology stack and requirements
To run this PHP project, you need these tools on your development machine:
- XAMPP or WAMP server. Bundles Apache, MySQL, and PHP so you can run PHP on Windows without individual installs. Free from apachefriends.org.
- PHP 8.0 or higher. Included with XAMPP. Older versions (5.x, 7.x) may work but modern PHP features improve security and performance.
- MySQL or MariaDB. Comes with XAMPP. phpMyAdmin manages the database through a browser UI.
- VS Code or PhpStorm. Free code editor with PHP syntax highlighting, IntelliSense, and debugging support.
- Web browser. Chrome, Firefox, or Edge for testing the running app.
Installing the source code
- Download the archive. Get the ZIP file from the download link on this page and extract it.
- Move to htdocs. Place the extracted folder inside C:\xampp\htdocs\ so Apache can serve it.
- Import the database. Open http://localhost/phpmyadmin, click Import, and select the .sql file included in the archive.
- Update database credentials. Open the config.php or connection.php file and set the correct database name, username, and password (default XAMPP: root / empty password).
- Run the project. Start Apache + MySQL in XAMPP, then visit http://localhost/your-project-folder/ in a browser.
Using this project for your BSIT capstone
This PHP project maps cleanly to standard BSIT capstone documentation. Suggested chapter alignment:
- Chapter 1 (Introduction). Discuss the problem the system solves in real-world context. Cite Philippine business or academic use cases where a manual process could be replaced.
- Chapter 2 (Review of Related Literature). Compare this system’s features against 5-10 similar published projects. Cite journals like IJERT or IEEE Access for academic-standard sources.
- Chapter 3 (Methodology). Include Use Case Diagram, Data Flow Diagram, Entity Relationship Diagram, and Activity Diagram covering all major workflows.
- Chapter 4 (Results and Discussion). Screenshot each module of the running system with a caption explaining what data it processes and which user role interacts with it.
- Chapter 5 (Conclusion and Recommendations). Identify features that could be added in a Version 2, such as mobile app, REST API export, or AI-powered analytics.
Modules typical of Image Editor
- Master data. CRUD forms for the primary entities with search and filter.
- Transaction processing. Data entry forms for day-to-day operations the system automates.
- Reports. Formatted printable output summarizing activity per day, user, or category.
- User management. Login with role-based permissions (Admin, Encoder, Viewer).
- Backup and restore. Export database to a .sql file and restore when needed.
Common enhancements for capstone review
- Modernize the UI. Add Bootstrap 5 or Tailwind CSS for a polished appearance.
- Add printable receipts. Use TCPDF or FPDF to generate PDF reports.
- Multi-user concurrency. Ensure database handles simultaneous writes without lost-update errors.
- Rewrite in Laravel. Migrate to Laravel for maintainability and modern development patterns.
Official documentation
Frequently Asked Questions
How does this PHP project work?
Built with vanilla PHP (no framework) and MySQL backend. Standard structure: form HTML, PHP script handlers, MySQL via PDO or mysqli, sessions for auth, Bootstrap for responsive layout. Ready to extend for BSIT capstone scope.
What PHP and MySQL versions does this project require?
Most projects in this batch run on PHP 7.4 to PHP 8.2 with MySQL 5.7+ or MariaDB 10+. A few older projects need PHP 5.6 (deprecated, use XAMPP 7.x). To run: install XAMPP / WAMP / Laragon, extract project to htdocs, import the included .sql file via phpMyAdmin, edit the connection file (usually config.php or db_connect.php) with your DB credentials, browse to the project URL in your browser.
How do I set up the database for this PHP project?
Open phpMyAdmin (http://localhost/phpmyadmin/ on XAMPP), create a new empty database with the name specified in the project’s config.php. Click the Import tab, choose the included .sql file, click Go. Then edit config.php (or includes/connection.php) with: ‘localhost’, your MySQL username (usually ‘root’), your MySQL password (usually blank for XAMPP), and the database name.
Can I use this PHP project for a BSIT capstone or thesis?
Yes, but extend it. A bare CRUD app is too narrow for full capstone scope. Add: user roles via session checks, reports/dashboards (Chart.js + AJAX), PDF exports (TCPDF library), email notifications (PHPMailer), real domain extension (analytics, audit log, multi-branch support). Pair with Chapter 1-5 documentation matching your panel’s rubric.
Why am I getting ‘connection error’ or ‘undefined function mysqli_connect’?
Three common PHP issues: (1) Connection error: Apache + MySQL services not running in XAMPP control panel, OR database name in config.php does not match what you created in phpMyAdmin. (2) ‘undefined function mysqli_connect’: MySQL extension not enabled, in php.ini uncomment extension=mysqli (then restart Apache). (3) ‘No such file or directory’: MySQL socket path wrong, use 127.0.0.1 instead of localhost in the connection string.
Where can I find more PHP projects with source code?
Browse the PHP Projects hub for the full library (300+ vanilla PHP systems). For modern PHP MVC alternatives see Laravel Projects (74 systems) or CodeIgniter Projects (32 systems). For BSIT-focused capstone idea lists see 150 Best Capstone Project Ideas.
Related PHP Projects
- Insert Multiple Image PHP MySQL
- Image Crop In PHP With Source Code
- User Profile Update Profile Info Using Phpmysql
- How To Upload Image Easily In PHP Using MySQL
- Upload Show Image Using PHP MySQL
- Stretch Image Using CSS
Inquiries
If you have any questions or suggestions about text editor with image upload in php, please feel free to leave a comment below.

Adrian Mercurio
Full-Stack Developer at PIES IT Solution
Specializes in building complete capstone projects with full documentation. Strong background in PHP/MySQL development and database design. Has personally built and tested over 30 capstone-ready projects with ER diagrams, DFDs, and chapter-by-chapter thesis documentation.
Expertise: PHP · Laravel · Database Design · Capstone Projects · C# · C · C++ · Python · AI Projects
· View all posts by Adrian Mercurio →