
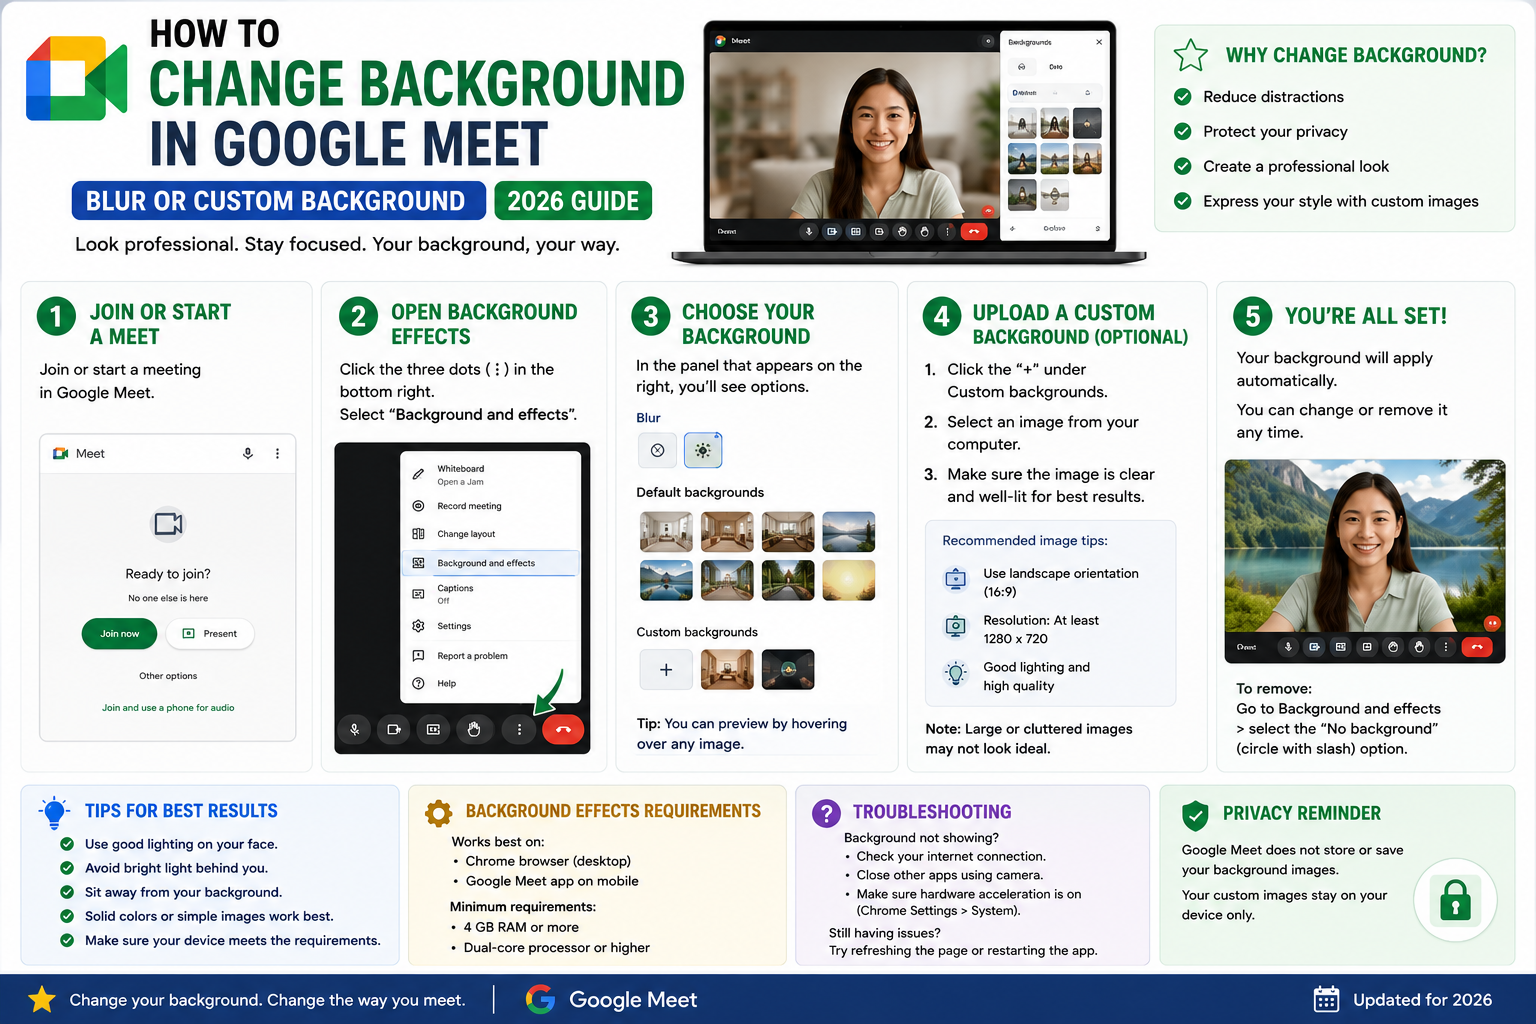
Changing your background in Google Meet hides messy rooms, adds professionalism, or lets you have fun with virtual scenes. Meet offers blur (light or heavy), preset scenes, and custom image uploads. This 2026 tutorial covers changing before or during a call, on desktop or mobile.
Change background BEFORE joining
- Click a Meet link to open the meeting.
- On the preview screen (before Join), click the Apply visual effects icon (bottom-right of video preview).
- Choose from:
- Backgrounds: blur options or preset scenes.
- Upload background image: your own photo.
- Filters: fun overlays (glasses, hats).
- Preview updates in real time.
- Click Join now.
Change background DURING a meeting
- Click the three-dot menu (bottom-right).
- Click Apply visual effects.
- Pick blur, preset scene, or upload.
- Change takes effect immediately.
- Close the effects panel.
Blur options
- Slightly blur: soft blur, room still visible but out of focus.
- Blur: strong blur, room details completely obscured.
- Blur updates as you move, Meet tracks your outline.
- Best for: hiding messy rooms while keeping natural lighting.
Preset backgrounds
Meet includes preset scenes:
- Office backgrounds (bookshelf, plants, wall art).
- Home scenes (living room, kitchen).
- Nature (beach, forest, mountains).
- Abstract (colors, patterns).
Preset scenes have Meet-quality edges, usually cleaner than user uploads.
Upload custom background image
- Open Apply visual effects panel.
- Click + at the top of Backgrounds section.
- Pick an image from your computer.
- Recommended:
- Resolution: 1920×1080 or higher.
- Aspect ratio: 16:9.
- Format: JPEG or PNG.
- Content: not too busy (edges look cleaner with simpler backgrounds).
- Applied.
Best custom background ideas
- Company logo watermark on solid color (professional).
- Bookshelf photo (looks organic, credible).
- Neutral office wall (safe, unobtrusive).
- Nature scene (calming, personality).
- Personal art or photo (memorable in networking meetings).
Filters (fun overlays)
- Meet includes AR filters: glasses, hats, mustaches.
- Fun for casual meetings, birthdays.
- Not appropriate for professional settings.
- Access via Apply visual effects > Filters tab.
Change background on Google Meet mobile
- Open Meet app.
- Join a call (or in preview screen).
- Tap the Effects icon (sparkle wand, bottom-right of video preview).
- Pick blur, preset, or filter.
- Custom uploads work on mobile too via + icon.
Turn off background effects
- Apply visual effects panel > pick “No effects” (top-left of Backgrounds).
- Camera shows real background again.
Performance and quality tips
- Backgrounds work best with even lighting (avoid strong backlight).
- Wear clothes that contrast with the wall, helps edge detection.
- Physical green screen improves quality dramatically for pro streams.
- Higher CPU laptops handle effects better; low-end may show artifacts or slow video.
- Turning off effects reduces CPU usage, helps with slow computers.
Common background issues
- Effects option missing: browser doesn’t support (older Firefox). Use Chrome or Edge.
- Background flickers: lighting or contrast issue. Improve lighting or wear different-colored clothing.
- Edges of body look jagged: low-quality webcam or bad lighting. Upgrade webcam or brighten room.
- Preset background looks fake: they’re artificial. Try blur instead for more natural look.
- Custom image looks distorted: aspect ratio doesn’t match 16:9. Crop image to correct ratio first.
- Filter face detection lost: move to face camera fully. Ambient light helps face tracking.
Common Google Meet mistakes to avoid
- Not testing camera and mic before the meeting. Meet has a preview page at meet.google.com/hangouts/preview where you can test devices before joining any meeting.
- Joining from mobile when you need to share screen. Screen sharing works on mobile but is limited. Use desktop when you need to share content in detail.
- Forgetting to mute when not speaking. Background noise disrupts everyone. Press Ctrl+D (Cmd+D on Mac) to toggle mute.
- Assuming recordings are automatic. Meet only records when the host clicks Record. Enable at the start; you cannot recover an unrecorded meeting.
- Ignoring the noise cancellation feature. Workspace tiers include background noise cancellation. Enable in Settings > Audio.
Power-user tips for Google Meet
- Use keyboard shortcuts. Ctrl+D to mute, Ctrl+E for camera, Ctrl+Alt+H to raise hand, Ctrl+Alt+M for the chat panel. All work on Windows and Mac (swap Ctrl for Cmd on Mac).
- Add captions. Turn on live captions at the bottom-right menu. Useful for accessibility and noisy environments.
- Enable Q&A for large meetings. Attendees can submit written questions without interrupting. Available on Workspace tiers.
- Use polls to gather feedback. Quick pulse checks during long meetings keep attention.
- Share a specific tab, not the whole desktop. Prevents accidentally sharing notifications or personal information.
When to use Meet vs alternatives
Meet works best when your organization is already on Google Workspace, calls are 3-10 participants, and simplicity matters more than advanced features. It integrates seamlessly with Calendar and Gmail, which is unbeatable for Google-first teams.
For large webinars (100+ attendees), Zoom or Webex offer better host controls. For persistent team chat with video, Slack Huddles or Microsoft Teams work better. For high-quality recorded content, tools like Riverside or Descript produce cleaner output.
For BSIT capstone defenses and student meetings, Meet is the right choice on any campus with Google Workspace for Education. Free tier supports up to 100 participants for 60 minutes.
Best practices summary
- Test devices 5 minutes before start. Camera, mic, network. Nothing worse than the “can you hear me?” opening.
- Share agenda in Calendar description. Attendees arrive knowing what to discuss.
- Assign a note-taker at start. Distributes cognitive load and produces action items.
- End on time or early. Respect people’s calendars. Reschedule if content overflows.
- Follow up with meeting notes within 24 hours. Consolidates decisions and prevents forgotten action items.
Recording and transcription options
Meet recordings save to Google Drive automatically. A few tips for reliable recording:
- Host controls recording. Non-host participants cannot record in Meet. Ensure the host is comfortable clicking Record.
- Recording notification. Meet notifies all participants when recording starts. Legal in most jurisdictions but consent is a courtesy.
- Storage in Drive. Recordings save to the host’s Google Drive in the “Meet Recordings” folder. Share the link with participants after.
- Transcription is separate. Meet transcription (available on higher Workspace tiers) generates a text transcript. Enable when recording for searchable notes.
- Storage quota matters. Recordings can be several hundred MB per hour. Monitor Drive storage.
Google Meet security and privacy
- Use the Waiting Room. Meet’s “quick access” toggle lets you review guests before admitting them.
- Password-protect sensitive meetings. Add a code that only invited attendees receive.
- Restrict screen sharing. Settings before or during meeting: only the host can share.
- Kick disruptive attendees. Host can remove anyone with a right-click.
- End-to-end encryption. Meet uses TLS in transit and AES-128 at rest. Sufficient for most business use.
Making virtual meetings feel real
Video meetings tire people out. A few practices reduce Zoom fatigue and keep energy high:
- Cameras on for smaller meetings. Non-verbal cues matter in 3-8 person conversations. Cameras off is fine for large all-hands.
- Stand-up option. Some meetings work better standing. Increases energy and shortens duration.
- Written pre-reads. Distribute a one-pager 24 hours before. Meeting time becomes discussion, not information transfer.
- Async by default. Ask: does this need to be synchronous? Loom videos or Docs collaboration replace many meetings.
- Time boxes. Set a hard end time. Discipline extends to next meeting on time and respects everyone’s calendar.
Official documentation
Recommended video call setup
The links below are affiliate links. We may earn a commission at no extra cost to you when you buy or sign up. See our affiliate disclosure.
Quick step-by-step summary (click to expand)
- Open a Google Meet call. Join or start any Meet call.
- Click the Effects icon. On desktop, click the sparkle icon at the bottom right of your video preview. On mobile, tap the effects button.
- Choose a background. Pick Blur (slight or full), a Google preset image, or click the plus icon to upload your own.
- Preview and apply. The change previews on your video tile. Click Apply to keep it for the call.
- For pre-call setup. Set the background before joining by clicking the effects icon on the Meet lobby screen.
Frequently Asked Questions
Is background change free?
Yes. Available for all Google Meet accounts (personal free and paid Workspace). No premium plan needed.
Does background slow down my computer?
Slightly. Uses more CPU. On low-end computers, video may lag. Turn off effects if performance suffers.
Can I use different backgrounds for different meetings?
Yes. Change per meeting. Meet remembers your last choice, you can also mix and match.
Best background for a job interview?
Blur or subtle preset (office scene). Avoid busy custom images or filters. Professional, unobtrusive is best. Neutral solid color also works.
Do custom backgrounds save my privacy?
Yes for room privacy. Meet processes video locally (not sent to server). Background never leaves your device. Practice: your camera view is only what your Meet processes.

Caren Bautista
Technical Writer at PIES IT Solution
Responsible for crafting clear, well-structured, and beginner-friendly content across the platform. Handles the writing, proofreading, and editorial review of tutorials, guides, and documentation to ensure every article is accurate, readable, and easy to follow.
Expertise: Technical Writing · Content Creation · Documentation · Editorial Writing · JavaScript · TypeScript · View all posts by Caren Bautista →