
Museum Management System Project in Django with Source Code
This Museum Management System Project in Django created based on python, Django, and SQLITE3 Database.
The Museum Management System, The museum’s manager has access to add and update privileges for artifacts, artists’ information, and employee and department data.
The manager can use the portal to make the necessary adjustments and additions.
Visitors can create an account on the internet and purchase museum tickets in advance.
After signing up, the user can log in using the same credentials and view the museum’s items as well as information about the museum’s departments and artists.
To start creating a Museum Management System Project in Python Django, makes sure that you have PyCharm Professional IDE Installed in your computer.
This Museum Management System in Django Framework, Also includes a Download Source Code for free, just find the downloadable source code below and click download now.
Admin Features: Museum Management System in Django
- Login Page – The page where the system administrator enters their system credentials in order to gain access to the system’s administrative side.
- New Employee Page-This is the page where an administrator can add a new employee.
- Employee List– The page on which the list of employee can be viewed, modified, or deleted.
- New Artist Page – The page to which an administrator can add new artist.
- Artist List– The page on which the list of artist can be viewed, modified, or deleted.
- New Artifact Page – The page to which an administrator can add new artifact.
- Artifact List– The page on which the list of artifact can be viewed, modified, or deleted.
- New Department Page – The page to which an administrator can add new department.
- Department List – The page on which the list of department can be viewed, modified, or deleted.
| About Project | Project Details | Definition |
|---|---|---|
| Project Name | Museum Management System in Django | A Museum Management System in Django is an easy project for beginners to learn how to build a web-based python Django project. We will provide you with the complete source code and database for the python project so that you can easily install it on your machine and learn how to program in Python Django. |
| Python version (Recommended) | 3.8 Version | Python 3.8 introduces some new syntax to the language, as well as a few small modifications to existing behavior and, most importantly, a slew of performance improvements, following in the footsteps of the previous 3.7 version. |
| Programming Language Used | Python Django Language | Django is a high-level Python web framework for building safe and maintainable websites quickly. Django is a web framework built by experienced developers that takes care of a lot of the heavy lifting so you can focus on developing your app instead of reinventing the wheel. |
| Developer Name | itsourcecode.com | Free projects containing source code in Java, PHP, Python, Django, VB.Net, Visual Basic, C, C++, C#, Javascript, and other languages are available on this website. |
| IDE Tool (Recommended) | Sublime, Visual Studio, PyCharm | Sublime Text is a source code editor that is available for purchase. It comes with built-in support for a variety of programming and markup languages. Plugins, which are often community-built and maintained under free-software licenses, allow users to extend the functionality of the system. Sublime Text has a Python API to help with plugins. |
| Project Type | Web Application | A web application, unlike computer-based software programs that operate locally on the device’s operating system, is application software that runs on a web server. The user uses a web browser with an active network connection to access web apps. |
| Database | SQLite | SQLite is a programming language that is used to create embedded software for devices such as televisions, cell phones, and cameras. It can handle HTTP requests with low to medium traffic. SQLite has the ability to compress files into smaller bundles with less metadata. SQLite is a temporary dataset that is used within an application to process data. |
Visitor Features: Museum Management System in Django
- Home Page– When visitor visit the website, this is the system’s default page.
- Register Page– The page where new visitor created their login credentials for the website.
- Login Page – visitor enter their website credentials on this page to gain access to all of the website’s features.
- Manage Profile Page – The page where the visitor can update their own profile information.
- Book Ticket Page – The page where the visitor can book a ticket to the museum.
- Send Feedback – The page where the visitor can send feedback to the admin about in museum.
Museum Management System in Django Steps on How to Create a Project
Time needed: 5 minutes
Here are the steps on how to create a Museum Management System Project in Django with Source Code.
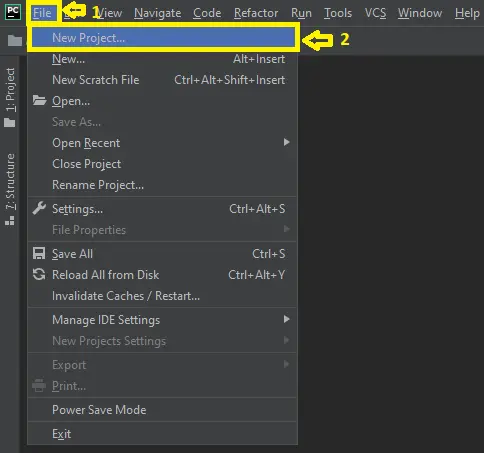
- Step 1: Open file.
First , open “pycharm professional” after that click “file” and click “new project”.

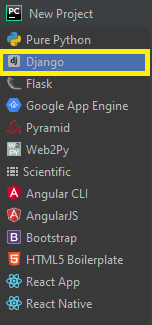
- Step 2: Choose Django.
Next, after click “new project“, choose “Django” and click.

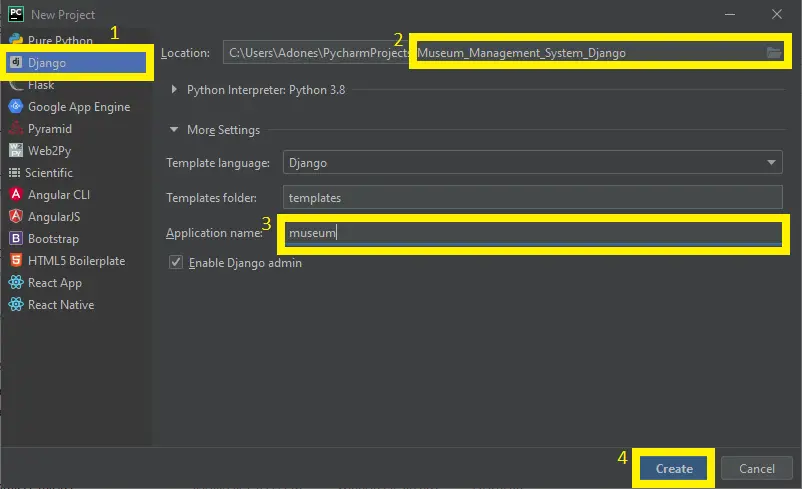
- Step 3: Select file location.
Then, select a file location wherever you want.

- Step 4: Create application name.
After that, name your application.

- Step 5: Click create.
Lastly, finish creating project by clicking “create” button.

- Step 6: Start Coding.
Finally, we will now start adding functionality to our Django Framework by adding some functional codes.

Functionality and Codes of the Museum Management System Project in Django with Source Code
- Create template for the book ticket form in Museum Management System in Django.
In this section, we will learn on how create a templates for the book ticket form. To start with, add the following code in your book_ticket.html under the folder of /templates/.
{% load static %}
<!DOCTYPE html>
<html>
<head>
<title>Book Ticket</title>
<link rel="stylesheet" href="{% static "css/style.css" %}" /> <!-- CSS -->
</head>
<body background="{% static "images/visitor.jpg" %}">
<center><h1 style="color: black; background-color: yellow;opacity: 60%;"> Hello , you are in Ticket Booking !!! </h1></center>
<br><br><br>
<center>
<div style="background-color: lightblue;">
<form action="/ticket_book/" method="POST">{% csrf_token %}
<label class="label">Visit Date </label>
<input type='text' name='date' required value={{date}}>
<br>(YYYY-MM-DD)<br>
<label class="label">Number of Tickets</label>
<input type='number' name='number' required value={{not}}>
<br>
<label class="label">Type(N/S) </label>
<input type='text' name='type' required value={{type}}>
<br><br>
<input name='submit' type='submit' value='Book Ticket' style="background-color: blue;"><br>
</form>
</div>
</center>
<br><br>{{error}}
</body>
</html>
- Create template for the feedback form in Museum Management System in Django.
In this section, we will learn on how create a templates for the feedback form. To start with, add the following code in your feedback.html under the folder of /templates/.
{% load static %}
<!DOCTYPE html>
<html>
<head>
<title>Add Feedback</title>
<link rel="stylesheet" href="{% static "css/style.css" %}" /> <!-- CSS -->
</head>
<body background="{% static "images/visitor.jpg" %}">
<center><h1 style="color: black; background-color: yellow;opacity: 60%;"> Hello , you are in Feedback !!! </h1></center>
<br><br><br>
<center>
<div style="background-color: lightblue;">
<form action="/feedback/" method="POST">{% csrf_token %}
<label class="label">Date of visit </label>
<input type='text' name='date' required value={{date}}>
<br>(YYYY-MM-DD)
<br>
<label class="label">Type of ticket</label>
<input type='text' name='type' required value={{type}}>
<br>
<label class="label">Feedback </label>
<input type='text' name='feedback' required value={{feedback}}>
<br><br>
<input name='submit' type='submit' value='Add Feedback' style="background-color: blue;"><br>
</form>
</div>
</center>
<br><br>{{error}}
</body>
</html>
- Create template for the admin dashboard in Museum Management System in Django.
In this section, we will learn on how create a templates for the admin dashboard page. To start with, add the following code in your admin_dashboard.html under the folder of /templates/.
{% load static %}

<!DOCTYPE html>
<html>
<head>
	<title>Dashboard</title>
</head>
<body background="{% static "images/working.jpg" %}">
	<link rel="stylesheet" type="text/css" href="{% static "css/style.css" %}"/>


      <ul style="background-color: blue;">
      <li><a href = '/emp_reg/'> New Employee</a></li>
      <li><a href = '/artist_reg/'> New Artist</a></li>
      <li><a href = '/artifact_reg/'> New Artifact</a></li>
      <li><a href = '/department_reg/'> New Department</a></li>
      <li style="float:right"><a class="active" href="/user_logout/"> Logout</a></li>
      </ul>

    <br><br><br><br><br><br><br>

	<center><center><h1> Hello {{Name}} </h1></center>
	<br><br><br>


<h2>EMPLOYEE DATA</h2>
	<table>

<tr>
	{% for i in emp_columns %}
		<th>{{i}}</th>
	{% endfor %}
</tr>

{% for i in emp_data %}
	<tr>
	{% for j in i %}
		<td>{{j}}</td>


	{% endfor %}
	</tr>
{% endfor %}

</table>

<br><br><br><br><br>
<h2>ARTIFACTS DATA</h2>
<table>


<tr>
	{% for i in artifact_columns %}
		<th>{{i}}</th>
	{% endfor %}
</tr>

{% for i in artifact_data %}
	<tr>
	{% for j in i %}
		<td>{{j}}</td>


	{% endfor %}
	</tr>
{% endfor %}

</table>

<br><br><br><br><br>
<h2>ARTISTS DATA</h2>
<table>


<tr>
	{% for i in artist_columns %}
		<th>{{i}}</th>
	{% endfor %}
</tr>

{% for i in artist_data %}
	<tr>
	{% for j in i %}
		<td>{{j}}</td>


	{% endfor %}
	</tr>
{% endfor %}

</table>
<br><br><br><br><br>
<h2>DEPARTMENT DATA</h2>
<table>


<tr>
	{% for i in dept_columns %}
		<th>{{i}}</th>
	{% endfor %}
</tr>

{% for i in dept_data %}
	<tr>
	{% for j in i %}
		<td>{{j}}</td>


	{% endfor %}
	</tr>
{% endfor %}

</table>
<br><br><br><br><br>
</center>

</body>
</html>
Downloadable Source Code Below.
Anyway, if you want to level up your programming knowledge, especially python, try this new article I’ve made for you Best Python Projects with source code for Beginners.
But If you’re going to focus on web development using Django, you can download here from our list of Best Django Projects with source code based on real-world projects.
How To Run The Museum Management System in Django?
- Step 1: Extract/unzip the file
- Step 2: Go inside the project folder, open cmd and type the following commands to install Django Framework and run the webserver:
- python manage.py migrate
- python manage.py runserver
- Step 3: Finally, open the browser and go to http://127.0.0.1:8000/
Summary
In summary, the Museum Management System in Django with Source Code can be useful to students or professional who wants to learn python programming language.
This project can also be modified to fit your personal requirements. Hope this project will help you to improve your skills. Happy Coding!
- How To Make A Point Of Sale System In Python
- Best Python Projects for Beginners
- Python MySQL Connection: Simple Python Step by Step Guide
- Python PIP Command Set-up / Fix: Step by Step Guide
- Random Password Generator in Python Projects With Source Code 2020
- Python Range Function|Range in Python Explained with Examples 2020
- School Management System Project In Django With Source Code
- Django Login And Registration With Source Code
- CRUD App In Django With Source Code
- Drag And Drop JavaScript With Source Code
- Todo List App Django With Source Code
Inquiries
If you have any questions or suggestions about Museum Management System in Django with Source Code, please feel free to leave a comment below.
Official documentation
Frequently Asked Questions
How does this Django management system work?
Standard Django MVT pattern: urls.py defines routes, views.py handles requests, models.py defines DB schema, templates render UI. CRUD on main entity, plus reports/dashboards. Django auth + groups for role-based access. Django admin available for back-office.
What Django and Python versions does this project require?
Most projects in this batch run on Django 4.x or 5.x with Python 3.8+. A few older projects need Django 3.2 with Python 3.7. Check the requirements.txt file for exact versions. To run any: install Python, create a virtualenv (python -m venv venv), activate it, pip install -r requirements.txt, run python manage.py migrate, then python manage.py runserver.
How do I set up the database for this Django project?
Most projects use SQLite (zero setup, auto-creates db.sqlite3 in project root on first migrate). For projects using MySQL or PostgreSQL: install the database server, create an empty database, edit settings.py DATABASES[‘default’] with your credentials, run python manage.py migrate. For sample data: python manage.py loaddata fixtures.json (if a fixture file is included) or create a superuser via python manage.py createsuperuser.
Can I use this Django project for a BSIT capstone or thesis?
Yes, but extend it. A bare CRUD app is too narrow for full capstone scope. Add: user roles via Django Groups, dashboards (Chart.js + AJAX endpoints), PDF exports (ReportLab or WeasyPrint), email notifications (Django send_mail), real domain extension (analytics, audit log, multi-branch). Pair with Chapter 1-5 documentation matching your panel’s rubric.
Why am I getting ModuleNotFoundError, OperationalError, or ‘No such table’ errors?
Three common Django startup issues: (1) ModuleNotFoundError: virtualenv not activated OR pip install -r requirements.txt skipped. (2) OperationalError: database credentials in settings.py don’t match your local MySQL/PostgreSQL. (3) ‘No such table’: you skipped python manage.py migrate. Also: if settings.py imports fail, check Python version compatibility (Django 5 needs Python 3.10+).
Where can I find more Django projects with source code?
Browse the Django Projects hub for the full library. For broader Python capstones see Python Projects (Tkinter desktop, Pygame games, OpenCV vision, ML). For PHP MVC alternatives see Laravel Projects. For BSIT capstone idea lists see 150 Best Capstone Project Ideas.

Adones Evangelista
Programmer & Technical Writer at PIES IT Solution
Adones Evangelista is a programmer and writer at PIES IT Solution, author of over 900 tutorials and error-fix guides at itsourcecode.com. Specializes in JavaScript, Django, Laravel, and Python error debugging covering ValueError, TypeError, AttributeError, ModuleNotFoundError, and RuntimeError, plus C/C++ and PHP capstone projects for BSIT students.
Expertise: JavaScript · Python · Django · Laravel · Error Debugging · C/C++ · View all posts by Adones Evangelista →