Django Login And Registration With Source Code
The Django Login And Registration is developed using Python Django, HTML and CSS, This Django Login Example teach you on how to Create Login Page Django. This Login Django Tutorial includes a registration page and login page for the users.
A Login Page Using Django features: the user can create their account and login their account into the system. This Django Login Page is good for the beginners who wants to learn in Python Django.
Watch the video here to see the full running User Registration and Login in Django with Source Code
This Django Login Form Bootstrap also includes a downloadable Django Login Page Template for free, just find the downloadable source code below and click to start downloading.
To start creating a Django Login And Registration, makes sure that you have PyCharm Professional IDE Installed in your computer.
Reminders
To perform this python django project make sure that you have knowledge in the following:
- CSS
- HTML
- Javascript
- Database Management
Features Of This Project Django Login And Registration
- Registration – In this feature, the user can “sign up” or “register” their account before can perform login to the system.
- Login – In this feature, the user can login their account into the system.
In This Project Django Login And Registration Consist Of The Following Method:
- web – In this method which is the main method of the system project that consist of different python script, and this method you can found the template design that being used, like HTML and CSS.
- website – In this method which is direct location when you run the project.
Steps on how to create a Django Login And Registration With Source Code
Django Login And Registration With Source Code
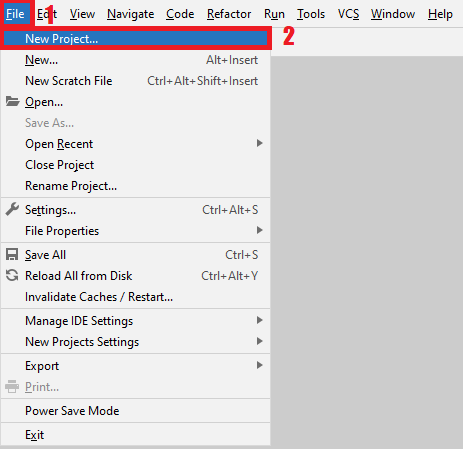
- Step 1: Open file.
First , open “pycharm professional” after that click “file” and click “new project“.
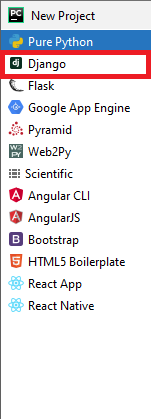
- Step 2: Choose Django.
Second, after click “new project“, choose “Django” and click.
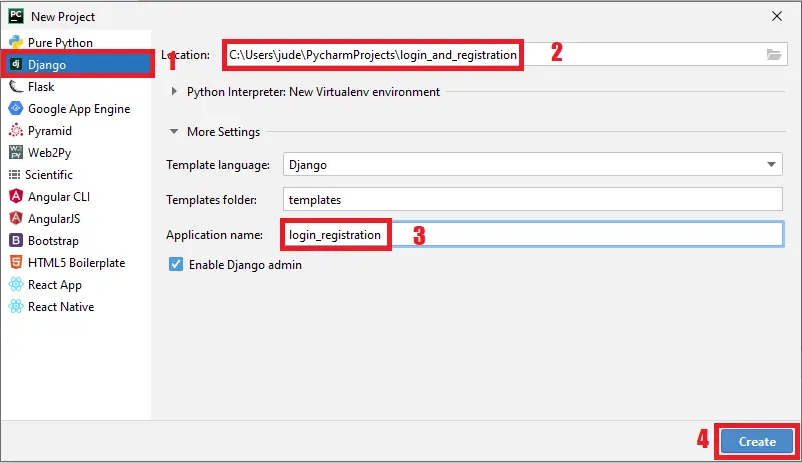
- Step 3: Select file location.
Third, select a file location wherever you want.
- Step 4: Create application name.
Fourth, name your application.
- Step 5: Click create.
Fifth, finish creating project by clicking “create” button.
- Step 6: Start of coding.
you are free to copy the following codes below in the given modules and method required.
The Following Module Given Below Are Under The “Website” Method
- The Code Given Below Is For The “setting.py” Module – you can add the following code below into your “setting.py” under the website method.
1 2 3 4 5 6 7 8 9 10 11 12 13 14 15 16 17 18 19 20 21 22 23 24 25 26 27 28 29 30 31 32 33 34 35 36 37 38 39 40 41 42 43 44 45 46 47 48 49 50 51 52 53 54 55 56 57 58 59 60 61 62 63 64 65 66 67 68 69 70 71 72 73 74 75 76 77 78 79 80 81 82 83 84 85 86 87 88 89 90 91 92 93 94 95 96 97 98 99 100 101 102 103 104 105 106 107 108 109 110 |
import os # Build paths inside the project like this: os.path.join(BASE_DIR, ...) BASE_DIR = os.path.dirname(os.path.dirname(os.path.abspath(__file__))) # Quick-start development settings - unsuitable for production # See https://docs.djangoproject.com/en/1.11/howto/deployment/checklist/ # SECURITY WARNING: keep the secret key used in production secret! # SECURITY WARNING: don't run with debug turned on in production! DEBUG = True ALLOWED_HOSTS = [] # Application definition INSTALLED_APPS = [ 'django.contrib.admin', 'django.contrib.auth', 'django.contrib.contenttypes', 'django.contrib.sessions', 'django.contrib.messages', 'django.contrib.staticfiles', 'web', ] MIDDLEWARE = [ 'django.middleware.security.SecurityMiddleware', 'django.contrib.sessions.middleware.SessionMiddleware', 'django.middleware.common.CommonMiddleware', 'django.middleware.csrf.CsrfViewMiddleware', 'django.contrib.auth.middleware.AuthenticationMiddleware', 'django.contrib.messages.middleware.MessageMiddleware', 'django.middleware.clickjacking.XFrameOptionsMiddleware', ] ROOT_URLCONF = 'website.urls' TEMPLATES = [ { 'BACKEND': 'django.template.backends.django.DjangoTemplates', 'DIRS': [], 'APP_DIRS': True, 'OPTIONS': { 'context_processors': [ 'django.template.context_processors.debug', 'django.template.context_processors.request', 'django.contrib.auth.context_processors.auth', 'django.contrib.messages.context_processors.messages', ], }, }, ] WSGI_APPLICATION = 'website.wsgi.application' # Database # https://docs.djangoproject.com/en/1.11/ref/settings/#databases DATABASES = { 'default': { 'ENGINE': 'django.db.backends.sqlite3', 'NAME': os.path.join(BASE_DIR, 'db.sqlite3'), } } # Password validation # https://docs.djangoproject.com/en/1.11/ref/settings/#auth-password-validators AUTH_PASSWORD_VALIDATORS = [ { 'NAME': 'django.contrib.auth.password_validation.UserAttributeSimilarityValidator', }, { 'NAME': 'django.contrib.auth.password_validation.MinimumLengthValidator', }, { 'NAME': 'django.contrib.auth.password_validation.CommonPasswordValidator', }, { 'NAME': 'django.contrib.auth.password_validation.NumericPasswordValidator', }, ] # Internationalization # https://docs.djangoproject.com/en/1.11/topics/i18n/ LANGUAGE_CODE = 'en-us' TIME_ZONE = 'UTC' USE_I18N = True USE_L10N = True USE_TZ = True # Static files (CSS, JavaScript, Images) # https://docs.djangoproject.com/en/1.11/howto/static-files/ STATIC_URL = '/static/' |
In this module which is the module for setting up the installed apps, database and etc.
- The Code Given Below Is For The “urls.py” Module – you can add the following code below into your “urls.py” under the website method.
1 2 3 4 5 6 7 8 9 |
from django.conf.urls import include, url from django.contrib import admin from . import views urlpatterns = [ url(r'^$', views.index_redirect, name='index_redirect'), url(r'^web/', include('web.urls')), url(r'^admin/', admin.site.urls), ] |
In this module which is the website URL configuration module.
- The Code Given Below Is For The “views.py” Module – you can add the following code below into your “views.py” under the website method.
1 2 3 4 5 |
from django.shortcuts import redirect from . import views def index_redirect(request): return redirect('/web/') |
In this module which is the index module of the website method.
The Following Module Given Below Are Under The “Web” Method
- The Code Given Below Is For The “views.py“.
1 2 3 4 5 6 7 8 9 10 11 12 13 14 15 16 17 18 19 20 21 22 23 24 25 |
from django.shortcuts import render, redirect, HttpResponseRedirect from .models import Member # Create your views here. def index(request): if request.method == 'POST': member = Member(username=request.POST['username'], password=request.POST['password'], firstname=request.POST['firstname'], lastname=request.POST['lastname']) member.save() return redirect('/') else: return render(request, 'web/index.html') def login(request): return render(request, 'web/login.html') def home(request): if request.method == 'POST': if Member.objects.filter(username=request.POST['username'], password=request.POST['password']).exists(): member = Member.objects.get(username=request.POST['username'], password=request.POST['password']) return render(request, 'web/home.html', {'member': member}) else: context = {'msg': 'Invalid username or password'} return render(request, 'web/login.html', context) |
In this module which is the index module of web method.
Run Quick Virus Scan for secure Download
Run Quick Scan for secure DownloadDownloadable Source Code Below.
Anyway, if you want to level up your programming knowledge, especially python, try this new article I’ve made for you Best Python Projects with source code for Beginners. But If you’re going to focus on web development using Django, you can download here from our list of Best Django Projects with source code based on real-world projects.
How To Run The Project Django Login And Registration?
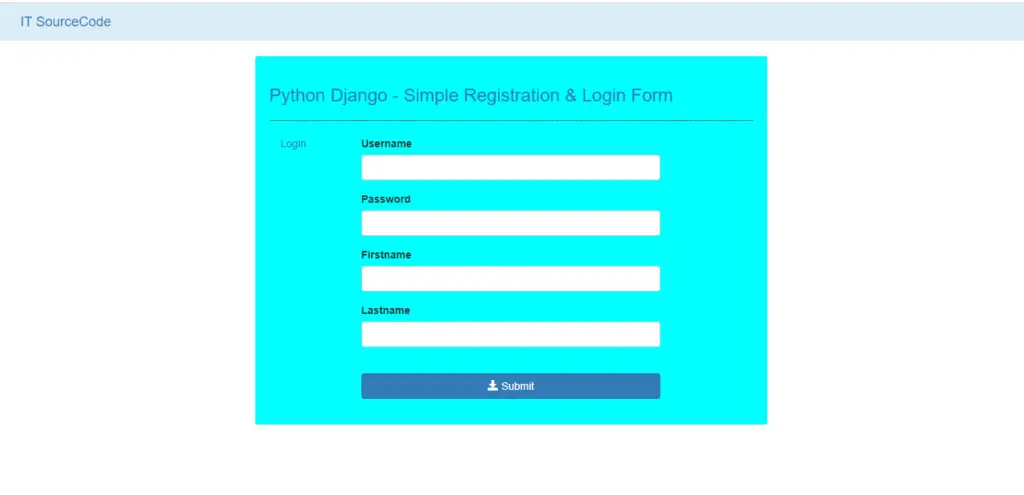
1.) python manage.py runserver
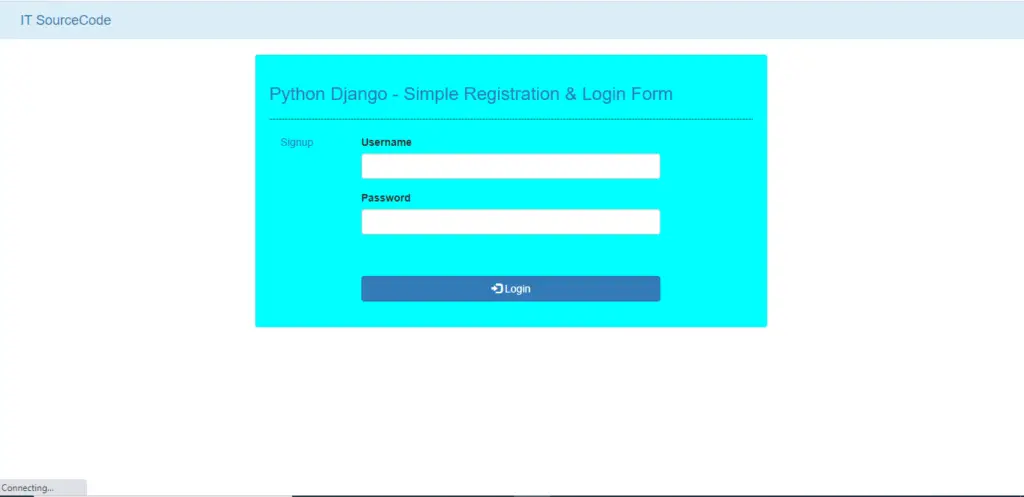
This Will Be The Output

Summary
The system is built fully in Django Framework in back-end and HTML, CSS in front-end. It has full-featured user interface with all the functionalities
This Article is the way to enhance and develop our skills and logic ideas which is important in practicing the python programming language which is most well known and most usable programming language in many company.
Related article below
- How To Make A Point Of Sale System In Python
- Best Python Projects for Beginners
- Python MySQL Connection: Simple Python Step by Step Guide
- Python PIP Command Set-up / Fix: Step by Step Guide
- Random Password Generator in Python Projects With Source Code 2020
- Python Range Function|Range in Python Explained with Examples 2020
Inquiries
If you have any questions or suggestions about Django Login And Registration, please feel free to leave a comment below.