

The Travel Management System is an easy project for beginners to learn how to build a web-based python Django project.
We will provide you with the complete source code and database for the python project so that you can easily install it on your machine and learn how to program in Python Django.
To start creating a Travel Management System Project in Python Django, makes sure that you have PyCharm Professional IDE Installed in your computer.
This Travel Management System in Django Framework, Also includes a Download Source Code for free, just find the downloadable source code below and click download now.
Checkout the linked below for other related articles.
- Travel Management System Project in C++ and MySQL Database
- Tours and Travels Management System Project in ASP.net Source Code
- Tour and Travel Management System Project in Laravel with Source Code
- Online Tour and Travel Management System Project in PHP Download With Source Code
- Travel Management System Project In Java With Source Code
- Travel Management System Project in Django with Source Code
- Tourism Management System Project in C with Source Code
- Tourist Reservation System Project in C++ with Source Code
| About Project | Project Details |
|---|---|
| Project Name | Travel Management System Project in Django |
| Python version (Recommended) | 3.8 Version |
| Programming Language Used | Python Django Language |
| Developer Name | itsourcecode.com |
| IDE Tool (Recommended) | Sublime, Visual Studio, PyCharm |
| Project Type | Web Application |
| Database | SQLite |
Admin Features of Travel Management System in Django
- Users Management – For the users, The admin can see the list of users details. Admin can update and delete the record of the users details.
- Manage Package Details– For the clients, The admin can see the list of Package details. Admin can update and delete the record of the Package details.
- Login – By default the admin need to login first to enable to access the system.
- Manage Change Password– For the change password, The admin can change strong password for better security in the system to avoid hacking the important details.
User Features of Travel Management System in Django
- Homepage– For the homepage, The user can see the information about packages in a place and amounts.
- Manage Signup– For the signup, The user need to sign first to create an account.
- Login – For the login, After creating an an account the user need to login first to access the system.
- About Us– For the about us, It is all about mission and vision of travel management system.
- Booking Tour – For the booking tour, The user can reserved a place like hotel and resort.
- Payment – For the payment, The user need to pay using credit card or online banking.
Travel Management System in Django Steps on How to Create a Project
Time needed: 5 minutes
Here are the steps on how to create a Travel Management System in Django
- Step 1: Open file.
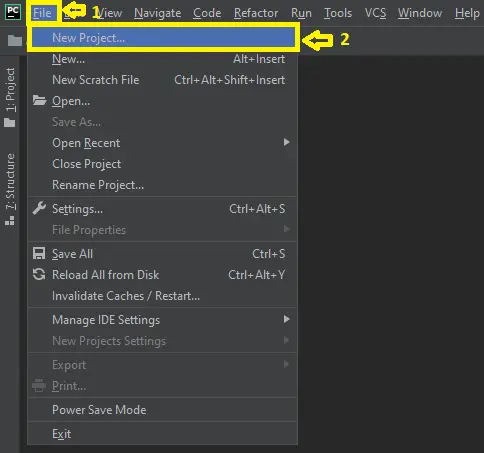
First , open “pycharm professional” after that click “file” and click “new project”.

- Step 2: Choose Django.
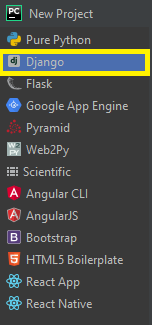
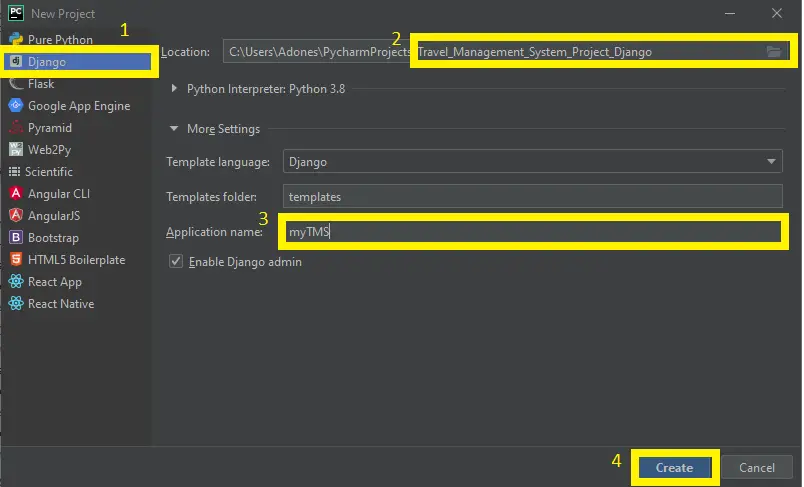
Next, after click “new project“, choose “Django” and click.

- Step 3: Select file location.
Then, select a file location wherever you want.

- Step 4: Create application name.
After that, name your application.

- Step 5: Click create.
Lastly, finish creating project by clicking “create” button.

- Step 6: Start Coding.
Finally, we will now start adding functionality to our Django Framework by adding some functional codes.


Functionality and Codes of the Travel Management System in Django
- Create template for the login in form in Travel Management System in Django.
In this section, we will learn on how create a templates for the login form. To start with, add the following code in your login.html under the folder of loginmodule/templates/.
<!-- login.html -->

{% extends 'home.html' %}
{% block content %}
<div class="agile-login">
		<div class="wrapper" >
			<h2>Login</h2>
			<div class="w3ls-form">
				<form action="/loginmodule/auth/" method="post">{% csrf_token %}
					<label>Username</label>
					<input type="text" name="username" placeholder="Username" required/>
					<label>Password</label>
					<input type="password" name="password" placeholder="Password" required />
                    <input type="submit" value="Log In" />
				<a href="/SignupApp/signup/" class="pass">Don't have account?SignUp</a>
				</form>
			</div>
            <br><h3 style="color: orangered"> {{ error }}</h3>
        </div>
		<br>
</div>
{% endblock %}- Create template for the home in Travel Management System in Django.
In this section, we will learn on how create a templates for the home. To start with, add the following code in your home.html under the folder of loginmodule/templates/.
{%extends 'dashboard/base.html' %}
{%block content %}
<section id="main-content">
                    <div class="space-30"></div>
                    <div class="container">

                        <div class="row">

                            <div class="col-md-12">
                                <div class="panel">
                                    <header class="panel-heading">
                                        <h2 class="panel-title ">Products</h2><button type="button"
													              class="btn btn-primary pull-right btn-sm js-add-product"
													              data-url="{% url 'dashboard:create_product' %}">
													                <span class="glyphicon glyphicon-pencil"></span> Add Products <span class="fa fa-plus"></span></a>
													        </button>
                                    </header>
                                    <div class="panel-body">
	                                    <div class="table-responsive">
			                                <table class="table table-hover table-striped" id="product-table">
			                                    <thead>
			                                        <tr>
			                                            <th>#</th>
			                                            <th>Name</th>
			                                            <th>Rate</th>
			                                            <th>Tenure</th>
			                                            <th>Frequency</th>
			                                            <th>Guarantor</th>
			                                            <th>Collateral</th>
			                                            <th>Actions</th>
			                                        </tr>
			                                    </thead>
			                                    <tbody>
			                                    {% include 'dashboard/includes/partial_product_list.html' %}
			                                    </tbody>
			                                </table>
                                        </div>
                                    </div>
                                </div>
                                <div class="modal  " id="modal-product">
	                                <div class="modal-dialog">
		                                <div class="modal-content"></div>
	                                </div>
                                </div>
                            </div><!--col end-->
                        </div>
                    </div><!-- end of container-->

                    <!--footer start-->

{% endblock %}
Anyway, if you want to level up your programming knowledge, especially python, try this new article I’ve made for you Best Python Projects with source code for Beginners.
But If you’re going to focus on web development using Django, you can download here from our list of Best Django Projects with source code based on real-world projects.
How To Run The Travel Management System in Django?
- Step 1: Extract/unzip the file
- Step 2: Go inside the project folder, open cmd and type the following commands to install Django Framework and run the webserver:
- pip install -r requirements.txt
- python manage.py migrate
- python manage.py runserver
- Step 3: Finally, open the browser and go to http://127.0.0.1:8000/
For admin panel:
- Username: admin
- Password: adminl12345
Summary
In summary, this Travel Management System in Django with Source Code can be useful to students or professional who wants to learn python programming language.
This project can also be modified to fit your personal requirements. Hope this project will help you to improve your skills. Happy Coding!
Inquiries
If you have any questions or suggestions about Travel Management System in Django with Source Code, please feel free to leave a comment below.
Official documentation
Frequently Asked Questions
How does this Django management system work?
Standard Django MVT pattern: urls.py defines routes, views.py handles requests, models.py defines DB schema, templates render UI. CRUD on main entity, plus reports/dashboards. Django auth + groups for role-based access. Django admin available for back-office.
What Django and Python versions does this project require?
Most projects in this batch run on Django 4.x or 5.x with Python 3.8+. A few older projects need Django 3.2 with Python 3.7. Check the requirements.txt file for exact versions. To run any: install Python, create a virtualenv (python -m venv venv), activate it, pip install -r requirements.txt, run python manage.py migrate, then python manage.py runserver.
How do I set up the database for this Django project?
Most projects use SQLite (zero setup, auto-creates db.sqlite3 in project root on first migrate). For projects using MySQL or PostgreSQL: install the database server, create an empty database, edit settings.py DATABASES[‘default’] with your credentials, run python manage.py migrate. For sample data: python manage.py loaddata fixtures.json (if a fixture file is included) or create a superuser via python manage.py createsuperuser.
Can I use this Django project for a BSIT capstone or thesis?
Yes, but extend it. A bare CRUD app is too narrow for full capstone scope. Add: user roles via Django Groups, dashboards (Chart.js + AJAX endpoints), PDF exports (ReportLab or WeasyPrint), email notifications (Django send_mail), real domain extension (analytics, audit log, multi-branch). Pair with Chapter 1-5 documentation matching your panel’s rubric.
Why am I getting ModuleNotFoundError, OperationalError, or ‘No such table’ errors?
Three common Django startup issues: (1) ModuleNotFoundError: virtualenv not activated OR pip install -r requirements.txt skipped. (2) OperationalError: database credentials in settings.py don’t match your local MySQL/PostgreSQL. (3) ‘No such table’: you skipped python manage.py migrate. Also: if settings.py imports fail, check Python version compatibility (Django 5 needs Python 3.10+).
Where can I find more Django projects with source code?
Browse the Django Projects hub for the full library. For broader Python capstones see Python Projects (Tkinter desktop, Pygame games, OpenCV vision, ML). For PHP MVC alternatives see Laravel Projects. For BSIT capstone idea lists see 150 Best Capstone Project Ideas.

Adones Evangelista
Programmer & Technical Writer at PIES IT Solution
Adones Evangelista is a programmer and writer at PIES IT Solution, author of over 900 tutorials and error-fix guides at itsourcecode.com. Specializes in JavaScript, Django, Laravel, and Python error debugging covering ValueError, TypeError, AttributeError, ModuleNotFoundError, and RuntimeError, plus C/C++ and PHP capstone projects for BSIT students.
Expertise: JavaScript · Python · Django · Laravel · Error Debugging · C/C++ · View all posts by Adones Evangelista →
Dear sir,
I cannot able to execute your project. Can you send me the execution from command prompt video. Thank you sir
Zip file password:itsourcecode.com or itsourcecode
from django.conf.urls import url,include
ImportError: cannot import name ‘url’ from ‘django.conf.urls’ (C:\Users\raira\AppData\Local\Programs\Python\Python311\Lib\site-packages\django\conf\urls\__init__.py)
is showing this error while running python manage.py makemigrations or migration
How to solve?
Dear sir,
In this project you have not uploded the sql file and requirement.txt file.
I’m facing errors because of that
Follow this steps and it is include for creating the admin in travel management system.
Step 1: pip install virtualenv
Step 2: virtualenv env
Step 3: cd env/Scripts
Step 4: activate
Step 5: cd ../..
Step 6: pip install django
Step 7: python manage.py makemigrations
Step 8: python manage.py migrate –run-syncdb
Step 9: python manage.py createsuperuser
Step 10: python manage.py runserver
Step 11: Type this in your browser or chrome: http://127.0.0.1:8000/
Will you please upload complete video to run this project?