

This tutorial about How To Track Location Using Python was developed using Python Programming, this simple Python Project With Source Code created using Graphical User Interface (GUI), the purpose of this project is to locate the country name based on the mobile number you input in the textbox.
A tutorial How To Track Phone Number Using Python is just a simple desktop application made using TKinter for them aim of tracking the country through phone number.
Track Phone Number Location Using Python : Project Information’s
| Project Name: | How To Track Location Using Python |
| Language/s Used: | Python (GUI) Based |
| Python version (Recommended): | 2.x or 3.x |
| Database: | None |
| Type: | Python App |
| Developer: | IT SOURCECODE |
| Updates: | 0 |
Additionally, this is a simple project and for educational purpose only. and this tutorial is good for the beginners or the students who wants to learn Programming, specially Python Programming Language
Moreover, this Track Phone Number Using Python also includes a downloadable Project With Source Code for free, just find the downloadable source code below and click to start downloading.
By the way if you are new to python programming and you don’t know what would be the the Python IDE to use, I have here a list of Best Python IDE for Windows, Linux, Mac OS that will suit for you.
I also have here How to Download and Install Latest Version of Python on Windows.
To start executing this tutorial on How To Track Mobile Location Using Python With Source Code, make sure that you have installed Python 3.9 and PyCharm in your computer.
Steps on how to run the project
Time needed: 5 minutes
These are the steps on How To Track Mobile Location Using Python With Source Code
- Step 1: Download the given source code below.
First, download the given source code below and unzip the source code.

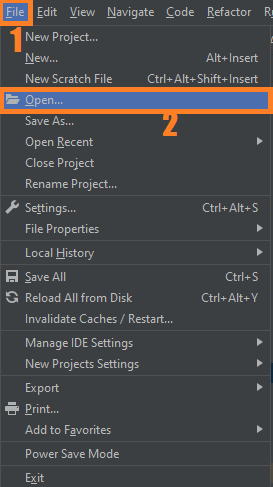
- Step 2: Import the project to your PyCharm IDE.
Next, import the source code you’ve download to your PyCharm IDE.

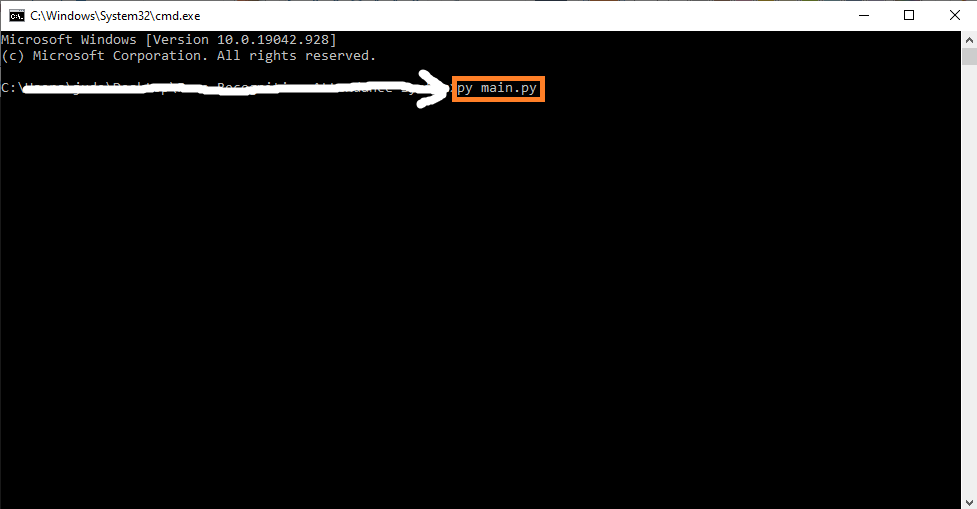
- Step 3: Run the project.
last, run the project with the command “py main.py”

Codes on How To Track Location Using Python
Installed Libraries
import json
import pycountry
from tkinter import Tk, Label, Button, Entry
from phone_iso3166.country import phone_country
Complete Source Code
import json
import pycountry
from tkinter import Tk, Label, Button, Entry
from phone_iso3166.country import phone_country


class Location_Tracker:
    def __init__(self, App):
        self.window = App
        self.window.title("Phone number Tracker")
        self.window.geometry("500x400")
        self.window.configure(bg="#3f5efb")
        self.window.resizable(False, False)

        #___________Application menu_____________
        Label(App, text="Enter a phone number",fg="white", font=("Times", 20), bg="#3f5efb").place(x=150,y= 30)
        self.phone_number = Entry(App, width=16, font=("Arial", 15), relief="flat")
        self.track_button = Button(App, text="Track Country", bg="#22c1c3", relief="sunken")
        self.country_label = Label(App,fg="white", font=("Times", 20), bg="#3f5efb")

        #___________Place widgets on the window______
        self.phone_number.place(x=170, y=120)
        self.track_button.place(x=200, y=200)
        self.country_label.place(x=100, y=280)

        #__________Linking button with countries ________
        self.track_button.bind("<Button-1>", self.Track_location)
        #255757294146

    def Track_location(self,event):
        phone_number = self.phone_number.get()
        country = "Country is Unknown"
        if phone_number:
            tracked = pycountry.countries.get(alpha_2=phone_country(phone_number))
            print(tracked)
            if tracked:
                    if hasattr(tracked, "official_name"):
                        country = tracked.official_name
                    else:
                        country = tracked.name
        self.country_label.configure(text=country)


PhoneTracker = Tk()
MyApp = Location_Tracker(PhoneTracker)
PhoneTracker.mainloop()
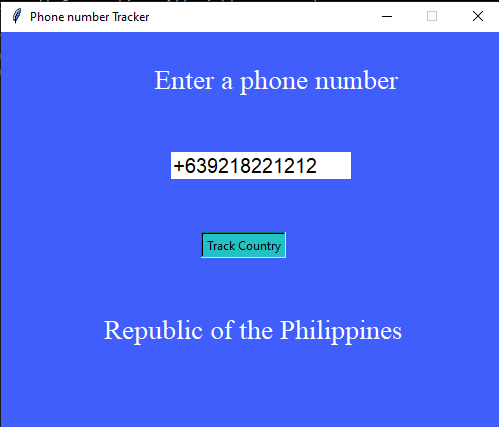
Output
Download Source Code below
Summary
This tutorial was developed using Python Programming, this simple Python Project With Source Code created using Graphical User Interface (GUI), The purpose of this project is to locate the country name based on the mobile number you input in the textbox.
Inquiries
If you have any questions or suggestions about How To Track Location Using Python With Source Code, please feel free to leave a comment below.
Technology stack and requirements
To run this Python project on your development machine, you need:
- Python 3.10 or higher. Download from python.org or install via Anaconda if you prefer bundled packages.
- pip package manager. Comes with Python. Used to install project dependencies from requirements.txt.
- Virtual environment. Use venv or conda to isolate project dependencies from your global Python install.
- VS Code or PyCharm. Free code editors with Python syntax highlighting, IntelliSense, and debugging.
- Git. For version control and cloning source code repositories.
Installing the source code
- Download or clone the repository. Get the ZIP archive from the download link on this page and extract it.
- Create a virtual environment. Open a terminal in the project folder and run: python -m venv venv, then activate it (venv\Scripts\activate on Windows or source venv/bin/activate on Mac/Linux).
- Install dependencies. Run pip install -r requirements.txt to install all libraries the project needs.
- Configure environment variables. If the project uses API keys (OpenAI, Anthropic, database), create a .env file and set the required keys.
- Run the project. Follow the run command in the README (usually python main.py or streamlit run app.py).
Using this project for your BSIT capstone
- Chapter 1 (Introduction). Discuss the real-world problem this system solves. Cite Philippine or international use cases where the manual process could be automated.
- Chapter 2 (RRL). Compare your project against 5-10 similar published works. Cite ACM, IEEE, or arXiv papers for academic-standard sources.
- Chapter 3 (Methodology). Document the model architecture, training data, hyperparameters, and evaluation metrics used.
- Chapter 4 (Results). Report accuracy, precision, recall, F1-score, and confusion matrix. Screenshot the running app on real inputs.
- Chapter 5 (Conclusion). Identify features for Version 2: better model, larger dataset, mobile deployment, or REST API.
Modules typical of [SOLVED] How To Track Location Using Python
- Core Python logic. Main functions implementing the business logic of the system.
- Data storage. SQLite for simple projects, PostgreSQL or MongoDB for larger data.
- User interface. Tkinter for desktop, Streamlit for data dashboards, or Flask/FastAPI for web.
- Input validation. Type checking and range validation before processing user data.
- Reports. CSV or PDF export using pandas.to_csv() or ReportLab.
- Testing. pytest unit tests covering core functions.
Common enhancements for capstone review
- Add REST API. Convert desktop app to FastAPI service for mobile or web front-ends.
- Multi-user support. Add login, roles, and per-user data isolation.
- Cloud deployment. Deploy to Render, Railway, or Fly.io for public access.
- Docker containerization. Package the app in Docker for portable deployment.
Official documentation
Frequently Asked Questions
What does this Python tutorial cover?
Focused Python language or library tutorial showing a single concept with working code. Use as building block when assembling a larger system.
What Python version and libraries does this project require?
Most projects in this batch use Python 3.10, 3.11, or 3.12 (avoid 3.13 until library wheels catch up). Standard libs: tkinter (built-in), sqlite3 (built-in). External: pip install pillow opencv-python pygame mysql-connector-python reportlab requests beautifulsoup4. Check the requirements.txt file (if included) for exact versions.
How do I set up the database for this Python project?
For SQLite (most common, no setup needed): the .db file auto-creates on first run. For MySQL: install MySQL Server + MySQL Workbench, create an empty database, import the included .sql file, edit the connection string in db.py (or db_connect.py) with your host, user, password, database name.
Can I use this Python project for a BSIT capstone or thesis?
Yes. Python is rising fast in Philippine BSIT panels. Extend it: add user roles via auth module, dashboards (matplotlib charts), PDF reports (reportlab), email notifications (smtplib), real domain extension (analytics, audit log, multi-branch support). Pair with Chapter 1-5 documentation matching your panel’s rubric.
Why am I getting ‘ModuleNotFoundError’ or ‘No module named X’?
Three common Python issues: (1) Module not installed: pip install
Where can I find more Python projects with source code?
Browse the Python Projects hub for the full library. For computer vision specifically see OpenCV Projects (46 vision systems). For ML / AI capstones see Machine Learning Projects. For BSIT capstone idea lists see 150 Best Capstone Project Ideas.

Angel Jude Suarez
Full-Stack Developer at PIES IT Solution
Focuses on Python development, machine learning, and AI integration. Has built production AI systems including OpenAI Whisper integration for medical transcription and GPT-4o-powered diagnosis assistance. Strong background in pandas, scikit-learn, and TensorFlow.
Expertise: Python · PHP · Java · VB.NET · ASP.NET · Machine Learning · AI Integration · OpenCV · Django · CodeIgniter
· View all posts by Angel Jude Suarez →
It’s saying there is a mistake on line 2.
it says there is mistake in line 2
it says there is a mistake in line 2 what should i do
What is the error?