
Generate Report from DataGridView to Crystal Reports in VB.Net
In this tutorial, you will learn how to generate report from datagridview to crystal reports in vb.net.
Take note that you need to follow the procedure correctly in order for you to achieve this tutorial but first you need these software in order for you to generate report from datagridview to crystal reports in vb.net.
- Microsoft Visual Studio 2013
- SAP Crystal Reports Download
Step 1: Generate Report from DataGridView to Crystal Reports in VB.Net
Create a new project and name it depending on your like.
Step 2:
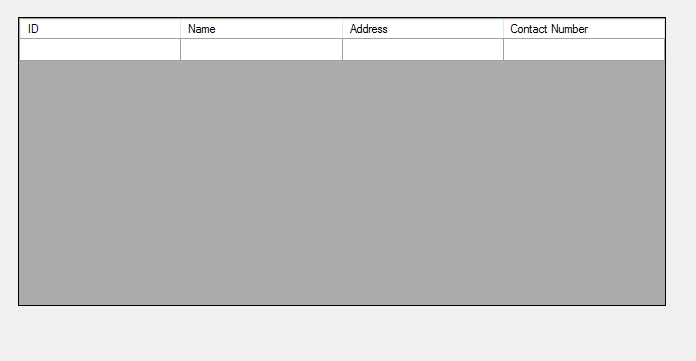
Drag the datagridview from our toolbox and modify its columns depending on your desired output. (see example image below).
Step 3:
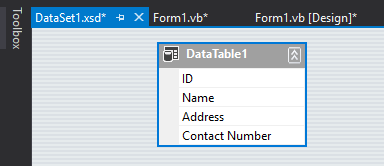
Right click your Solution Project from the Solution Explorer and add new item, then search for DataSet. After adding new dataset, create a datatable from there.
You should name your datatable columns accordingly to your datagridview columns. DataSet will be used as an adapter to pass all our datagridview values to our crystal report. (see example image below).
Step 4:
Right click again your Solution Project from the Solution Explorer and add new item, then search for Crystal Reports and create a blank report.
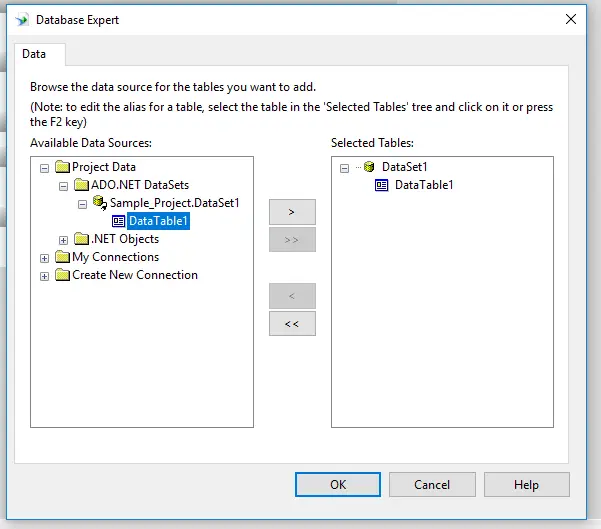
After creating your crystal report, go to Field Explorer > Database Fields > Right Click > Database Expert > Project Data Folder > ADO.NET DataSets > then select your DataTable1. After seeing your DataTable1 at the right corner (Selected Tables) click OK. (see sample image below).
Step 5: Generate Report from DataGridView to Crystal Reports in VB.Net
After that, check your database fields by clicking the small plus button on its left side then click also the small plus button on your DataTable1.
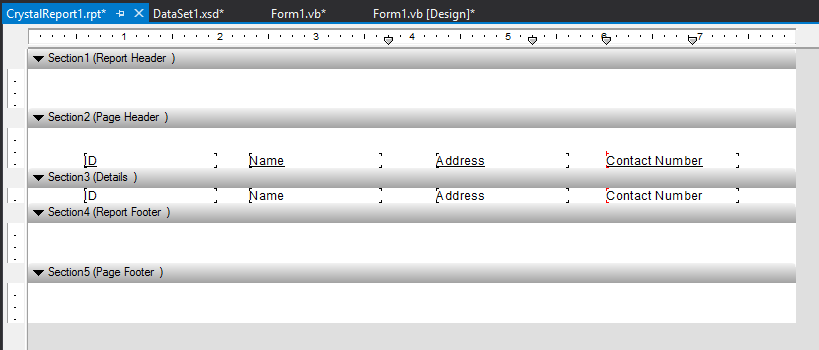
Drag the columns on the Section 3 (Details) of our blank crystal report, as you drag all the columns into our report, you will notice that the crystal report will automatically produce its designated column header at the Section 2 (Page Header). (see example image below).
Step 6:
Add another windows form, and drag the crystalreportviewer in the form. The crystalreportviewer will automatically dock to the form.
Step 7:
Lets do the coding! To achieve generate report from datagridview to crystal reports in vb.net, first we will add example values on our datagridview. We will put the codes on the form load in order for the project to read it while the form is loading.
Private Sub Form1_Load(sender As Object, e As EventArgs) Handles MyBase.Load
DataGridView1.Rows.Add("1", "Ian", "Iloilo", "123456789")
DataGridView1.Rows.Add("2", "Luffy", "Antique", "12345987")
DataGridView1.Rows.Add("3", "Pirates", "Capiz", "23421324")
End Sub
Step 8:
Then, lets add a button on our project and insert this line of code by double clicking the button.
Dim dt As New DataTable
With dt
.Columns.Add("ID")
.Columns.Add("Name")
.Columns.Add("Address")
.Columns.Add("Contact Number")
End With
For Each dgr As DataGridViewRow In Me.DataGridView1.Rows
dt.Rows.Add(dgr.Cells(0).Value, dgr.Cells(1).Value, dgr.Cells(2).Value, dgr.Cells(3).Value)
Next

Dim reportDocument As CrystalDecisions.CrystalReports.Engine.ReportDocument
reportDocument = New CrystalReport1
reportDocument.SetDataSource(dt)
Form2.CrystalReportViewer1.ReportSource = reportDocument
Form2.ShowDialog()
Form2.Dispose()
IMPORTANT NOTE:
If error persists while running the system, go to your app.config, erase the whole line of code and add this line of code. If you don’t have an app.config on your project then go to your solution project, right-click and add new item. Select go to Common Items > General > Application Configuration File.
<?xml version="1.0" encoding="utf-8" ?>
<configuration>
<startup useLegacyV2RuntimeActivationPolicy="true">
<supportedRuntime version="v4.0" sku=".NETFramework,Version=v4.0"/>
</startup>
</configuration>
Congratulations! You successfully finished this tutorial and generate report from datagridview to crystal reports in vb.net!
RAR Extraction Password:
Password: luffypirates
For questions or any other concerns or thesis/capstone creation with documentation, you can contact me through the following:
E-Mail: ianlavapiez@gmail.com
Facebook: facebook.com/kirk.lavapiez
Contact No.: +639771069640
To download the project sample code, click here.
Ian Hero L. Lavapiez
BSIT Graduate
System Analyst and Developer
Related topic(s) that you may like:
Technology stack and requirements
To run this VB.NET project, you need the following on your development machine:
- Visual Studio 2019 or later. The free Community Edition is enough for building, debugging, and running the project.
- .NET Framework 4.7.2 or higher. Most Windows 10 and 11 systems have it preinstalled through Windows Update.
- MySQL Server 8.0 or MSSQL Express 2019. Choose whichever your capstone panel prefers; both work with VB.NET data adapters.
- MySQL Connector/NET or SqlClient library. Add via NuGet Package Manager inside Visual Studio.
- Crystal Reports (optional). Required only if the project generates printable reports; install the runtime redistributable.
Installing the source code
The download link contains a ZIP archive with the full solution. Extract and set up in five steps:
- Extract the archive to a folder outside Program Files (avoids permission issues).
- Open the .sln file in Visual Studio. It loads the full solution with all forms and modules.
- Restore NuGet packages. Right-click the solution then Restore NuGet Packages if prompted.
- Import the database. Locate the .sql file in the archive and import via phpMyAdmin (MySQL) or SQL Server Management Studio.
- Update the connection string in App.config or module code to match your local database name, user, and password.
How to use this project for your BSIT capstone
This VB.NET project maps cleanly to standard BSIT capstone documentation. Suggested chapter alignment:
- Chapter 1 (Introduction). Discuss the problem the system solves in real-world context. Cite Philippine business or academic use cases where a manual process could be replaced.
- Chapter 2 (Review of Related Literature). Compare this system’s features against 5-10 similar published projects. Cite journals like IJERT or IEEE Access for academic-standard sources.
- Chapter 3 (Methodology). Include Use Case Diagram, Data Flow Diagram, Entity Relationship Diagram, and Activity Diagram covering all major workflows in the system.
- Chapter 4 (Results and Discussion). Screenshot each module of the running system with a caption explaining what data it processes and which user role interacts with it.
- Chapter 5 (Conclusion and Recommendations). Identify features that could be added in a Version 2, such as web dashboard, mobile app, or REST API export.
Modules typical of Generate Report from DataGridView to Crystal Reports
- Master data. CRUD forms for the primary entities the system manages, with search and filter.
- Transaction processing. Data entry forms for the day-to-day operations the system automates.
- Reports. Formatted printable output summarizing activity per day, per user, or per category.
- User management. Login with role-based permissions (Admin, Encoder, Viewer).
- Backup and restore. Export database to a .sql or .bak file and restore when needed.
Common enhancements for capstone review
- Modernize the UI. Add Bunifu or Guna UI controls for a more polished, modern appearance.
- Add printable receipts. Integrate a printer preview form with page-setup options.
- Multi-user concurrency. Ensure the database handles simultaneous writes without lost-update errors.
- Web version. Rewrite the front-end in ASP.NET Core or React for a modern deployment path.
Official documentation
Frequently Asked Questions
How does this VB.NET DataGridView example work?
Demonstrates binding a DataGridView to a DataTable or SQL Server source via ADO.NET. Common patterns: filter rows, edit cells with validation, export to Excel via interop, custom column formatting, search.
What Visual Studio and SQL Server versions does this VB.NET project require?
Most projects use VB.NET WinForms on .NET Framework 4.5+ with SQL Server 2012 Express or higher. To run: install Visual Studio 2019 / 2022 (Community is free) with the ‘Desktop development with .NET’ workload, install SQL Server Express + SSMS, open the .sln file, build, run.
How do I set up the database for this VB.NET project?
Open SQL Server Management Studio (SSMS) and connect to your SQL Server (e.g. localhost\SQLEXPRESS). Right-click Databases, choose Restore Database OR New Database then import the included .sql script. Update the connection string in App.config (or in code-behind Module) with your server name + credentials. Rebuild and run.
Can I use this VB.NET project for a BSIT capstone or thesis?
Yes, VB.NET is one of the most accepted languages by Philippine BSIT panels. Extend it: add role-based access (admin/staff/customer login redirect), Crystal Reports or RDLC reports, dashboards with Chart control, audit log, multi-branch support. Pair with Chapter 1-5 documentation matching your panel’s rubric.
Why am I getting ‘connection error’ or ‘cannot find SQL Server’?
Three common VB.NET issues: (1) Connection error: SQL Server isn’t running. Open SQL Server Configuration Manager and verify SQL Server (SQLEXPRESS) service is started. (2) Wrong server name in connection string. Try .\SQLEXPRESS, (local)\SQLEXPRESS, or your machine name. (3) Login failed: SQL Server is set to ‘Windows-only’ authentication. Switch to Mixed Mode in SSMS Server Properties, Security.
Where can I find more VB.NET projects with source code?
Browse the VB.NET Projects hub for the full library. For C# WinForms alternatives see C# Projects. For ASP.NET web alternatives see ASP.NET Projects. For BSIT capstone idea lists see 150 Best Capstone Project Ideas.