
Real-Time Left Eye Detection OpenCV Python With Source Code
The Real-Time Left Eye Detection OpenCV Python was developed using Python OpenCV, In this article the system can detect the eye of a human in real-time using a web camera.
A Left Eye Detection OpenCV Python’s most successful application of eye detection would probably be photo taking.
When you take a photo of your friends, the eye detection algorithm built into your digital camera detects where the eyes are and adjusts the focus accordingly.
This Code Project also includes a downloadable Project With Source Code for free, just find the downloadable source code below and click to start downloading.
By the way, if you are new to Python programming and don’t know what Python IDE to use, I have here a list of the Best Python IDE for Windows, Linux, and Mac OS that will suit you.
I also have here How to Download and Install the Latest Version of Python on Windows.
To start executing Left Eye Detection OpenCV Python With Source Code, make sure that you have installed Python 3.9 and PyCharm on your computer.
Real-Time Left Eye Detection OpenCV Python With Source Code: Steps on how to run the project
Time needed: 5 minutes
These are the steps on how to run Real-Time Left Eye Detection OpenCV Python With Source Code
- Step 1: Download the given source code below.
First, download the given source code below and unzip the source code.

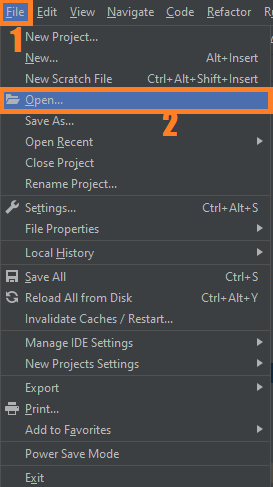
- Step 2: Import the project to your PyCharm IDE.
Next, import the source code you’ve downloaded to your PyCharm IDE.

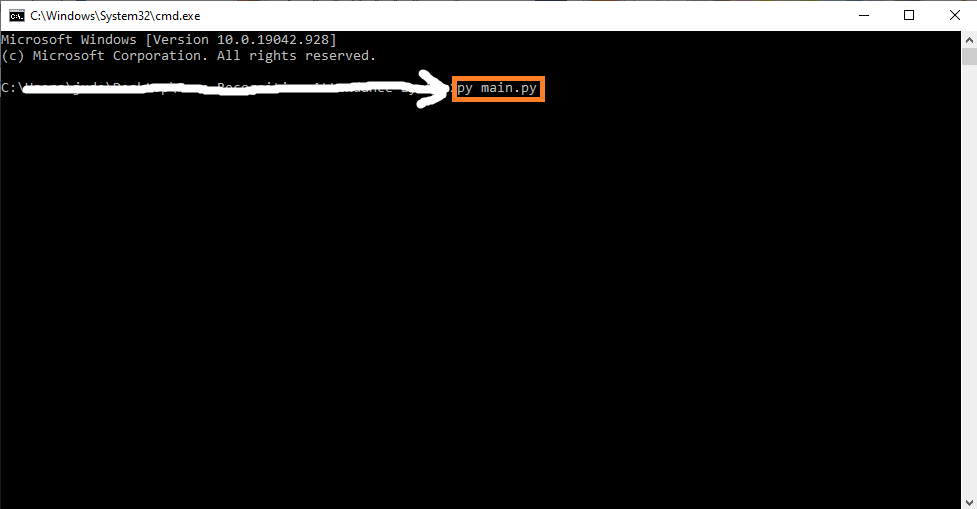
- Step 3: Run the project.
Lastly, run the project with the command “py main.py”


Installed Libraries
import cv2
Complete Source Code
import cv2

# Load the cascade
face_cascade = cv2.CascadeClassifier('haarcascade_lefteye_2splits.xml')
# To capture video from webcam.
cap = cv2.VideoCapture(0)
# To use a video file as input
# cap = cv2.VideoCapture('filename.mp4')
while True:
    # Read the frame
    _, img = cap.read()
    # Convert to grayscale
    gray = cv2.cvtColor(img, cv2.COLOR_BGR2GRAY)
    # Detect the faces
    faces = face_cascade.detectMultiScale(gray, 1.1, 4)
    # Draw the rectangle around each face
    for (x, y, w, h) in faces:
        cv2.rectangle(img, (x, y), (x + w, y + h), (255, 0, 0), 2)
    # Display
    cv2.imshow('img', img)
    # Stop if escape key is pressed
    k = cv2.waitKey(30) & 0xff
    if k == 27:
        break
# Release the VideoCapture object
cap.release()
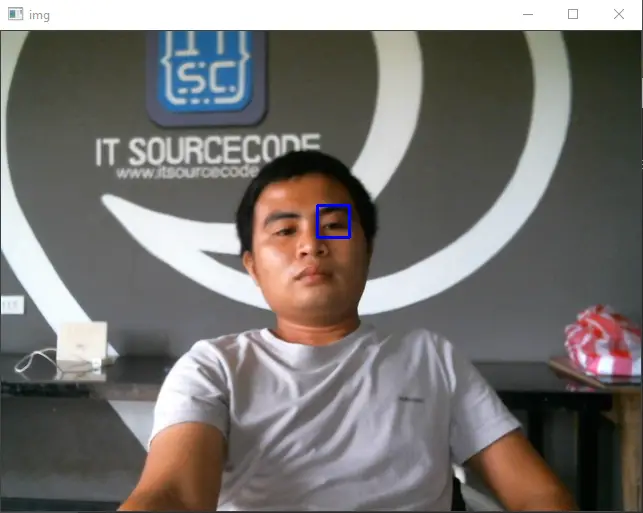
Output:
Download the Source Code below
Summary
In this article, Left Eye Detection OpenCV Python’s most successful application of eye detection would probably be photo taking.
When you take a photo of your friends, the eye detection algorithm built into your digital camera detects where the eyes are and adjusts the focus accordingly.
Related Articles
- Code For Game in Python: Python Game Projects With Source Code
- Best Python Projects With Source Code FREE DOWNLOAD
- How to Make a Point of Sale In Python With Source Code
- Python Code For Food Ordering System | FREE DOWNLOAD
- Inventory Management System Project in Python With Source Code
Inquiries
If you have any questions or suggestions about Real-Time Left Eye Detection OpenCV Python With Source Code, please feel free to leave a comment below.
Technology stack and requirements
To run this Python project on your development machine, you need:
- Python 3.10 or higher. Download from python.org or install via Anaconda if you prefer bundled packages.
- pip package manager. Comes with Python. Used to install project dependencies from requirements.txt.
- Virtual environment. Use venv or conda to isolate project dependencies from your global Python install.
- VS Code or PyCharm. Free code editors with Python syntax highlighting, IntelliSense, and debugging.
- Git. For version control and cloning source code repositories.
Installing the source code
- Download or clone the repository. Get the ZIP archive from the download link on this page and extract it.
- Create a virtual environment. Open a terminal in the project folder and run: python -m venv venv, then activate it (venv\Scripts\activate on Windows or source venv/bin/activate on Mac/Linux).
- Install dependencies. Run pip install -r requirements.txt to install all libraries the project needs.
- Configure environment variables. If the project uses API keys (OpenAI, Anthropic, database), create a .env file and set the required keys.
- Run the project. Follow the run command in the README (usually python main.py or streamlit run app.py).
Using this project for your BSIT capstone
- Chapter 1 (Introduction). Discuss the real-world problem this system solves. Cite Philippine or international use cases where the manual process could be automated.
- Chapter 2 (RRL). Compare your project against 5-10 similar published works. Cite ACM, IEEE, or arXiv papers for academic-standard sources.
- Chapter 3 (Methodology). Document the model architecture, training data, hyperparameters, and evaluation metrics used.
- Chapter 4 (Results). Report accuracy, precision, recall, F1-score, and confusion matrix. Screenshot the running app on real inputs.
- Chapter 5 (Conclusion). Identify features for Version 2: better model, larger dataset, mobile deployment, or REST API.
Modules typical of Real-Time Left Eye Detection OpenCV Python
- Image dataset preparation. Train/val/test split, augmentation (rotation, flip, brightness).
- Model architecture. Pre-trained CNN (ResNet, EfficientNet) fine-tuned on your dataset.
- Training loop. PyTorch or TensorFlow/Keras training with early stopping and checkpoints.
- Evaluation. Confusion matrix, precision, recall, and per-class F1 scores.
- Inference API. FastAPI endpoint accepting image uploads and returning predictions.
- Web or mobile demo. Streamlit or React front-end for user interaction.
Common enhancements for capstone review
- Grad-CAM visualization. Show which pixels the model focused on when making a prediction.
- Data augmentation. Increase training data variety with imgaug or Albumentations library.
- Transfer learning benchmark. Compare training-from-scratch vs fine-tuning pre-trained models.
- Model quantization. Convert to TensorFlow Lite for mobile deployment.
Official documentation
Frequently Asked Questions
How does real-time eye detection work in OpenCV?
Detect the face first with haarcascade_frontalface_default.xml, then run haarcascade_eye.xml (or the left/right specific xml files) within the face ROI. Restricting eye search to the face region is much faster and more accurate than scanning the full frame. The same pattern extends to nose and mouth detection with their respective Haar cascades shipped with OpenCV.
What Python and library versions do I need?
Python 3.10, 3.11, or 3.12 (avoid 3.13 until all DL wheels catch up). Install with: pip install opencv-python numpy. For deep learning models add: tensorflow keras (CPU build is fine for most demos), torch torchvision (PyTorch alternative), mediapipe (for face/hand/pose). Some projects also need: pytesseract for OCR, pyzbar for barcode, dlib for legacy face-landmark predictor.
Do I need a GPU to run this deep learning project?
For inference on a pretrained model: no, CPU runs at 10-30 FPS for most computer-vision tasks. For TRAINING a custom model: GPU strongly recommended (CPU works but slow). Free GPU options for training: Google Colab Free (12-hour sessions, sufficient for most BSIT capstones), Kaggle Notebooks Free. Buying a $1000+ GPU just for capstone is overkill.
Can I use this deep learning project for a BSIT or CSE capstone?
Yes, but extend it. A single OpenCV deep-learning demo (face detection, object detection alone) is too narrow for full capstone scope. Combine with a real domain wrapper: an attendance system using face recognition, a traffic monitoring system using vehicle detection, a wildlife camera using object detection, a driver-monitoring app using drowsiness detection. Add database logging, simple UI, and Chapter 1-5 manuscript.
Why does my model give wrong predictions or low accuracy?
Three most common causes: (1) Input preprocessing mismatch: the model expects 224×224 RGB normalized to [0,1] or [-1,1]; using BGR (OpenCV default) or wrong size produces garbage. (2) Insufficient training data: if you trained your own model on under 1,000 samples per class, accuracy plateaus low. Augment with cv2.flip, rotate, brightness shifts. (3) Lighting and angle drift between training and live use: train on data that matches the deployment environment.
Where can I find more deep learning project ideas with source code?
Browse our Deep Learning Projects hub for 19+ vision demos. For broader AI / ML / RAG / NLP capstones see 100+ AI Capstone Project Ideas. For pure ML (no deep learning) see Machine Learning Projects.

Angel Jude Suarez
Full-Stack Developer at PIES IT Solution
Focuses on Python development, machine learning, and AI integration. Has built production AI systems including OpenAI Whisper integration for medical transcription and GPT-4o-powered diagnosis assistance. Strong background in pandas, scikit-learn, and TensorFlow.
Expertise: Python · PHP · Java · VB.NET · ASP.NET · Machine Learning · AI Integration · OpenCV · Django · CodeIgniter
· View all posts by Angel Jude Suarez →