Leave Management System Project in Python with Source Code
The Leave Management System Project in Python is design using tkinter and graphical user interface(GUI). This Leave Management System is a desktop application developed using Python Programming Language and SQLite3 Database.
This Leave Management System is totally built at admin side and thus only the admin is guaranteed the access. Also, We have Leave Management System PHP Source Code .
It manages all the information about the employee and leave type. Employee can apply for leaves and see if they are approved by manager.
The Database used in this project is SQLite3, In this tutorial, I will teach you on how to create Leave Management System Project in Python with Source Code.
This Leave Management System Project in Python Tutorial is free to download the open source code. And it has a Complete Source Code and features in a PHP version.
Before you start creating this Leave Management System Project in Python with Source Code., make sure that you have PyCharm IDE and SQLite3 installed in your computer.
By the way if you are new to python programming and you don’t know what would be the the Python IDE to use, I have here a list of Best Python IDE for Windows, Linux, Mac OS that will suit for you. I also have here How to Download and Install Latest Version of Python on Windows.
This are the steps on how to create Leave Management System Project in Python.
Leave Management System Project in Python with Source Code
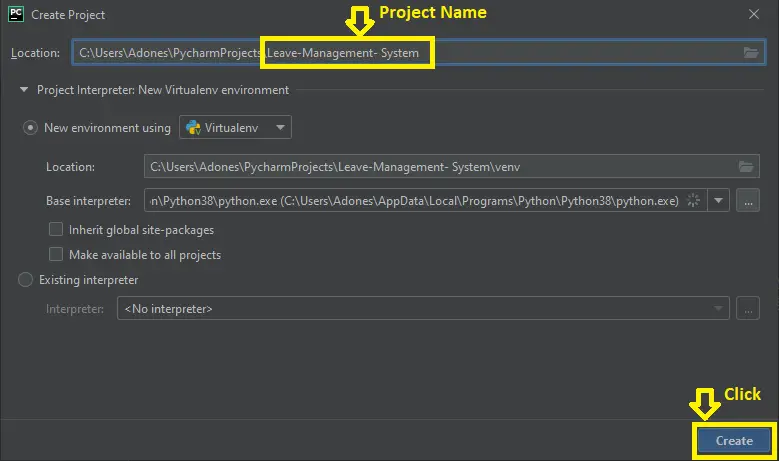
- Step 1: Create a project name
First when you finished installed the Pycharm IDE in your computer, open it and then create a “project name” after creating a project name click the “create” button.

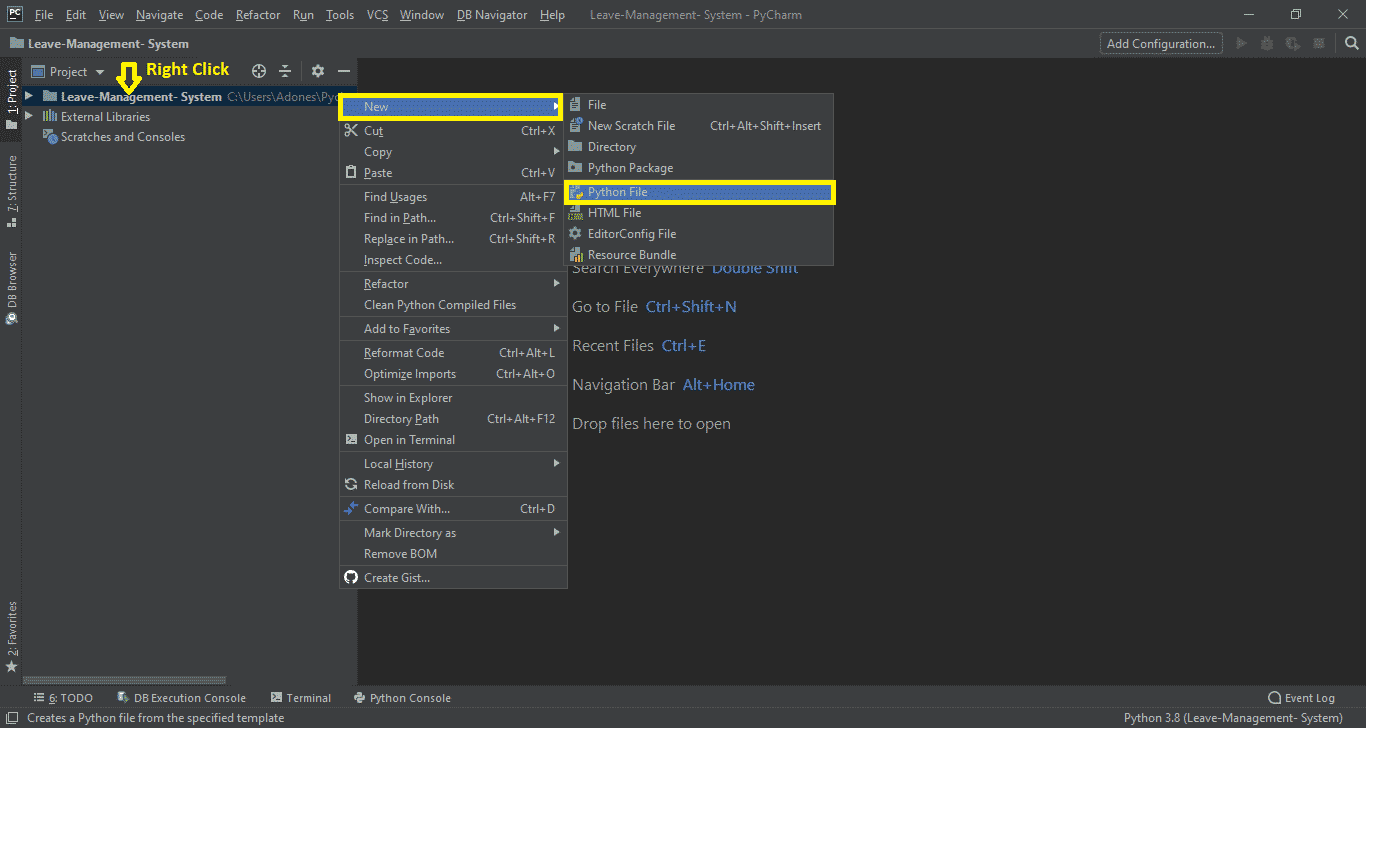
- Step 2: Create a python file.
Second after creating a project name, “right click” your project name and then click “new” after that click the “python file“.

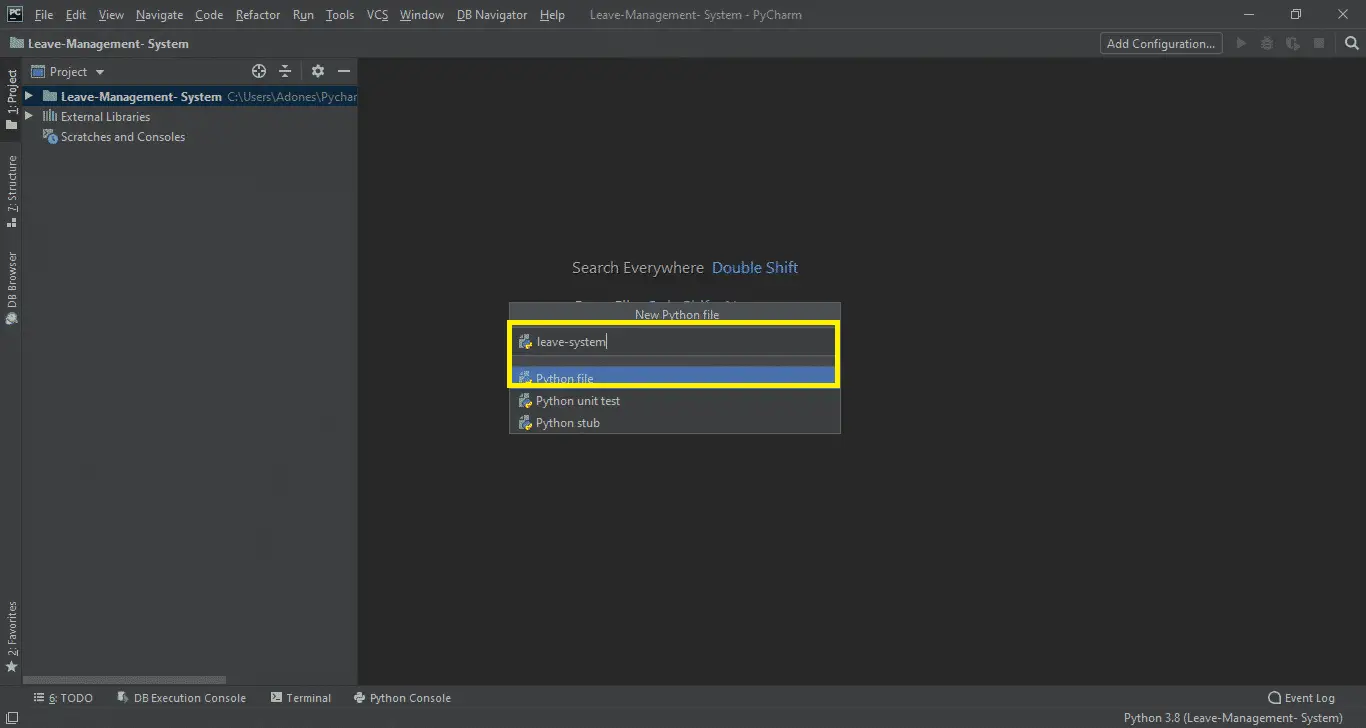
- Step 3: Name your python file.
Third after creating a python file, Name your python file after that click “enter“.

- Step 4: The actual code.
This is the actual coding on how to create Leave Management System Project in Python, and you are free to copy this code and download the full source code given below.
Importing Tkinter Module
Tkinter is the standard GUI library for Python. Python when combined with Tkinter provides a fast and easy way to create GUI applications.
import tkinter
import tkinter.messagebox as tk
from tkinter.font import Font
In the code above, which is for importing tkinter just write 3 line of code.
Importing the Sqlite3 Module
SQLite is a C library that provides a lightweight disk-based database that doesn’t require a separate server process and allows accessing the database using a nonstandard variant of the SQL query language. (Leave Management System Project in Python)
import sqlite3
In the code above, which is for importing sqlite just write one line of code.
Module for the Database
conn = sqlite3.connect('leaveDb.db')
cur = conn.cursor()

conn.execute("CREATE TABLE balance (employee_id text,sickleave int,maternityleave int,emergencyleave int)")
conn.execute("CREATE TABLE status (leave_id int,employee_id text,leave text,Date1 text,Date2 text,days int,status text)")
conn.execute('''CREATE TABLE employee (employee_id text,Name text,ContactNumber text,Password text)''')
In the code above, which is for the creating a database name “leavedb.db” and have 3 tables created. This are the “balance“, “status” and “employee“.
Module for the Admin Login
def AdminLogin():
message = "Enter Username and Password"
title = "Admin Login"
fieldnames = ["Username", "Password"]
field = []
field = multpasswordbox(message, title, fieldnames)
if field[0] == 'admin' and field[1] == 'admin':
tkinter.messagebox.showinfo("Admin Login", "Login Successfully")
adminwindow()
else:
tk.showerror("Error info", "Incorrect username or password")
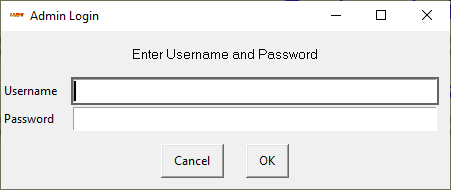
In the code above, which is for the admin login design window screen. The display screen have a level of username and password, and for the buttons have only two cancel and ok.
Then the title which is Admin Login, If the username and password is correct the popup message will appear login successfully while if it is wrong the popup message will appear incorrect username or password.(Leave Management System Project in Python)
You can also minimize or maximize the design of main screen window as in line with your choice and make it extra attractive.
When the above code is executed, let’s see the output of this code.
Module for the Employee Login
def EmployeeLogin():
message = "Enter Employee ID and Password"
title = "Employee Login"
fieldnames = ["Employee ID", "Password"]
field = []
field = multpasswordbox(message, title, fieldnames)

for row in conn.execute('SELECT * FROM employee'):
if field[0] == row[0] and field[1] == row[3]:
global login
login = field[0]
f = 1
print("Success")
tkinter.messagebox.showinfo("Employee Login", "Login Successfully")
EmployeeLoginWindow()
break
if not f:
print("Invalid")
tk.showerror("Error info", "Incorrect employee id or password")
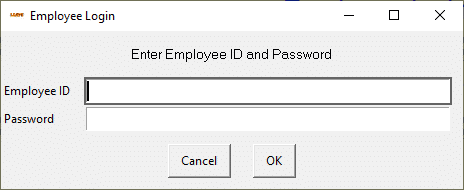
In the code above, which is for the employee login design window screen. The display screen have a level of employee id and password, and for the buttons have only two cancel and ok.
Then the title which is Employee Login, If the employee id and password is correct the popup message will appear login successfully while if it is wrong the popup message will appear incorrect employee id or password.(Leave Management System Project in Python)
You can also minimize or maximize the design of main screen window as in line with your choice and make it extra attractive.
When the above code is executed, let’s see the output of this code.
Module for the Employee Registration
def registration():
message = "Enter Details of Employee"
title = "Registration"
fieldNames = ["Employee ID", "Name", "Contact Number", "Password"]
fieldValues = []
fieldValues = multpasswordbox(message, title, fieldNames)
while 1:
if fieldValues == None: break
errmsg = ""
for i in range(len(fieldNames)):
if fieldValues[i].strip() == "":
errmsg = errmsg + ('"%s" is a required field.\n\n' % fieldNames[i])

if errmsg == "": break
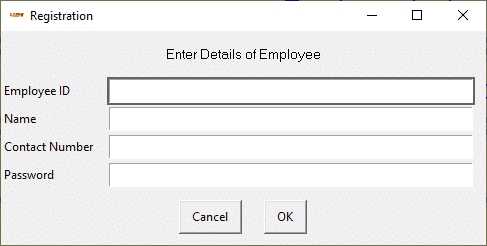
In the code above, which is for the employee registration design window screen. The display screen have a level of employee id, name, contact number and password, and for the buttons have only two cancel and ok.
You can also minimize or maximize the design of main screen window as in line with your choice and make it extra attractive.
When the above code is executed, let’s see the output of this code.
Module for the Design Main Screen Window
root = Tk()
root.wm_attributes('-fullscreen', '1')
root.title("Leave Management System")
root.iconbitmap(default='leavelogo.ico')
filename = PhotoImage(file="background.gif")
background_label = Label(root, image=filename)
background_label.place(x=0, y=0, relwidth=1, relheight=1)
BtnFont = Font(family='Calibri(Body)', size=20)
MainLabel = Label(root, text="Leave Management System", bd=12, relief=GROOVE, fg="White", bg="blue",
font=("Calibri", 36, "bold"), pady=3)
MainLabel.pack(fill=X)
im = PhotoImage(file='login.gif')

AdminLgnBtn = Button(root, text='Admin login', bd=12, relief=GROOVE, fg="blue", bg="#ffffb3",
font=("Calibri", 36, "bold"), pady=3, command=AdminLogin)
AdminLgnBtn['font'] = BtnFont
AdminLgnBtn.pack(fill=X)


LoginBtn = Button(root, text='Employee login', bd=12, relief=GROOVE, fg="blue", bg="#ffffb3",
font=("Calibri", 36, "bold"), pady=3, command=EmployeeLogin)
LoginBtn['font'] = BtnFont
LoginBtn.pack(fill=X)


EmployeeRegistration = Button(root, text='Employee registration', command=registration, bd=12, relief=GROOVE, fg="blue", bg="#ffffb3",
font=("Calibri", 36, "bold"), pady=3)
EmployeeRegistration['font'] = BtnFont
EmployeeRegistration.pack(fill=X)

ExitBtn = Button(root, text='Exit', command=root.destroy, bd=12, relief=GROOVE, fg="red", bg="#ffffb3",
font=("Calibri", 36, "bold"), pady=3)
ExitBtn['font'] = BtnFont
ExitBtn.pack(fill=X)
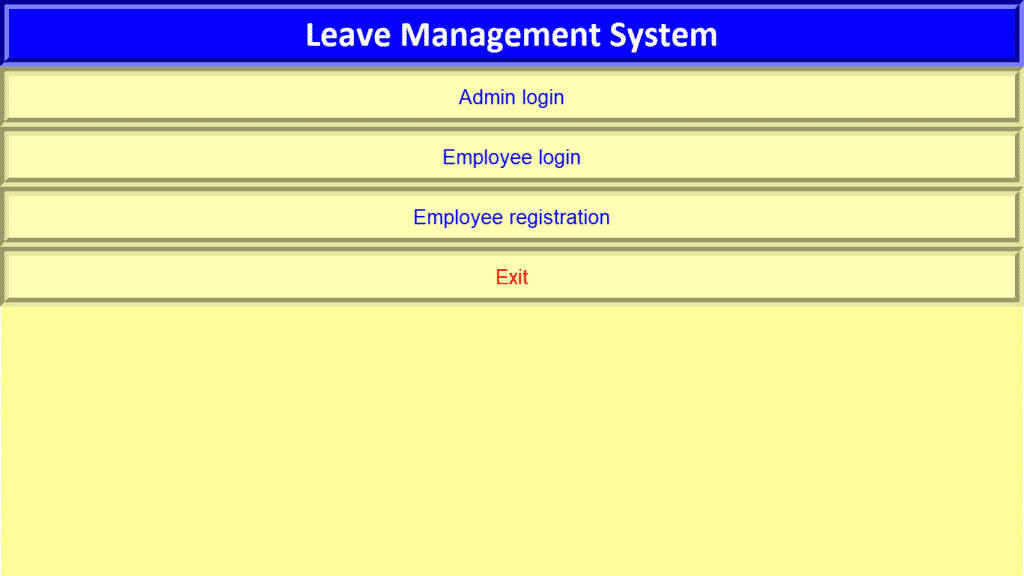
In the code above , which is first of all you have to design the main screen window. This display screen have a buttons of admin login, employee login, employee registration and exit. Then the background image and the title.(Leave Management System Project in Python)
When the above code is executed, let’s see the output of this code.
Module for the Design of Admin Window
def adminwindow():
# Manager login window after successful login
adminmainwindow = Toplevel()
adminmainwindow.wm_attributes('-fullscreen', '1')
Background_Label = Label(adminmainwindow, image=filename)

Background_Label.place(x=0, y=0, relwidth=1, relheight=1)
informationEmployee = Button(adminmainwindow, text='All Employee information', command=EmployeeAllInformationWindow, bd=12, relief=GROOVE, fg="blue", bg="#ffffb3",
font=("Calibri", 36, "bold"), pady=3)
informationEmployee['font'] = BtnFont
informationEmployee.pack(fill=X)


LeaveListButton = Button(adminmainwindow, text='Leave approval list', command=leavelist, bd=12, relief=GROOVE, fg="blue", bg="#ffffb3",
font=("Calibri", 36, "bold"), pady=3)
LeaveListButton['font'] = BtnFont
LeaveListButton.pack(fill=X)

ApprovalButton = Button(adminmainwindow, text='Approve leave', command=LeaveApproval, bd=12, relief=GROOVE, fg="blue", bg="#ffffb3",
font=("Calibri", 36, "bold"), pady=3)
ApprovalButton['font'] = BtnFont
ApprovalButton.pack(fill=X)

LogoutBtn = Button(adminmainwindow, text='Logout', command=adminmainwindow.destroy, bd=12, relief=GROOVE, fg="red",
bg="#ffffb3",
font=("Calibri", 36, "bold"), pady=3)
LogoutBtn['font'] = BtnFont
LogoutBtn.pack(fill=X)
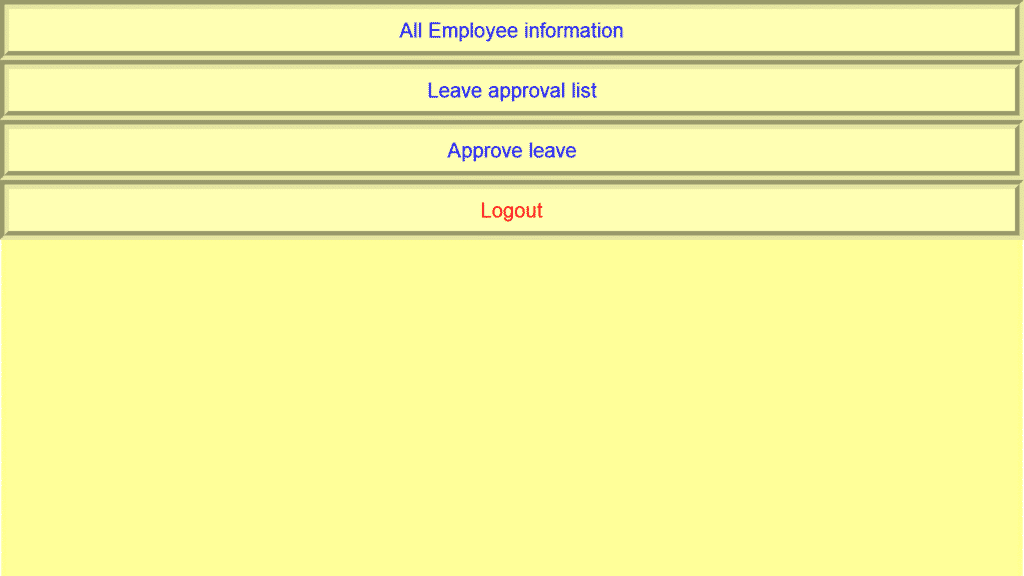
In the code above , which is first of all you have to design the admin window. This display screen have a buttons of all employee information, leave approval list, approve leave and logout.(Leave Management System Project in Python)
When the above code is executed, let’s see the output of this code.
Module Design for the Employee Window
def EmployeeLoginWindow():
# employee login window after successful login
global LoginWindow
LoginWindow = Toplevel()
LoginWindow.wm_attributes('-fullscreen', '1')
Background_Label = Label(LoginWindow, image=filename)
Background_Label.place(x=0, y=0, relwidth=1, relheight=1)

informationEmployee = Button(LoginWindow, text='Employee information', command=EmployeeInformationWindow, bd=12, relief=GROOVE, fg="blue", bg="#ffffb3",
font=("Calibri", 36, "bold"), pady=3)
informationEmployee['font'] = BtnFont
informationEmployee.pack(fill=X)

submit = Button(LoginWindow, text='Submit Leave', command=apply, bd=12, relief=GROOVE, fg="blue", bg="#ffffb3",
font=("Calibri", 36, "bold"), pady=3)
submit['font'] = BtnFont
submit.pack(fill=X)

LeaveBalance = Button(LoginWindow, text='Leave Balance', command=balance, bd=12, relief=GROOVE, fg="blue", bg="#ffffb3",
font=("Calibri", 36, "bold"), pady=3)
LeaveBalance['font'] = BtnFont
LeaveBalance.pack(fill=X)

LeaveApplicationStatus = Button(LoginWindow, text='Last leave status', command=EmployeeLeaveStatus, bd=12, relief=GROOVE, fg="blue", bg="#ffffb3",
font=("Calibri", 36, "bold"), pady=3)
LeaveApplicationStatus['font'] = BtnFont
LeaveApplicationStatus.pack(fill=X)

AllLeaveStatus = Button(LoginWindow, text='All leave status', command=EmployeeAllStatus, bd=12, relief=GROOVE, fg="blue", bg="#ffffb3",
font=("Calibri", 36, "bold"), pady=3)
AllLeaveStatus['font'] = BtnFont
AllLeaveStatus.pack(fill=X)


LogoutBtn = Button(LoginWindow, text='Logout', bd=12, relief=GROOVE, fg="red", bg="#ffffb3",
font=("Calibri", 36, "bold"), pady=3, command=Employeelogout)
LogoutBtn['font'] = BtnFont
LogoutBtn.pack(fill=X)
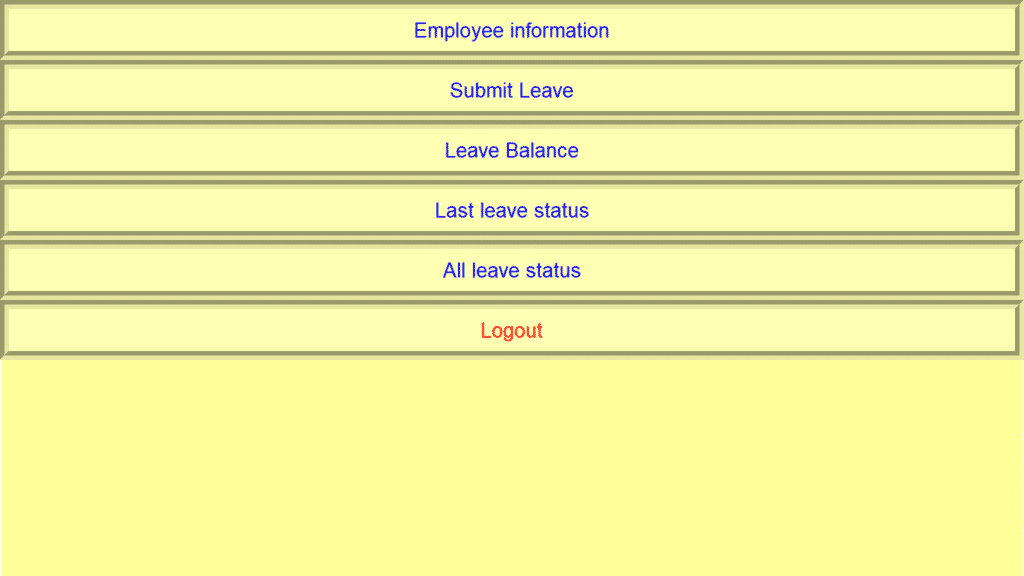
In the code above , which is first of all you have to design the employee window. This display screen have a buttons of employee information, submit leave, leave balance, last leave status, all leave status and logout.(Leave Management System Project in Python)
When the above code is executed, let’s see the output of this code
Complete Source Code of Leave Management System Project in Python
import sqlite3
import tkinter
import tkinter.messagebox as tk
from tkinter.font import Font
from easygui import *
from tkinter import *
from turtle import *
import random

conn = sqlite3.connect('leaveDb.db')
cur = conn.cursor()


#conn.execute("CREATE TABLE balance (employee_id text,sickleave int,maternityleave int,emergencyleave int)")
#conn.execute("CREATE TABLE status (leave_id int,employee_id text,leave text,Date1 text,Date2 text,days int,status text)")
#conn.execute('''CREATE TABLE employee (employee_id text,Name text,ContactNumber text,Password text)''')

def AdminLogin():
message = "Enter Username and Password"
title = "Admin Login"
fieldnames = ["Username", "Password"]
field = []
field = multpasswordbox(message, title, fieldnames)
if field[0] == 'admin' and field[1] == 'admin':
tkinter.messagebox.showinfo("Admin Login", "Login Successfully")
adminwindow()
else:
tk.showerror("Error info", "Incorrect username or password")


def EmployeeLogin():
message = "Enter Employee ID and Password"
title = "Employee Login"
fieldnames = ["Employee ID", "Password"]
field = []
field = multpasswordbox(message, title, fieldnames)

for row in conn.execute('SELECT * FROM employee'):
if field[0] == row[0] and field[1] == row[3]:
global login
login = field[0]
f = 1
print("Success")
tkinter.messagebox.showinfo("Employee Login", "Login Successfully")
EmployeeLoginWindow()
break
if not f:
print("Invalid")
tk.showerror("Error info", "Incorrect employee id or password")

def Employeelogout():
global login
login = -1
LoginWindow.destroy()


def EmployeeLeaveStatus():
global leaveStatus
leaveStatus = []
for i in conn.execute('SELECT * FROM status where employee_id=?', login):
leaveStatus = i

WindowStatus()


def EmployeeAllStatus():
allStatus = Toplevel()
txt = Text(allStatus)
for i in conn.execute('SELECT * FROM status where employee_id=?', login):
txt.insert(INSERT, i)
txt.insert(INSERT, '\n')

txt.pack()


def EmployeeInformationWindow():
employeeInformation = Toplevel()
txt = Text(employeeInformation)
for i in conn.execute('SELECT employee_id,Name,ContactNumber FROM employee where employee_id=?', login):
txt.insert(INSERT, i)
txt.insert(INSERT, '\n')

txt.pack()


def EmployeeAllInformationWindow():
allEmployeeInformation = Toplevel()
txt = Text(allEmployeeInformation)
for i in conn.execute('SELECT employee_id,Name,ContactNumber FROM employee'):
txt.insert(INSERT, i)
txt.insert(INSERT, '\n')

txt.pack()


def WindowStatus():
StatusWindow = Toplevel()
label_1 = Label(StatusWindow, text="Employee ID=", fg="blue", justify=LEFT, font=("Calibri", 16))
label_2 = Label(StatusWindow, text=leaveStatus[1], font=("Calibri", 16))
label_3 = Label(StatusWindow, text="Type=", fg="blue", font=("Calibri", 16), justify=LEFT)
label_4 = Label(StatusWindow, text=leaveStatus[2], font=("Calibri", 16))
label_5 = Label(StatusWindow, text="start=", fg="blue", font=("Calibri", 16), justify=LEFT)
label_6 = Label(StatusWindow, text=leaveStatus[3], font=("Calibri", 16))
label_7 = Label(StatusWindow, text="end=", fg="blue", font=("Calibri", 16), justify=LEFT)
label_8 = Label(StatusWindow, text=leaveStatus[4], font=("Calibri", 16))
label_9 = Label(StatusWindow, text="Status:", fg="blue", font=("Calibri", 16), justify=LEFT)
label_10 = Label(StatusWindow, text=leaveStatus[6], font=("Calibri", 16))
label_11 = Label(StatusWindow, text="leave_id:", fg="blue", font=("Calibri", 16), justify=LEFT)
label_12 = Label(StatusWindow, text=leaveStatus[0], font=("Calibri", 16))
label_11.grid(row=0, column=0)
label_12.grid(row=0, column=1)
label_1.grid(row=1, column=0)
label_2.grid(row=1, column=1)
label_3.grid(row=2, column=0)
label_4.grid(row=2, column=1)
label_5.grid(row=3, column=0)
label_6.grid(row=3, column=1)
label_7.grid(row=4, column=0)
label_8.grid(row=4, column=1)
label_9.grid(row=5, column=0)
label_10.grid(row=5, column=1)


def balance():
global login
check = (login,)
global balanced
balanced = []
for i in conn.execute('SELECT * FROM balance WHERE employee_id = ?', check):
balanced = i

WindowBalance()


def WindowBalance():
balanceWindow = Toplevel()
label_1 = Label(balanceWindow, text="Employee ID=", fg="blue", justify=LEFT, font=("Calibri", 16))
label_2 = Label(balanceWindow, text=balanced[0], font=("Calibri", 16))
label_3 = Label(balanceWindow, text="Sick Leave=", fg="blue", font=("Calibri", 16), justify=LEFT)
label_4 = Label(balanceWindow, text=balanced[1], font=("Calibri", 16))
label_5 = Label(balanceWindow, text="Maternity Leave=", fg="blue", font=("Calibri", 16), justify=LEFT)
label_6 = Label(balanceWindow, text=balanced[2], font=("Calibri", 16))
label_7 = Label(balanceWindow, text="Emergency Leave=", fg="blue", font=("Calibri", 16), justify=LEFT)
label_8 = Label(balanceWindow, text=balanced[3], font=("Calibri", 16))
label_1.grid(row=0, column=0)
label_2.grid(row=0, column=1)
label_3.grid(row=1, column=0)
label_4.grid(row=1, column=1)
label_5.grid(row=2, column=0)
label_6.grid(row=2, column=1)
label_7.grid(row=3, column=0)
label_8.grid(row=3, column=1)


def apply():
message = "Enter the following details "
title = "Leave Apply"
fieldNames = ["Employee ID", "From", "To", "days"]
fieldValues = []
fieldValues = multenterbox(message, title, fieldNames)
message1 = "Select type of leave"
title1 = "Type of leave"
choices = ["Sick leave", "Maternity leave", "Emergency leave"]
choice = choicebox(message1, title1, choices)
leaveid = random.randint(1, 1000)

conn.execute("INSERT INTO status(leave_id,employee_id,leave,Date1,Date2,days,status) VALUES (?,?,?,?,?,?,?)",
(leaveid, fieldValues[0], choice, fieldValues[1], fieldValues[2], fieldValues[3], "Pending"))
conn.commit()

def LeaveApproval():
message = "Enter leave_id"
title = "leave approval"
fieldNames = ["Leave_id"]
fieldValues = []
fieldValues = multenterbox(message, title, fieldNames)
message1 = "Approve/Deny"
title1 = "leave approval"
choices = ["approve", "deny"]
choice = choicebox(message1, title1, choices)

conn.execute("UPDATE status SET status = ? WHERE leave_id= ?", (choice, fieldValues[0]))
conn.commit()

if choice == 'approve':
print(0)
cur.execute("SELECT leave FROM status WHERE leave_id=?", (fieldValues[0],))
row = cur.fetchall()
col = row

for row in conn.execute("SELECT employee_id FROM status WHERE leave_id=?", (fieldValues[0],)):
print(2)
exampleId = row[0]

for row in conn.execute("SELECT days FROM status WHERE leave_id=?", (fieldValues[0],)):
print(2)
exampleDays = row[0]

for row in conn.execute("SELECT sickleave from balance where employee_id=?", (exampleId,)):
balance = row[0]
print(balance)

for row in conn.execute("SELECT maternityleave from balance where employee_id=?", (exampleId,)):
balance1 = row[0]
print(balance1)

for row in conn.execute("SELECT emergencyleave from balance where employee_id=?", (exampleId,)):
balance2 = row[0]
print(balance2)

if (col[0] == ('sickleave',)):
print(3)
conn.execute("UPDATE balance SET sickleave =? WHERE employee_id= ?", ((balance - exampleDays), (exampleId)))

if (col[0] == ('maternityleave',)):
print(3)
conn.execute("UPDATE balance SET maternityleave =? WHERE employee_id= ?", ((balance1 - exampleDays), (exampleId)))

if (col[0] == ('emergencyleave',)):
print(3)
conn.execute("UPDATE balance SET emergencyleave =? WHERE employee_id= ?", ((balance2 - exampleDays), (exampleId)))


def leavelist():
leavelistwindow = Toplevel()
txt = Text(leavelistwindow)
for i in conn.execute('SELECT * FROM status'):
txt.insert(INSERT, i)
txt.insert(INSERT, '\n')

txt.pack()


def registration():
message = "Enter Details of Employee"
title = "Registration"
fieldNames = ["Employee ID", "Name", "Contact Number", "Password"]
fieldValues = []
fieldValues = multpasswordbox(message, title, fieldNames)
while 1:
if fieldValues == None: break
errmsg = ""
for i in range(len(fieldNames)):
if fieldValues[i].strip() == "":
errmsg = errmsg + ('"%s" is a required field.\n\n' % fieldNames[i])

if errmsg == "": break


fieldValues = multpasswordbox(errmsg, title, fieldNames, fieldValues)
conn.execute("INSERT INTO employee(employee_id,Name,ContactNumber,Password) VALUES (?,?,?,?)",
(fieldValues[0], fieldValues[1], fieldValues[2], fieldValues[3]))
conn.execute("INSERT INTO balance(employee_id,sickleave,maternityleave,emergencyleave) VALUES (?,?,?,?)", (fieldValues[0], 12, 12, 50))
conn.commit()


def EmployeeLoginWindow():
# employee login window after successful login
global LoginWindow
LoginWindow = Toplevel()
LoginWindow.wm_attributes('-fullscreen', '1')
Background_Label = Label(LoginWindow, image=filename)
Background_Label.place(x=0, y=0, relwidth=1, relheight=1)

informationEmployee = Button(LoginWindow, text='Employee information', command=EmployeeInformationWindow, bd=12, relief=GROOVE, fg="blue", bg="#ffffb3",
font=("Calibri", 36, "bold"), pady=3)
informationEmployee['font'] = BtnFont
informationEmployee.pack(fill=X)

submit = Button(LoginWindow, text='Submit Leave', command=apply, bd=12, relief=GROOVE, fg="blue", bg="#ffffb3",
font=("Calibri", 36, "bold"), pady=3)
submit['font'] = BtnFont
submit.pack(fill=X)

LeaveBalance = Button(LoginWindow, text='Leave Balance', command=balance, bd=12, relief=GROOVE, fg="blue", bg="#ffffb3",
font=("Calibri", 36, "bold"), pady=3)
LeaveBalance['font'] = BtnFont
LeaveBalance.pack(fill=X)

LeaveApplicationStatus = Button(LoginWindow, text='Last leave status', command=EmployeeLeaveStatus, bd=12, relief=GROOVE, fg="blue", bg="#ffffb3",
font=("Calibri", 36, "bold"), pady=3)
LeaveApplicationStatus['font'] = BtnFont
LeaveApplicationStatus.pack(fill=X)

AllLeaveStatus = Button(LoginWindow, text='All leave status', command=EmployeeAllStatus, bd=12, relief=GROOVE, fg="blue", bg="#ffffb3",
font=("Calibri", 36, "bold"), pady=3)
AllLeaveStatus['font'] = BtnFont
AllLeaveStatus.pack(fill=X)


LogoutBtn = Button(LoginWindow, text='Logout', bd=12, relief=GROOVE, fg="red", bg="#ffffb3",
font=("Calibri", 36, "bold"), pady=3, command=Employeelogout)
LogoutBtn['font'] = BtnFont
LogoutBtn.pack(fill=X)

informationEmployee.pack()
submit.pack()
LeaveBalance.pack()
LeaveApplicationStatus.pack()
AllLeaveStatus.pack()
LogoutBtn.pack()
ExitBtn.pack()


def adminwindow():
adminmainwindow = Toplevel()
adminmainwindow.wm_attributes('-fullscreen', '1')
Background_Label = Label(adminmainwindow, image=filename)

Background_Label.place(x=0, y=0, relwidth=1, relheight=1)
informationEmployee = Button(adminmainwindow, text='All Employee information', command=EmployeeAllInformationWindow, bd=12, relief=GROOVE, fg="blue", bg="#ffffb3",
font=("Calibri", 36, "bold"), pady=3)
informationEmployee['font'] = BtnFont
informationEmployee.pack(fill=X)


LeaveListButton = Button(adminmainwindow, text='Leave approval list', command=leavelist, bd=12, relief=GROOVE, fg="blue", bg="#ffffb3",
font=("Calibri", 36, "bold"), pady=3)
LeaveListButton['font'] = BtnFont
LeaveListButton.pack(fill=X)

ApprovalButton = Button(adminmainwindow, text='Approve leave', command=LeaveApproval, bd=12, relief=GROOVE, fg="blue", bg="#ffffb3",
font=("Calibri", 36, "bold"), pady=3)
ApprovalButton['font'] = BtnFont
ApprovalButton.pack(fill=X)

LogoutBtn = Button(adminmainwindow, text='Logout', command=adminmainwindow.destroy, bd=12, relief=GROOVE, fg="red",
bg="#ffffb3",
font=("Calibri", 36, "bold"), pady=3)
LogoutBtn['font'] = BtnFont
LogoutBtn.pack(fill=X)

informationEmployee.pack()
LeaveListButton.pack()
ApprovalButton.pack()
ExitBtn.pack()


root = Tk()
root.wm_attributes('-fullscreen', '1')
root.title("Leave Management System")
root.iconbitmap(default='leavelogo.ico')
filename = PhotoImage(file="background.gif")
background_label = Label(root, image=filename)
background_label.place(x=0, y=0, relwidth=1, relheight=1)
BtnFont = Font(family='Calibri(Body)', size=20)
MainLabel = Label(root, text="Leave Management System", bd=12, relief=GROOVE, fg="White", bg="blue",
font=("Calibri", 36, "bold"), pady=3)
MainLabel.pack(fill=X)
im = PhotoImage(file='login.gif')

AdminLgnBtn = Button(root, text='Admin login', bd=12, relief=GROOVE, fg="blue", bg="#ffffb3",
font=("Calibri", 36, "bold"), pady=3, command=AdminLogin)
AdminLgnBtn['font'] = BtnFont
AdminLgnBtn.pack(fill=X)


LoginBtn = Button(root, text='Employee login', bd=12, relief=GROOVE, fg="blue", bg="#ffffb3",
font=("Calibri", 36, "bold"), pady=3, command=EmployeeLogin)
LoginBtn['font'] = BtnFont
LoginBtn.pack(fill=X)


EmployeeRegistration = Button(root, text='Employee registration', command=registration, bd=12, relief=GROOVE, fg="blue", bg="#ffffb3",
font=("Calibri", 36, "bold"), pady=3)
EmployeeRegistration['font'] = BtnFont
EmployeeRegistration.pack(fill=X)

ExitBtn = Button(root, text='Exit', command=root.destroy, bd=12, relief=GROOVE, fg="red", bg="#ffffb3",
font=("Calibri", 36, "bold"), pady=3)
ExitBtn['font'] = BtnFont
ExitBtn.pack(fill=X)
MainLabel.pack()
AdminLgnBtn.pack()
LoginBtn.pack()
EmployeeRegistration.pack()
ExitBtn.pack()


root.mainloop()
How To Run The Leave Management System Project in Python with Source Code?
To run this project, you must have installed a Pycharm on your PC (for Windows). This Leave Management System Project in Python is for educational purposes only!
After downloading the project you must follow the steps below:
Step 1: Unzip the file or Extract the file
Step 2: Double click the leave-system
Step 3: Project is ready to run
Run Quick Virus Scan for secure Download
Run Quick Scan for safe DownloadDownloadable Source Code
I have here the list of Best Python Project with Source code free to download for free, I hope this can help you a lot.
Conclusion
In this Leave Management System Project in Python with Source Code is free to download. This project is good for the student who want to learn python programming because this project contains a Graphical User Interface (GUI) and a users friendly.
It is easy to understand and manipulate this project and use for education purpose only.
Related Articles
- Python MySQL UPDATE Query: Step-by-Step Guide in Python
- Bank Management System Project in Python With Source Code
- Python MySQL INSERT Query: Step by Step Guide in Python
- How To Make Game In Python With Source Code
- Complaint Management System Source Code In PHP
Inquiries
If you have any questions or suggestions about Leave Management System Project in Python with Source Code , please feel free to leave a comment below.


unable to download the source code
UnboundLocalError: local variable ‘f’ referenced before assignment
Aoa…plz provide Leave limit source code after apply leave show how many leaves are remaining in a person
from easygui import *
ModuleNotFoundError: No module named ‘easygui’
i am facing this issue plz reply
how can i get the tables balance,status,employee that created in database leavedb.db
Hi, I have read a lot from this blog thank you for sharing this information. We provide all the essential topics in Data Science Course In Chennai like, Full stack Developer, Python, AI and Machine Learning, Tableau, etc. for more information just log in to our website
Data science course in chennai
Thank you for the valuable information on the blog.
I am not an expert in blog writing, but I am reading your content slightly, increasing my confidence in how to give the information properly. Your presentation was also good, and I understood the information easily.
For more information, Pls visit the 1stepgrow website.