PHP Tutorial For Beginners With Examples
The primary purpose of this PHP Tutorial For Beginners With Examples is to help PHP Beginner or novice programmer to learn PHP programming. Through this PHP programming tutorial, you will be able to understand and apply the basics of PHP coding.
Topics in this PHP tutorial for programmers is only for beginners. If you want a few advanced lessons, you may start PHP MySQL Tutorials for beginners here.
Learning the PHP basics from this PHP tutorial will enable you to know how to learn PHP coding. PHP tutorial for beginners with examples is available in all lesson.

What is the Expectation after Completion of this PHP tutorial for beginners with example?
The readers are expected to understand the working model of PHP, and you can begin to design your PHP projects.
Readers may acquire a solid foundation in PHP. With this, will make you the best asset in your future clients or employers.
Take note! If you want to learn PHP quickly, you need to make sure to read all the lesson carefully. And you have to follow all the instructions given.
PHP tutorial for beginners: What Are PHP Requirements
To start with our PHP tutorial for beginners with example, we have to learn first about what are PHP Requirements. I will discuss here the necessary requirements you need to install in your computer system before you proceed in PHP programming.
This tutorial is vital especially to those who are new to web design and development. After you complete this article, it is expected that you have now a strong foundation of what are the PHP Requirments is necessary for PHP developers.
Anyway, in order for you to understand how PHP works in a web server, I will show you here a Sample Diagram of a PHP Operational Trail.
In the image above, you can see there that the basic requirements to start learning PHP is a Web serverinstalled in your computer as the basic requirements to run your PHP codes.
Next, in order for you to edit the PHP files you one of the basic requirements in learning PHP is a Text Editor.
If you are running in a Windows environment, you can use WAMP or XAMPP as your Web Server and for your Editor, you can choose either Notepad++ or Sublime Text.
XAMPP or WAMP Server is a free and opensource webserver solution package containing MySQL Database, PHP, and Perl programming languages and Apache HTTP Server.
Below is the example image of a XAMPP.

And here is the sample screenshot of the control panel using xampp, wherein you can see there that there’s running PHP and MySQL.

PHP tutorial for beginners: PHP Operational Trail
Before we further proceed in this PHP tutorial for beginners with example, It is necessary to have this concept in mind, so that your programming in PHP will be in lot more sense.
To proceed in our further discussion, we need to understand first what is the PHP operational trail. In this tutorial, you will be introduce about the operation of the web server to process the PHP script. But first, take a look at the diagram shown in figure 1.
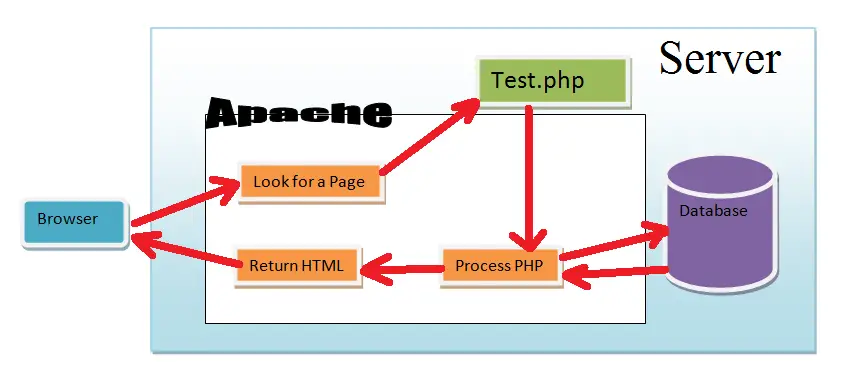
Figure 1. Operational Trail
All of the process shown in figure will happen when you ask the URL in your browser before get back your HTML return back to you. As you can see, we have there Browser, Web Server and Apache.
The diagram shows that the web browser will make a request to “find a page” and that page is located on the hard drive and in our diagram, we call it as “Test.php” and since it has a “.php” extension it tells the web browser to “process php” files and all the file that has a .php extension will be process by the web server.
If the process file contains operation on the database, then it will ask and receive data from the database. And finally, the server will then returns pure HTML code to the browser which the browser can easily understand.
PHP tutorial for beginners: PHP Syntax
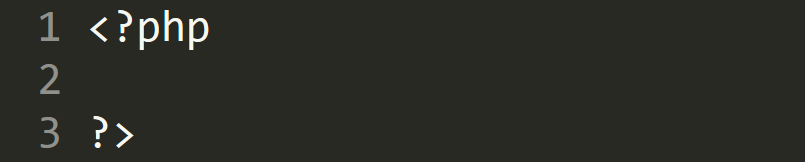
Before we proceed to code our PHP script, we need to understand first what is the syntax of coding a PHP script. A syntax is a rule that should be followed in order to write a properly structured code.
If you have a background in programming other programming languages such as Java, C, and Perl, you don’t have to worry more about the syntax, because their syntax is almost similar to PHP and only the difference is that the PHP code contains a Tag like as the given syntax below.
PHP Code:
For shorthand:
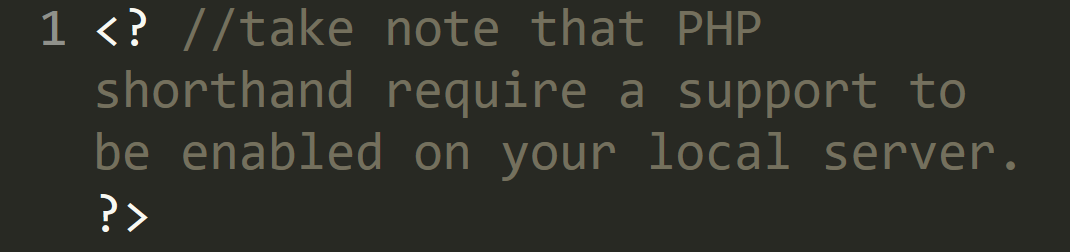
In my experience, I strongly suggest that you must use a standard PHP syntax that includes <?php over shorthand code. This is to make sure that your scripts will run on other servers with different settings.
Here is the example PHP page with simple HTML

Before running this page in your browser, you need to save this file with .php extension(sample.php). As you observe in our code above, we included they’re a PHP command“echo” which we are going to discuss this in the later part of our tutorial.
And just Java or C program, we need to add a semicolon at the end of our statement to signifies the end of the PHP statement.
Output:
PHP Programming is fun!
One of the best programming practice is using a Comment. A comment is a string code or text within PHP or any programming languages that is not visible during the execution in your web browser.
And it provides the feedback to the developers or it temporarily disable the code and the most important thing is that comment serves to give some information about the code.
In PHP, there are two types of Comment. The Single line comment and the Multiple line comment.
PHP comment syntax: Using Single Line Comment
The single line comment only ignores everything to the end of the line or the current block of PHP code. To make a single line comment, you can simply type “//” or “#” and all text right will be disabled by the PHP interpreter.
Example:

Output:
This is a test sample
PHP comment syntax: Using Multiple line comment
The multiple line comment used to comment large block of code. The multiple line comment in PHP starts with “
echo ‘This is a sample’; ?>
Output:
This is a test sample
This tutorial is all about PHP echo.
The echo command in PHP is used to output the text in the web browser. And echo is not a function, but it is a language construct. Meaning you don’t need to use a parenthesis with it.
How to output a String?
In retrieving a string output in PHP, we use echo. We place a string variable or we can use quotes, like what we are going to do in this example.
The code below we output a “Hello everyone!”. And the text output is being sent to the user in a form of a web page and it is very important to use a proper HTML syntax.
In the second echo, we simply put the <h3> tag at the beginning and closed it at the end of the string. Because we are using PHP to make web pages.
PHP CODE
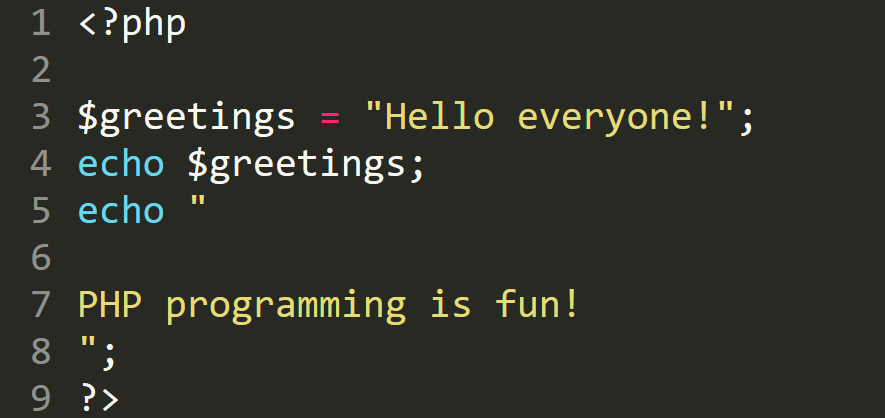
Display:
Hello everyone!
PHP programming is fun!
Echoing Variables
In echoing variables using PHP is very easy because there are no quotations are required even if the variable does not hold a string.
PHP CODE

Display:
I am Christian Ignacio am 21 Years old
PHP tutorial for beginners: PHP Variables
In PHP programming, variable plays a very important role wherein it allows you to store the value in a computer memory such storing some text like “PHP programming is fun” or even an integer value 8.
The declared variable can be used throughout your code without typing out the actual value over and over again.
Syntax:
$variable = specificvalue;
Take note!
In declaring PHP variable should begin with a dollar sign($) or else it will not work and it must start with letters and underscore only. Similar to other programming languages, PHP does not contain spaces.
PHP Variable is also a case-sensitive, so make use the proper naming convention. For example when using a variable. The variables $personand $Person are different variables in the eyes of PHP.
PHP Syntax
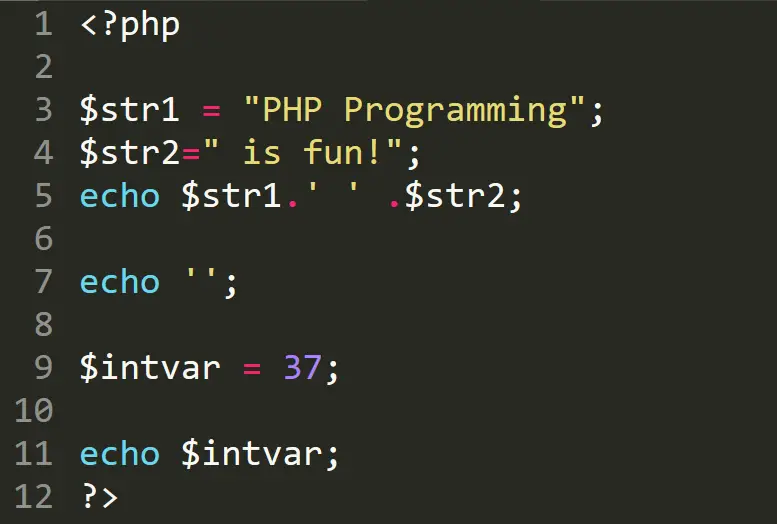
The code above will display the following.
Output:
PHP Programming is fun!
37
Same as the code above, the variables are not declared before you can use it. Take note that PHP does not require variables to be declared before being initialized.
PHP tutorial for beginners: PHP Constants
In this lesson of PHP Tutorial For Beginners With Examples, I’m going to show you another type of PHP the importance and to how to use the Constants. In PHP, a Constant is an identifier (name) from a simple value. As the value cannot be changed, unlike to variable.
A Constant name must start with a letter or underscore and no dollar sign before the constant name. And unlike variables, constants are automatically global across the entire script.
How to set Constants?
In setting a constant, we’re going to use the define() function, and it takes a three parameters: First the parameter is used to define the name of the constant, and the second parameter is used to define the value of the constant and last is optional third parameter specify if set to true, the constant will be case-insensitive, and the default behavior is case-sensitive.
Syntax:

This time, let’s create a new PHP file called “constants.php”. And add the following code.

The code above will give us back 230.and since the MAX_LENGTH is constants we won’t be able to change its value. But we’re going to do some experiments using the code below.

Output:
Parse error: syntax error, unexpected T_PLUS_EQUAL in C:\xampp\htdocs\file\constants.php on line 8
Meaning it cannot allow us to do the += because it changes the value of MAX_LENGTH. Instead, we’re going to change the code that looks like as shown below.
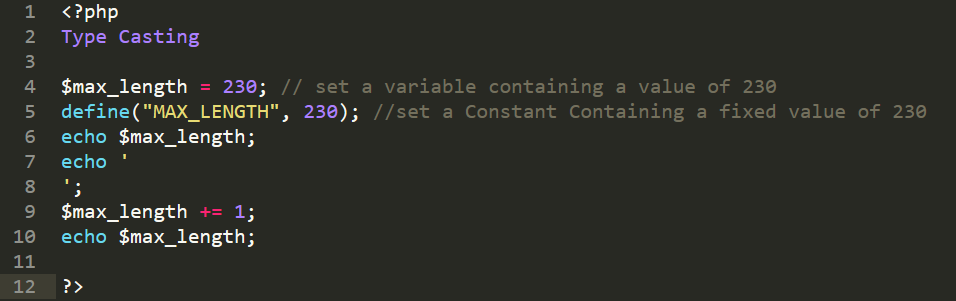
Output:
230
231
Summary
The constants are basically like a variable, and most times we’re going to use variables that you could have the option of changing those. But there are some circumstances, maybe you want to be used constants to define a username or password to login in your database and you wanted to find those with the constant because they Shouldn’t’ be changeable though always be the same, and we go edit the file of what we ever need to change them to something different.
PHP tutorial for beginners: Basic File System
Being a serious PHP programmer it is necessary to learn about how to manipulate files because it gives you great tools for creating, uploading, and editing files.
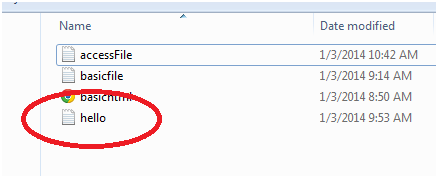
In this tutorial, we’re going to focus on working with the file system and directories in PHP. To start in in this lesson, let’s create first a folder inside the local server name and name it as “file”.
Then inside this folder we’re going to create a simple HTML file and add the following code, then save it as “basichtml.hml”.

At this time, we will create a new PHP file called “basicfile.php”. And take note, one of the most important things about working with files and directory is the magic constant__FILE__ and read as “underscore, underscore capital FILE underscore”. Then let’s add the following code.

This tutorial will serve as a basic fundamental block of building a file system because before we write a file we want to check if the file really exists or not. Or after we have written the file we really want to check if the file does exist. Or we want to check if a file exists before we to want read.
PHP Accessing File
In this tutorial, we’re going to access file in PHP. And primarily we’re going to focus on this lesson in dealing with fopen (filename, mode)so we’re going to open a file and we’re to provide a filename and we’re going to tell it what mode is should open it.
And remember using “fopen” opens up a file whether it exists or not so we will create it if necessary.
At this time, we will know first how to deal with FILE ACCESS MODES:
Below are the three basic ways to open a file and the corresponding character that PHP uses. This is used to specify the intentions when you open a file.
r – it reads from the start of a file, this is just reading and it the file must exist if we’re going to read it.
W – it Truncate or Write from start, and it erases anything what is in the file that are already existing or it creates a new file if didn’t.
A – it is used to append or write to the end and these can be useful especially when we are doing a log file and we just want to add one new entry and then exit the file.
And using these modes offers an alternative version used for Reading and Writing into a file. The combination is done by placing a plus sign “+” after the file mode character.
Read/Write: r+ – it opens a file that it can be read from and written to.
Write/Read: w+ – it’s going to truncate and put it at the start but then we can go ahead and write it there.
Append: a+ – it puts us at the end of the file and also enable us to read write to the file.
At this time we’re going to create a new PHP file called “accessFile.php” and add the following code.
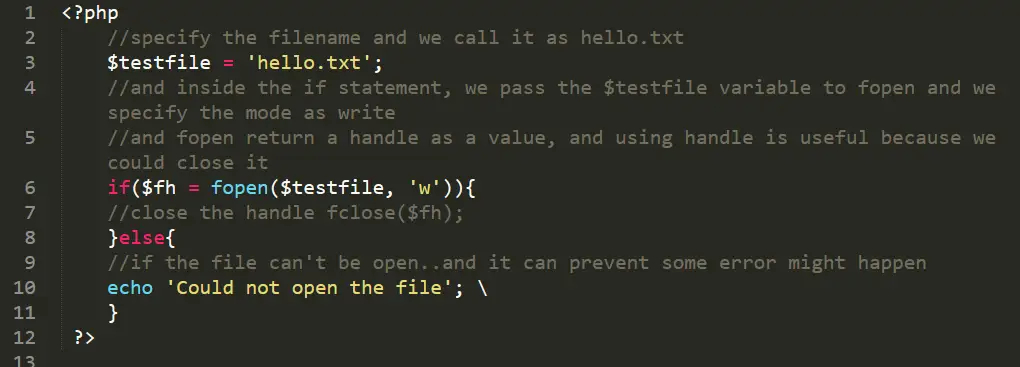
After executing the code above, as expected it will create a new file in our document root. And it looks like as shown below.
PHP File Handling: Examining File Details
In this tutrial, I’m going to show how to get information about the file details. To start in this lesson lets create a new PHP file called “file_detail.php”. And add the following code:

When executing the code above, it will return the size of a file in bytes and all the modification time are all the same. And it looks like as shown below.
Output:
13
01/09/2014 14:37
01/03/2014 02:53
01/09/2014 14:37
Next, on that we can modify those time is using the touch command, so that we can update those into the current time and we can also pass in some additional arguments.
But this were going to set it to the current system time and flip all of these time to the current time. and here’s the following code.

Output:
16
01/09/2014 14:37
01/03/2014 02:53
01/09/2014 14:37
01/09/2014 14:37
01/03/2014 02:53
01/09/2014 14:37
C:\xampp\htdocs\file
file_detail.php
file_detail
php
PHP File Handling: Writing to Files
In our last tutorial, we discussed on how access file using PHP. At this we’re going to focus on how write into a file.
Since we know how to access files, writing into a file is really simple. To start on lesson lets create a new PHP file called “writefile.php”. Then add the following code:
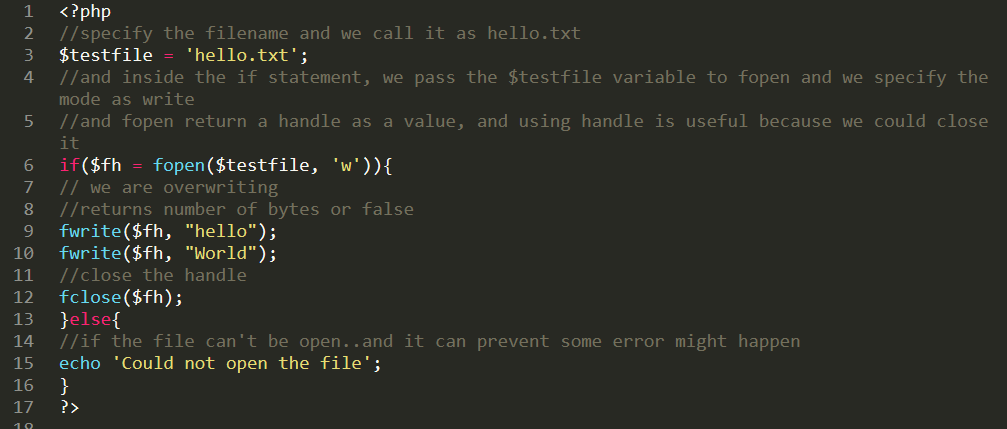
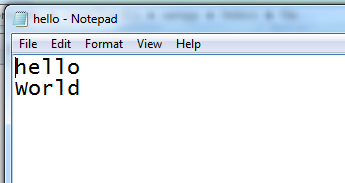
When you execute the code above, and then when you open the hello.txt file it will look like as shown below:

And if you notice that when we issue another write statement,its just pick where are left off. So introduce to us the idea of a pointer that works like a cursor.
So while the file is open, it puts it into the beginning of the file and waiting for us to type, and we do it using fwrite($fh, “hello”); and then the cursor can be found at the side of the letter “o” and then when add another fwrite($fh, “World”); it append the second word to our first word.
Here’s the another example.
Here in our new code you have noticed that in order for us to move the “world” into the next line we use these $greetings = “hello\r\nWorld”; because we are using windows platform. And for UNIX you can simply use $greetings = “hello\nWorld”;.

The output of the code above will now look like as shown below.
PHP File Handling: Reading File
In this tutorial I’m going to show how to read back information from files. So before we can read information from a file we need to use a function fopen just to open the file for reading.
In this lesson, we’re going to use the “hello.txt” file that we created in the writing of file lesson.
To start in this lesson, we are going to create a new PHP file called readfile. Then add the following code:

Output:
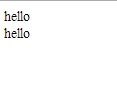
We have this result because we simply specify the number of characters we want to display, in our case we write five(5) character. But what if we want to read the entire file and you don’t know how many byte the file is. And add the following code for the second example.

Output:
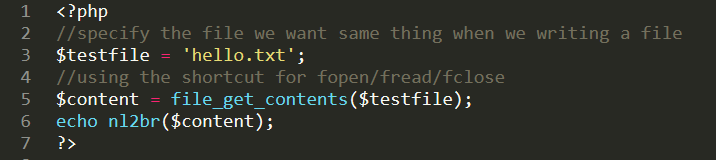
But I have here another way using the shortcut for fopen/fread/fclose, and this is also a companion to shortcut <code> file_put_contents(filename, data)</code>. And here’s add the following code.
Output:

PHP File Handling: Delete File
In our previous tutorial, we have seen how to write the file and read the file, and we also know how to open a file in an assortment of different ways.
At this time we’re going to focus on how to destroy (delete) files. Deleting is too simple but we need to keep two things in mind.
- Close the file – because we can’t delete the open files
- Must have permission on the folder containing the file – we have to make sure that the directory is writable, we could create the file, so we have also to make sure that we could delete the file.
When you are navigating and viewing the contents of a directory, you can see all the files that exist in that directory because the operating system displays the list of filenames.
As a scenario, you can think of these filenames as links that join the files to the directory you are currently viewing. So if you unlink a file, it’s causing the system to forget about the it or delete it.
The PHP unlink function is not about removing files, it’s about removing a file name. The unlink deletes a name and possibly the file in referring to.
Take note that we have created a “hello.txt” file in our previous tutorial called “PHP File Handling: Accessing File”.

At this time, let’s create a new PHP file called “deletefile.php” and add the following code performing the unlink function.

And if you are going to check the file in the document root, it is already gone.
PHP File Handling: File Append
In our previous tutorial, we have learned how to open, close, read and write to a file. However, the ways which we wrote to a file so far have caused data that was stored in the file to be deleted.
So in this lesson we’re going to deal on how to append to a file or to add on to the existing data, but we need to open the file in append mode.
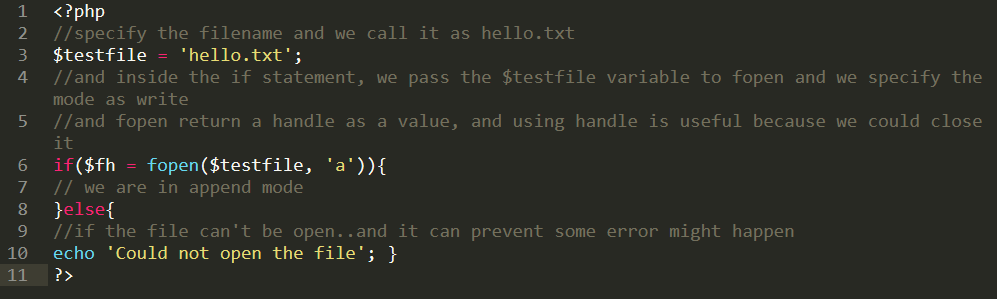
To start with, this application and if we want to add on to a file we need to open it up in append mode. To do this, let’s create first a new file PHP file called “append.php”. And add the following code:
Take note, that when we were to write to a file it would begin writing data at the of the file.
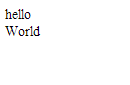
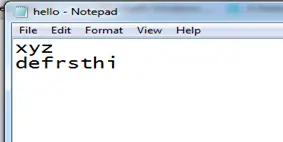
If you open the hello.txt file, you can see that it will look like as shown below.
hello
World
For appending data, we’re going to use the hello.txt file that we have created in our previous tutorial called “Writing to Files”.
At this time we will modify our code above to do the appending of data. And here’s the following code.
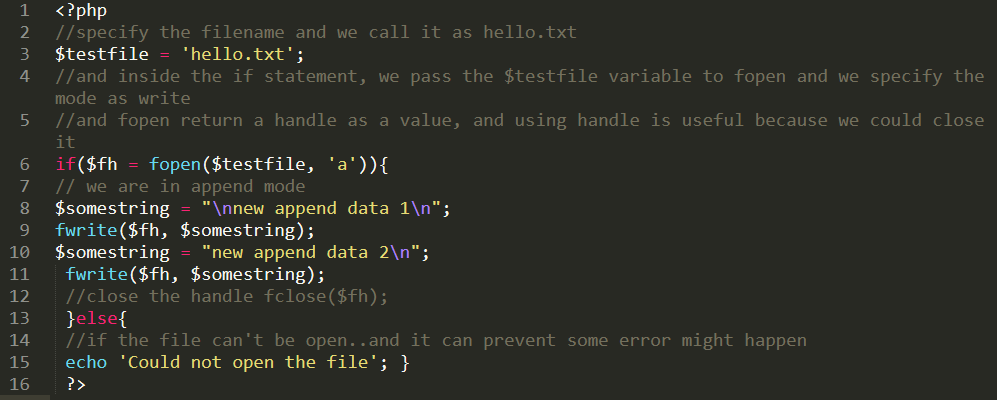
You should noticed that the way we write data to the file is exactly the same as in the write lesson. The only thing that is different is that the file pointer is placed at the end of the file in append mode, so all data is added to the end of the file.
After executing the code above, you can notice that the way we write data to the file is exactly the same as in the Writing to File lesson.
But the only difference is that the pointer is placed at the end of the file in append mode so all data is added to the end of the file. And the hello.txt file will look like as shown below.
hello
World
new append data 1
new append data 2
PHP File Handling: Moving the File Pointer
If you have remembered in one of our lesson the writing of the file, we talked about the idea of the file pointer or its like a cursor in a word processor. So in file handling we have the ability to move the pointer around the file to write in different places within the file. And this will be our focus for this lesson.
To start in this lesson lets create a new PHP file and lets call it as “filepointer.php” and add the following code.
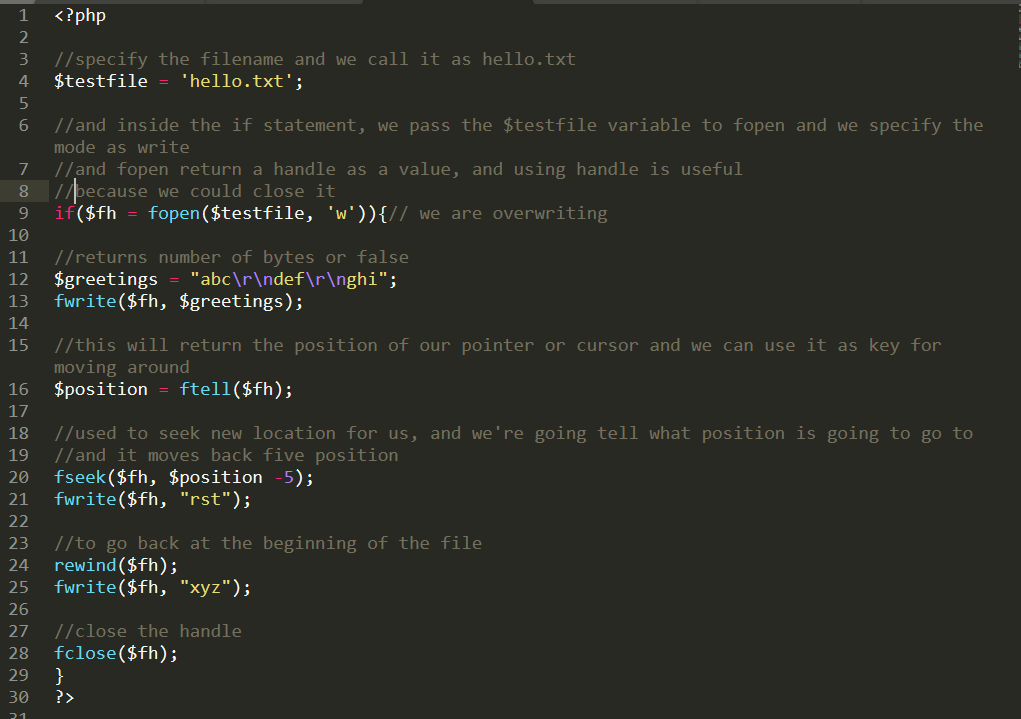
Output:
PHP tutorial for beginners: PHP Type Casting
In this tutorial, we’re going to discuss PHP Type Casting. We can call Type casting or Type Switching or Type Juggling.
The idea here is that, out of all types we’ve been working in PHP such numbers or strings, we can actually switch from one type to another.
To start this application lets create a new PHP file called “typecasting.php”. And add the following code.
The PHP code below is trying to combine the string value of 10 to 4.
Then we echo the variable value and it returns 14 meaning it will able to perform a mathematical operation. But this is a bad programming because we don’t want to make this switch for us, and we want a correct type to do the computation for us.

Next we’re going to modify our code using the gettype function that will tell us what type that we are working with.
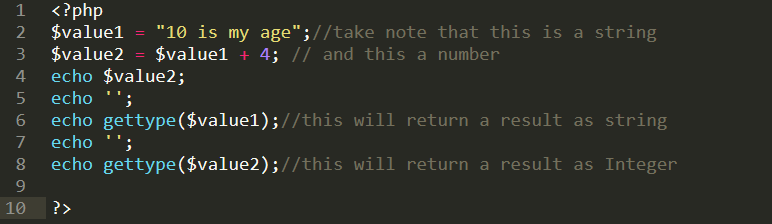
Output:
14
string
integer
At this time, we’re going to switch the type for the ourselves. And we can do it using the settype function is used to set the type of a variable. Here’s the modified code below using settype function.

Output:
14
string
integer
string
The other way to set a type on something is going to be referring to it using the first type. And here’s the following code.
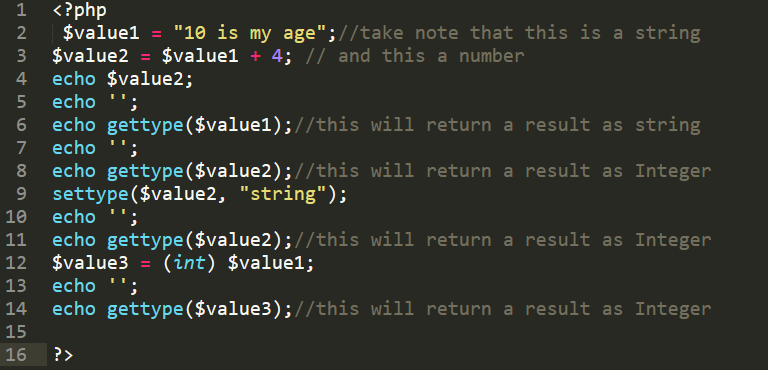
Output:
14
string
integer
string
integer
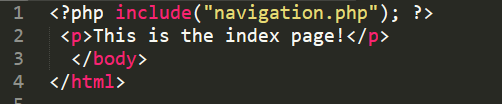
PHP tutorial for beginners: PHP Include
Even though you don’t have enough much understanding about the details of PHP, you have nothing to worry about because you can save yourself with the use of PHP include command.
Include command is used to get the file name and insert that file into the script that provide an include command.
This method has the ability to lessen your working load and when updating you don’t have to update all the pages because you can simply make it on one page. For instance, a navigation file.
See Examples Below:
- Create a file and name it “navigation.php“. After that, do the following codes as follows.
navigation.php Code:
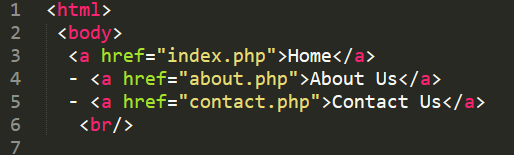
- Create a file and name it “index.php”. After that, do the following codes as follows.
index.php Code:
Create a file and name it “about.php“. After that, do the following codes as follows.
about.php Code:

- Create a file and name it “about.php“. After that, do the following codes as follows.
contact.php Code:

Output:
Home – About Us – Contact Us
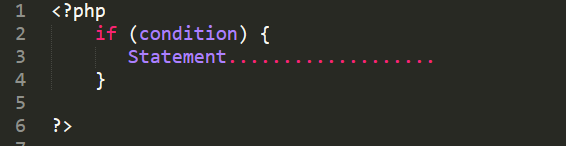
PHP tutorial for beginners: PHP If Statement
This tutorial is all about PHP If Statement.
The if statement is a powerful tool when used properly and it is also necessary for most programming languages because it serves as a conditional operator of your statement.
The if statement has different syntax in other programming languages while there are some languages that has the same syntax just like C#, PHP, C++, Java, etc..
In PHP the syntax of if statement are the following:
For those who are not familiar with the if statement, come to think of this folowing statement:
In our daily life we always make decisions for isntance, If you have a long quiz tomorrow in your Math subject, then you will study hard and review those lessons that your teacher discussed. Otherwise, you will fail the long quiz.
The given example was just a simple if/then statement that happens in our daily life and this quite often appears in programming.
Example
if statement Code:
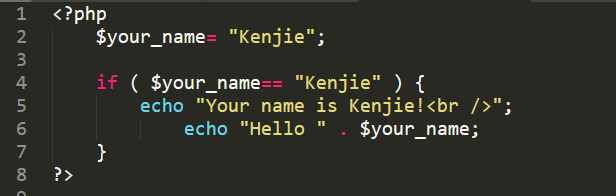
Result:
Your name is Kenjie!
Hello Kenjie
You will notice that we compare the variable $your_name with kenjie because of that, the result will be true or equal.
Now, let see what will happen when the if statement is not equal or false.
if statement Code:
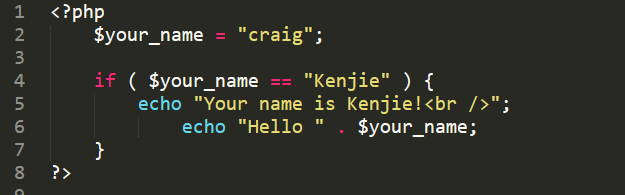
Result:
In the given example, the variable $your_name contained the value “Craig” which is obviously not equal to “Kenjie“. Therefore: The result is false or not equal.
PHP tutorial for beginners: PHP if/else Statement
In my previous lesson, I have tackled the if statement which is important in PHP when used properly and it executes some code if one condition is true.
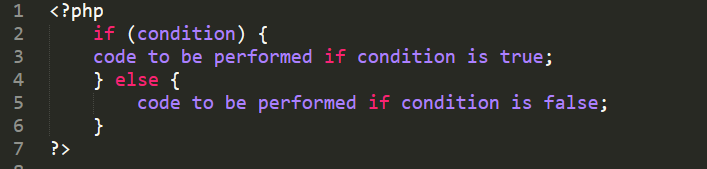
This time, let’s tackle about the PHP if/else statement, obviously as its name suggests, it is a combination of if and else. However, The if/else statement performs some code if a condition is equal or true and another code will be executed if that condition is false.
Syntax
Here’s a simple example of an if/else conditional statement that is common in every day life. This is to make you more familiar with it, picture the following:
“If you study hard, then you will get a passing grade”. So, what happens, if you don’t study hard? Well, you fail!
- If you study hard then you will get a passing grade.
- Else, if you don’t study hard, then you will fail.
Here’s an example of the basic form of PHP if/else statement:
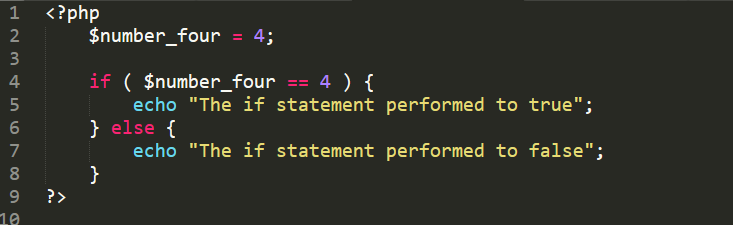
Result:
The if statement performed to true.
perform else code with false
If the if statement was false, then the code within the else segment would not be performed.
Always keep in mind that the code contained in the if and else cannot be both performed, because the if statement cannot assess to both true and false at once.
Below is the result of what would happen if we changed to $number_four to anything apart from number 4.
Example:
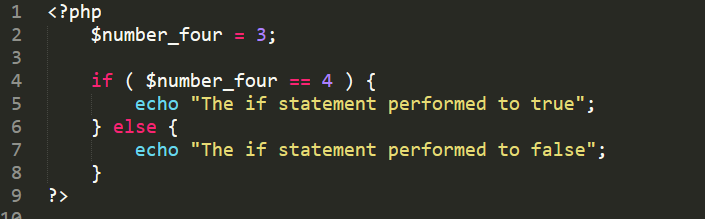
Result:
The if statement performed to false
You will see that the variable was set to 3, which is not equal to 4 and the if statement was false. Notice that the code segment within the else was used in the given example above.
PHP tutorial for beginners: PHP elseif Statement
To check for one condition, if/else statement is a powerful tool to use. However, if you check the variable $emp_name for the name of the employee which is Craig the President, Kenjie the CEO or a Manager of the company, will need an elseif statement to check 3 or more conditions.
What is elseif in php?
An elseif statement is used for three or more conditions. This elseif statement must come after the if statement because you cannot use it without having an if statement.
If…elseif…else statement once evaluated in PHP it see first if the statement is equal or true. But, if the test results into false, it will immediately check first the elseif statement.
Once proven false, the next elseif statement will be checked or it will evaluate the else segment if there are no more elseif statements, if it exists.
Using elseif with if…else
Picture out the simple problem described above, we want to find out if the employee is the President Mr. Craig. An if else statement is what we need for this example.
if Code in PHP:
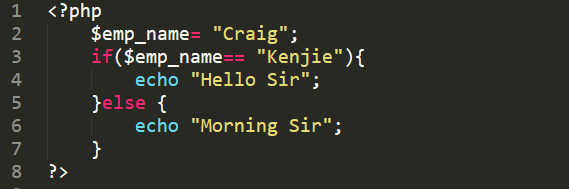
However, if we also want to check if President Craig was the employee well, we have to insert an elseif clause.
elseif Code:

Result:
Good Morning Sir!
PHP checked if $emp_name was equal to “Craig“, which is evaluated to false. Then, the first elseif statement is checked. The $emp_name was indeed equal to “Craig“so,it printed out the phrase “Good Morning Sir!” We could also insert more elseif statement if we wanted to check out for more of the employee names.
PHP tutorial for beginners: PHP Switch
Last time, in my previous lesson we have learned about the If statement in PHP. But, when checking for certain conditions there are times that an if statement is not the most effective way.
For instance, there is a variable that contains OOTD (Outfit of the day) for summer vacation and you want to prepare those clothes according to this OOTD (Outfit of the day) variable.
In this example, you might have 30 variety of clothes that you would have to check with long codes of If/ElseIf/ElseIf/ElseIf/… statements. This may sound complicated and not fun to code well, let’s see what we can do to make things easier.
php switch statement: Checking Quickly
The switch statement is the most efficient way to check all conditions at once. Instead, of checking the variable one at a time as it goes through a lot of if statements, it only takes a single variable to check all variety cases you set up for that switch statement. That’s the great thing about switch statement.
Example
In our example, the single variable will be $OOTD and the cases will be? Monday, Tuesday, Wednesdays, Thursday, and Friday.
PHP Code-Switch Statement:
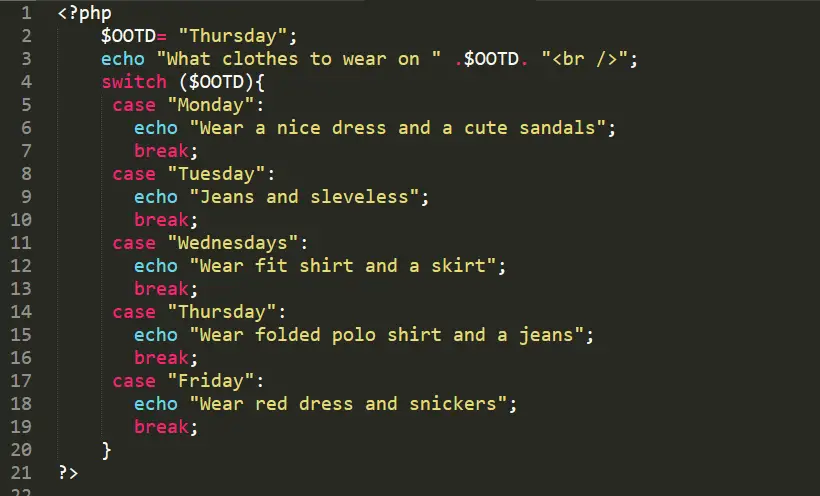
Result:
What clothes to wear on Thursday
Wear folded polo shirt and jeans
The value of $OOTD was Thursday, so when PHP performed the switch operating on $OOTD it immediately did a search for a case with the value of “Thursday“. It searches for it and moved to execute the code that existed within that segment.
You will see that there’s a break at the end of the codes. Well, this break simply stops other cases from being performed. If the break statement is not used in the above example all other cases that follow Thursday will be executed too.
So, you have to take note most especially for newbie programmers to avoid confusions when using switch statements.
PHP switch statement: default
It is very important that to have a default in a conditional statement. For instance, if the variable does not match to the condition that is where you use the default statement.
The if statement, it has an else for the default and the switch statement also has a default case for the default.
Reminder: its not necessary to use the word case you can directly use the keyword default.
PHP Code-Switch Statement with default case:
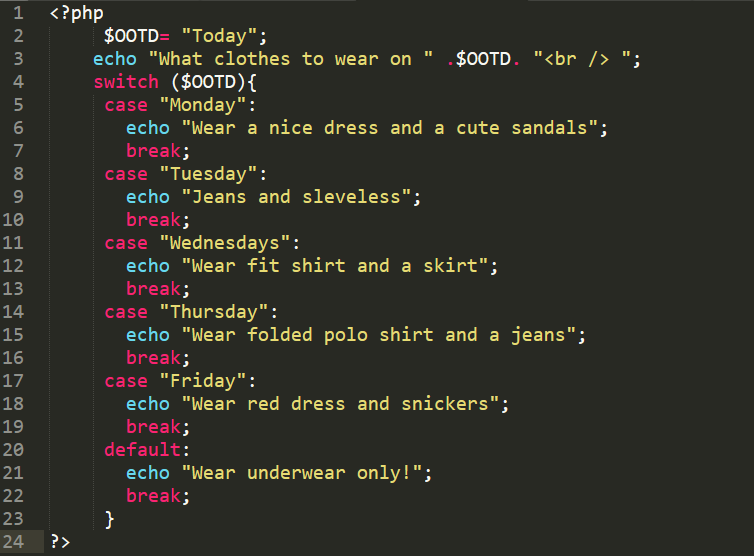
Result:
Traveling to New York
Wear underwear only!
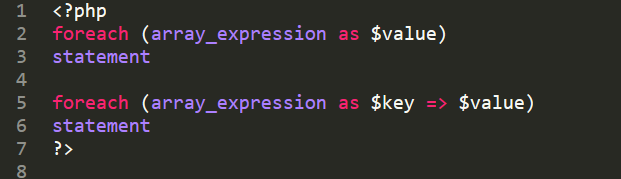
PHP Foreach Loop
Using PHP programming, one of the most commonly used loop to iterate over an array is a foreach loop.
The foreach loop works on arrays and objects, and it will give you an error when you try to use it on a variable with a different data type or an undefined variable.
Here’s the two sample syntax:
The syntax in plain English this statement will do the following, For each item in the specified array execute the statement.
An example using the first given syntax:
This code below declares an array of months, then it displays each month using foreach loop.

Output:
JAN
FEB
MAR
APR
MAY
JUN
JUL
AUG
SEP
OCT
NOV
DEC
And example using the second syntax:
The code below is an associative array that stores the Employee name and their Work as the keys with values. And using the foreach loop it prints out the name and work of each employee.

Output:
Name: Adrew, Work:Manager
Name:Pedro, Work:Clerk
Name:Juan, Work:HR
Conclusion
This PHP tutorial for beginners will not only help you to learn PHP quickly, but it will lead you in a successful career in PHP programming. For more PHP Tutorial, you can check it here.
Remember: You could only Achieve your Goal Unless You Do!
Official documentation
Frequently Asked Questions
What does this PHP tutorial cover?
Focused PHP language or library tutorial showing a single concept with working code. Use as a building block when assembling a larger system.
What PHP and MySQL versions does this project require?
Most projects in this batch run on PHP 7.4 to PHP 8.2 with MySQL 5.7+ or MariaDB 10+. A few older projects need PHP 5.6 (deprecated, use XAMPP 7.x). To run: install XAMPP / WAMP / Laragon, extract project to htdocs, import the included .sql file via phpMyAdmin, edit the connection file (usually config.php or db_connect.php) with your DB credentials, browse to the project URL in your browser.
How do I set up the database for this PHP project?
Open phpMyAdmin (http://localhost/phpmyadmin/ on XAMPP), create a new empty database with the name specified in the project’s config.php. Click the Import tab, choose the included .sql file, click Go. Then edit config.php (or includes/connection.php) with: ‘localhost’, your MySQL username (usually ‘root’), your MySQL password (usually blank for XAMPP), and the database name.
Can I use this PHP project for a BSIT capstone or thesis?
Yes, but extend it. A bare CRUD app is too narrow for full capstone scope. Add: user roles via session checks, reports/dashboards (Chart.js + AJAX), PDF exports (TCPDF library), email notifications (PHPMailer), real domain extension (analytics, audit log, multi-branch support). Pair with Chapter 1-5 documentation matching your panel’s rubric.
Why am I getting ‘connection error’ or ‘undefined function mysqli_connect’?
Three common PHP issues: (1) Connection error: Apache + MySQL services not running in XAMPP control panel, OR database name in config.php does not match what you created in phpMyAdmin. (2) ‘undefined function mysqli_connect’: MySQL extension not enabled, in php.ini uncomment extension=mysqli (then restart Apache). (3) ‘No such file or directory’: MySQL socket path wrong, use 127.0.0.1 instead of localhost in the connection string.
Where can I find more PHP projects with source code?
Browse the PHP Projects hub for the full library (300+ vanilla PHP systems). For modern PHP MVC alternatives see Laravel Projects (74 systems) or CodeIgniter Projects (32 systems). For BSIT-focused capstone idea lists see 150 Best Capstone Project Ideas.
Related PHP Projects
- Online Examination System In PHP
- MySQL Tutorial Beginners
- Html5 Introduction Beginners Guide
- Html5 Shiv Beginners Guide
- Html5 Boilerplate Beginners Guide
- Html5 Video Tag Beginners Guide

Joken E. Villanueva
Founder & Lead Developer at PIES IT Solution
Founder of PIES Information Technology Solutions, a software company building production-grade applications for institutions across the Philippines. Over 8 years of hands-on full-stack development experience, currently leading the development of ClinicAI, an AI-powered clinic management platform.
Expertise: PHP · MySQL · JavaScript · AI Integration · SaaS Architecture · VB.NET · Database Design · Capstone Documentation · Java · View all posts by Joken E. Villanueva →
Awesome! Its truly remarkable paragraph, I have got much clear idea regarding from this article.
This is my first time go to see at here and i am truly happy to read all at alone place.
Thanks in favor of sharing such a good thought, post is nice, thats why i have read it entirely
Simply wish to say your article is as astounding. The clarity on your post is just great and i could think you’re an expert on this subject. Well with your permission allow me to seize your feed to stay up to date with impending post. Thanks a million and please carry on the rewarding work.
Why users still use to read news papers when in this technological world everything is presented on web?
Woah! I’m really enjoying the template/theme of this site. It’s simple, yet effective. A lot of times it’s tough to get that “perfect balance” between usability and visual appearance. I must say you’ve done a great job with this. In addition, the blog loads extremely quick for me on Firefox. Outstanding Blog!
What’s up everyone, it’s my first pay a quick visit at this web page, and paragraph is truly fruitful for me, keep up posting these types of posts.
If you desire to take much from this article then you have to apply these techniques to your won website.
Hello to every single one, it’s genuinely a good for me to go to see this web site, it includes useful Information.
Undeniably consider that that you stated. Your favourite justification appeared to be at the net the simplest thing to remember of. I say to you, I certainly get irked at the same time as folks think about issues that they plainly don’t understand about. You controlled to hit the nail upon the highest as smartly as outlined out the entire thing with no need side-effects , folks can take a signal. Will probably be back to get more. Thanks
Thank you for some other magnificent post. The place else may just anybody get that kind of info in such a perfect approach of writing? I have a presentation next week, and I’m on the look for such information.
Hello there, just became alert to your blog through Google, and found that it is truly informative. I’m gonna watch out for brussels. I’ll be grateful if you continue this in future. Lots of people will be benefited from your writing. Cheers!
Great site you have here but I was curious about if you knew of any discussion boards that cover the same topics talked about in this article? I’d really love to be a part of online community where I can get advice from other knowledgeable individuals that share the same interest. If you have any recommendations, please let me know. Bless you!
Hi there friends, its wonderful article about cultureand
entirely explained, keep it up all the time.
Hi, its good piece of writing regarding media print, we all be familiar with
media is a great source of information.
Great looking website. Presume you did a great deal of your very own coding. http://anunturi.Desibiu.ro/author/tailornorth2/
Chuva e balas são servidas aos clientes. http://denemebahis.890m.com/index.php?a=stats&u=paulogabrielarag
Really interesting website !!!!!