
Weather Forecast Project In Python With Source Code
The Weather Forecast Project In Python was developed using Python Programming, this Simple Project With Source Code created using console based, and this project is good for the beginners or the students who wants to learn programming specially python programming language.
A Weather Prediction Project In Python is a simple console based application using machine learning which helps to determine if the current situation of weather is good to play or not. It is done under the supervised learning in which data are given first to train the system and then the result for new data will be produce.
This Weather Prediction Python Code also includes a downloadable, Project With Source Code for free, just find the downloadable source code below and click to start downloading.
By the way if you are new to python programming and you don’t know what would be the the Python IDE to use, I have here a list of Best Python IDE for Windows, Linux, Mac OS that will suit for you. I also have here How to Download and Install Latest Version of Python on Windows.
To start executing Weather Forecast Project In Python With Source Code, make sure that you have installed Python 3.9 and PyCharm in your computer.
Weather Forecast Project In Python With Source Code : Steps on how to run the project
Time needed: 5 minutes
These are the steps on how to run Weather Forecast Project In Python With Source Code
- Step 1: Download the given source code below.
First, download the given source code below and unzip the source code.

- Step 2: Import the project to your PyCharm IDE.
Next, import the source code you’ve download to your PyCharm IDE.

- Step 3: Run the project.
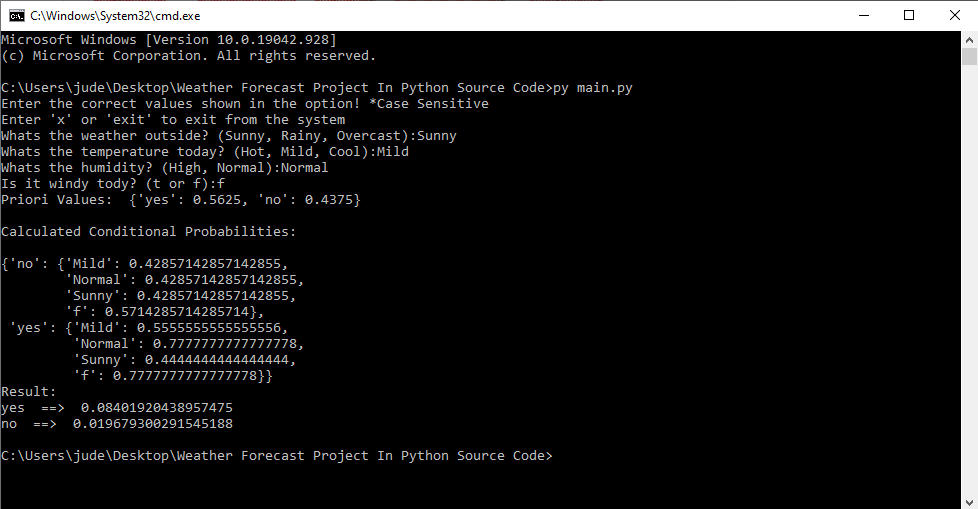
last, run the project with the command “py main.py”


Installed Libraries
from functools import reduce
import pandas as pd
import pprint
Complete Source Code
from functools import reduce
import pandas as pd
import pprint

class Classifier():
    data = None
    class_attr = None
    priori = {}
    cp = {}
    hypothesis = None


    def __init__(self,filename=None, class_attr=None ):
        self.data = pd.read_csv(filename, sep=',', header =(0))
        self.class_attr = class_attr

    '''
        probability(class) =    How many  times it appears in cloumn
                             __________________________________________
                                  count of all class attribute
    '''
    def calculate_priori(self):
        class_values = list(set(self.data[self.class_attr]))
        class_data =  list(self.data[self.class_attr])
        for i in class_values:
            self.priori[i]  = class_data.count(i)/float(len(class_data))
        print ("Priori Values: ", self.priori)

    '''
        Here we calculate the individual probabilites
        P(outcome|evidence) =   P(Likelihood of Evidence) x Prior prob of outcome
                               ___________________________________________
                                                    P(Evidence)
    '''
    def get_cp(self, attr, attr_type, class_value):
        data_attr = list(self.data[attr])
        class_data = list(self.data[self.class_attr])
        total =1
        for i in range(0, len(data_attr)):
            if class_data[i] == class_value and data_attr[i] == attr_type:
                total+=1
        return total/float(class_data.count(class_value))

    '''
        Here we calculate Likelihood of Evidence and multiple all individual probabilities with priori
        (Outcome|Multiple Evidence) = P(Evidence1|Outcome) x P(Evidence2|outcome) x ... x P(EvidenceN|outcome) x P(Outcome)
        scaled by P(Multiple Evidence)
    '''
    def calculate_conditional_probabilities(self, hypothesis):
        for i in self.priori:
            self.cp[i] = {}
            for j in hypothesis:
                self.cp[i].update({ hypothesis[j]: self.get_cp(j, hypothesis[j], i)})
        print ("\nCalculated Conditional Probabilities: \n")
        pprint.pprint(self.cp)

    def classify(self):
        print ("Result: ")
        for i in self.cp:
            print (i, " ==> ", reduce(lambda x, y: x*y, self.cp[i].values())*self.priori[i])

'''    Exit from the system it the input is "x" or "exit"   '''
def exitSystem():
        print("System Terminated!")
        print("Thank you for using this system!")
        exit()

if __name__ == "__main__":
    c = Classifier(filename="dataset.csv", class_attr="Play")
    print("Enter the correct values shown in the option! *Case Sensitive")
    print("Enter 'x' or 'exit' to exit from the system")
    outlook = input("Whats the weather outside? (Sunny, Rainy, Overcast):")
    if outlook.lower() == 'x' or outlook.lower() == 'exit':
        exitSystem()
    temp = input("Whats the temperature today? (Hot, Mild, Cool):")
    if temp.lower() == 'x' or temp.lower()== 'exit':
        exitSystem()
    humidity = input("Whats the humidity? (High, Normal):")
    if humidity.lower() == 'x' or humidity.lower()== 'exit':
        exitSystem()
    windy = input("Is it windy tody? (t or f):")
    if windy.lower() == 'x' or windy.lower()== 'exit':
        exitSystem()

    c.hypothesis = {"Outlook":outlook, "Temp":temp, "Humidity":humidity , "Windy":windy}
    c.calculate_priori()
    c.calculate_conditional_probabilities(c.hypothesis)
    c.classify()
Output
Download Source Code below
Summary
A simple machine learning project done in Python. This is a simple console based application using machine learning which helps to determine if the current situation of weather is good to play or not.
It is done under the supervised learning in which data are given first to train the system and then the result for new data will be produce.
Related Articles
- Code For Game in Python: Python Game Projects With Source Code
- Best Python Projects With Source Code FREE DOWNLOAD
- How to Make a Point of Sale In Python With Source Code
- Python Code For Food Ordering System | FREE DOWNLOAD
- Inventory Management System Project in Python With Source Code
Inquiries
If you have any questions or suggestions about Weather Forecast Project In Python With Source Code, please feel free to leave a comment below.
Frequently Asked Questions
How does this Python utility project work?
Single-purpose Tkinter / CLI tool: weather (requests + OpenWeather API), todo list (Tkinter + JSON file), password generator (random.choice from charset), QR generator (qrcode library), file downloader. Foundation for beginner Python practice.
What Python version and libraries does this project require?
Most projects in this batch use Python 3.10, 3.11, or 3.12 (avoid 3.13 until library wheels catch up). Standard libs: tkinter (built-in), sqlite3 (built-in). External: pip install pillow opencv-python pygame mysql-connector-python reportlab requests beautifulsoup4. Check the requirements.txt file (if included) for exact versions.
How do I set up the database for this Python project?
For SQLite (most common, no setup needed): the .db file auto-creates on first run. For MySQL: install MySQL Server + MySQL Workbench, create an empty database, import the included .sql file, edit the connection string in db.py (or db_connect.py) with your host, user, password, database name.
Can I use this Python project for a BSIT capstone or thesis?
Yes. Python is rising fast in Philippine BSIT panels. Extend it: add user roles via auth module, dashboards (matplotlib charts), PDF reports (reportlab), email notifications (smtplib), real domain extension (analytics, audit log, multi-branch support). Pair with Chapter 1-5 documentation matching your panel’s rubric.
Why am I getting ‘ModuleNotFoundError’ or ‘No module named X’?
Three common Python issues: (1) Module not installed: pip install
Where can I find more Python projects with source code?
Browse the Python Projects hub for the full library. For computer vision specifically see OpenCV Projects (46 vision systems). For ML / AI capstones see Machine Learning Projects. For BSIT capstone idea lists see 150 Best Capstone Project Ideas.

Angel Jude Suarez
Full-Stack Developer at PIES IT Solution
Focuses on Python development, machine learning, and AI integration. Has built production AI systems including OpenAI Whisper integration for medical transcription and GPT-4o-powered diagnosis assistance. Strong background in pandas, scikit-learn, and TensorFlow.
Expertise: Python · PHP · Java · VB.NET · ASP.NET · Machine Learning · AI Integration · OpenCV · Django · CodeIgniter · View all posts by Angel Jude Suarez →
how i download the dataset in the form of csv ,and after getting this how i just set it