

Eye Blink Counting Detection OpenCV Python With Source Code
This Eye Blink Counting Detection OpenCV Python was developed using Python OpenCV with Source Code.
We are going to build upon this knowledge and develop a computer vision application that is capable of detecting and counting blinks in video streams using facial landmarks and OpenCV.
An Eye Blink Detection OpenCV Python focused solely on using the eye aspect ratio as a quantitative metric to determine if a person has blinked in a video stream.
However, due to noise in a video stream, subpar facial landmark detections, or fast changes in viewing angle, a simple threshold on the eye aspect ratio could produce a false-positive detection, reporting that a blink had taken place when in reality the person had not blinked.
What is OpenCV?
OpenCV is short for Open Source Computer Vision. Intuitively by the name, it is an open-source Computer Vision and Machine Learning library.
This library is capable of processing real-time images and videos while also boasting analytical capabilities. It supports the Deep Learning frameworks.
In this Python OpenCV Project also includes a downloadable Python Project With Source Code for free, just find the downloadable source code below and click to start downloading.
By the way, if you are new to Python programming and don’t know what Python IDE to use, I have here a list of Best Python IDE for Windows, Linux, Mac OS that will suit you. I also have here How to Download and Install Latest Version of Python on Windows.
To start executing this project, make sure that you have installed Python 3.9 and PyCharm in your computer.
Eye Blink Counting Detection OpenCV Python With Source Code: Steps on how to run the project
Time needed: 5 minutes
These are the steps on how to run Eye Blink Counting Detection OpenCV Python With Source Code
- Step 1: Download the given source code below.
First, download the given source code below and unzip the source code.

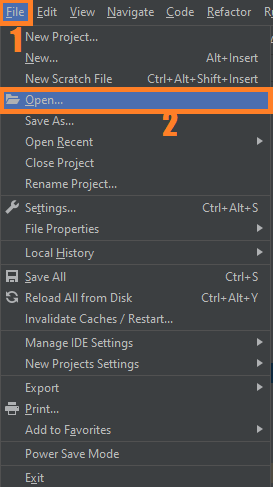
- Step 2: Import the project to your PyCharm IDE.
Next, import the source code you’ve download to your PyCharm IDE.

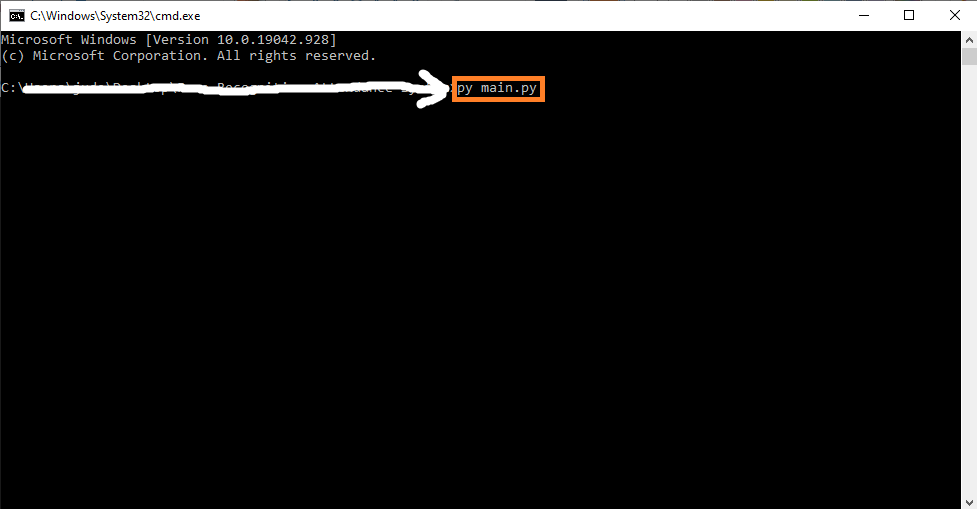
- Step 3: Run the project.
last, run the project with the command “py main.py”


Installed Libraries
import cv2
import dlib
from scipy.spatial import distance
from imutils import face_utils
Complete Source Code
import cv2
import dlib
from scipy.spatial import distance
from imutils import face_utils

cap = cv2.VideoCapture(0)

detector = dlib.get_frontal_face_detector()
predictor = dlib.shape_predictor('shape_predictor_68_face_landmarks.dat')

def eye_aspect_ratio(eye):
	A = distance.euclidean(eye[1], eye[5])
	B = distance.euclidean(eye[2], eye[4])

	C = distance.euclidean(eye[0], eye[3])
	eye = (A + B) / (2.0 * C)

	return eye

count = 0
total = 0

while True:
    success,img = cap.read()
    imgGray = cv2.cvtColor(img,cv2.COLOR_BGR2GRAY)
    faces = detector(imgGray)

    for face in faces:
        landmarks = predictor(imgGray,face)

        landmarks = face_utils.shape_to_np(landmarks)
        leftEye = landmarks[42:48]
        rightEye = landmarks[36:42]

        leftEye = eye_aspect_ratio(leftEye)
        rightEye = eye_aspect_ratio(rightEye)

        eye = (leftEye + rightEye) / 2.0

        if eye<0.3:
            count+=1
        else:
            if count>=3:
                total+=1

            count=0

    cv2.putText(img, "Blink Count: {}".format(total), (10, 30),cv2.FONT_HERSHEY_SIMPLEX, 0.7, (0, 0, 255), 2)
    cv2.imshow('Video',img)
    if cv2.waitKey(1) & 0xff==ord('q'):
        break
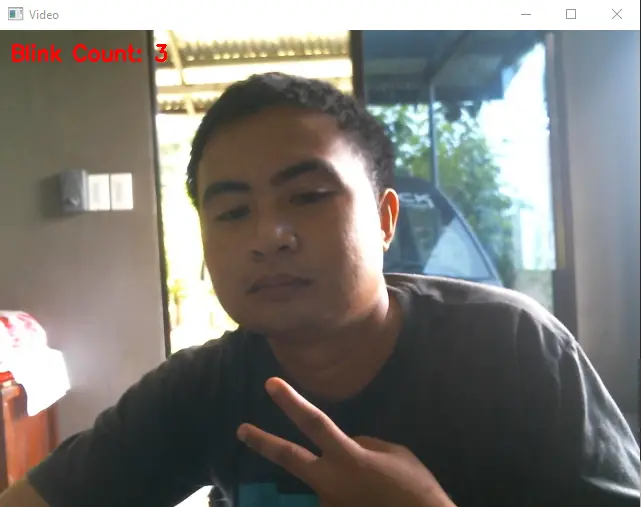
Output
Eye Blink Counting Detection OpenCV Python: Project Information
| Project Name: | Eye Blink Counting Detection OpenCV Python |
| Language/s Used: | Python OpenCV |
| Python version (Recommended): | 3.8 |
| Database: | None |
| Type: | Deep Learning |
| Developer: | IT SOURCECODE |
| Updates: | 0 |
Download the Source Code below
Anyway, if you want to level up your programming knowledge, especially Python OpenCV, try this new article I’ve made for you Best OpenCV Projects With Source Code For Beginners.
Summary
In this article, I demonstrated how to execute a blink detector using OpenCV, Python, and dlib.
The first step in building a blink detector is to perform facial landmark detection to localize the eyes in a given frame from a video stream.
Once we have the facial landmarks for both eyes, we compute the eye aspect ratio for each eye, which gives us a singular value, relating the distances between the vertical eye landmark points to the distances between the horizontal landmark points.
Once we have the eye aspect ratio, we can threshold it to determine if a person is blinking, the eye aspect ratio will remain approximately constant when the eyes are open and then will rapidly approach zero during a blink, then increase again as the eye opens.
Related Articles
- Code For Game in Python: Python Game Projects With Source Code
- Best Python Projects With Source Code FREE DOWNLOAD
- How to Make a Point of Sale In Python With Source Code
- Python Code For Food Ordering System | FREE DOWNLOAD |
- Inventory Management System Project in Python With Source Code
Inquiries
If you have any questions or suggestions about Eye Blink Counting Detection OpenCV Python With Source Code, please feel free to leave a comment below.
Official documentation
Frequently Asked Questions
How does eye blink detection and counting work?
Uses MediaPipe Face Mesh to detect 468 face landmark points, then calculates the Eye Aspect Ratio (EAR): the ratio of eye height to eye width using specific landmark indices. EAR drops sharply when the eye closes (typically below 0.2). Counting consecutive low-EAR frames detects a blink. Useful for driver-drowsiness monitoring or accessibility input devices.
What OpenCV version do I need to run this project?
Use OpenCV 4.5 or newer. Install with pip install opencv-python (the standard build for desktop projects). Some projects also need opencv-contrib-python which adds extra modules (SIFT, SURF, advanced trackers). The pip install command auto-downloads pre-built wheels so no compilation is needed on Windows, Mac, or Linux.
How do I install OpenCV and the dependencies for this project?
Open a terminal, then: pip install opencv-python numpy. Most projects also need one of these: mediapipe (for face / hand / pose detection), pyzbar (for barcode and QR), pytesseract (for OCR), Pillow (for image manipulation), pyautogui (for screen capture). Pin Python version to 3.10, 3.11, or 3.12 for maximum library compatibility.
Can I use this OpenCV project for a BSIT or CSE capstone?
Yes, but extend it. A single OpenCV demo (face detection alone, lane detection alone) is too narrow for full capstone scope. Combine it with a real domain (attendance system using face recognition, traffic monitoring system using lane detection, fitness coach app using pose detection), add a database to log results, build a simple Tkinter or Streamlit UI, and document the whole pipeline in Chapter 3.
Why am I getting AttributeError or ImportError when running this code?
Three most common causes: (1) You installed opencv-python but the code needs opencv-contrib-python (extra modules like xfeatures2d). Reinstall with pip install opencv-contrib-python. (2) You are on Python 3.13 but some wheels (mediapipe) lag behind, downgrade to Python 3.11 or 3.12. (3) NumPy version mismatch, pin numpy to a version your other libraries support.
Where do I find more OpenCV and Machine Learning project ideas?
Browse our Machine Learning Projects hub for 23+ OpenCV demos with source code. For capstone-scale AI ideas (RAG, NLP, recommendation systems), see 100+ AI Capstone Project Ideas. For broader Python project ideas, our Python Projects library has 250+ working capstones.

Angel Jude Suarez
Full-Stack Developer at PIES IT Solution
Focuses on Python development, machine learning, and AI integration. Has built production AI systems including OpenAI Whisper integration for medical transcription and GPT-4o-powered diagnosis assistance. Strong background in pandas, scikit-learn, and TensorFlow.
Expertise: Python · PHP · Java · VB.NET · ASP.NET · Machine Learning · AI Integration · OpenCV · Django · CodeIgniter · View all posts by Angel Jude Suarez →