The CRUD Operations In Python is written in Python programming language and MySQL database, in this article I will teach you how to create a Python crud operation with mysql.
CRUD Operation In Python: Project Information
| Project Name: | CRUD Operation In Python |
| Language/s Used: | Python (GUI) Based |
| Python version (Recommended): | 2.x or 3.x |
| Database: | None |
| Type: | Python App |
| Developer: | IT SOURCECODE |
| Updates: | 0 |
About The Project
The abbreviation CRUD expands to Create, Read, Update, and Delete. These four are fundamental operations in a database.
A crud application in Python is designed in a Graphical User Interface(GUI) using crud python tkinter, it also includes a downloadable python crud operation.
CRUD In Python: Four Fundamental Operations
- CREATE – This refers to the insertion of new data into the table. Data is inserted in the form of a tuple. The number of attributes in the tuple must be equal to that defined in the relation schema while creating the table.
- READ – This refers to reading data from a database. A read statement has three clauses:
- SELECT: Takes as the predicate the attributes to be queried, use * for all attributes.
- FROM: Takes as the predicate a relation.
- WHERE: Takes as the predicate a condition, this is not compulsory.
- UPDATE – This refers to the updating of tuple values already present in the table.
- DELETE – This refers to the deletion of the tuple present in the table.
Before we start to perform this Python CRUD Operation, be sure that you have Pycharm IDE and XAMPP installed on your computer.
By the way, if you are new to Python programming and don’t know what Python IDE to use, I have here a list of the Best Python IDE for Windows, Linux, and Mac OS that will suit you.
I also have here How to Download and Install Latest Version of Python on Windows.
How to create a CRUD Operations In Python With Source Code: A step-by-step guide
Python CRUD Operations With Source Code
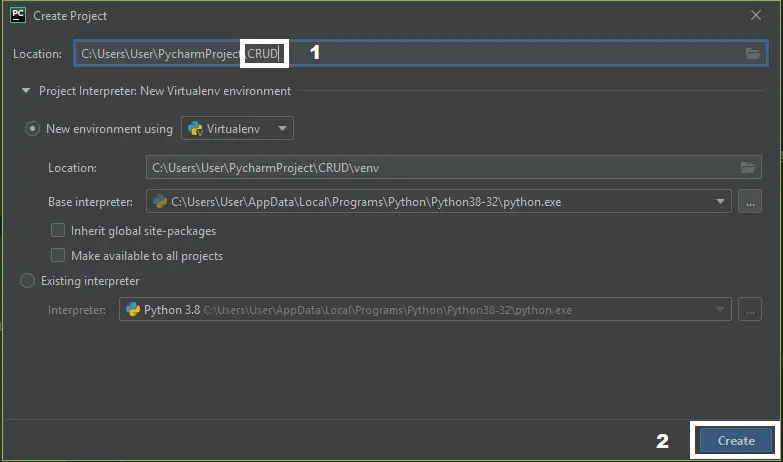
- Step 1: Create a project name.
First, when you finished installing the Pycharm IDE on your computer, open it and then create a “project name” After creating a project name click the “create” button.

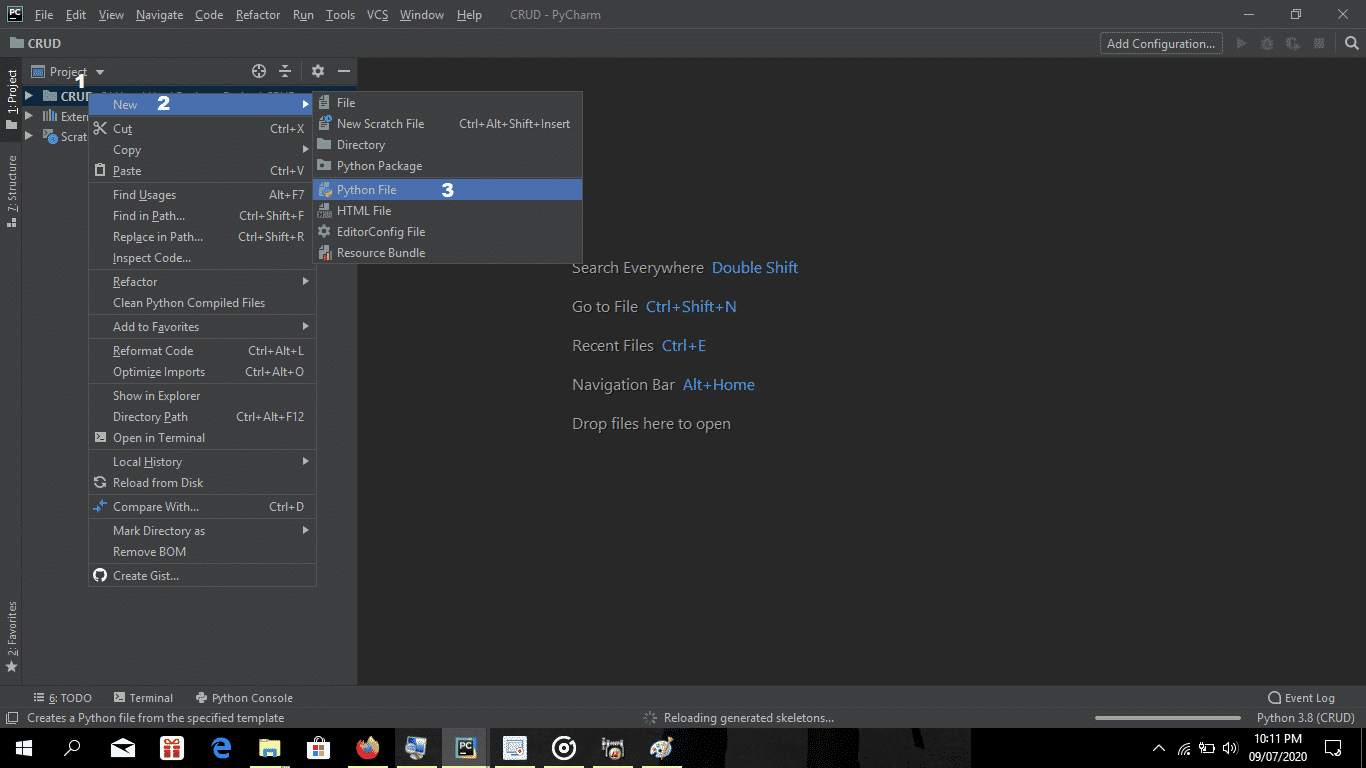
- Step 2: Create a python file.
Second, after creating a project name, “right-click” your project name and then click “new.” After that click the “python file“.

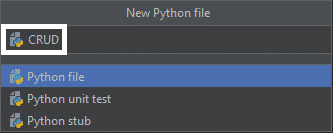
- Step 3: Name your python file.
Third, after creating a Python file, Name your Python file after that click “enter“.

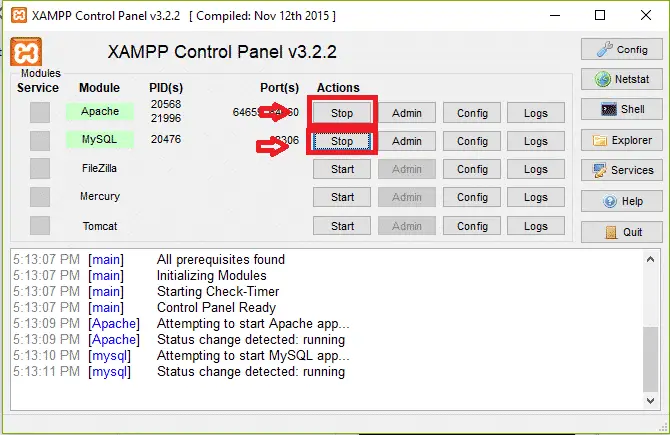
- Step 4: Open the XAMPP.
Fourth when you are done creating a project name and python file in PyCharm IDE, open the XAMPP and click the “start” button of “Apache” and “MySQL.”

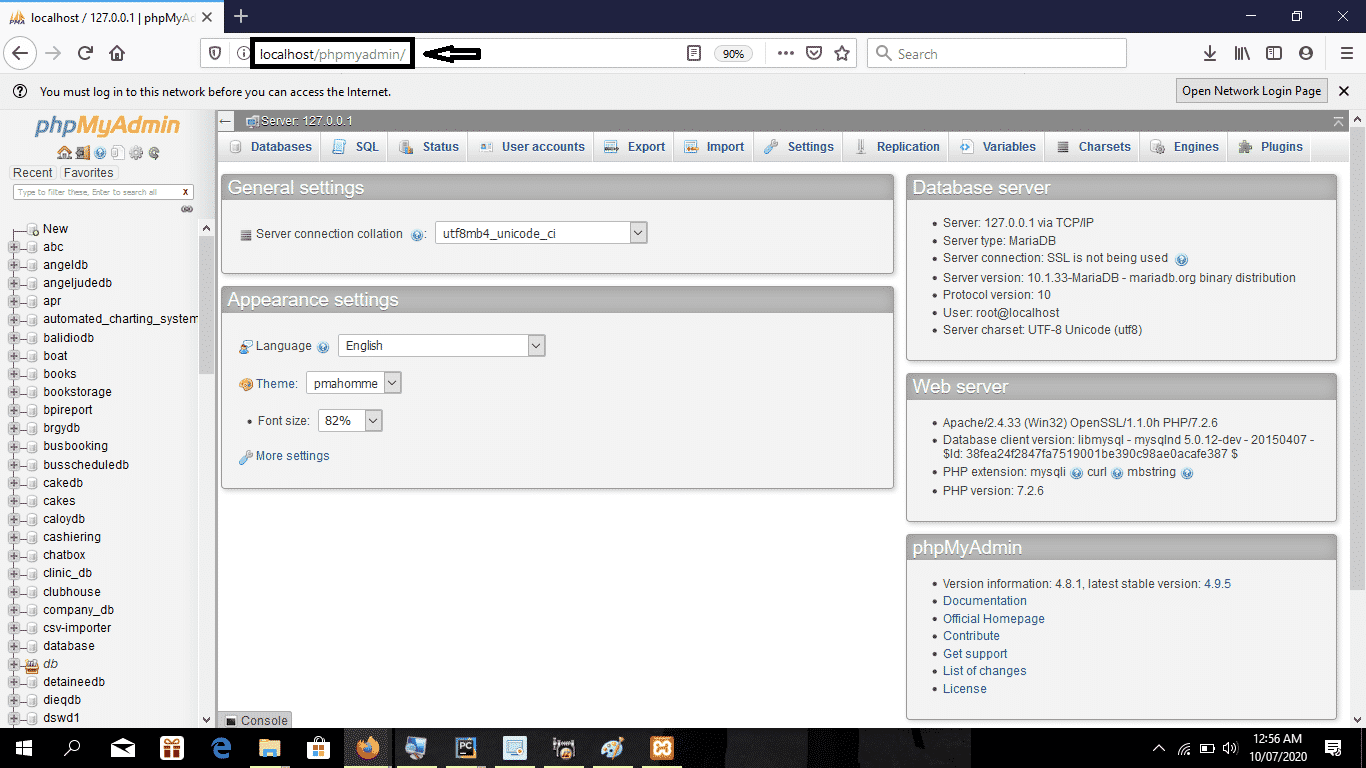
- Step 5: Open any browser.
Fifth open any browser and type in the URL: localhost/phpMyadmin.
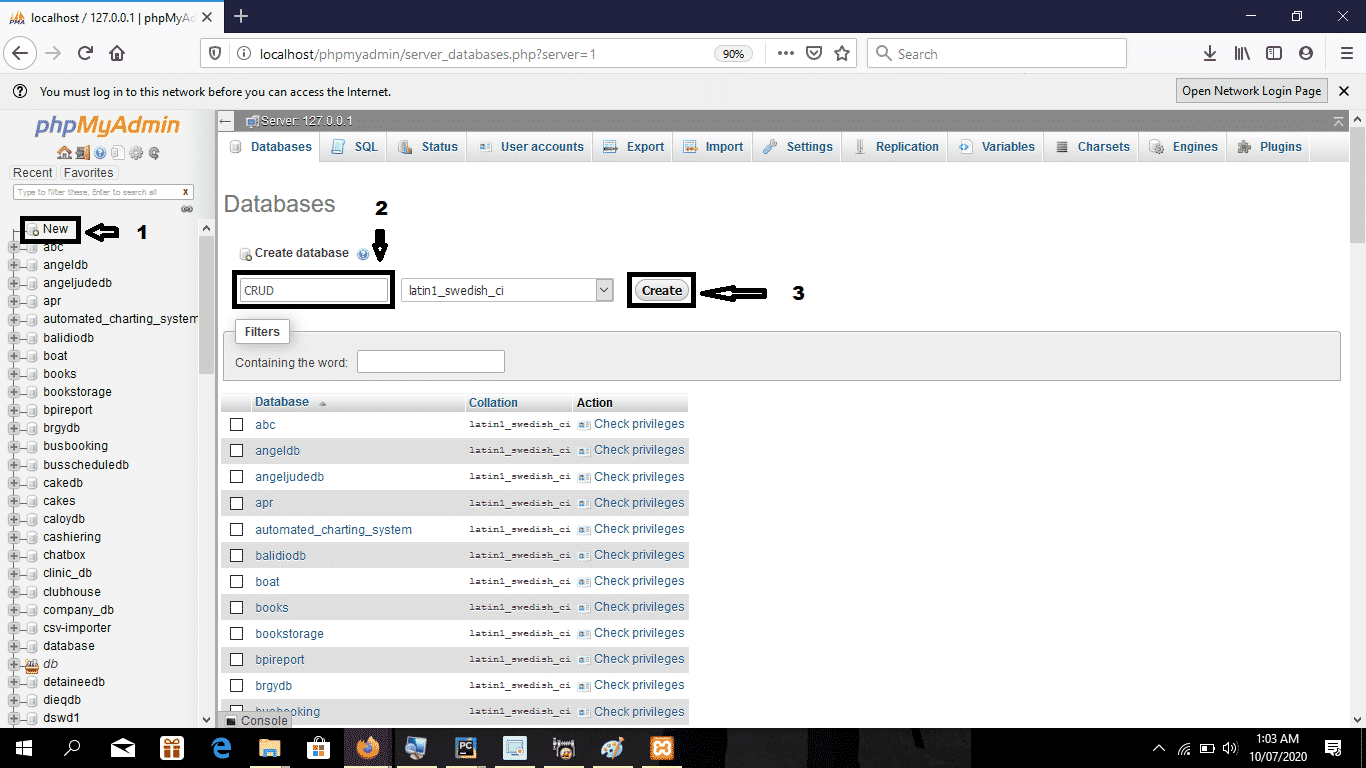
- Step 6: Create a database name.
Sixth click “new” and name your database after that click the “create” button.
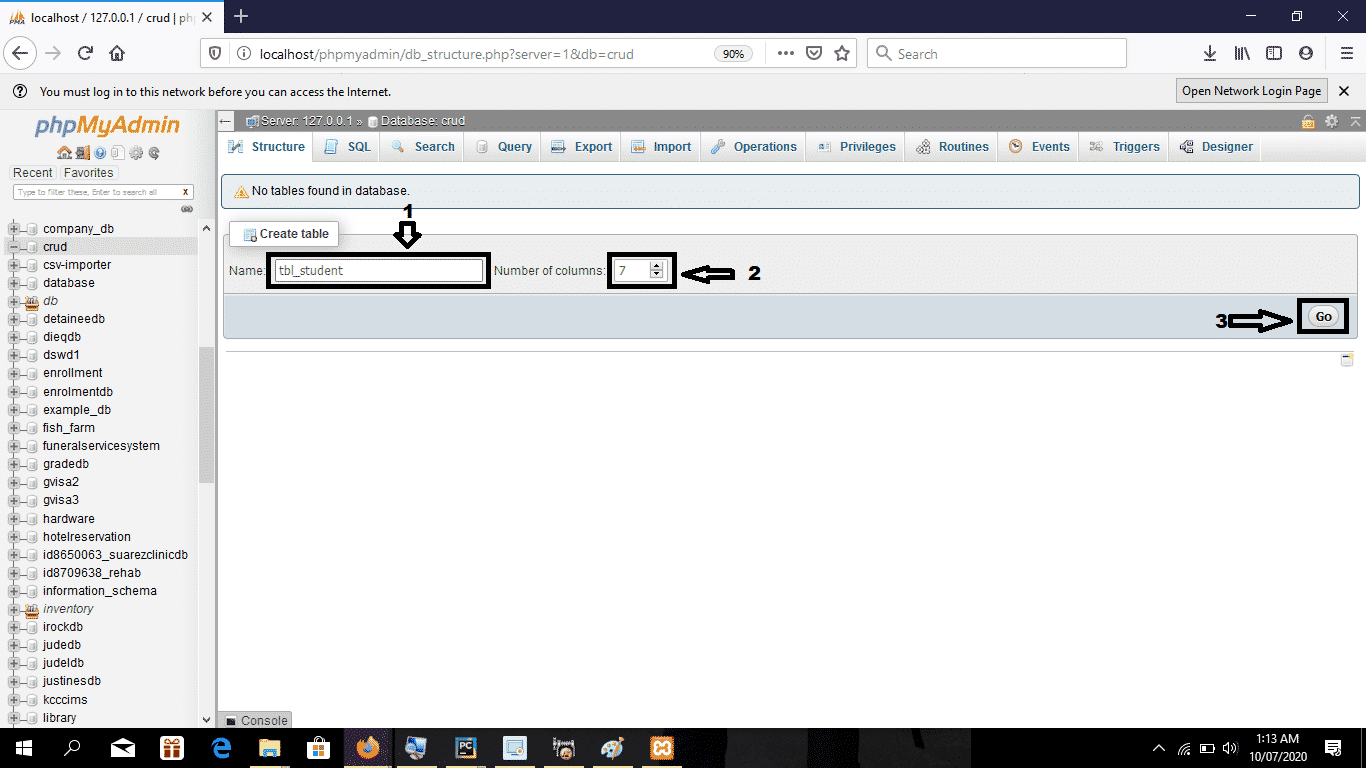
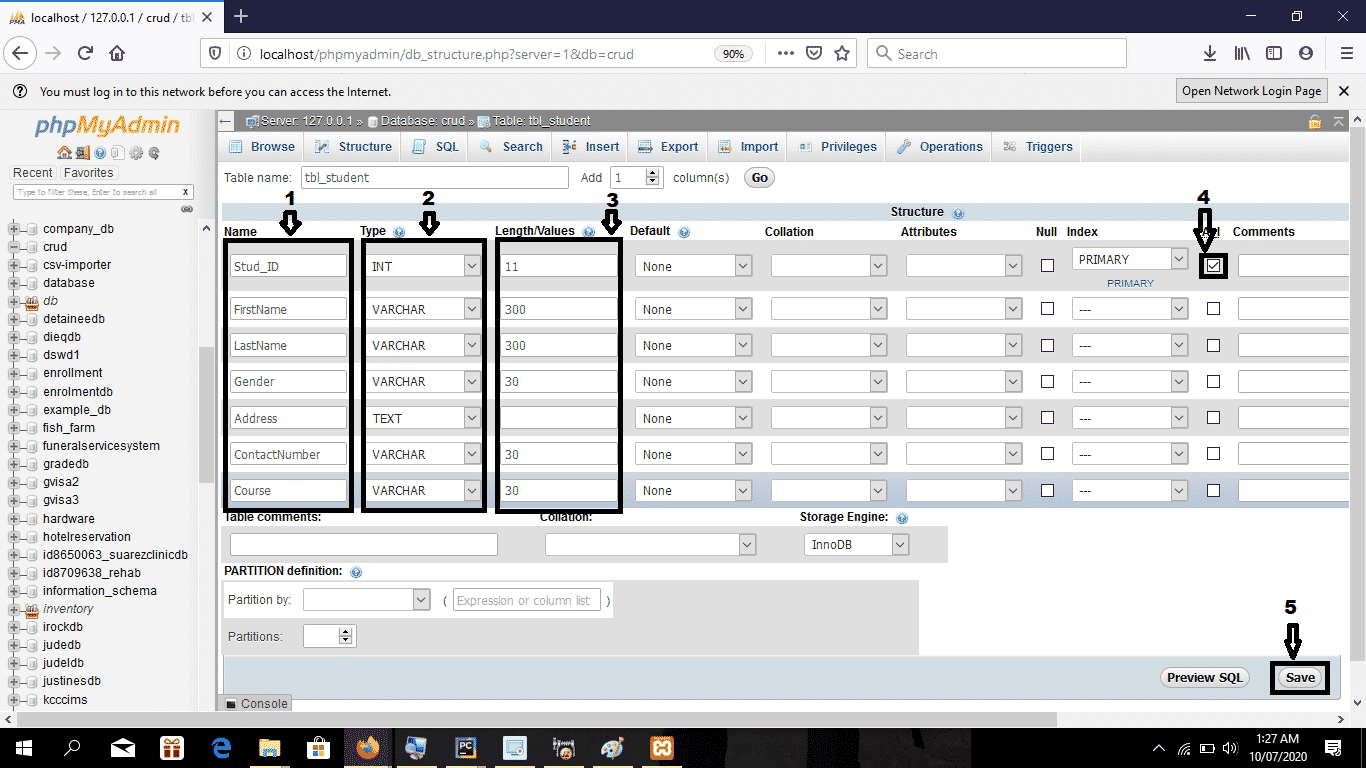
- Step 7: Create a database table.
After creating a database name, create a table name and then select how many “rows” you want to create in your database table after that click the “GO” button.
- Step 8: Add entity and attributes.
After creating the database table, add the entity and attributes in your database table and set the Stud_ID into a primary key and auto-incremented.
- Step 9: The actual code on how to create CRUD Operations.
This step gives the code below on how to create CRUD Operations using Python and connect to MySQL as a backend, you are free to copy this code and explore coding in your project.
Code Explanations
1. Create a Connection
The code given below is the connection under Python and MySQL.
import mysql.connector
from mysql.connector import Error
 try:
                        conn = mysql.connector.connect(host='localhost',
                                                       database='CRUD',
                                                       user='root',
                                                       password='')
                        mycursor = conn.cursor()
In this module which is the connection of the system from a Python connect into MySQL database to perform adding, updating, deleting, and retrieving data.
2. Main Module
The code given below is the main module of the project.
from tkinter import *
from tkinter import messagebox
import os
import sys
from tkinter import ttk
import mysql.connector
from mysql.connector import Error
py=sys.executable
#creating window
class MainWin(Tk):
def __init__(self):
super().__init__()
self.configure(bg='gray')
self.canvas = Canvas(width=1366, height=768, bg='gray')
self.canvas.pack()
self.maxsize(1320, 768)
self.minsize(1320,768)
self.state('zoomed')
self.title('CRUD Operation In Python')
self.a = StringVar()
self.b = StringVar()
self.mymenu = Menu(self)
#calling scripts
def ib():
os.system('%s %s' % (py, 'Update.py'))
def ret():
os.system('%s %s' % (py, 'Delete.py'))
def sea():
os.system('%s %s' % (py,'Add.py'))
#creating table
self.listTree = ttk.Treeview(self,height=14,columns=('First Name','Last Name','Gender','Address','Contact Number','Course'))
self.vsb = ttk.Scrollbar(self,orient="vertical",command=self.listTree.yview)
self.hsb = ttk.Scrollbar(self,orient="horizontal",command=self.listTree.xview)
self.listTree.configure(yscrollcommand=self.vsb.set,xscrollcommand=self.hsb.set)
self.listTree.heading("#0", text='ID')
self.listTree.column("#0", width=50,minwidth=50,anchor='center')
self.listTree.heading("First Name", text='First Name')
self.listTree.column("First Name", width=200, minwidth=200,anchor='center')
self.listTree.heading("Last Name", text='Last Name')
self.listTree.column("Last Name", width=200, minwidth=200,anchor='center')
self.listTree.heading("Gender", text='Gender')
self.listTree.column("Gender", width=125, minwidth=125,anchor='center')
self.listTree.heading("Address", text='Address')
self.listTree.column("Address", width=125, minwidth=125, anchor='center')
self.listTree.heading("Contact Number", text='Contact Number')
self.listTree.column("Contact Number", width=125, minwidth=125, anchor='center')
self.listTree.heading("Course", text='Course')
self.listTree.column("Course", width=125, minwidth=125, anchor='center')
self.listTree.place(x=200,y=360)
self.vsb.place(x=1150,y=361,height=287)
self.hsb.place(x=200,y=650,width=966)
ttk.Style().configure("Treeview",font=('Times new Roman',15))
def ser():
try:
conn = mysql.connector.connect(host='localhost',
database='crud',
user='root',
password='')
cursor = conn.cursor()
cursor.execute("Select * from tbl_student")
pc = cursor.fetchall()
if pc:
self.listTree.delete(*self.listTree.get_children())
for row in pc:
self.listTree.insert("",'end',text=row[0] ,values = (row[1],row[2],row[3],row[4],row[5],row[6]))
else:
messagebox.showinfo("Error", "No Student!")
except Error:
#print(Error)
messagebox.showerror("Error","Something Goes Wrong")
def check():
#label and input box
self.label3 = Label(self, text='CRUD Operation In Python',fg='black',bg="gray" ,font=('Courier new', 30, 'bold'))
self.label3.place(x=350, y=22)
self.label6 = Label(self, text="STUDENT INFORMATION DETAILS",bg="gray", font=('Courier new', 15, 'underline', 'bold'))
self.label6.place(x=560, y=300)
self.button = Button(self, text='View Student(s)', width=25,bg='blue', font=('Courier new', 10), command=ser).place(x=240,y=250)
self.button = Button(self, text='Add Student', width=25,bg='green', font=('Courier new', 10), command=sea).place(x=520,y=250)
self.brt = Button(self, text="Update Student", width=15,bg='orange', font=('Courier new', 10), command=ib).place(x=800, y=250)
self.brt = Button(self, text="Delete Student", width=15,bg='red', font=('Courier new', 10), command=ret).place(x=1000, y=250)
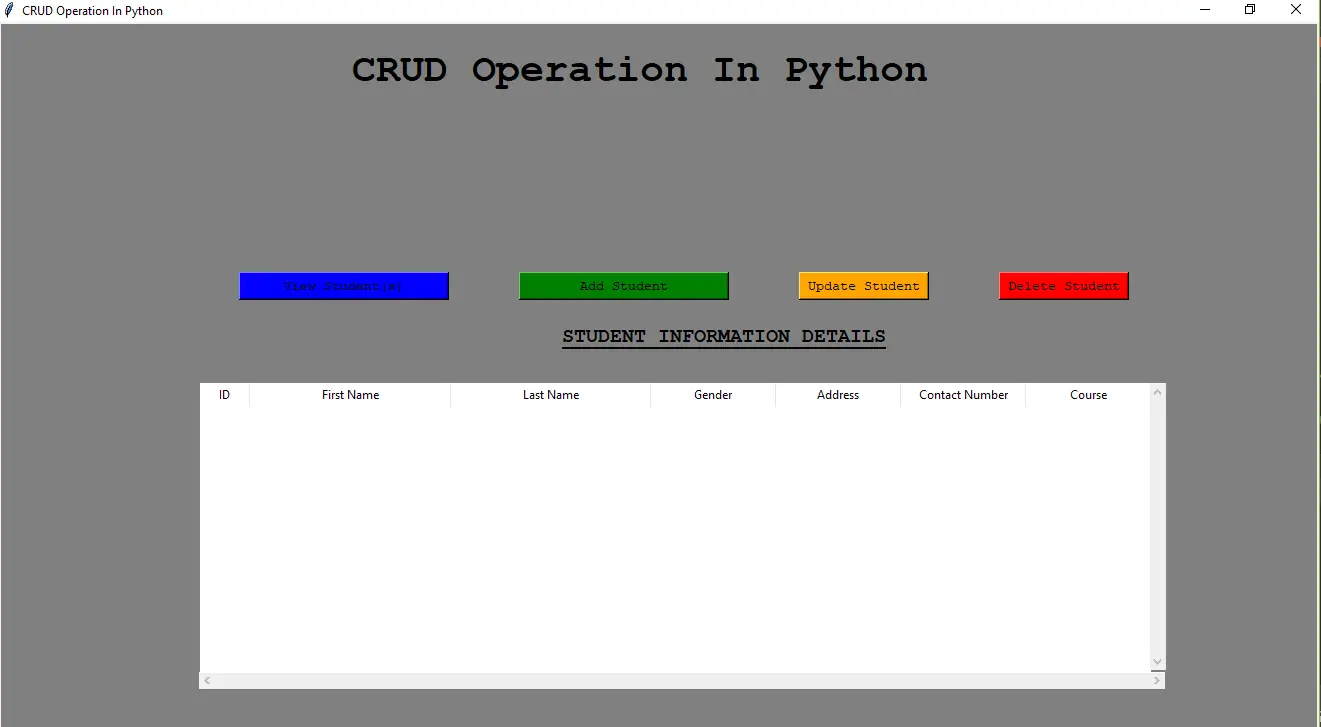
check()
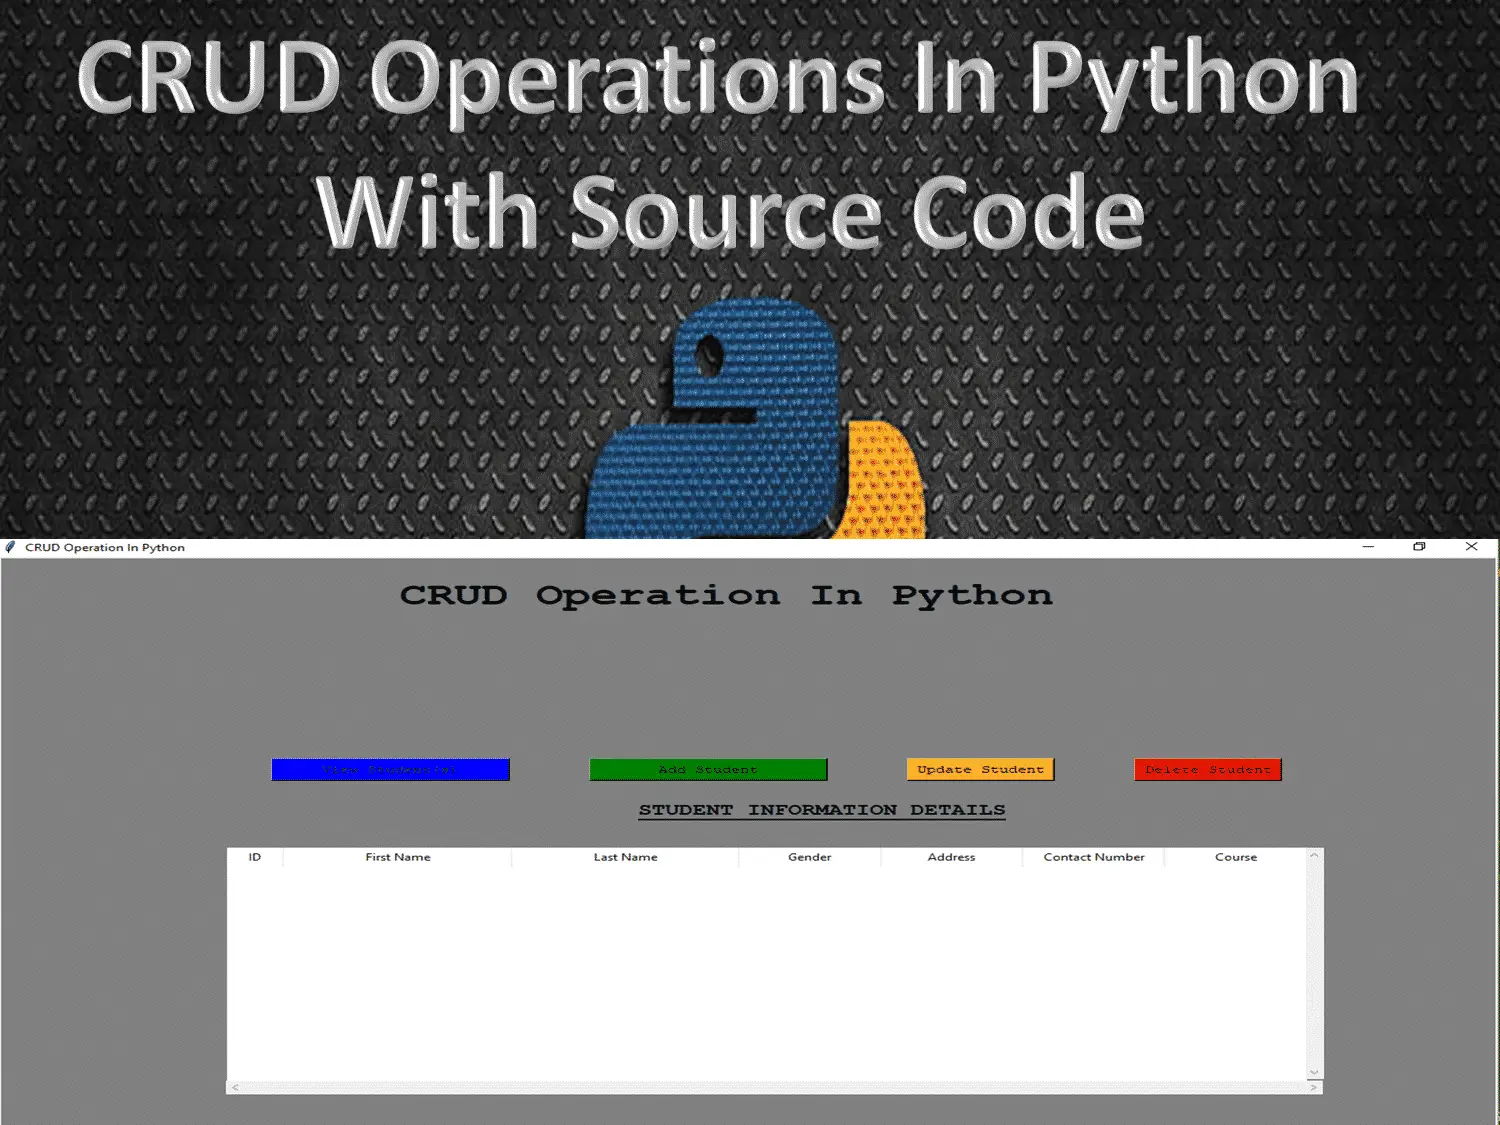
MainWin().mainloop()In this module which is the main module of the system, the CRUD function is connected to this module.
Output:
3. Add Data
The code given below is for adding data.
from tkinter import *
from tkinter import messagebox
from tkinter import filedialog
import os
import sys
import mysql.connector
from mysql.connector import Error
py = sys.executable
#creating window
class Add(Tk):
def __init__(self):
super().__init__()
self.maxsize(500,417)
self.minsize(500,417)
self.title('Add Student')
self.canvas = Canvas(width=500, height=417, bg='gray')
self.canvas.pack()
fname = StringVar()
lname = StringVar()
cn = StringVar()
gender = StringVar()
add = StringVar()
c = StringVar()
#verifying input
def asi():
try:
self.conn = mysql.connector.connect(host='localhost',
database='crud',
user='root',
password='')
self.myCursor = self.conn.cursor()
first = fname.get()
last = lname.get()
contact = cn.get()
gend = gender.get()
address = add.get()
course = c.get()
self.myCursor.execute("Insert into tbl_student(FirstName,LastName,Gender,Address,ContactNumber,Course) values (%s,%s,%s,%s,%s,%s)",[first,last,gend,address,contact,course])
self.conn.commit()
messagebox.showinfo("Done","Student Inserted Successfully")
ask = messagebox.askyesno("Confirm","Do you want to add another student?")
if ask:
self.destroy()
os.system('%s %s' % (py, 'Add.py'))
else:
self.destroy()
self.myCursor.close()
self.conn.close()
except Error:
messagebox.showerror("Error","Something goes wrong")
# label and input box
Label(self, text='Student Details',bg='gray', fg='white', font=('Courier new', 25, 'bold')).pack()
Label(self, text='First Name:', bg='gray', font=('Courier new', 10, 'bold')).place(x=70, y=102)
Entry(self, textvariable=fname, width=30).place(x=200, y=104)
Label(self, text='Last Name:', bg='gray', font=('Courier new', 10, 'bold')).place(x=70, y=150)
Entry(self, textvariable=lname, width=30).place(x=200, y=152)
Label(self, text='Gender:', bg='gray', font=('Courier new', 10, 'bold')).place(x=70, y=200)
Entry(self, textvariable=gender, width=30).place(x=200, y=202)
Label(self, text='Address:', bg='gray', font=('Courier new', 10, 'bold')).place(x=70, y=250)
Entry(self, textvariable=add, width=30).place(x=200, y=250)
Label(self, text='Contact Number:', bg='gray', font=('Courier new', 10, 'bold')).place(x=70, y=300)
Entry(self, textvariable=cn, width=30).place(x=200, y=300)
Label(self, text='Course:', bg='gray', font=('Courier new', 10, 'bold')).place(x=70, y=350)
Entry(self, textvariable=c, width=30).place(x=200, y=350)
Button(self, text="Save", bg='blue', width=15, command=asi).place(x=230, y=380)
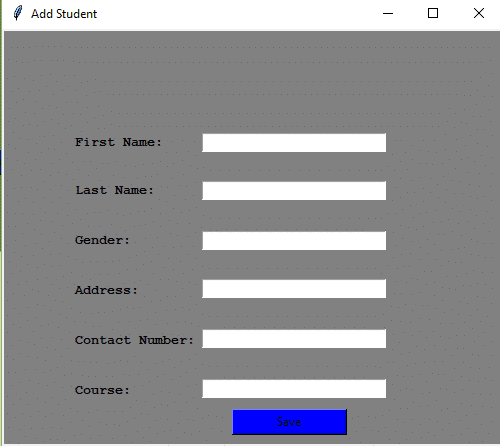
Add().mainloop()
In this module which is performing the create function and save into MySQL database.
Output:
4. Update Data
The code given below is for Update.
#import all the modules
from tkinter import *
import mysql.connector
from mysql.connector import Error
import tkinter.messagebox
conn=mysql.connector.connect(host='localhost',
database='crud',
user='root',
password='')
mycursor = conn.cursor()
class Database:
def __init__(self,master,*args,**kwargs):
self.master=master
self.heading=Label(master,text="Update Student Information",font=('Courier new', 40),fg='black')
self.heading.place(x=100,y=0)
#label and entry for id
self.id_le=Label(master,text="Enter ID",font=('Courier new', 10))
self.id_le.place(x=0,y=70)
self.id_leb=Entry(master,font=('Courier new', 10),width=10)
self.id_leb.place(x=380,y=70)
self.btn_search=Button(master,text="search",width=8,height=0,bg='orange',command=self.search)
self.btn_search.place(x=500,y=70)
#lables for the window
self.first=Label(master,text="Enter First Name",font=('Courier new', 10,'bold'))
self.first.place(x=0,y=120)
self.last=Label(master,text="Enter Last Name",font=('Courier new', 10,'bold'))
self.last.place(x=0,y=170)
self.gender = Label(master, text="Enter Gender ", font=('Courier new', 10,'bold'))
self.gender.place(x=0, y=220)
self.address = Label(master, text="Enter Address", font=('Courier new', 10,'bold'))
self.address.place(x=0, y=270)
self.contact = Label(master, text="Enter Contact", font=('Courier new', 10,'bold'))
self.contact.place(x=0, y=320)
self.course = Label(master, text="Enter Course ", font=('Courier new', 10,'bold'))
self.course.place(x=0, y=370)
#enteries for window
self.first=Entry(master,width=25,font=('Courier new', 10,'bold'))
self.first.place(x=380,y=120)
self.last = Entry(master, width=25, font=('Courier new', 10,'bold'))
self.last.place(x=380, y=170)
self.gender = Entry(master, width=25, font=('Courier new', 10,'bold'))
self.gender.place(x=380, y=220)
self.address = Entry(master, width=25, font=('Courier new', 10,'bold'))
self.address.place(x=380, y=270)
self.contact = Entry(master, width=25, font=('Courier new', 10,'bold'))
self.contact.place(x=380, y=320)
self.course = Entry(master, width=25, font=('Courier new', 10,'bold'))
self.course.place(x=380, y=370)
#button to add to the database
self.btn_add=Button(master,text='Update Student',width=27,height=1,bg='green',fg='white',command=self.update)
self.btn_add.place(x=380,y=420)
def search(self, *args, **kwargs):
mycursor.execute("SELECT * FROM tbl_student WHERE Stud_ID=%s",[self.id_leb.get()])
result = mycursor.fetchall()
for r in result:
self.n1 = r[1]
self.n2 = r[2]
self.n3 = r[3]
self.n4 = r[4]
self.n5 = r[5]
self.n6 = r[6]
conn.commit()
#inster into the enteries to update
self.first.delete(0,END)
self.first.insert(0, str(self.n1))
self.last.delete(0, END)
self.last.insert(0, str(self.n2))
self.gender.delete(0, END)
self.gender.insert(0, str(self.n3))
self.address.delete(0, END)
self.address.insert(0, str(self.n4))
self.contact.delete(0, END)
self.contact.insert(0, str(self.n5))
self.course.delete(0, END)
self.course.insert(0, str(self.n6))
def update(self,*args,**kwargs):
self.u1=self.first.get()
self.u2 = self.last.get()
self.u3 = self.gender.get()
self.u4 = self.address.get()
self.u5 = self.contact.get()
self.u6 = self.course.get()
mycursor.execute("UPDATE tbl_student SET FirstName=%s,LastName=%s,Gender=%s,Address=%s,ContactNumber=%s,Course=%s WHERE Stud_ID=%s",[self.u1,self.u2,self.u3,self.u4,self.u5,self.u6,self.id_leb.get()])
conn.commit()
tkinter.messagebox.showinfo("Success","Update Student successfully")
root=Tk()
b=Database(root)
root.geometry("1000x760+0+0")
root.title("Update Student Information")
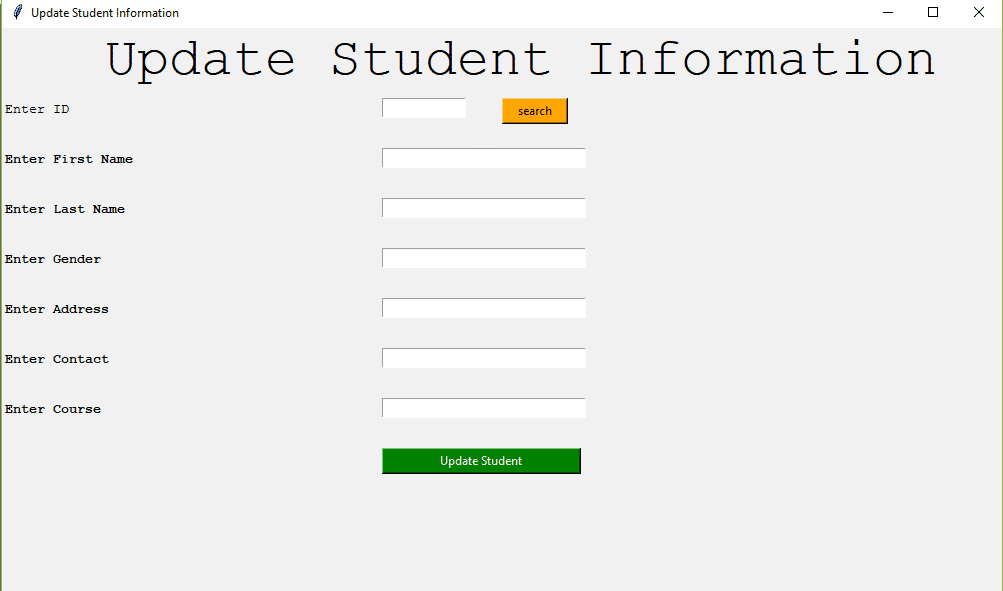
root.mainloop()In this module which is the update function of the system.
Output:
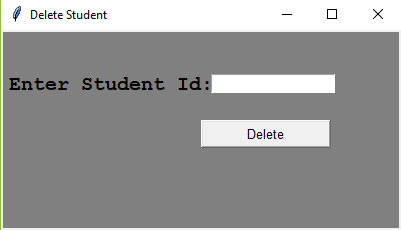
5. Delete Data
The code given below is for deletion.
from tkinter import *
from tkinter import messagebox
import mysql.connector
from mysql.connector import Error
#creating widow
class Rem(Tk):
    def __init__(self):
        super().__init__()
        self.maxsize(400, 200)
        self.minsize(400, 200)
        self.title("Delete Student")
        self.canvas = Canvas(width=1366, height=768, bg='gray')
        self.canvas.pack()
        a = StringVar()
        def ent():
            if len(a.get()) ==0:
                messagebox.showinfo("Error","Please Enter A Valid Id")
            else:
                d = messagebox.askyesno("Confirm", "Are you sure you want to delete the Student?")
                if d:
                    try:
                        self.conn = mysql.connector.connect(host='localhost',
                                         database='crud',
                                         user='root',
                                         password='')
                        self.myCursor = self.conn.cursor()
                        self.myCursor.execute("Delete from tbl_student where Stud_ID = %s",[a.get()])
                        self.conn.commit()
                        self.myCursor.close()
                        self.conn.close()
                        messagebox.showinfo("Confirm","Student Deleted Successfully")
                        a.set("")
                    except:
                        messagebox.showerror("Error","Something goes wrong")
        Label(self, text = "Enter Student Id: ",bg='gray',fg='black',font=('Courier new', 15, 'bold')).place(x = 5,y = 40)
        Entry(self,textvariable = a,width = 20).place(x = 210,y = 44)
        Button(self, text='Delete', width=15, font=('arial', 10),command = ent).place(x=200, y = 90)


Rem().mainloop()
In this module which is the delete function of the system.
Output:
Frequently Asked Questions (FAQs)
CRUD In Python is a simple way how to create, read, update, and delete data in the database using the Python programming language and MySQL or any Database.
To run the CRUD Operation In Python First download the source code given below.
Second, extract the zip file that you have downloaded.
Third, open the unzip file in your PyCharm IDE.
Fourth, import the sql file into your database.
Fifth, you are free to explore and manage the project given.
Downloadable Source Code
I have here the list of Best Python Project with Source code free to download for free, I hope this can help you a lot.
Summary
The CRUD Operations In Python is written in a Python programming language and MySQL database, In this tutorial you will learn how to perform CRUD operations with the MySQL database.
This project contains the following Python script (CRUD.py) which is the main module of this project.(Add.py) which is the create module of this project.(Update.py) which is the update module, and last (Delete.py) which is the delete module of this project.
To begin, make sure you’ve prepared for your interview. The Python DS Course will help you improve your understanding of data structures.
Join the Machine Learning – Basic Level Course to get started on your Machine Learning journey.
Official documentation
Frequently Asked Questions
What does this Python CRUD example demonstrate?
Basic Create, Read, Update, Delete operations against one SQLite/MySQL table via sqlite3 or mysql.connector. Foundation tutorial showing parametrized queries, form binding, Treeview refresh.
What Python version and libraries does this project require?
Most projects in this batch use Python 3.10, 3.11, or 3.12 (avoid 3.13 until library wheels catch up). Standard libs: tkinter (built-in), sqlite3 (built-in). External: pip install pillow opencv-python pygame mysql-connector-python reportlab requests beautifulsoup4. Check the requirements.txt file (if included) for exact versions.
How do I set up the database for this Python project?
For SQLite (most common, no setup needed): the .db file auto-creates on first run. For MySQL: install MySQL Server + MySQL Workbench, create an empty database, import the included .sql file, edit the connection string in db.py (or db_connect.py) with your host, user, password, database name.
Can I use this Python project for a BSIT capstone or thesis?
Yes. Python is rising fast in Philippine BSIT panels. Extend it: add user roles via auth module, dashboards (matplotlib charts), PDF reports (reportlab), email notifications (smtplib), real domain extension (analytics, audit log, multi-branch support). Pair with Chapter 1-5 documentation matching your panel’s rubric.
Why am I getting ‘ModuleNotFoundError’ or ‘No module named X’?
Three common Python issues: (1) Module not installed: pip install
Where can I find more Python projects with source code?
Browse the Python Projects hub for the full library. For computer vision specifically see OpenCV Projects (46 vision systems). For ML / AI capstones see Machine Learning Projects. For BSIT capstone idea lists see 150 Best Capstone Project Ideas.

Angel Jude Suarez
Full-Stack Developer at PIES IT Solution
Focuses on Python development, machine learning, and AI integration. Has built production AI systems including OpenAI Whisper integration for medical transcription and GPT-4o-powered diagnosis assistance. Strong background in pandas, scikit-learn, and TensorFlow.
Expertise: Python · PHP · Java · VB.NET · ASP.NET · Machine Learning · AI Integration · OpenCV · Django · CodeIgniter · View all posts by Angel Jude Suarez →
Really informative article post.Thanks Again.
Add button code…
os.system(‘%s %s’ % (py,’Add.py’))
is causing ‘C:\Program’ is not recognised as an internal or external command, operable program or batch file.
My Python executable is installed at ‘C:\Program Files\Python310\Python.exe’, and variable ‘py’ contains that value at execution.
Why therefore, is os.system only seeing the value ‘C:\Program’ and truncating everything after the SPACE in the Path?
Thanks for this tutorial. For those with os.system issue, this worked for me :
def sea():
# os.system(‘%s %s’ % (py,’Add.py’))
add_rec = os.path.join(os.getcwd(), “tkinter\student\CRUD”, “Add.py”)
os.system(‘%s %s’ % (py, add_rec))