Gender and Age Detection OpenCV Python With Source Code
The Gender and Age Detection OpenCV Python was developed using Python OpenCV, In this Python Project, we will use Python Deep Learning to accurately identify the gender and age of a person from a single image of a face.
What is OpenCV?
OpenCV is short for Open Source Computer Vision. Intuitively by the name, it is an open-source Computer Vision and Machine Learning library.
This library is capable of processing real-time image and video while also boasting analytical capabilities. It supports the Deep Learning frameworks TensorFlow, Caffe, and PyTorch.
To build a gender and age detector that can approximately guess the gender and age of the person (face) in a picture using Python Deep Learning on the Adience dataset.
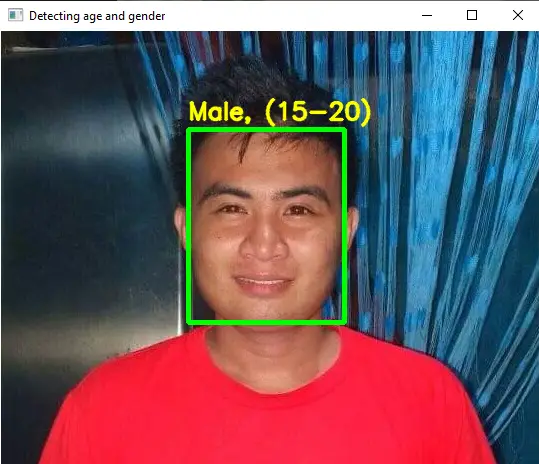
The predicted gender may be one of ‘Male’ and ‘Female’, and the predicted age may be one of the following ranges- (0 – 2), (4 – 6), (8 – 12), (15 – 20), (25 – 32), (38 – 43), (48 – 53), (60 – 100) (8 nodes in the final softmax layer).
It is very difficult to accurately guess an exact age from a single image because of factors like makeup, lighting, obstructions, and facial expressions. And so, we make this a classification problem instead of making it one of regression.
In this Python OpenCV Project also includes a downloadable Python Project With Source Code for free, just find the downloadable source code below and click to start downloading.
By the way if you are new to python programming and you don’t know what would be the the Python IDE to use, I have here a list of Best Python IDE for Windows, Linux, Mac OS that will suit for you. I also have here How to Download and Install Latest Version of Python on Windows.
To start executing Gender and Age Detection OpenCV Python With Source Code, make sure that you have installed Python 3.9 and PyCharm in your computer.
Gender and Age Detection OpenCV Python With Source Code : Steps on how to run the project
Time needed: 5 minutes
These are the steps on how to run Gender and Age Detection OpenCV Python With Source Code
- Step 1: Download the given source code below.
First, download the given source code below and unzip the source code.

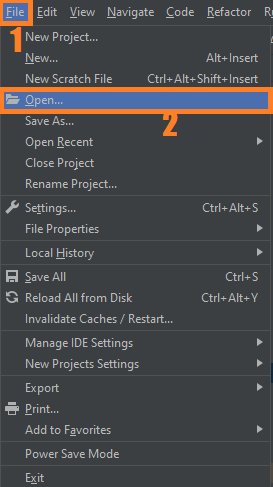
- Step 2: Import the project to your PyCharm IDE.
Next, import the source code you’ve download to your PyCharm IDE.

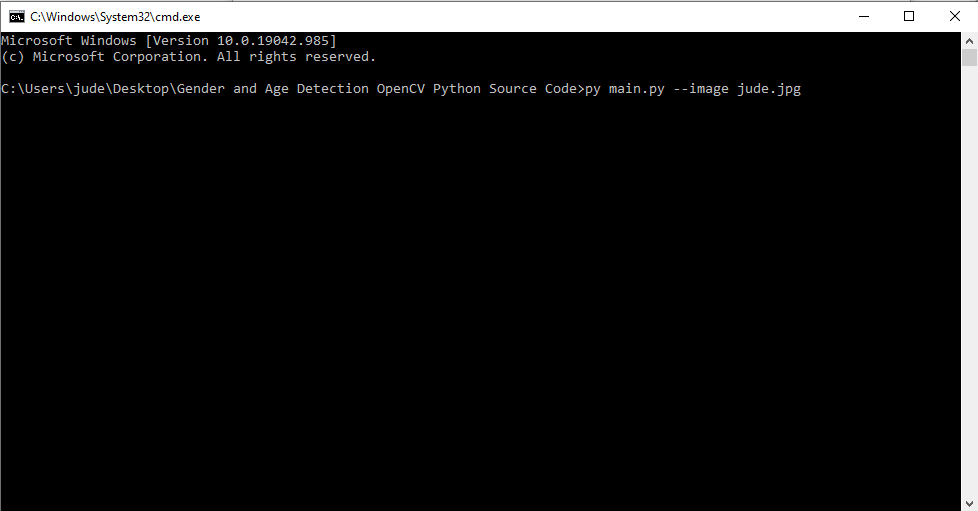
- Step 3: Run the project.
last, run the project with the command “py main.py”

Installed Libraries
import cv2
import math
import argparse
Complete Source Code
import cv2
import math
import argparse

def highlightFace(net, frame, conf_threshold=0.7):
    frameOpencvDnn=frame.copy()
    frameHeight=frameOpencvDnn.shape[0]
    frameWidth=frameOpencvDnn.shape[1]
    blob=cv2.dnn.blobFromImage(frameOpencvDnn, 1.0, (300, 300), [104, 117, 123], True, False)

    net.setInput(blob)
    detections=net.forward()
    faceBoxes=[]
    for i in range(detections.shape[2]):
        confidence=detections[0,0,i,2]
        if confidence>conf_threshold:
            x1=int(detections[0,0,i,3]*frameWidth)
            y1=int(detections[0,0,i,4]*frameHeight)
            x2=int(detections[0,0,i,5]*frameWidth)
            y2=int(detections[0,0,i,6]*frameHeight)
            faceBoxes.append([x1,y1,x2,y2])
            cv2.rectangle(frameOpencvDnn, (x1,y1), (x2,y2), (0,255,0), int(round(frameHeight/150)), 8)
    return frameOpencvDnn,faceBoxes


parser=argparse.ArgumentParser()
parser.add_argument('--image')

args=parser.parse_args()

faceProto="opencv_face_detector.pbtxt"
faceModel="opencv_face_detector_uint8.pb"
ageProto="age_deploy.prototxt"
ageModel="age_net.caffemodel"
genderProto="gender_deploy.prototxt"
genderModel="gender_net.caffemodel"

MODEL_MEAN_VALUES=(78.4263377603, 87.7689143744, 114.895847746)
ageList=['(0-2)', '(4-6)', '(8-12)', '(15-20)', '(25-32)', '(38-43)', '(48-53)', '(60-100)']
genderList=['Male','Female']

faceNet=cv2.dnn.readNet(faceModel,faceProto)
ageNet=cv2.dnn.readNet(ageModel,ageProto)
genderNet=cv2.dnn.readNet(genderModel,genderProto)

video=cv2.VideoCapture(args.image if args.image else 0)
padding=20
while cv2.waitKey(1)<0:
    hasFrame,frame=video.read()
    if not hasFrame:
        cv2.waitKey()
        break

    resultImg,faceBoxes=highlightFace(faceNet,frame)
    if not faceBoxes:
        print("No face detected")

    for faceBox in faceBoxes:
        face=frame[max(0,faceBox[1]-padding):
                   min(faceBox[3]+padding,frame.shape[0]-1),max(0,faceBox[0]-padding)
                   :min(faceBox[2]+padding, frame.shape[1]-1)]

        blob=cv2.dnn.blobFromImage(face, 1.0, (227,227), MODEL_MEAN_VALUES, swapRB=False)
        genderNet.setInput(blob)
        genderPreds=genderNet.forward()
        gender=genderList[genderPreds[0].argmax()]
        print(f'Gender: {gender}')

        ageNet.setInput(blob)
        agePreds=ageNet.forward()
        age=ageList[agePreds[0].argmax()]
        print(f'Age: {age[1:-1]} years')

        cv2.putText(resultImg, f'{gender}, {age}', (faceBox[0], faceBox[1]-10), cv2.FONT_HERSHEY_SIMPLEX, 0.8, (0,255,255), 2, cv2.LINE_AA)
        cv2.imshow("Detecting age and gender", resultImg)
Output

Download Source Code below
Anyway, if you want to level up your programming knowledge, especially Python OpenCV, try this new article I’ve made for you Best OpenCV Projects With Source Code For Beginners 2021.
Summary
In this python project, we implemented a CNN to detect gender and age from a single picture of a face. In this Python OpenCV Project also includes a downloadable Python Project With Source Code for free, just find the downloadable source code below and click to start downloading.
Related Articles
- Code For Game in Python: Python Game Projects With Source Code
- Best Python Projects With Source Code 2020 FREE DOWNLOAD
- How to Make a Point of Sale In Python With Source Code 2021
- Python Code For Food Ordering System | FREE DOWNLOAD | 2020
- Inventory Management System Project in Python With Source Code
Inquiries
If you have any questions or suggestions about Gender and Age Detection OpenCV Python With Source Code, please feel free to leave a comment below.


Not install CV 2 ? Error with name as No Module named cv2 why is this error come…
Because cv2(opencv) is not installed to your system.