The Real-Time Face Mask Detection OpenCV Python was developed using Python Detection OpenCV, during the Pandemic COVID-19, WHO has made wearing masks compulsory to protect against this deadly virus.
In this tutorial, we will develop a machine learning project – a Real-time Face Mask Detector with Python.
A Face Mask Detection We will build a real-time system to detect whether the person on the webcam is wearing a mask or not. We will train the face mask detector model using OpenCV.
This is a nice project for beginners to implement their learnings and gain expertise.
About The Project
This Face Mask Detection In Python also includes a downloadable Python Project With Source Code for free, just find the downloadable source code below and click to start downloading.
By the way, if you are new to Python programming and don’t know what Python IDE to use, I have here a list of the Best Python IDE for Windows, Linux, and Mac OS that will suit you.
I also have here How to Download and Install the Latest Version of Python on Windows.
To start executing a Real-Time Face Mask Detection OpenCV Python With Source Code, make sure that you have installed Python in your computer.
How To Run The Face Mask Detection OpenCV Python: A step-by-step Guide with Source Code
Time needed: 5 minutes
These are the steps on how to run Real-Time Face Mask Detection OpenCV Python With Source Code
- Step 1: Download the given source code below.
First, download the given source code below and unzip the source code.

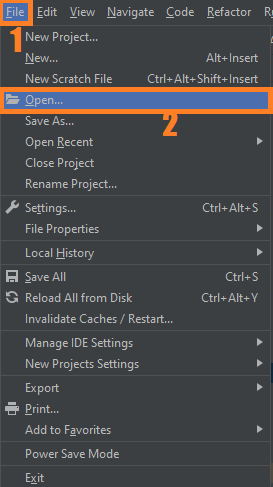
- Step 2: Import the project to your PyCharm IDE.
Next, import the source code you’ve downloaded to your PyCharm IDE.

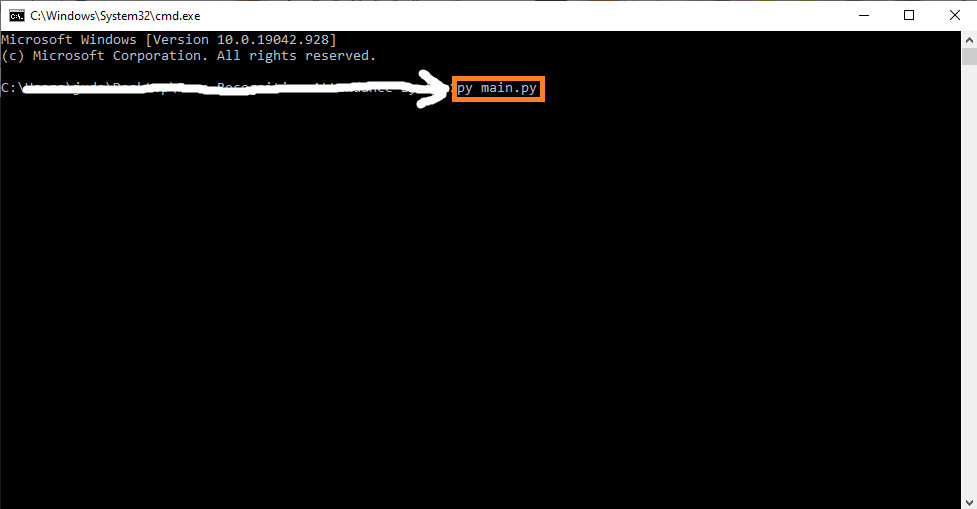
- Step 3: Run the project.
Lastly, run the project with the command “py main.py”

Installed Libraries
from tensorflow.keras.applications.mobilenet_v2 import preprocess_input
from tensorflow.keras.preprocessing.image import img_to_array
from tensorflow.keras.models import load_model
from imutils.video import VideoStream
import numpy as np
import imutils
import time
import cv2
import os
Complete Source Code
# import the necessary packages
from tensorflow.keras.applications.mobilenet_v2 import preprocess_input
from tensorflow.keras.preprocessing.image import img_to_array
from tensorflow.keras.models import load_model
from imutils.video import VideoStream
import numpy as np
import imutils
import time
import cv2
import os

def detect_and_predict_mask(frame, faceNet, maskNet):
	# grab the dimensions of the frame and then construct a blob
	# from it
	(h, w) = frame.shape[:2]
	blob = cv2.dnn.blobFromImage(frame, 1.0, (224, 224),
		(104.0, 177.0, 123.0))

	# pass the blob through the network and obtain the face detections
	faceNet.setInput(blob)
	detections = faceNet.forward()
	print(detections.shape)

	# initialize our list of faces, their corresponding locations,
	# and the list of predictions from our face mask network
	faces = []
	locs = []
	preds = []

	# loop over the detections
	for i in range(0, detections.shape[2]):
		# extract the confidence (i.e., probability) associated with
		# the detection
		confidence = detections[0, 0, i, 2]

		# filter out weak detections by ensuring the confidence is
		# greater than the minimum confidence
		if confidence > 0.5:
			# compute the (x, y)-coordinates of the bounding box for
			# the object
			box = detections[0, 0, i, 3:7] * np.array([w, h, w, h])
			(startX, startY, endX, endY) = box.astype("int")

			# ensure the bounding boxes fall within the dimensions of
			# the frame
			(startX, startY) = (max(0, startX), max(0, startY))
			(endX, endY) = (min(w - 1, endX), min(h - 1, endY))

			# extract the face ROI, convert it from BGR to RGB channel
			# ordering, resize it to 224x224, and preprocess it
			face = frame[startY:endY, startX:endX]
			face = cv2.cvtColor(face, cv2.COLOR_BGR2RGB)
			face = cv2.resize(face, (224, 224))
			face = img_to_array(face)
			face = preprocess_input(face)

			# add the face and bounding boxes to their respective
			# lists
			faces.append(face)
			locs.append((startX, startY, endX, endY))

	# only make a predictions if at least one face was detected
	if len(faces) > 0:
		# for faster inference we'll make batch predictions on *all*
		# faces at the same time rather than one-by-one predictions
		# in the above `for` loop
		faces = np.array(faces, dtype="float32")
		preds = maskNet.predict(faces, batch_size=32)

	# return a 2-tuple of the face locations and their corresponding
	# locations
	return (locs, preds)

# load our serialized face detector model from disk
prototxtPath = r"face_detector\deploy.prototxt"
weightsPath = r"face_detector\res10_300x300_ssd_iter_140000.caffemodel"
faceNet = cv2.dnn.readNet(prototxtPath, weightsPath)

# load the face mask detector model from disk
maskNet = load_model("mask_detector.model")

# initialize the video stream
print("[INFO] starting video stream...")
vs = VideoStream(src=0).start()

# loop over the frames from the video stream
while True:
	# grab the frame from the threaded video stream and resize it
	# to have a maximum width of 400 pixels
	frame = vs.read()
	frame = imutils.resize(frame, width=400)

	# detect faces in the frame and determine if they are wearing a
	# face mask or not
	(locs, preds) = detect_and_predict_mask(frame, faceNet, maskNet)

	# loop over the detected face locations and their corresponding
	# locations
	for (box, pred) in zip(locs, preds):
		# unpack the bounding box and predictions
		(startX, startY, endX, endY) = box
		(mask, withoutMask) = pred

		# determine the class label and color we'll use to draw
		# the bounding box and text
		label = "Mask" if mask > withoutMask else "No Mask"
		color = (0, 255, 0) if label == "Mask" else (0, 0, 255)

		# include the probability in the label
		label = "{}: {:.2f}%".format(label, max(mask, withoutMask) * 100)

		# display the label and bounding box rectangle on the output
		# frame
		cv2.putText(frame, label, (startX, startY - 10),
			cv2.FONT_HERSHEY_SIMPLEX, 0.45, color, 2)
		cv2.rectangle(frame, (startX, startY), (endX, endY), color, 2)

	# show the output frame
	cv2.imshow("Frame", frame)
	key = cv2.waitKey(1) & 0xFF

	# if the `q` key was pressed, break from the loop
	if key == ord("q"):
		break

# do a bit of cleanup
cv2.destroyAllWindows()
vs.stop()
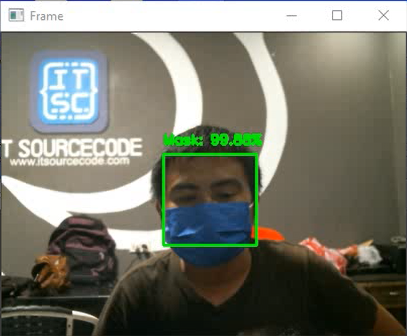
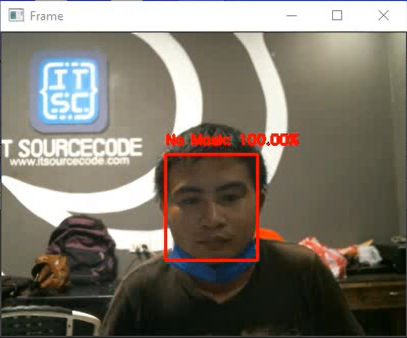
Output:
With Mask
Without Mask
Download the Source Code below
Summary
In this project, we have developed a deep-learning model for face mask detection using Python, Keras, and OpenCV.
We developed the face mask detector model for detecting whether a person is wearing a mask or not.
We have trained the model using Keras with network architecture. Training the model is the first part of this project and testing using webcam using OpenCV is the second part.
Related Articles
- Code For Game in Python: Python Game Projects With Source Code
- Best Python Projects With Source Code FREE DOWNLOAD
- How to Make a Point of Sale In Python With Source Code
- Python Code For Food Ordering System | FREE DOWNLOAD
- Inventory Management System Project in Python With Source Code
Inquiries
If you have any questions or suggestions about Real-Time Face Mask Detection OpenCV Python With Source Code, please feel free to leave a comment below.


i am unable to run the program plz help me
Hello po, I’m Mary Angel from Cebu..I’m a follower of your projects po. Would like to ask the GPU of your desktop pc or laptop po? To build that machine/deep learning project. Looking forward for your response po. Thank you. ☺
Which algorithm you have used