The Railway Reservation System project in Django allow users to search for trains, book tickets, cancel tickets, check train schedules, and check PNR.
It has an admin side which allows extra features like adding routes, stations, and trains.
A Railway Reservation System allows passengers to book and cancel tickets from any of the terminals.
These tickets can be purchased or cancelled for trips that start in one part of Manila and travel times of up to 72 hours and distances of up to thousands of kilometers.
To start creating a Railway Reservation System in Python Django, makes sure that you have PyCharm Professional IDE Installed in your computer.
This Railway Reservation System in Django Framework, Also includes a Download Source Code for free, just find the downloadable source code below and click download now.
About Railway Reservation System Project
| About Project | Project Details |
|---|---|
| Project Name | Railway Reservation System Project in Django |
| Python version (Recommended) | 3.8 Version |
| Programming Language Used | Python Django Language |
| Developer Name | itsourcecode.com |
| IDE Tool (Recommended) | Sublime, Visual Studio, PyCharm |
| Project Type | Web Application |
| Database Used | SQLite |
Admin Features of Railway Reservation System Project in Django
- Login – By default the admin need to login first to enable to access the system.
- Manage User – For the user, the admin can add, edit, delete user information.
- Payment Management – For the payment, the admin can view the customer payments information.
- Manage Reservations – For the reservations, the admin can manage and view reservations of customers.
- Train Management – For the train, the admin can add, edit, and delete train information.
- Manage Station – For the station, the admin can add, edit, and delete station information.
- Routes Management – For the routes, the admin can add, edit, and delete routes information.
User Features of Railway Reservation System Project in Django
- Registration – For the registration, the customer needs to register first to create an account.
- Login – For the login, after creating an account, the customer needs to login to access the whole system.
- Search Trains – For the search, the customer can search all the available trains.
Reservations – For the reservations, the customer can reserve available trains. - Cancel Reservations – For the cancel, the customer can cancel his/her reservation.
Railway Reservation System Project in Django Steps on How to Create a Project
Time needed: 5 minutes
Here are the steps on how to create a Railway Reservation System Project in Django
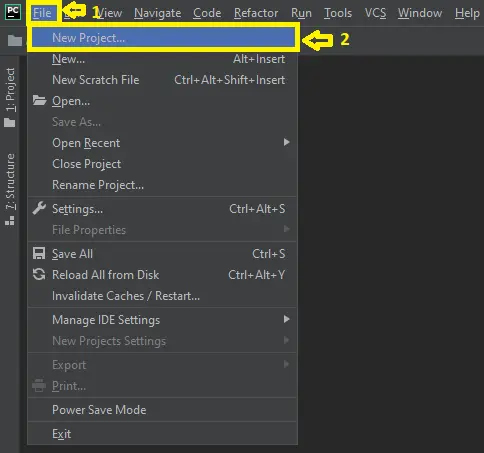
- Step 1: Open file.
First , open “pycharm professional” after that click “file” and click “new project”.

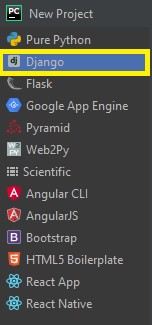
- Step 2: Choose Django.
Next, after click “new project“, choose “Django” and click.

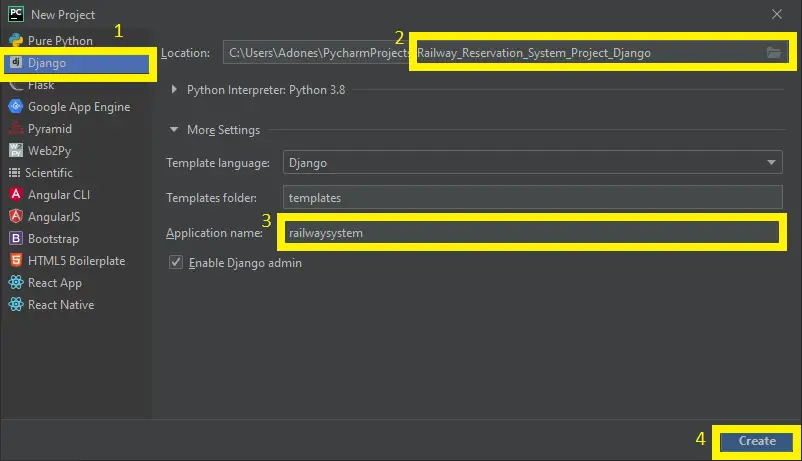
- Step 3: Select file location.
Then, select a file location wherever you want.

- Step 4: Create application name.
After that, name your application.

- Step 5: Click create.
Lastly, finish creating project by clicking “create” button.

- Step 6: Start Coding.
Finally, we will now start adding functionality to our Django Framework by adding some functional codes.
This are the module to add functionality for Railway Reservation System Project in Django
- Create template for the login form Railway Reservation System Project in Django.
In this section, we will learn on how create a templates for the login form. To start with, add the following code in your login.html under the folder of features/templates/features.
<!DOCTYPE html>
<html lang="en">
<head>
    <meta charset="UTF-8">
    <title>Railway System</title>
     {% load static %}
    <link rel="stylesheet" href="https://maxcdn.bootstrapcdn.com/bootstrap/3.3.7/css/bootstrap.min.css">
  <script src="https://ajax.googleapis.com/ajax/libs/jquery/3.3.1/jquery.min.js"></script>
  <script src="https://maxcdn.bootstrapcdn.com/bootstrap/3.3.7/js/bootstrap.min.js"></script>
    <link href="https://fonts.googleapis.com/css?family=Dancing+Script" rel="stylesheet">
    <style>
        body{

            background-image:url('{% static "images/rail.jpg" %}');
            background-repeat:no-repeat;
            background-size:100% 100%;
            height: 650px;


        }
        .log
        {
            margin-left: 42%;
            height:280px;
            width:300px;
            border-radius:10px;
            background-color: blue;
            opacity: 70%;

        }
        .sty
        {
            font-size:15px;
            color:white;
            margin-left: 20px;
        }


    </style>
</head>
<body >

    <div class="log">
         <h2 style="text-align:center; color: white;">Login</h2>
        <br/>

        <form action="" method="POST">
            {% csrf_token %}
            <span class="sty"> Username: </span><input type="text" name="username" required=""><br><br>
            <span class="sty"> Password: </span><input type="password" name="password" required=""><br/></br></br>

            <center><input type="submit" class="btn btn-success" value="Login"></center><br/>

        </form>
        <center><a href="/register/"><button class="btn btn-success" >Register</button></a></center>
    </div>
</body>
</html>- Create template for the registration form Railway Reservation System Project in Django.
In this section, we will learn on how create a templates for the registration form. To start with, add the following code in your register.html under the folder of features/templates/features.
<!DOCTYPE html>
<html lang="en">
<head>
    <meta charset="UTF-8">
    <title>Railway System</title>
         <!-- Latest compiled and minified CSS -->
    {% load static %}

    <script type="text/javascript" src="{%static 'js/bootstrap.min.js'%}"></script>
    <script type="text/javascript" src="{%static 'js/jquery-3.3.1.min.js'%}"></script>
    <link rel="stylesheet" href="{%static 'css/bootstrap.min.css'%}">
    <link href="https://fonts.googleapis.com/css?family=Dancing+Script" rel="stylesheet">
    <style>
        body
        {
            background-image:url('{%static "images/mrt.jpg" %}');
            background-size:100%;
            background-repeat:no-repeat;


        }
        .rform
        {
            padding:20px 50px;;
            background-color:rgba(0, 51, 204);
            width:30%;
            height:400px;
            margin-top:100px;
            margin-left:95px;
            border-radius:30px;
            opacity: 70%;
            }
            .white
            {
            color:white;
            }
        </style>
</head>
<center><body>
    <h1 style="text-align:center;font-family:sans-seriff;">Register</h1>
    {%if form.errors%}

    <h3>{{form.errors}}</h3>

    {%else%}
    <form class="rform" action="" method="POST">
        {% csrf_token %}
        <span class="white">Username:</span><br/><input type="text" name="username"><br/><br/>
        <span class="white">Password:</span><br/><input type="password" name="password"><br/><br/>

        <span class="white">Email:</span><br/><input type="email" name="email"><br/><br/>
        <span class="white">Phone Number:</span><br/><input type="text" name="number"><br/><br/>
        <input class="btn btn-success" type="submit" value="Register"><br/>
    </form>
    {%endif%}
</body>
</html>- Create template for the Payment form Railway Reservation System Project in Django.
In this section, we will learn on how create a templates for the payment form. To start with, add the following code in your payment.html under the folder of features/templates/features.
{% load static %}
<!DOCTYPE html>
<html lang="en">
<head>
    <meta charset="UTF-8">
    <title>Payment</title>
    <link rel="stylesheet" href="https://maxcdn.bootstrapcdn.com/bootstrap/3.3.7/css/bootstrap.min.css">
  <script src="https://ajax.googleapis.com/ajax/libs/jquery/3.3.1/jquery.min.js"></script>
  <script src="https://maxcdn.bootstrapcdn.com/bootstrap/3.3.7/js/bootstrap.min.js"></script>
    <style>
        body
        {
            height:650px;
           background-image:url('{% static "images/pay.jpg"%}');
           background-repeat:no-repeat;
           background-size:100% 100%;

        }
        .payform{
                    background-color:rgba(0,0,0,0.3);
                    height:450px;
                }
         .white
         {
            color:white;
            }
    </style>
</head>
<body>
<h1 style="text-align:center;font-family:sans-seriff">Payment Gateway</h1>
<form action="book/" method="POST">
    {%csrf_token%}
    <div class="row">
    <div class="col-lg-6" style="background-color:rgba(256,256,256,0.4);height:450px;">
        <h3 style="text-align:center">Check Details</h3>
        <div class="col-lg-6">

        Train no   :<br/><input type="text" value="{{tno}}" readonly name="tno"><br/><br/>
    Train name :<br/><input type="text" value="{{tname}}" readonly name="tname"><br/><br/>
    From       :<br/><input type="text" value="{{src}}" readonly name="src"><br/><br/>
    To         :<br/><input type="text" value="{{des}}" readonly name="des"><br/><br/>

    </div>
    <div class="col-lg-6">
    Class      :<br/><input type="text" value="{{cls}}" readonly name="cls"><br/><br/>
    No of Seats:<br/><input type="text" value="{{nos}}" readonly name="nos"><br/><br/>
    Date       :<br/><input type="text" value="{{dt}}" readonly name="date"><br/><br/>
    Total Price:<br/><input type="text" value="{{price}}" readonly name="price"><br/>
    </div>

    </div>
    <div class="col-lg-6 payform">
        <h3 style="text-align:center">Payment Method</h3>
    <select id="selectMe" name="select">
      <option value="option1">Credit or Debit card</option>
      <option value="option2">Paytm</option>

    </select>
       <div id="option1" class="group">
           <span class="white">Card Number:</span><br/>
           <input type="text" name="crd"><br/><br>
           <span class="white">Name on Card:</span><br/>
           <input type="text" name="nam"><br/><br/>
               <span class="white">CVV Number:</span><br/>
           <input type="password" maxlength="3" name="cvv"><br/><br/>
               <span class="white">Expiry:</span><br/>
           <input type="text" placeholder="MM/YY" name="exp"><br/><br/>


       </div>
       <div id="option2" class="group">
           <h3><span class="white">Click to proceed to Paytm Portal for payment</span></h3>
       </div>
    <input type="submit" value="Confirm Book" >
    </div>
        </div>
</form>
 <script>
    $(document).ready(function () {
  $('.group').hide();
  $('#option1').show();
  $('#selectMe').change(function () {
    $('.group').hide();
    $('#'+$(this).val()).show();
  })
});
</script>
</body>
</html>- Create template for the schedule form Railway Reservation System Project in Django.
In this section, we will learn on how create a templates for the schedule form. To start with, add the following code in your register.html under the folder of features/templates/features.
<!DOCTYPE html>
<html lang="en">
<head>
    <meta charset="UTF-8">
    <title>Train Schedule</title>
         <!-- Latest compiled and minified CSS -->
    {% load static %}

    <script type="text/javascript" src="{%static 'js/bootstrap.min.js'%}"></script>
    <script type="text/javascript" src="{%static 'js/jquery-3.3.1.min.js'%}"></script>
    <link rel="stylesheet" href="{%static 'css/bootstrap.min.css'%}">
    <link href="https://fonts.googleapis.com/css?family=Dancing+Script" rel="stylesheet">
    <style>
        body{
            background-image:url('{% static "images/schedule.jpg"%}');
            background-size:100%;
            background-opacity:0.4;
            background-repeat:no-repeat;


        }
        .sty
        {
            font-family: 'Dancing Script', cursive;
            color:white;
        }
        .hd
        {
            margin-left:400px;

            }
         .tform{
            background-color:rgba(0,0,0,0.3);
            }


    </style>
</head>
<body>
    <div class="row">
        <div class="col-lg-4"></div>
    <div class="col-lg-4" style="background-color:green;margin-top:100px; opacity: 90%;">
    <h2 style="text-align:center;"><span class="sty" style="font-size:50px;color:Yellow;">Train Schedule</span></h2>

    <form class="form-inline" style="margin-top:50px;"action="trains">

        <span class="sty" style="font-size:30px;color:Yellow;">Select Train Number/Name:</span><br/><br/>
        <select name="tnum">
        {% for i in a %}
            <option value="{{i.tno}}">{{i.tno}}/{{i.tname}}</option>
        {%endfor%}
        </select>
        <input type="submit" class="btn btn-primary" value="check">
    </form>
        <br/>
        </div>
        </div>
</body>
</html>
Downloadable Source Code Below.
Anyway, if you want to level up your programming knowledge, especially python, try this new article I’ve made for you Best Python Projects with source code for Beginners.
But If you’re going to focus on web development using Django, you can download here from our list of Best Django Projects with source code based on real-world projects.
How To Run The Railway Reservation System Project in Django?
- Step 1: Extract/unzip the file
- Step 2: Go inside the project folder, open cmd and type the following commands to install Django Framework and run the webserver:
- python manage.py runserver
- Step 3: Finally, open the browser and go to http://127.0.0.1:8000/
For admin panel:
- Username: admin
- Password: admin12345
Summary
In summary, the Railway Reservation System Project in Django with Source Code can be useful to students or professional who wants to learn python programming language.
This project can also be modified to fit your personal requirements. Hope this project will help you to improve your skills. Happy Coding!
- How To Make A Point Of Sale System In Python
- Best Python Projects for Beginners
- Python MySQL Connection: Simple Python Step by Step Guide
- Python PIP Command Set-up / Fix: Step by Step Guide
- Random Password Generator in Python Projects With Source Code
- Python Range Function | Range in Python Explained with Examples
- School Management System Project In Django With Source Code
- Django Login And Registration With Source Code
- CRUD App In Django With Source Code
- Drag And Drop JavaScript With Source Code
- Todo List App Django With Source Code
Inquiries
If you have any questions or suggestions about Railway Reservation System Project in Django with Source Code, please feel free to leave a comment below.


