A Clinic Management System Project in Django is a full-stack Django web application that offers a clean, descriptive, and interactive user interface for viewing and registering patients and for managing doctors and patients.
Moving on, it has responsive features and tabs for patients, health histories, patients visits, prescriptions, clinic staff, suppliers, feedbacks, drug records, and appointments.
However, this is a role-based module in which the admin can perform any operation on the data.
The Django hospital management system is a web framework for patient and doctor.
Anyway, To start creating a Clinic Management System Project in Python Django with Source Code, makes sure that you have PyCharm Professional IDE Installed in your computer.
Also, this Clinic Management System in Python Django and MySQL also includes a free source code, just find the downloadable source code below and click download now.
Plus, Read and visit the other interesting language used in clinic management system.
- Clinic Management System Project in C++ with Source Code
- Clinic Management System Project in Laravel with Source Code
- [Complete] Clinic Management System In CodeIgniter With Source Code
- Online Clinic Management System In PHP With Source Code
- Clinic Information Management System in VB.Net with Source Code
Project Information and Recommended Tools
| About Project | Project Details |
|---|---|
| Project Name | Clinic Management System Project in Django |
| Python version (Recommended) | 3.8 Version |
| Programming Language Used | Python Django Language |
| IDE Tool (Recommended) | Sublime, Visual Studio, PyCharm |
| Database | SQLite |
Admin Features of Clinic Management System Project in Django
- Manage Patients – For the patients, the admin can add, edit, delete and view patients information.
- Health Histories Management – For the health histories, the admin can add, edit, delete and health histories information.
- Manage Patients Visits – For the patients visits, the admin can add, edit, and delete patients visits information.
- Prescriptions Management – For the prescriptions, the admin can add, edit, delete and view prescriptions information.
- Manage Clinic Staff– For the clinic staff, the admin can add, edit, delete and view clinic staff information.
- Suppliers Management – For the suppliers, the admin can add, edit, delete and view suppliers information.
- Manage Feedbacks – For the feedbacks, the admin can add, edit, and delete feedback information.
- Drug Record Management – For the drug records, the admin can add, edit, delete and view drug records information.
- Manage Appointments – For the Appointments, the admin can add, edit, delete and view appointments information.
Clinic Management System Project Steps on How to Create a Project
Time needed: 5 minutes
Here are the steps on how to create a Clinic Management System Project in Django
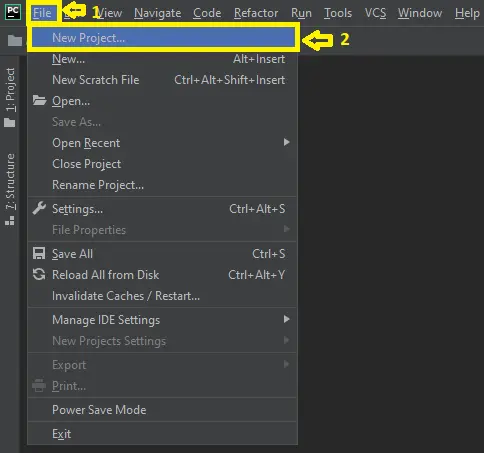
- Step 1: Open file.
First , open “pycharm professional” after that click “file” and click “new project”.

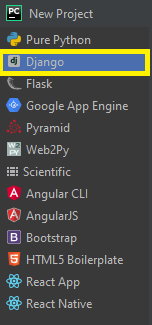
- Step 2: Choose Django.
Next, after click “new project“, choose “Django” and click.

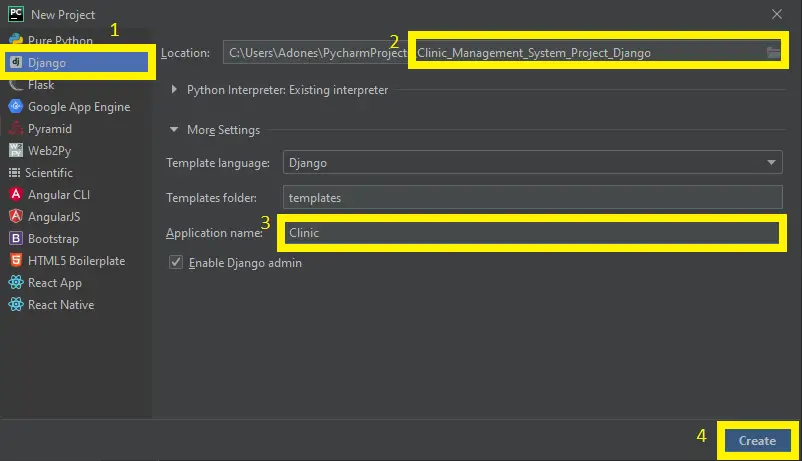
- Step 3: Select file location.
Then, select a file location wherever you want.

- Step 4: Create application name.
After that, name your application.

- Step 5: Click create.
Lastly, finish creating project by clicking “create” button.

- Step 6: Start Coding.
Finally, we will now start adding functionality to our Django Framework by adding some functional codes.
Module and Functionality for Clinic Management System Project
- Create template for the homepage in Clinic Management System Project.
In this section, we will learn on how create a templates for the homepage. To start with, add the following code in your user_home.html under the folder of templates.
<!DOCTYPE html>
{% load static %}

<html>
<head>
  <meta charset="UTF-8">
  <meta name="viewport" content="width=device-width, initial-scale=1.0">
  <meta http-equiv="X-UA-Compatible" content="ie=edge">
  <title>Event Management System</title>
  <link rel="stylesheet" href="https://stackpath.bootstrapcdn.com/bootstrap/4.4.1/css/bootstrap.min.css">
  <!-- <link rel="stylesheet" href="https://cdnjs.cloudflare.com/ajax/libs/materialize/0.100.2/css/materialize.min.css"> -->

  <link href="https://fonts.googleapis.com/icon?family=Material+Icons" rel="stylesheet">
  <link href="https://fonts.googleapis.com/css?family=Roboto+Mono:400,500,700&display=swap" rel="stylesheet">
  <link href="https://fonts.googleapis.com/css?family=Open+Sans&display=swap" rel="stylesheet">
  <link href="https://fonts.googleapis.com/css?family=Muli:500&display=swap" rel="stylesheet">

  <link rel="stylesheet" href="{% static 'css/index.css' %}">
</head>

<body class="bg-success">
<div class="container-fluid header text-center bg-primary">
  <h1 style="color: white;">CHMSC Events Management System</h1>
  <h3 style="color: white;"> Welcome {{ name }} </h3>
  <a href="{% url 'scmapp:user_logout' %}" style="font-size:20; color: white;">Logout</a><br>
  <span style="font-size:18px">{{ status }}</span>
</div>

<div class="container">
  <div class="row">
    <div class="col-lg-6">
      <a href="{% url 'scmapp:user_event' %}">
      <div class="card bg-danger">
        <img src="{% static 'res/event.jpeg' %}">
        <div class="card-title text-center" style="color: white;">Events</div>
      </div>
      </a>
    </div>

    <div class="col-lg-6">
      <a href="{% url 'scmapp:ground_booking' %}">
      <div class="card bg-danger">
        <img src="{% static 'res/volley.jpg' %}" style="height:312px;">
        <div class="card-title text-center" style="color: white;">Events Booking</div>
      </div>
      </a>
    </div>

  </div>
</div>

<script src="https://code.jquery.com/jquery-3.4.1.slim.min.js"></script>
<script src="https://cdn.jsdelivr.net/npm/[email protected]/dist/umd/popper.min.js"></script>
<script src="https://stackpath.bootstrapcdn.com/bootstrap/4.4.1/js/bootstrap.min.js"></script>
<!-- <script src="https://cdnjs.cloudflare.com/ajax/libs/materialize/0.100.2/js/materialize.min.js"></script> -->

</body>
</html>
Downloadable Source Code Below.
Anyway, if you want to level up your programming knowledge, especially python, try this new article I’ve made for you Best Python Projects with source code for Beginners.
But If you’re going to focus on web development using Django, you can download here from our list of Best Django Projects with source code based on real-world projects.
How To Run The Clinic Management System Project with Source Code?
- First Step: Extract/unzip the file
- Second Step: Go inside the project folder, open cmd and type the following commands to install Django Framework and run the webserver:
- pip install -r requirements.txt
- python manage.py migrate
- python manage.py runserver
- Third Step: Finally, open the browser and go to http://127.0.0.1:8000/
Summary
In summary, the Clinic Management System Project in python Django with Source Code can be useful to students or professional who wants to learn python programming language.
This project can also be modified to fit your personal requirements. Hope this project will help you to improve your skills. Happy Coding!
Inquiries
If you have any questions or suggestions about Clinic Management System Project with Source Code, please feel free to leave a comment below.