Cartoonify an Image using OpenCV Python With Source Code
The Cartoonify an Image OpenCV Python was developed using Python OpenCV, At the end of this article, we aim to transform images into cartoons.
Yes, we will CARTOONIFY the images. Thus, we will build a Python application that will transform an image into a cartoon using OpenCV.
What is OpenCV?
Python is the pool of libraries. It has numerous libraries for real-world applications. One such library is OpenCV.
OpenCV is a cross-platform library used for Computer Vision. It includes applications like video and image capturing and processing.
It is majorly used in image transformation, object detection, face recognition, and many other stunning applications.
To convert an image to a cartoon, multiple transformations are done. Firstly, an image is converted to a Grayscale image. Yes, similar to the old day’s pictures.!
Then, the Grayscale image is smoothened, and we try to extract the edges in the image. Finally, we form a color image and mask it with edges.
This creates a beautiful cartoon image with edges and the lightened color of the original image.
This Python OpenCV Project also includes a downloadable Project With Source Code for free, just find the downloadable source code below and click to start downloading.
By the way, if you are new to Python programming and don’t know how to use the Python IDE, I have here a list of the Best Python IDE for Windows, Linux, and Mac OS that will suit you.
I also have here How to Download and Install the Latest Version of Python on Windows.
To start executing Cartoonify an Image OpenCV Python With Source Code, make sure that you have installed Python 3.9 and PyCharm on your computer.
How to Cartoonify an Image with OpenCV in Python? A step-by-step Guide with Source Code
Time needed: 5 minutes
These are the steps on how to run Cartoonify an Image OpenCV Python With Source Code
- Step 1: Download the given source code below.
First, download the given source code below and unzip the source code.

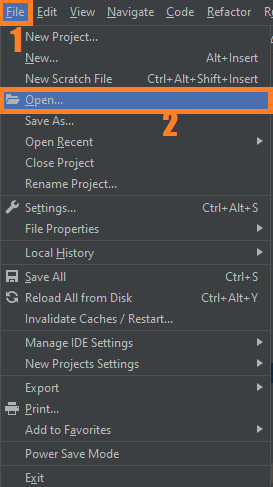
- Step 2: Import the project to your PyCharm IDE.
Next, import the source code you’ve downloaded to your PyCharm IDE.

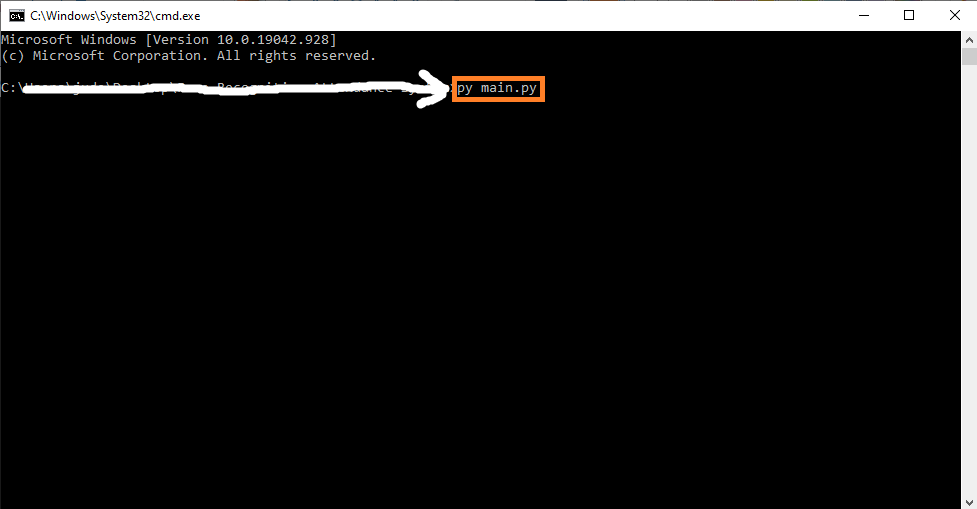
- Step 3: Run the project.
Lastly, run the project with the command “py main.py”


Installed Libraries
import cv2 #for image processing
import easygui #to open the filebox
import numpy as np #to store image
import imageio #to read image stored at particular path

import sys
import matplotlib.pyplot as plt
import os
import tkinter as tk
from tkinter import filedialog
from tkinter import *
from PIL import ImageTk, Image
Complete Source Code
import cv2 #for image processing
import easygui #to open the filebox
import numpy as np #to store image
import imageio #to read image stored at particular path

import sys
import matplotlib.pyplot as plt
import os
import tkinter as tk
from tkinter import filedialog
from tkinter import *
from PIL import ImageTk, Image

top=tk.Tk()
top.geometry('400x400')
top.title('Cartoonify Your Image !')
top.configure(background='white')
label=Label(top,background='#CDCDCD', font=('calibri',20,'bold'))

def upload():
    ImagePath=easygui.fileopenbox()
    cartoonify(ImagePath)


def cartoonify(ImagePath):
    # read the image
    originalmage = cv2.imread(ImagePath)
    originalmage = cv2.cvtColor(originalmage, cv2.COLOR_BGR2RGB)
    #print(image)  # image is stored in form of numbers

    # confirm that image is chosen
    if originalmage is None:
        print("Can not find any image. Choose appropriate file")
        sys.exit()

    ReSized1 = cv2.resize(originalmage, (960, 540))
    #plt.imshow(ReSized1, cmap='gray')


    #converting an image to grayscale
    grayScaleImage= cv2.cvtColor(originalmage, cv2.COLOR_BGR2GRAY)
    ReSized2 = cv2.resize(grayScaleImage, (960, 540))
    #plt.imshow(ReSized2, cmap='gray')


    #applying median blur to smoothen an image
    smoothGrayScale = cv2.medianBlur(grayScaleImage, 5)
    ReSized3 = cv2.resize(smoothGrayScale, (960, 540))
    #plt.imshow(ReSized3, cmap='gray')

    #retrieving the edges for cartoon effect
    #by using thresholding technique
    getEdge = cv2.adaptiveThreshold(smoothGrayScale, 255,
        cv2.ADAPTIVE_THRESH_MEAN_C,
        cv2.THRESH_BINARY, 9, 9)

    ReSized4 = cv2.resize(getEdge, (960, 540))
    #plt.imshow(ReSized4, cmap='gray')

    #applying bilateral filter to remove noise
    #and keep edge sharp as required
    colorImage = cv2.bilateralFilter(originalmage, 9, 300, 300)
    ReSized5 = cv2.resize(colorImage, (960, 540))
    #plt.imshow(ReSized5, cmap='gray')


    #masking edged image with our "BEAUTIFY" image
    cartoonImage = cv2.bitwise_and(colorImage, colorImage, mask=getEdge)

    ReSized6 = cv2.resize(cartoonImage, (960, 540))
    #plt.imshow(ReSized6, cmap='gray')

    # Plotting the whole transition
    images=[ReSized1, ReSized2, ReSized3, ReSized4, ReSized5, ReSized6]

    fig, axes = plt.subplots(3,2, figsize=(8,8), subplot_kw={'xticks':[], 'yticks':[]}, gridspec_kw=dict(hspace=0.1, wspace=0.1))
    for i, ax in enumerate(axes.flat):
        ax.imshow(images[i], cmap='gray')

    save1=Button(top,text="Save cartoon image",command=lambda: save(ReSized6, ImagePath),padx=30,pady=5)
    save1.configure(background='#364156', foreground='white',font=('calibri',10,'bold'))
    save1.pack(side=TOP,pady=50)

    plt.show()


def save(ReSized6, ImagePath):
    #saving an image using imwrite()
    newName="cartoonified_Image"
    path1 = os.path.dirname(ImagePath)
    extension=os.path.splitext(ImagePath)[1]
    path = os.path.join(path1, newName+extension)
    cv2.imwrite(path, cv2.cvtColor(ReSized6, cv2.COLOR_RGB2BGR))
    I= "Image saved by name " + newName +" at "+ path
    tk.messagebox.showinfo(title=None, message=I)

upload=Button(top,text="Cartoonify an Image",command=upload,padx=10,pady=5)
upload.configure(background='#364156', foreground='white',font=('calibri',10,'bold'))
upload.pack(side=TOP,pady=50)

top.mainloop()
Output:

Download the Source Code below
Summary
Yes, now you have a reason to tease your sibling by saying “You look like a cartoon”. Just cartoonify his/ her image, and show it!
We have successfully developed an Image Cartoonifier with OpenCV in Python.
This is the magic of openCV which lets us do miracles. We suggest you make a photo editor of your own and try different effects.
Related Articles
- Code For Game in Python: Python Game Projects With Source Code
- Best Python Projects With Source Code FREE DOWNLOAD
- How to Make a Point of Sale In Python With Source Code
- Python Code For Food Ordering System | FREE DOWNLOAD
- Inventory Management System Project in Python With Source Code
Inquiries
If you have any questions or suggestions about Cartoonify an Image OpenCV Python With Source Code, please feel free to leave a comment below.