Traffic Signs Recognition using CNN & Keras in Python With Source Code
The Traffic Signs Recognition Using CNN & Keras In Python was developed using Python Programming with CNN and Keras.
There are several different types of traffic signs like speed limits, no entry, traffic signals, turn left or right, children crossing, no passing of heavy vehicles, etc.
Traffic sign classification is the process of identifying which class a traffic sign belongs to.
A Traffic Signs Recognition Python project example, we will build a deep neural network model that can classify traffic signs present in the image into different categories.
With this model, we are able to read and understand traffic signs which are a very important task for all autonomous vehicles.
This Python Project Using CNN and Keras also includes a downloadable Python Project With Source Code for free, just find the downloadable source code below and click to start downloading.
By the way, if you are new to Python programming and don’t know how to use Python IDE, I have here a list of the Best Python IDE for Windows, Linux, and Mac OS that will suit you.
I also have here How to Download and Install the Latest Version of Python on Windows.
To start executing Traffic Signs Recognition Using CNN & Keras In Python With Source Code, make sure that you have installed Python 3.9 and PyCharm on your computer.
Traffic Signs Recognition using CNN and Keras in Python With Source Code: Steps on how to run the project
Time needed: 5 minutes
These are the steps on how to run the project:
- Step 1: Download the given source code below.
First, download the given source code below and unzip the source code.

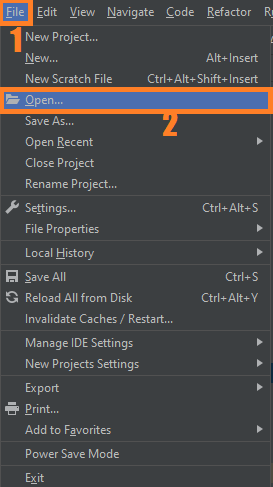
- Step 2: Import the project to your PyCharm IDE.
Next, import the source code you’ve download to your PyCharm IDE.

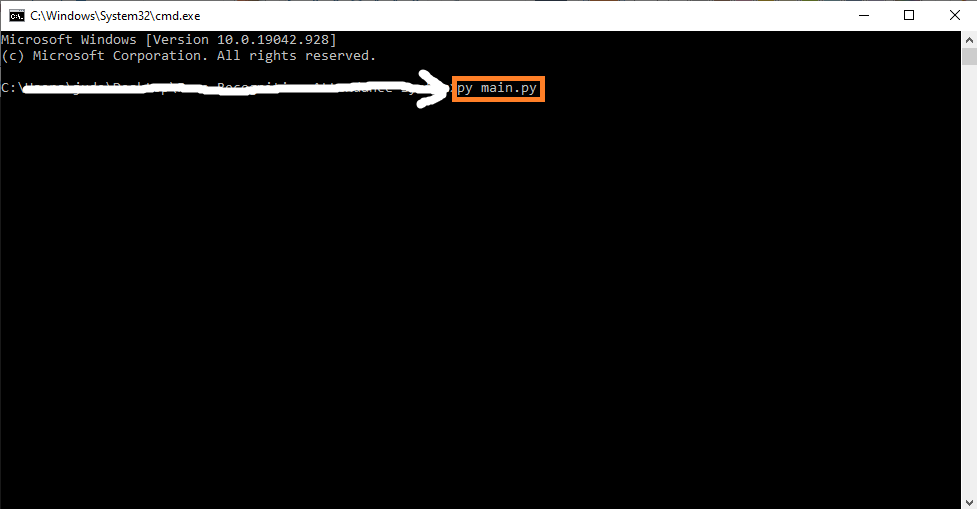
- Step 3: Run the project.
Lastly, run the project with the command “py main.py”

Installed Libraries
import tkinter as tk
from tkinter import filedialog
from tkinter import *
from PIL import ImageTk, Image

import numpy
#load the trained model to classify sign
from keras.models import load_model
Complete Source Code
import tkinter as tk
from tkinter import filedialog
from tkinter import *
from PIL import ImageTk, Image

import numpy
#load the trained model to classify sign
from keras.models import load_model
model = load_model('traffic_classifier.h5')

#dictionary to label all traffic signs class.
classes = { 1:'Speed limit (20km/h)',
            2:'Speed limit (30km/h)',
            3:'Speed limit (50km/h)',
            4:'Speed limit (60km/h)',
            5:'Speed limit (70km/h)',
            6:'Speed limit (80km/h)',
            7:'End of speed limit (80km/h)',
            8:'Speed limit (100km/h)',
            9:'Speed limit (120km/h)',
           10:'No passing',
           11:'No passing veh over 3.5 tons',
           12:'Right-of-way at intersection',
           13:'Priority road',
           14:'Yield',
           15:'Stop',
           16:'No vehicles',
           17:'Veh > 3.5 tons prohibited',
           18:'No entry',
           19:'General caution',
           20:'Dangerous curve left',
           21:'Dangerous curve right',
           22:'Double curve',
           23:'Bumpy road',
           24:'Slippery road',
           25:'Road narrows on the right',
           26:'Road work',
           27:'Traffic signals',
           28:'Pedestrians',
           29:'Children crossing',
           30:'Bicycles crossing',
           31:'Beware of ice/snow',
           32:'Wild animals crossing',
           33:'End speed + passing limits',
           34:'Turn right ahead',
           35:'Turn left ahead',
           36:'Ahead only',
           37:'Go straight or right',
           38:'Go straight or left',
           39:'Keep right',
           40:'Keep left',
           41:'Roundabout mandatory',
           42:'End of no passing',
           43:'End no passing veh > 3.5 tons' }

#initialise GUI
top=tk.Tk()
top.geometry('800x600')
top.title('Traffic sign classification')
top.configure(background='#CDCDCD')

label=Label(top,background='#CDCDCD', font=('arial',15,'bold'))
sign_image = Label(top)

def classify(file_path):
    global label_packed
    image = Image.open(file_path)
    image = image.resize((30,30))
    image = numpy.expand_dims(image, axis=0)
    image = numpy.array(image)
    print(image.shape)
    pred = model.predict_classes([image])[0]
    sign = classes[pred+1]
    print(sign)
    label.configure(foreground='#011638', text=sign)


def show_classify_button(file_path):
    classify_b=Button(top,text="Classify Image",command=lambda: classify(file_path),padx=10,pady=5)
    classify_b.configure(background='#364156', foreground='white',font=('arial',10,'bold'))
    classify_b.place(relx=0.79,rely=0.46)

def upload_image():
    try:
        file_path=filedialog.askopenfilename()
        uploaded=Image.open(file_path)
        uploaded.thumbnail(((top.winfo_width()/2.25),(top.winfo_height()/2.25)))
        im=ImageTk.PhotoImage(uploaded)

        sign_image.configure(image=im)
        sign_image.image=im
        label.configure(text='')
        show_classify_button(file_path)
    except:
        pass

upload=Button(top,text="Upload an image",command=upload_image,padx=10,pady=5)
upload.configure(background='#364156', foreground='white',font=('arial',10,'bold'))

upload.pack(side=BOTTOM,pady=50)
sign_image.pack(side=BOTTOM,expand=True)
label.pack(side=BOTTOM,expand=True)
heading = Label(top, text="Know Your Traffic Sign",pady=20, font=('arial',20,'bold'))
heading.configure(background='#CDCDCD',foreground='#364156')
heading.pack()
top.mainloop()
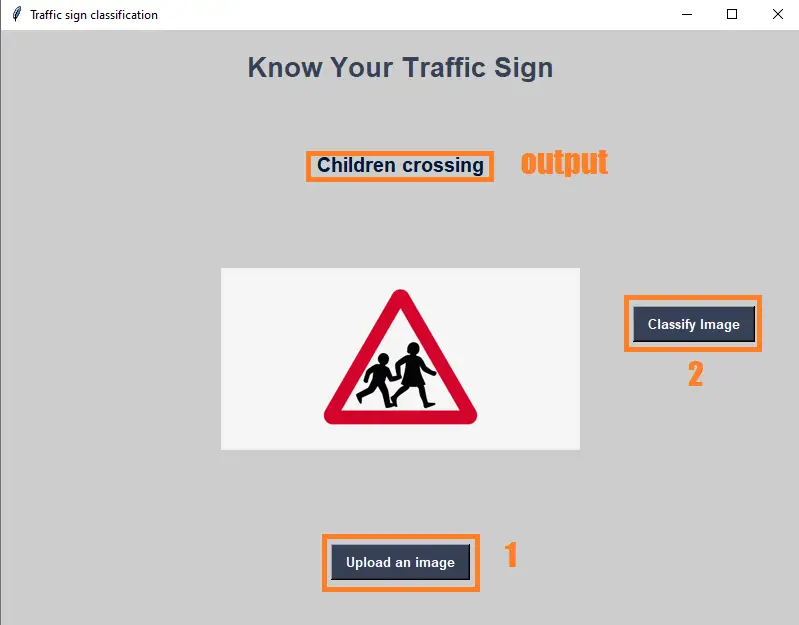
Output:

Download the Source Code below
Summary
In this Python project with source code, we have successfully classified the traffic signs classifier with 95% accuracy and also visualized how our accuracy and loss change with time, which is pretty good from a simple CNN model.
Related Articles
- Code For Game in Python: Python Game Projects With Source Code
- Best Python Projects With Source Code FREE DOWNLOAD
- How to Make a Point of Sale In Python With Source Code
- Python Code For Food Ordering System | FREE DOWNLOAD
- Inventory Management System Project in Python With Source Code
Inquiries
If you have any questions or suggestions about Traffic Signs Recognition using CNN & Keras in Python With Source Code, please feel free to leave a comment below.


