
We’ll talk about how to use graphics in Word 2019 in this chapter. You can make your Microsoft Word documents look nicer by adding different kinds of graphics. This section will show you two ways to add pictures.
Table of contents
What are graphics in Word?
Graphics refers to hardware or software that allows a computer to show and change pictures. The word can also mean the pictures themselves. For example, laser printers and plotters are graphics devices because they let the computer print pictures.
You can add more information and make your spreadsheets, documents, and presentations more interesting by using graphics. In Office 2010, the commands and tools used to add and change images, shapes, SmartArt graphics, and clip art are used in all of the programs in the suite.
What is graphics used for?
Graphics are used for everything from making Web pages look better to be the presentation and user interaction layer for full-fledged Web applications. Graphics can be used in many different ways, so there are many different technologies to choose from.
Images and Multimedia
You don’t have to think of Word as just a program for making and editing text. It has the tools you need to make some pretty cool page layouts. Even though it doesn’t have as many features or be as strong as a professional page layout program like Adobe InDesign. You can still make things look very professional if you know what you have and how to use it.
Online Pictures and Pictures
The same thing is done by both “Pictures” and “Online Pictures.” The only difference is that when you choose “Pictures,” you can insert images from your computer. Still, when you choose “Online Pictures,” you can add images from the internet, such as clip art from Office.com, Bing, or OneDrive.
Drawing Tools
Shapes, diagrams, flowcharts, curves, lines, and WordArt are all drawing tools. These things are part of the Word file you are working on. You can use colors, patterns, borders, and other effects to change and improve these objects.
Picture Tools
If you want to change a picture or anything else in a Word document, you can always click on it, and the right tab will show up on the Ribbon.
“Picture Tools” is the name of the tab for pictures. Here, we can see that you can make changes to the picture as you go. For instance, you can change the brightness, contrast, color, and add a border.
Your choice of where to put text and how to wrap it will also have a big impact on how your documents look.
These controls are shown here. We don’t worry as much about how words wrap or where they go in our documents because Word isn’t the last step before publishing online. But if you’re making something WYSIWYG (What You See Is What You Get), like for a PDF or print publication, these things will matter.
Also, you can change your pictures inline in a few ways, such as by resizing, rotating, or moving them. In the next picture, you can see these controls, many of which you may already know.
Shapes
You can use the built-in shapes in Microsoft Word 2013 to make callouts, boxes, stars, and other shapes.
When you click the shape, all you have to do is draw it on a blank spot on the page. You can change it as much as you want once it’s in your document, so it doesn’t matter if it’s perfect or just the way you want it.
At the bottom of the “Shapes” menu, there is an option to make a “new drawing canvas.” This will open a box for shapes that works like a text box. You can use these shapes to make drawings on this drawing canvas. This lets you make things like diagrams and flowcharts.
SmartArt and WordArt
SmartArt and WordArt are similar in some ways, especially if you use WordArt to make something and then change the text. You can use one or the other, but not both. However, we’ll discuss them in the same section because one often leads to the other.
Think of SmartArt as pre-made drawing canvases that you can add to your document and then change as you like. Just pick a way to put things together, like a list, a process, or a cycle.
As you can see, we used a “Continuous Block Process” to make a picture. We can change what is in the text boxes when we click them. There are also the usual grab handles for resizing the image and “Layout Options” that let you wrap text however you like.
Format Text Effects
Let’s look at this more closely because it has a pretty big number of features. We’ll talk about the basics so you know more about them. The “Format Text Effects” pane slides out from the right side of the screen.
It can be detached, just like any other pane in Word 2013. You can then move it out of the way to save screen space or keep it close, so it is easy to use.
This dialog box will make it easy to work quickly with text, so you won’t have to keep going to the ribbon to make changes. Note that the “Text Fill and Outline” and “Text Effects” buttons are separated in the dialog box. “Text Fill and Outline” is easy to understand and is used to improve the way text looks.
Chart
Charts are fun for everyone. Charts are a great way to show data sets visually, and Word 2013 comes with a huge variety of charts to choose from, such as columns, pie, bars, and many more. Take a look at the screenshot to see how many choices you have:
It’s easy to change and format charts. When you click on a chart in your document, you’ll see “Chart Tools,” which, as you might have guessed, is the Ribbon tab for charts only.
Text Box
In Word, text boxes are like little islands. When you add a “Text Box” to a document, it can’t be changed no matter what you do to the rest of the document. It’s like putting a document inside another document.
This is helpful if you want to show something “as is” in your work but still be able to change the formatting of the document as a whole. Something you’ve pasted will stay the same.
Text boxes are usually painful for editors because they don’t work well with styles. You may find them very useful, which is fine, but if you want something that fits the style and format of your document but still goes in a box or has a border around it, we suggest just adding a border.
Drop Cap
Drop caps just mean that the first letter of a chapter or book is bigger than the rest:
You can set your drop cap to “Dropped” or “In Margin.” If you choose “Dropped,” the text below will move under it. Check out the “Drop Cap” options to have more control over how your drop caps work.
How to add Picture in Document
Follow these steps to add an already-made picture to your Word file. It is assumed that before you add this picture to your Word document, you already have a picture on your computer.
- Step 1 − Click on your document where you want to add a picture.
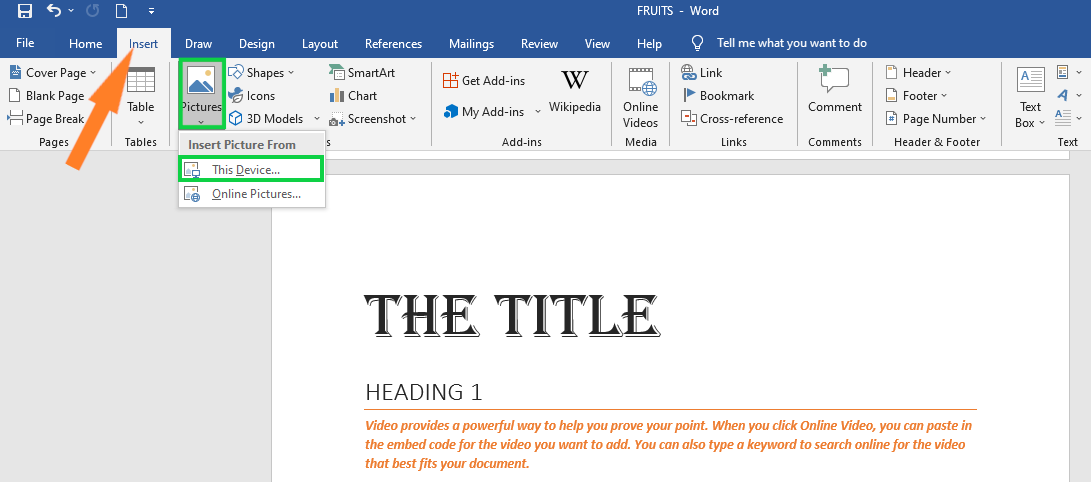
- Step 2 −Click the Insert tab and then click the Picture button in the Illustrations group, the Insert Picture dialog box will appear.

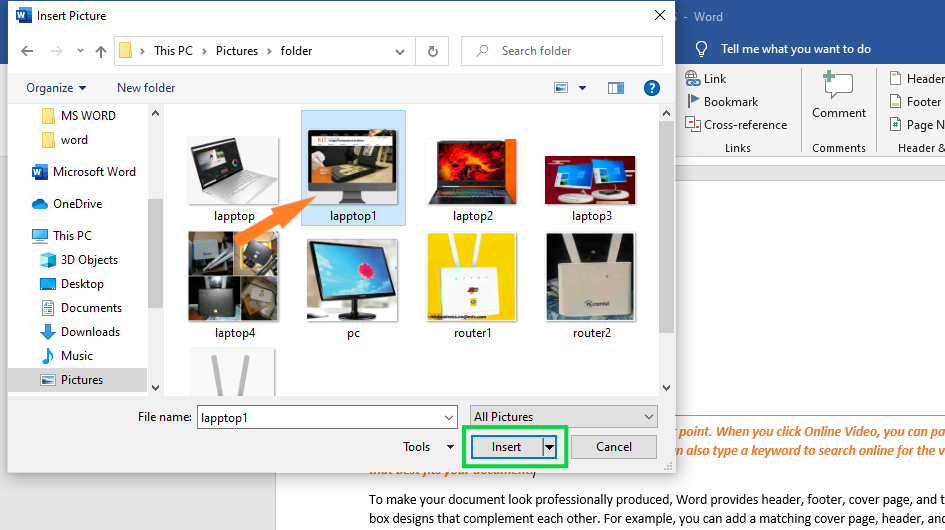
- Step 3 − The Insert Picture dialog box lets you choose the picture you want to use.
 When you click “Insert,” the picture you chose will be added to your document.
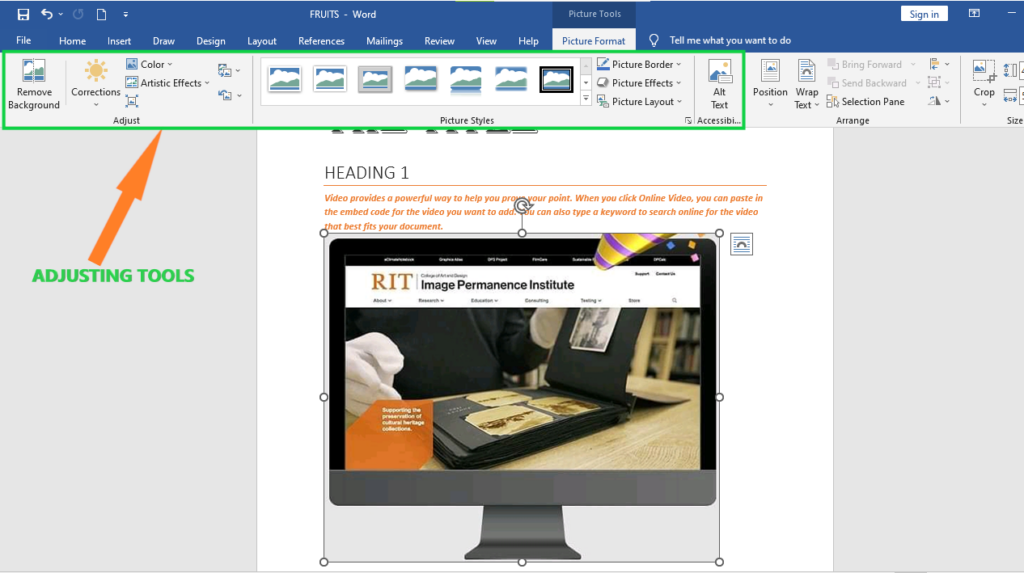
You can play around with your inserted picture in different ways. For example, you can give it quick styles, change its size, or change its color.
To try it out, just click on the image you inserted, and Word will give you a lot of options for how to format it under the Format tab.
- You can try to add other graphics, such as Clipart, different shapes, charts, SmartArt, or screenshots, if you want to.
 When you click “Insert,” the picture you chose will be added to your document.
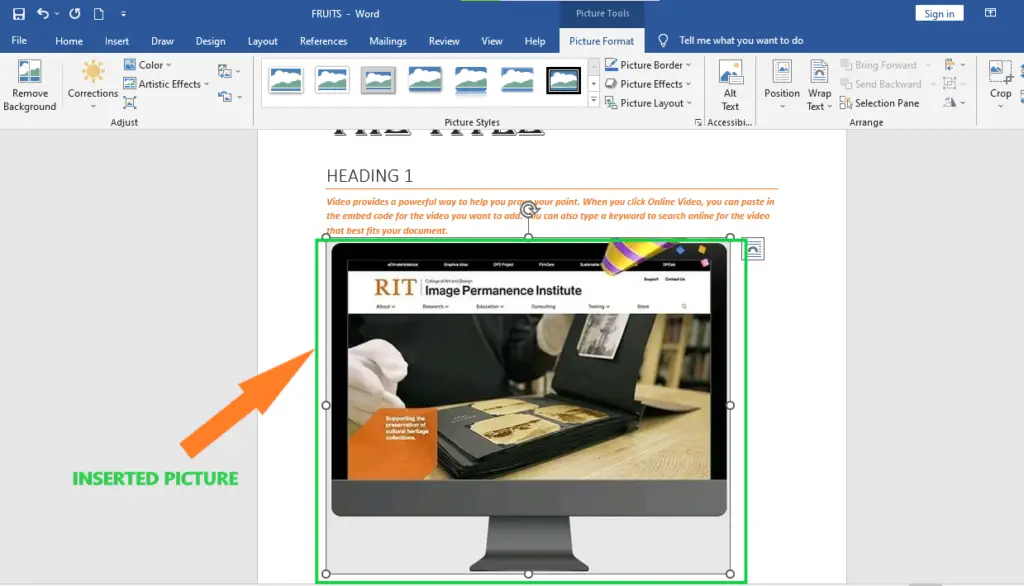
How to Add WordArt in Document
With WordArt, you can add fancy words to a Word document. There are many ways to back up your text. Follow these steps to put WordArt into your document.
- Step 1 − Click in your document where you want to add WordArt.
- Step 2 − Click the Insert tab and then click the WordArt option available in the Text group; this will display a gallery of WordArt.
- Step 3 − You can click on any of the WordArt styles shown in the gallery to choose it. Now you can change the text you’ve added to fit your needs, and you can use the different options to make it look even better. To try it, just double-click the WordArt you’ve added, and Word will give you many options for how to format your image on the Format tab. Shape Styles and WordArt Styles are the options that are used most often.
You can change the shape styles, colors, WordArt Styles, etc. of the inserted WordArt to try out different options.
Summary
In the end, we’ve learned how to use graphics in Word and what those terms mean. We also know that there are available graphics that can be used, which we can use in our document to make it look more professional and presentable.
Meanwhile, if you want to learn more about working on tables, see the previous tutorial on how to resize tables and how to merge and split table in Microsoft Word. You can browse those guides if you are having a hard time working with your tables in a document
We hope this tutorial helps you as you format your documents in MS Word.
PREVIOUS
Featured guides worth reading next

Glay Eliver
Programmer & Technical Writer at PIES IT Solution
Glay Eliver is a programmer and writer at PIES IT Solution, author of over 600 tutorials at itsourcecode.com. Specializes in JavaScript tutorials, Microsoft Office how-tos (Excel, Word, PowerPoint), and Python error debugging covering ImportError, TypeError, AttributeError, ModuleNotFoundError, and JavaScript ReferenceError. Authored several of the site’s highest-traffic Excel and MS Office reference articles.
Expertise: JavaScript · MS Excel · MS Word · MS PowerPoint · Python · Python ImportError · Python TypeError · Python AttributeError · ModuleNotFoundError · JavaScript ReferenceError · Pygame · View all posts by Glay Eliver →