Insurance Management System Project in Django with Source Code
This Insurance Management System Project in Django created based on python, Django, and SQLITE3 Database. We live in a world full of dangers and unpredictable happenings.
As a result, we are always in need of an insurance policy to ensure a brighter future. As a result, many people are committed to purchasing an insurance coverage.
However, an insurance administration system should be readily available to manage all of our customers’ details.
System Description: Insurance Management System Project in Django
A fully working project based on the Insurance Management System, which is written in Python and implemented using the Django Web Framework.
The following Django project has all of the necessary functionalities for first- and second-year IT students to employ in their college projects.
It comes with a variety of useful tools that will help users manage and implement policies. This system, as well as the web application, has a clear idea that is similar to real-life circumstances and well-implemented.
Please scroll down to the bottom of this page for the Download button to get a free insurance management system project in Python Django with source code files.
To start creating a Insurance Management System Project in Python Django, makes sure that you have PyCharm Professional IDE Installed in your computer.
This Insurance Management System in Django Framework, Also includes a Download Source Code for free, just find the downloadable source code below and click download now.
Admin Features: Insurance Management System Project in Django
- Admin account can be created using createsuperuser command.
- After login, admin can view, update, and delete customer.
- Administrator can view, add, update, delete policy category like Life, Health, Motor, and Travel.
- Admin can view, add, update, and delete policy
- Administrator can view total policy holder, approved policy holder, disapproved policy holder.
- Admin can approve policy, applied by customer.
- Administrator can answer customer question.
| About Project | Project Details | Definition |
|---|---|---|
| Project Name | Insurance Management System Project in Django | This Python Django insurance administration system project is primarily concerned with dealing with insurance policies. The system also shows all of the various categories, along with their policies. Additionally, the system enables for the management of client records. This project is clearly separated into two sections: Customer and Admin Panel. In this online application’s summary, a consumer may easily register and begin utilizing it. Initially, the system displays all of the student’s possible insurance coverage. He/she may, in fact, just apply for it. |
| Python version (Recommended) | 3.8 Version | Python 3.8 introduces some new syntax to the language, as well as a few small modifications to existing behavior and, most importantly, a slew of performance improvements, following in the footsteps of the previous 3.7 version. |
| Programming Language Used | Python Django Language | Django is a high-level Python web framework for building safe and maintainable websites quickly. Django is a web framework built by experienced developers that takes care of a lot of the heavy lifting so you can focus on developing your app instead of reinventing the wheel. |
| Developer Name | itsourcecode.com | Free projects containing source code in Java, PHP, Python, Django, VB.Net, Visual Basic, C, C++, C#, Javascript, and other languages are available on this website. |
| IDE Tool (Recommended) | Sublime, Visual Studio, PyCharm | Sublime Text is a source code editor that is available for purchase. It comes with built-in support for a variety of programming and markup languages. Plugins, which are often community-built and maintained under free-software licenses, allow users to extend the functionality of the system. Sublime Text has a Python API to help with plugins. |
| Project Type | Web Application | A web application, unlike computer-based software programs that operate locally on the device’s operating system, is application software that runs on a web server. The user uses a web browser with an active network connection to access web apps. |
| Database | SQLite | SQLite is a programming language that is used to create embedded software for devices such as televisions, cell phones, and cameras. It can handle HTTP requests with low to medium traffic. SQLite has the ability to compress files into smaller bundles with less metadata. SQLite is a temporary dataset that is used within an application to process data. |
User Features: Insurance Management System Project in Django
- Create account (no approval required by admin).
- After login, can view all policy that are added by admin.
- If customer likes any policy, then they can apply for it.
- When customer will apply for any policy, it will go into pending status, admin can approve it.
- Customer can check status of his policy under history section.
- Customer can ask question from admin.
Insurance Management System in Django Steps on How to Create a Project
Time needed: 5 minutes
Here are the steps on how to create a Insurance Management System Project in Django with Source Code.
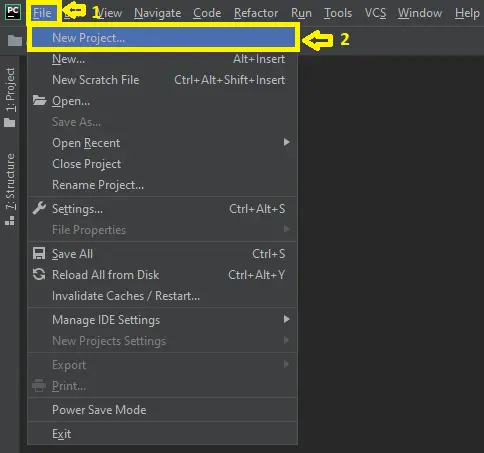
- Step 1: Open file.
First , open “pycharm professional” after that click “file” and click “new project”.

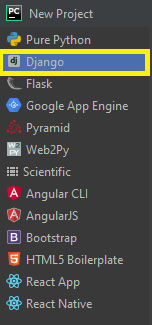
- Step 2: Choose Django.
Next, after click “new project“, choose “Django” and click.

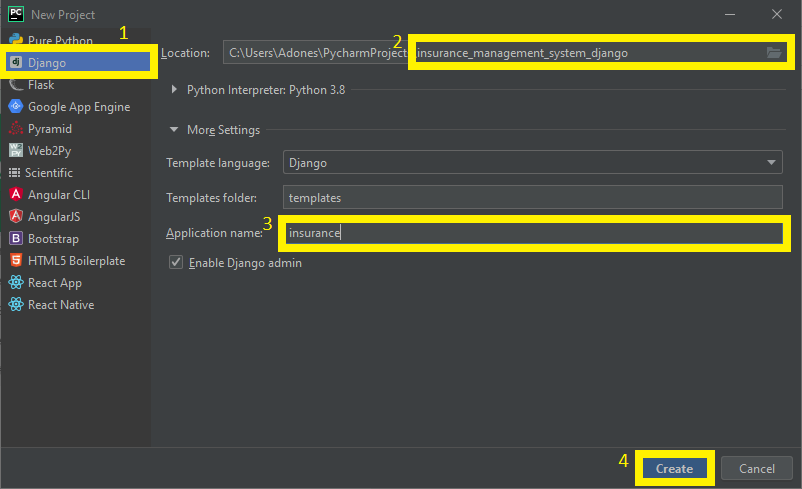
- Step 3: Select file location.
Then, select a file location wherever you want.

- Step 4: Create application name.
After that, name your application.

- Step 5: Click create.
Lastly, finish creating project by clicking “create” button.

- Step 6: Start Coding.
Finally, we will now start adding functionality to our Django Framework by adding some functional codes.
Functionality and Codes of the Insurance Management System Project in Django with Source Code
- Create template for the policy form in Insurance Management System Project in Django.
In this section, we will learn on how create a templates for the add policy form. To start with, add the following code in your apply_policy.html under the folder of /templates/.
{% extends 'customer/customerbase.html' %}
{% block content %}
{%load static%}

<head>
  <link href="//netdna.bootstrapcdn.com/bootstrap/3.0.0/css/bootstrap.min.css" rel="stylesheet" id="bootstrap-css">
  <script src="//netdna.bootstrapcdn.com/bootstrap/3.0.0/js/bootstrap.min.js"></script>
  <script src="//code.jquery.com/jquery-1.11.1.min.js"></script>

  <style media="screen">
    a:link {
      text-decoration: none;
    }

    h6 {
      text-align: center;
    }

    .row {
      margin: 100px;
    }
       label #sidebar_btn {
      z-index: 1;
      color: #fff;
      position: fixed;
      cursor: pointer;
      left: 300px;
      padding-left: 60px;
      margin-top:15px;
      font-size: 20px;

      transition: 0.5s;
      transition-property: color;
    }
  </style>
</head>
<br><br>
<div class="container">
  <div class="panel panel-primary">
    <div class="panel-heading">
      <h6 class="panel-title">Available Policies</h6>
    </div>
    <table class="table table-hover" id="dev-table">
      <thead>
        <tr>
        <th>Serial No.</th>
          <th>Policy Name</th>
          <th> Category</th>
          <th> Sum Assurance</th>
          <th> Premium</th>
          <th> Tenure</th>
          <th> Creation Date</th>
          <th> Apply</th>

        </tr>
      </thead>
      {% for t in policies %}
      <tr>
        <td> {{ forloop.counter }}</td>
        <td> {{t.policy_name}}</td>
        <td> {{t.category}}</td>
        <td> {{t.sum_assurance}}</td>
        <td> {{t.premium}}</td>
        <td> {{t.tenure}}</td>
        <td>{{t.creation_date}}</td>
        <td><a class="btn btn-danger btn-xs" href="{% url 'apply' t.id  %}">Apply</a></td>
      </tr>
      {% endfor %}
    </table>
  </div>
</div>

<br><br><br><br><br><br>
{% endblock content %}- Create template for the customer dashboard in Insurance Management System Project in Django.
In this section, we will learn on how create a templates for the customer dashboard. To start with, add the following code in your customer_dashboard.html under the folder of /templates/.
{% extends 'customer/customerbase.html' %}
{% load widget_tweaks %}
{% block content %}


<head>
    <meta charset="utf-8">
    <meta name="viewport" content="width=device-width, initial-scale=1, shrink-to-fit=no">

    <meta name="viewport" content="width=device-width, initial-scale=1">
    <script src="https://ajax.googleapis.com/ajax/libs/jquery/1.10.2/jquery.min.js"></script>
    <link href="http://netdna.bootstrapcdn.com/bootstrap/4.0.0-beta/css/bootstrap.min.css" rel="stylesheet">
    <link rel="stylesheet" href="https://maxcdn.bootstrapcdn.com/bootstrap/4.4.1/css/bootstrap.min.css">
    <link href="https://maxcdn.bootstrapcdn.com/font-awesome/4.3.0/css/font-awesome.min.css" rel="stylesheet">
    <style type="text/css">
      a:link {
        text-decoration: none;
      }

      .order-card {
        color: rgb(255, 255, 255);
      }

      .bg-c-blue {
        background: #04868f;
      }

      .bg-c-green {
        background:#4C51BF;
      }

      .bg-c-yellow {
        background: #F56565;
      }

      .bg-c-pink {
        background: #663a30;
      }


      .card {

        -webkit-box-shadow: 0 1px 2.94px 0.06px rgba(4, 26, 55, 0.16);
        box-shadow: 0 1px 2.94px 0.06px rgba(4, 26, 55, 0.16);
        border: 1px solid black;
        margin-bottom: 30px;
        -webkit-transition: all 0.3s ease-in-out;
        transition: all 0.3s ease-in-out;
      }

      .card .card-block {
        padding: 25px;
      }

      .order-card i {
        font-size: 26px;
      }

      .f-left {
        float: left;
      }

      .f-right {
        float: right;
      }
      header {
      left: 0px;
      right: 0px;
    }
    </style>
  </head>


  <div class="container">
    <div class="row">
      <div class="col-md-4 col-xl-3">
        <div class="card bg-success order-card">
          <div class="card-block">
            <h6 class="m-b-20"> <a href="apply-policy" style="text-decoration: none;color:white;">Available Policy</a> </h6>
            <h2 class="text-right"><i  class="fab fa-product-hunt f-left"></i><span>{{available_policy}}</span></h2>

          </div>
        </div>
      </div>

      <div class="col-md-4 col-xl-3">
        <div class="card bg-primary order-card">
          <div class="card-block">
            <h6 class="m-b-20"><a href="history" style="text-decoration: none;color:white;">Applied Policy</a> </h6>
            <h2 class="text-right"><i class="fab fa-product-hunt f-left"></i><span>{{applied_policy}}</span></h2>

          </div>
        </div>
      </div>

      <div class="col-md-4 col-xl-3">
        <div class="card bg-danger order-card">
          <div class="card-block">
            <h6 class="m-b-20"><a href="/" style="text-decoration: none;color:white;">Policy Categories</a></h6>
           <h2 class="text-right"><i class="fas fa-list-alt f-left"></i><span>{{total_category}}</span></h2>

          </div>
        </div>
      </div>

      <div class="col-md-4 col-xl-3">
        <div class="card bg-warning order-card">
          <div class="card-block">
            <h6 class="m-b-20"><a href="question-history" style="text-decoration: none;color:white;">Total Question Asked</a></h6>
            <h2 class="text-right"><i class="fas fa-question-circle f-left"></i><span>{{total_question}}</span></h2>

          </div>
        </div>
      </div>


    </div>
  </div>


<br><br><br><br><br><br><br><br><br><br>

<script src="http://netdna.bootstrapcdn.com/bootstrap/4.0.0-beta/js/bootstrap.min.js"></script>


{% endblock content %}
- Create template for the customer sign up form in Insurance Management System Project in Django.
In this section, we will learn on how create a templates for the customer sign up form. To start with, add the following code in your customersignup.html under the folder of /templates/.
<!DOCTYPE html>
{% load widget_tweaks %}
<html lang="en" dir="ltr">
  <head>
    <meta charset="utf-8">
    <style>

        form{
           margin: 50px;

        }

    </style>
  </head>
  <body>
    {% include "insurance/navbar.html" %}


<br><br><br>
<h3 style="text-align: center;color: red;">CUSTOMER SIGNUP</h3>
<form method="POST" autocomplete="off" enctype="multipart/form-data">
    {% csrf_token %}
    <div class="form-row">
      <div class="form-group col-md-6">
        <label for="username">Username</label>
        {% render_field userForm.username|attr:'required:true'  class="form-control" placeholder="username" %}
      </div>
      <div class="form-group col-md-6">
        <label for="inputPassword4">Password</label>
        {% render_field userForm.password|attr:'required:true'  class="form-control" placeholder="password" %}
      </div>
    </div>

    <div class="form-row">
        <div class="form-group col-md-6">
          <label for="first_name">First Name</label>
          {% render_field userForm.first_name|attr:'required:true'  class="form-control" placeholder="First Name" %}
        </div>
        <div class="form-group col-md-6">
          <label for="last_name">Last Name</label>
          {% render_field userForm.last_name|attr:'required:true'  class="form-control" placeholder="Last Name" %}
        </div>
      </div>

      <div class="form-row">
        <div class="form-group col-md-6">
          <label for="mobile">Mobile</label>
          {% render_field customerForm.mobile|attr:'required:true'  class="form-control" placeholder="Mobile" %}
        </div>
        <div class="form-group col-md-6">
          <label for="address">Address</label>
          {% render_field customerForm.address|attr:'required:true'  class="form-control" placeholder="Address" %}
        </div>
      </div>

      <div class="form-row">
        <div class="form-group col-md-12">
          <label for="profile_pic">Profile Picture</label>
          {% render_field customerForm.profile_pic|attr:'required:true' class="form-control" placeholder="" %}
        </div>

      </div>


    <button type="submit" class="btn btn-primary">Sign Up</button>
  </form>


<br><br>
{% include "insurance/footer.html" %}
  </body>
</html>
Downloadable Source Code Below.
Anyway, if you want to level up your programming knowledge, especially python, try this new article I’ve made for you Best Python Projects with source code for Beginners.
But If you’re going to focus on web development using Django, you can download here from our list of Best Django Projects with source code based on real-world projects.
How To Run The Insurance Management System Project in Django?
- Step 1: Extract/unzip the file
- Step 2: Go inside the project folder, open cmd and type the following commands to install Django Framework and run the webserver:
- pip install -r requirements.txt
- python manage.py migrate
- python manage.py runserver
- Step 3: Finally, open the browser and go to http://127.0.0.1:8000/
Summary
In summary, the Insurance Management System Project in Django with Source Code can be useful to students or professional who wants to learn python programming language.
This project can also be modified to fit your personal requirements. Hope this project will help you to improve your skills. Happy Coding!
- How To Make A Point Of Sale System In Python
- Best Python Projects for Beginners
- Python MySQL Connection: Simple Python Step by Step Guide
- Python PIP Command Set-up / Fix: Step by Step Guide
- Random Password Generator in Python Projects With Source Code
- Python Range Function|Range in Python Explained with Examples
- School Management System Project In Django With Source Code
- Django Login And Registration With Source Code
- CRUD App In Django With Source Code
- Drag And Drop JavaScript With Source Code
- Todo List App Django With Source Code
Inquiries
If you have any questions or suggestions about Insurance Management System Project in Django with Source Code, please feel free to leave a comment below.


hello sir I need source code of Insurance Management System Project in Django
Hii. what is the password of admin
Follow this steps and it is include for creating the admin in Insurance system.
Step 1: pip install virtualenv
Step 2: virtualenv env
Step 3: cd env/Scripts
Step 4: activate
Step 5: cd ../..
Step 6: pip install django
Step 7: python manage.py makemigrations
Step 8: python manage.py migrate –run-syncdb
Step 9: python manage.py createsuperuser
Step 10: python manage.py runserver
Step 11: Type this in your browser or chrome: http://127.0.0.1:8000/