This Simple Bouncing Ball Program in Python is developed using Python Programming Language.
The Bouncing Ball Game in Python is designed using Tkinter and a graphical user interface(GUI) and it is a desktop application.
A Bouncing Ball Game Code in Python uses Canvas for drawing objects and random modules in Python.
A canvas is a rectangular area intended for drawing pictures or other complex layouts. We can place graphics, text, widgets, or frames on Canvas.
Bouncing Ball Code in Python – Project Information
| Project Name: | Simple Bouncing Ball Program in Python |
| Language/s Used: | Python (GUI) Based |
| Python version (Recommended): | 2.x or 3.x |
| Database: | None |
| Type: | Python App |
| Developer: | IT SOURCECODE |
| Updates: | 0 |
The Bouncing Ball Code in Python could be very simple to control for the users.
There is one bar at the lowest of the game window which may be moved left or right key for the proper usage of the buttons which are in the game window.
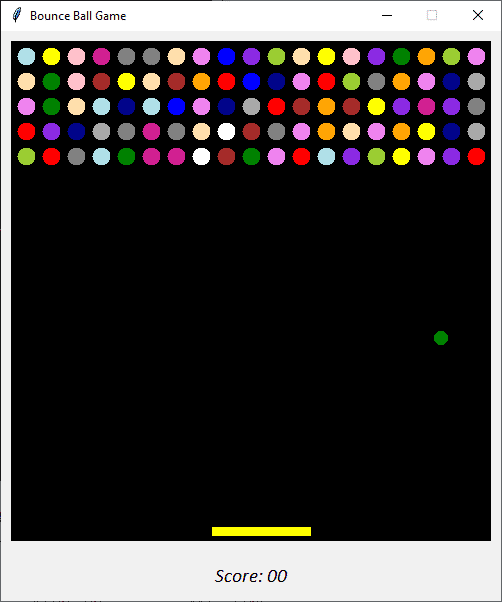
The goal of the Bouncing Ball Game is to hit all targets as many times as you can to earn the highest score. Every time the ball hits the Target you earn 1 point, and if it hits 2 targets you earn 2 points, respectively.
If the player fails to catch the ball on the bar then it will appear the game over on the game window.
Anyway, if you want to level up your knowledge in programming especially games in Python, try this new article I’ve made for you Code For Game in Python: Python Game Projects With Source Code.
Before you start on How to Make Bouncing Ball Game in Python, make sure that you have PyCharm IDE installed on your computer.
By the way, if you are new to Python programming and don’t know what Python IDE to use, I have here a list of the Best Python IDE for Windows, Linux, and Mac OS that will suit you.
I also have here How to Download and Install the Latest Version of Python on Windows.
Steps on How to Create a Bouncing Ball in Python
Time needed: 5 minutes
These are the steps on How To Create a Bouncing Ball in Python with Source Code
- Step 1: Create a project name
First, when you finished installing the Pycharm IDE on your computer, open it and then create a “project name.” After creating a project name click the “create” button.
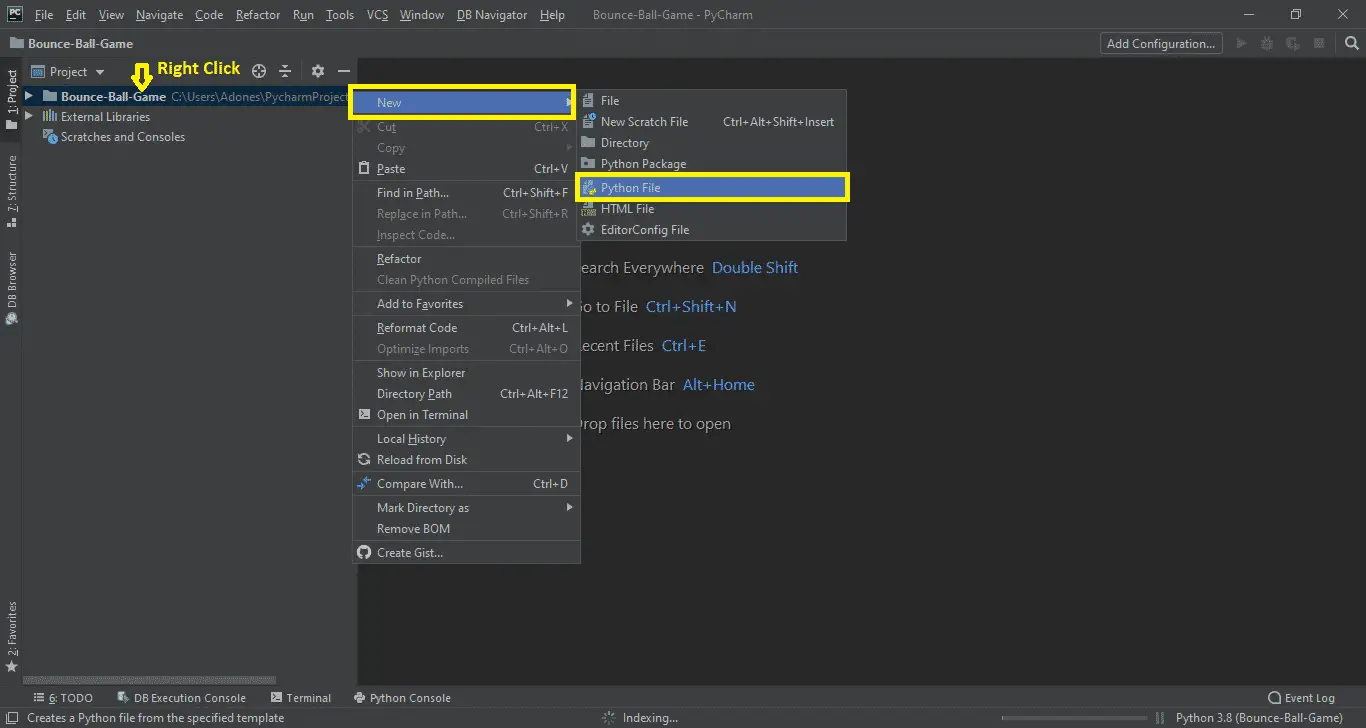
- Step 2: Create a python file.
Second, after creating a project name, “right click” your project name and then click “new” After that click the “python file“.

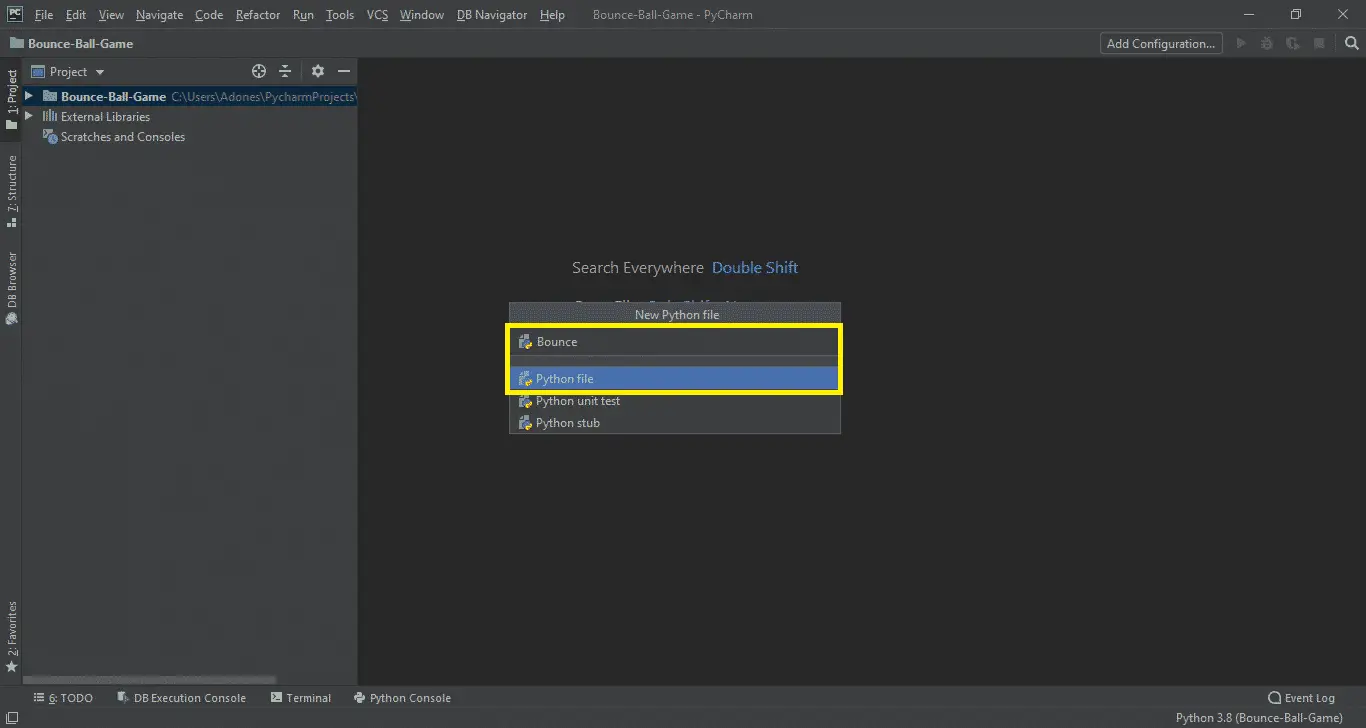
- Step 3: Name your Python file.
Third, after creating a Python file, Name your Python file after that click “enter“.
- Step 4: The actual code
This is the actual coding on How To Create a Bouncing Ball in Python, and you are free to copy this code and download the full source code given below.
Code Explanations
1. Importing Tkinter Module
Code:
from tkinter import *
Explanations:
Tkinter is the standard GUI library for Python. Python when combined with Tkinter provides a fast and easy way to create GUI applications.
2. Importing Random Module
Code:
import random
Explanation:
Among these is the random() function, which generates random numbers between 0 and 1.
3. Designing the Main Window
Code:
root = Tk()
root.title("Bounce Ball Game")
root.geometry("500x570")
root.resizable(0, 0)
root.wm_attributes("-topmost", 1)
canvas = Canvas(root, width=500, height=500, bd=0, highlightthickness=0, highlightbackground="Red", bg="Black")
canvas.pack(padx=10, pady=10)
score = Label(height=50, width=80, text="Score: 00", font="Calibri 14 italic")
score.pack(side="left")
root.update()
Explanation;
In the code above, which is first of all you have to design the main screen window.
4. Module for Starting a Game
Code:
def start_game(event):
global playing
if playing is False:
playing = True
score.configure(text="Score: 00")
canvas.delete("all")
BALL_COLOR = ["blue", "green", "violet"]
STONE_COLOR = ["green", "dark blue", "red", "pink", "violet", "yellow",
"orange", "gray", "brown", "white", "blue", "yellow green",
"navajo white", "dark gray", "violet red", "powder blue", "blue violet"]
random.shuffle(BALL_COLOR)
pole = Pole(canvas, "yellow")
stones = []
for i in range(0, 5):
b = []
for j in range(0, 19):
random.shuffle(STONE_COLOR)
tmp = Stone(canvas, STONE_COLOR[0])
b.append(tmp)
stones.append(b)

for i in range(0, 5):
for j in range(0, 19):
canvas.move(stones[i][j].id, 25 * j, 25 * i)

ball = Ball(canvas, BALL_COLOR[0], pole, stones, score)
root.update_idletasks()
root.update()

time.sleep(1)
while 1:
if pole.pauseSeconds != 1:
try:
canvas.delete(m)
del m
except:
pass
if not ball.bottom_hit:
ball.draw()
pole.draw()
root.update_idletasks()
root.update()
time.sleep(0.01)
if ball.hit == 95:
canvas.create_text(250, 250, text="YOU WON !!", fill="yellow", font="Calibri 24 ")
root.update_idletasks()
root.update()
playing = False
break
else:
canvas.create_text(250, 250, text="GAME OVER!!", fill="red", font="Calibri 24 ")
root.update_idletasks()
root.update()
playing = False
break
else:
try:
if m == None: pass
except:
m = canvas.create_text(250, 250, text="PAUSE!!", fill="green", font="Calibri 24 ")
root.update_idletasks()
root.update()
Explanation:
In the code above, which is for starting a game function use and design of a game. If you hit all the balls it will appear YOU WIN, and if you lose it will appear GAME OVER.
5. Module for the Class Function Use
Code:
class Ball:
def __init__(self, cvs, clr, pole, stones, scre):
self.stones = stones
self.cvs = cvs
self.pole = pole
self.scre = scre
self.bottom_hit = False
self.hit = 0
self.id = canvas.create_oval(10, 10, 25, 25, fill=clr, width=1)
self.cvs.move(self.id, 230, 461)
start = [4, 3.8, 3.6, 3.4, 3.2, 3, 2.8, 2.6]
random.shuffle(start)

self.a = start[0]
self.b = -start[0]
self.cvs.move(self.id, self.a, self.b)
self.cvs_height = canvas.winfo_height()
self.cvs_width = canvas.winfo_width()
Explanation:
In the code above, which is for the class function used in the system.
6. Module for Left and Right Key
Code:
def turn_left(self, event):
self.a = -3.5

def turn_right(self, event):
self.a = 3.5

def pause(self, event):
self.pauseSeconds += 1
if self.pauseSeconds == 2:
self.pauseSeconds = 0
Explanation:
In the code above, which is for the function of left and right key use in the game window.
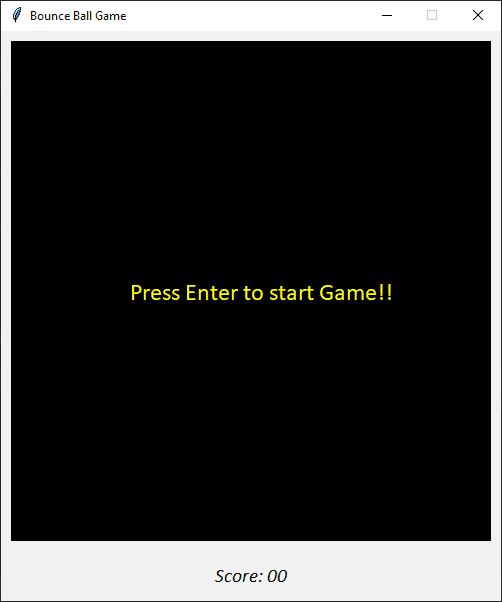
First Output
Second Output
How to Run the Simple Bouncing Ball Program in Python with Source Code?
To run this project, you must have installed a Pycharm on your PC (for Windows). This Simple Bouncing Ball Program in Python is for educational purposes only!
After downloading the project you must follow the steps below:
Step 1: Unzip the file or Extract the file.
Step 2: Double-click the Bounce ball.
Step 3: The project is ready to run.
Downloadable Source Code
I have here the list of Best Python Projects with Source code free to download for free, I hope this can help you a lot.
Summary
This is an easy game created for beginners. Bouncing Ball Game in Python is free to download the open source code and it is used for educational purposes only.
Inquiries
If you have any questions or suggestions about the Simple Bouncing Ball Program in Python with Source Code, please feel free to leave a comment below.
Official documentation
Quick step-by-step summary (click to expand)
- Install Pygame. Run pip install pygame in your terminal.
- Set up the window and ball. Open a display window and draw a small circle at a starting x, y position. Track the ball’s velocity as vx and vy.
- Move and bounce off walls. Add vx to x and vy to y every frame. Reverse vx when the ball hits the left or right edge, reverse vy at the top or bottom.
- Add a paddle. Draw a paddle rectangle at the bottom of the screen and move it left or right with arrow keys. Detect collision between the ball and the paddle.
- Track the score and end game. Add a point every time the ball bounces off the paddle. End the game if the ball touches the bottom below the paddle.
Frequently Asked Questions
How does the bouncing ball physics work in this Python project?
The ball has an x, y position and an x_velocity, y_velocity. Each frame, position is updated by adding velocity. When the ball hits a wall (x boundary), x_velocity flips sign (reverses direction). Same for y boundary. Gravity is simulated by adding a small downward acceleration to y_velocity each frame. Friction can be added by multiplying velocity by 0.99 each frame. This is the fundamental pattern for all 2D physics in Pygame, learning this enables Breakout, Pong, and many other games.
What Python version do I need to run this game?
Python 3.8 or newer works. We recommend Python 3.11 or 3.12 because Pygame ships pre-built wheels for those versions (faster pip install, no compilation errors). Python 3.13 may need a slightly older Pygame release because some wheels lag the latest CPython. Verify your version with python –version on Windows or python3 –version on Mac/Linux.
How do I install Pygame for this project?
Run pip install pygame in your terminal (Windows: open Command Prompt, Mac/Linux: open Terminal). On Windows, if pip is not recognized, try python -m pip install pygame instead. On Linux, you may need sudo apt install python3-pygame if pip fails. Verify with python -c “import pygame; print(pygame.version.ver)”.
Can I use this Python game as my BSIT capstone project?
On its own, no, most Philippine BSIT panels expect a full system with users, data, reports, and a real-world problem. A single Pygame game is too narrow for capstone scope. BUT, you can use this game as ONE module inside a larger capstone (e.g. a gamified learning system, a math practice tool for elementary students with this game as the reward layer, or an arcade-style POS for an internet cafe). Pair the game with a Django backend, a database, and analytics for a defensible capstone.
Can I package this game as a standalone .exe to distribute?
Yes, use PyInstaller. Run pip install pyinstaller then pyinstaller –onefile –windowed your_game.py from the project folder. PyInstaller bundles Python and Pygame into a single .exe (Windows) or .app (Mac) that runs without Python installed on the target machine. Include asset files (images, sounds) with –add-data “assets;assets”. Output goes to the dist/ folder.
Where do I get help if the game does not run?
Check the top 3 most common failures: (1) Pygame is not installed correctly, re-run pip install pygame. (2) The game cannot find an asset file (image/sound), make sure you run python from the project folder so relative paths resolve. (3) Wrong Python version, this code expects Python 3.8+; older Python 2.x or 3.6 raises syntax errors. If you still hit a wall, drop a comment on this article with the exact error message, our team monitors comments daily.

Adones Evangelista
Programmer & Technical Writer at PIES IT Solution
Adones Evangelista is a programmer and writer at PIES IT Solution, author of over 900 tutorials and error-fix guides at itsourcecode.com. Specializes in JavaScript, Django, Laravel, and Python error debugging covering ValueError, TypeError, AttributeError, ModuleNotFoundError, and RuntimeError, plus C/C++ and PHP capstone projects for BSIT students.
Expertise: JavaScript · Python · Django · Laravel · Error Debugging · C/C++ · View all posts by Adones Evangelista →