
In this article, we’re going to learn How To Make a Login Page in Python.
Python’s usage is presently taking the web development scene by the usage of the storm, growing every year.
Project Software Information
| Project Name: | Login Page in Python |
| Abstract: | Login Page in Python is a simple form for a username and password that lets people who already have an account on the site login. |
| Language/s Used: | Python Tkinter GUI Library |
| Python version (Recommended): | 2.x or 3.x |
| Database: | MySQL |
| Type: | Python App |
| Developer: | IT SOURCECODE |
| Updates: | 0 |
This Login Page project system is a simple GUI-based application and this was created by using Python and Mysql Database files. It used the Tkinter module for the Graphical User Interface.
As a beginner, it is easy to Python and would no longer require as many dependencies that you want to download separately. Python gives the TKinter toolkit to increase graphical user interface packages.
About Login Page in Python
In this, we will create a graphical user interface. You may expand any graphical user interface packages easily by just learning. So without wasting your time, let’s start our Python graphical user interface Login tutorial.
Remember in order for you to acquire the idea of how to make a Login Page in Python with MySql Database with Source Code. Please follow all the given instructions below without skipping any step.
By the way, if you are new to Python programming and don’t know what Python IDE to use, I have here a list of the Best Python IDE for Windows, Linux, and Mac OS that will suit you.
I also have here How to Download and Install the Latest Version of Python on Windows.
These are the Steps on How To Make a Login Page in Python
Time needed: 5 minutes
Login Page in Python with MySql Database with Source Code
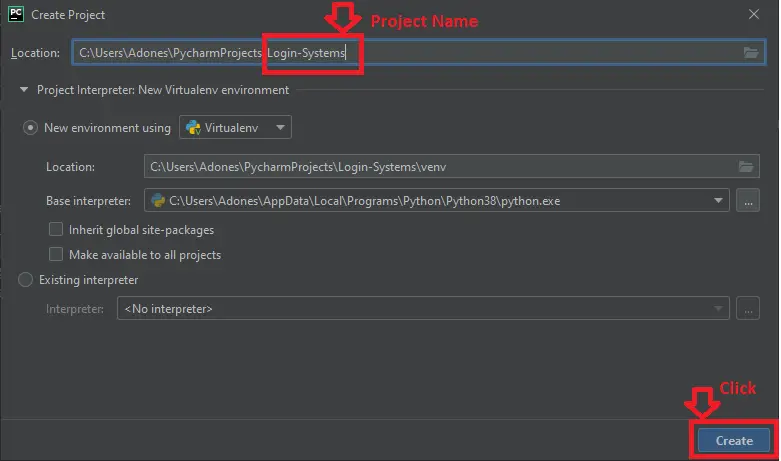
- Step 1: Create a Project Name
First step open the PyCharm IDE and click “File” and select “New Project” and then create a project name after that click the “create” button.

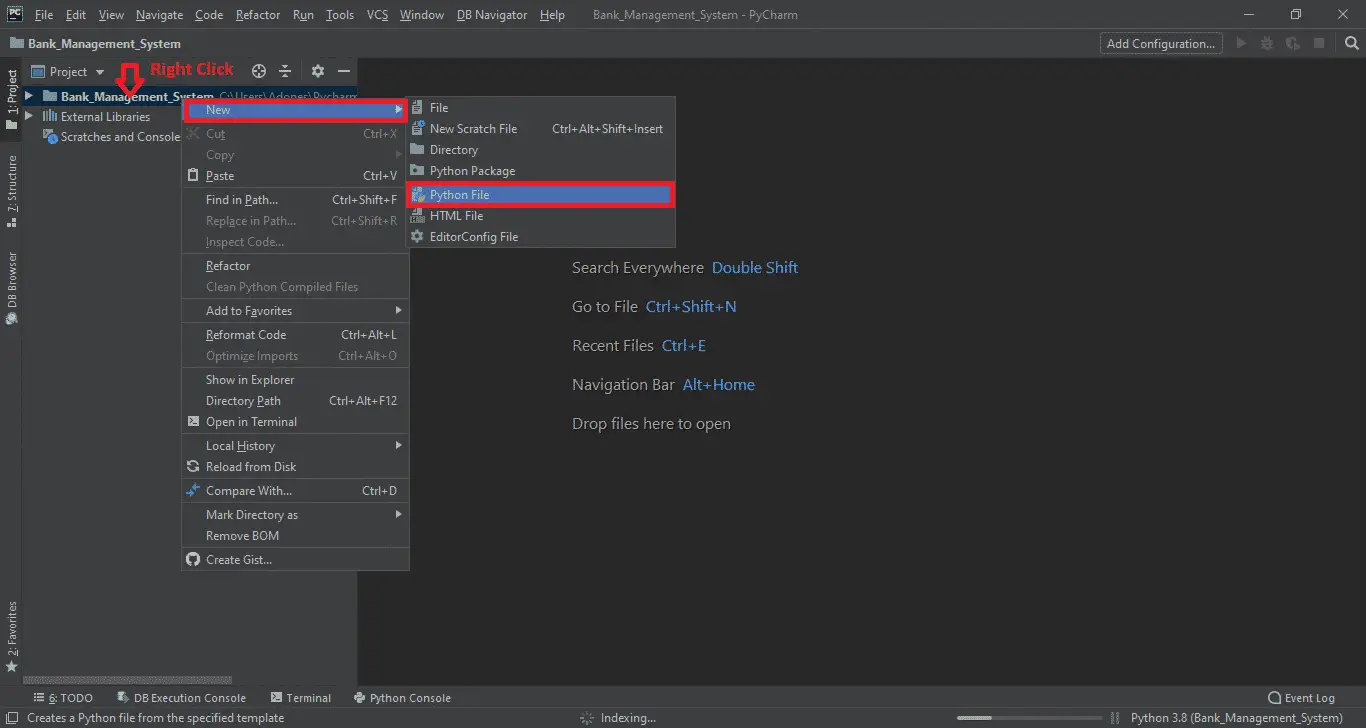
- Step 2: Create a Python File
In the second step after creating a project name, “right” click the project name and then click “New.” After that choose “Python File“.

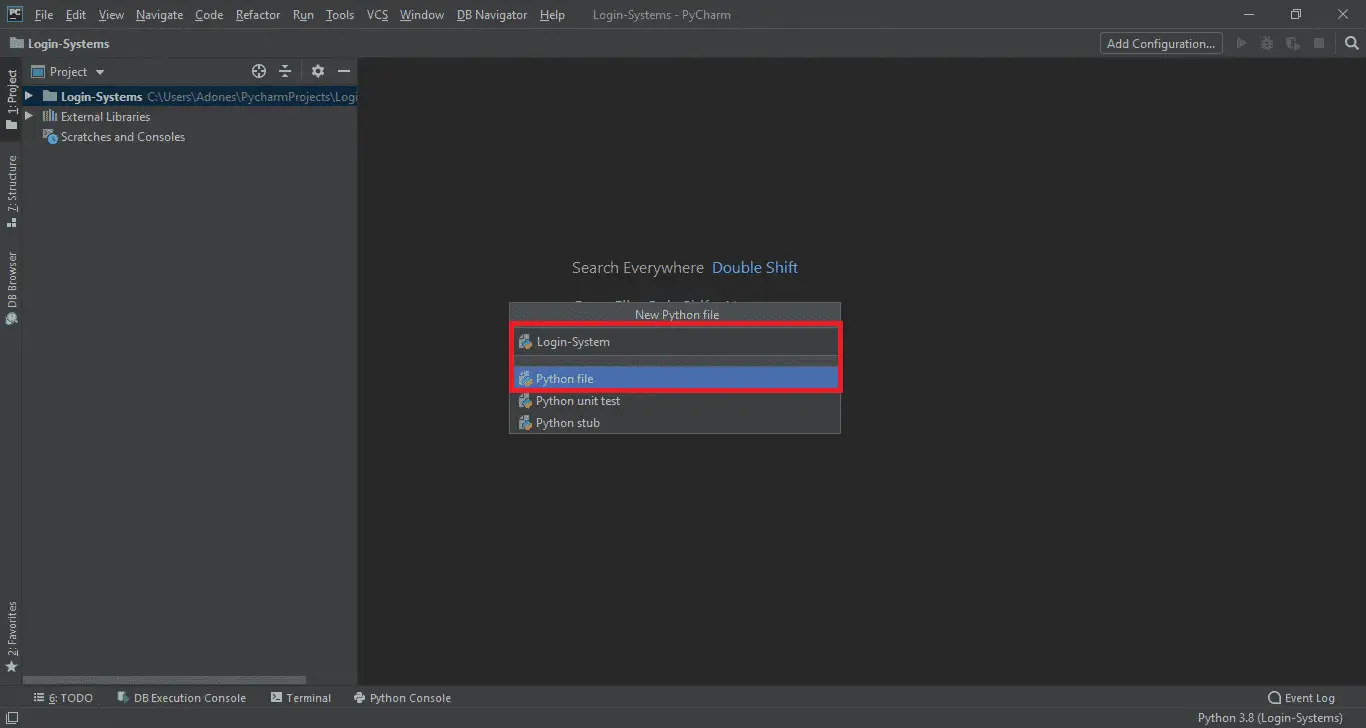
- Step 3: Name the Python File
The third step after choosing Python File name the file “Login-System” and then click “Enter“.
- Creating a File name in the Login Page
Now you can start coding, you are free to copy the code that is being provided below(Python Language with Source Code for Login Page with MySql Database).
Code Explanations
1. Importing Tkinter Function
What does import tkinter do in Python?
Tkinter is the standard GUI library for Python. Python when combined with Tkinter provides a fast and easy way to create GUI applications.
Tkinter provides a powerful object-oriented interface to the Tk GUI toolkit
from tkinter import *In the code above, which is for importing tkinter just write one line of code.
2. Importing the mysql connector
What is MySQL connector in Python?
MySQL Connector/Python enables Python programs to access MySQL databases, using an API that is compliant with the Python Database API Specification v2. 0 (PEP 249).
It is written in pure Python and does not have any dependencies except for the Python Standard Library.
import mysql.connectorIn the code above, which is for importing mysql connector just write one line of code.
3. Connecting to the Database
In the code below, which is for the connection to the mysql database.
connectiondb = mysql.connector.connect(host="localhost",user="root",passwd="",database="logindb")
cursordb = connectiondb.cursor()
4. Designing the main window
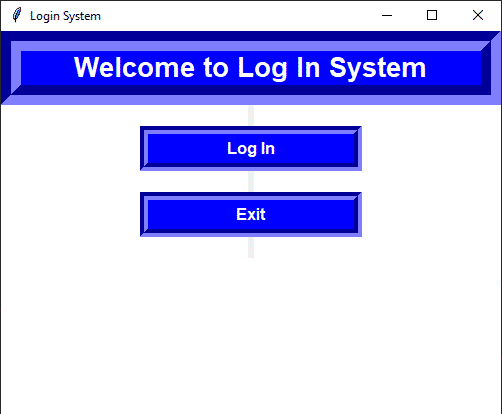
So first of all you have to design the main display. This display screen has two buttons Login and exit. So let’s see the way to put into effect this.
(Python Language with Source Code for Login Page with MySql Database)
def main_display():
global root
root = Tk()
root.config(bg="white")
root.title("Log-IN Portal")
root.geometry("1400x750")
Label(root,text='Welcome to Log In', bd=20, font=('arial', 20, 'bold'), relief="groove", fg="white",
bg="blue",width=300).pack()
Label(root,text="").pack()
Button(root,text='Log In', height="1",width="20", bd=8, font=('arial', 12, 'bold'), relief="groove", fg="white",
bg="blue",command=login).pack()
Label(root,text="").pack()
Button(root,text='Exit', height="1",width="20", bd=8, font=('arial', 12, 'bold'), relief="groove", fg="white",
bg="blue",command=Exit).pack()
Label(root,text="").pack()

main_display()- You can also minimize or maximize the design of the main screen window as in line with your choice and make it extra attractive.
- When the above code is executed, let’s see the output of this code. (Python Language with Source Code for Login Page with MySql Database)
Output:
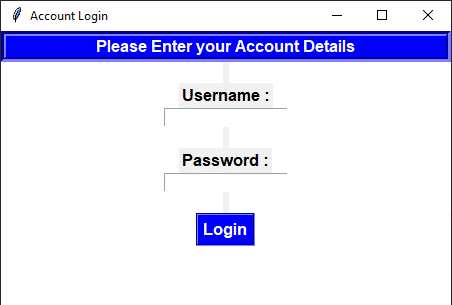
5. Designing a new window for login
Now we ought to implement a login process. So for this, first of all, we should layout a login window. It is equal as the sign-in window however it has a few changes.
def login():
global root2
root2 = Toplevel(root)
root2.title("Account Login")
root2.geometry("1400x750")
root2.config(bg="white")

global username_verification
global password_verification
Label(root2, text='Log In', bd=5,font=('arial', 12, 'bold'), relief="groove", fg="white",
bg="blue",width=300).pack()
username_verification = StringVar()
password_verification = StringVar()
Label(root2, text="").pack()
Label(root2, text="Username :", fg="black", font=('arial', 12, 'bold')).pack()
Entry(root2, textvariable=username_verification).pack()
Label(root2, text="").pack()
Label(root2, text="Password :", fg="black", font=('arial', 12, 'bold')).pack()
Entry(root2, textvariable=password_verification, show="*").pack()
Label(root2, text="").pack()
Button(root2, text="Login", bg="blue", fg='white', relief="groove", font=('arial', 12, 'bold'),command=login_verification).pack()
Label(root2, text="")- And now we will sooner or later take a look at our login process. So fill in the username and password area in sign-in form and press the login button.
- When the above code is executed, it produces the following result below.
Output:
6. Login verification module
In this module, we will verify the username and password for login.
def login_verification():
user_verification = username_verification.get()
pass_verification = password_verification.get()
sql = "select * from usertable where username = %s and password = %s"
mycur.execute(sql,[(user_verification),(pass_verification)])
results = mycur.fetchall()
if results:
for i in results:
logged()
break
else:
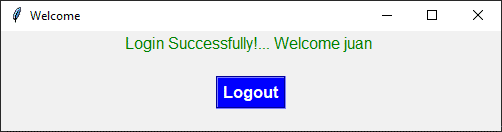
failed()7. Login design and success message popup
Now we are able to outline a characteristic that will show a popup for successful login. So let’s see the way to do it.
So if the user has entered the valid entries then the popup success message will appear.
ef logged():
global logged_message
logged_message = Toplevel(root2)
logged_message.title("Welcome")
logged_message.geometry("500x100")
Label(logged_message, text="Login Successfully!... Welcome {} ".format(username_verification.get()), fg="green", font="bold").pack()
Label(logged_message, text="").pack()
Button(logged_message, text="Logout", bg="blue", fg='white', relief="groove", font=('arial', 12, 'bold'), command=logged_destroy).pack()- If the user enters the correct username and password then the popup message will appear
- If the above code is executed, it produces the following result below.
Output:
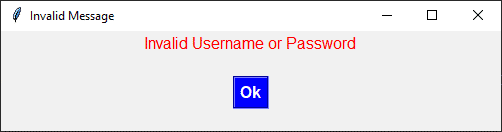
8. Design for login failed or invalid message popup
Now we are able to outline a characteristic that will show a popup for an invalid message popup. So let’s see the way to do it.
So if the user has entered the invalid value then the invalid popup message will appear..
ef failed():
global failed_message
failed_message = Toplevel(root2)
failed_message.title("Invalid")
failed_message.geometry("500x100")
Label(failed_message, text="Invalid Username or Password", fg="red", font="bold").pack()
Label(failed_message, text="").pack()
Button(failed_message,text="Ok", bg="blue", fg='white', relief="groove", font=('arial', 12, 'bold'), command=failed_destroy).pack()
- If the user enters the incorrect username or password then the invalid popup message will appear
- If the above code is executed, it produces the following result below.
Output:
9. Complete the source code of the Login Page in Python with MySql Database
from tkinter import *
import tkinter.messagebox
import mysql.connector


#connecting to the database
connectiondb = mysql.connector.connect(host="localhost",user="root",passwd="",database="logindb")
cursordb = connectiondb.cursor()


def login():
global root2
root2 = Toplevel(root)
root2.title("Account Login")
root2.geometry("450x300")
root2.config(bg="white")

global username_verification
global password_verification
Label(root2, text='Please Enter your Account Details', bd=5,font=('arial', 12, 'bold'), relief="groove", fg="white",
bg="blue",width=300).pack()
username_verification = StringVar()
password_verification = StringVar()
Label(root2, text="").pack()
Label(root2, text="Username :", fg="black", font=('arial', 12, 'bold')).pack()
Entry(root2, textvariable=username_verification).pack()
Label(root2, text="").pack()
Label(root2, text="Password :", fg="black", font=('arial', 12, 'bold')).pack()
Entry(root2, textvariable=password_verification, show="*").pack()
Label(root2, text="").pack()
Button(root2, text="Login", bg="blue", fg='white', relief="groove", font=('arial', 12, 'bold'),command=login_verification).pack()
Label(root2, text="")

def logged_destroy():
logged_message.destroy()
root2.destroy()

def failed_destroy():
failed_message.destroy()

def logged():
global logged_message
logged_message = Toplevel(root2)
logged_message.title("Welcome")
logged_message.geometry("500x100")
Label(logged_message, text="Login Successfully!... Welcome {} ".format(username_verification.get()), fg="green", font="bold").pack()
Label(logged_message, text="").pack()
Button(logged_message, text="Logout", bg="blue", fg='white', relief="groove", font=('arial', 12, 'bold'), command=logged_destroy).pack()


def failed():
global failed_message
failed_message = Toplevel(root2)
failed_message.title("Invalid Message")
failed_message.geometry("500x100")
Label(failed_message, text="Invalid Username or Password", fg="red", font="bold").pack()
Label(failed_message, text="").pack()
Button(failed_message,text="Ok", bg="blue", fg='white', relief="groove", font=('arial', 12, 'bold'), command=failed_destroy).pack()


def login_verification():
user_verification = username_verification.get()
pass_verification = password_verification.get()
sql = "select * from usertable where username = %s and password = %s"
cursordb.execute(sql,[(user_verification),(pass_verification)])
results = cursordb.fetchall()
if results:
for i in results:
logged()
break
else:
failed()

def Exit():
wayOut = tkinter.messagebox.askyesno("Login System", "Do you want to exit the system")
if wayOut > 0:
root.destroy()
return

def main_display():
global root
root = Tk()
root.config(bg="white")
root.title("Login System")
root.geometry("500x500")
Label(root,text='Welcome to Log In System', bd=20, font=('arial', 20, 'bold'), relief="groove", fg="white",
bg="blue",width=300).pack()
Label(root,text="").pack()
Button(root,text='Log In', height="1",width="20", bd=8, font=('arial', 12, 'bold'), relief="groove", fg="white",
bg="blue",command=login).pack()
Label(root,text="").pack()
Button(root,text='Exit', height="1",width="20", bd=8, font=('arial', 12, 'bold'), relief="groove", fg="white",
bg="blue",command=Exit).pack()
Label(root,text="").pack()

main_display()
root.mainloop()
How To Run The Login Page in Python with MySql Database with Source Code?
To run this project, you must have installed a Pycharm on your PC (for Windows). This Login Page in Python with MySql Database with Source Code purposes only!
After downloading the project you must follow the steps below:
Step 1: Unzip the file or Extract the file
Step 2: Double-click the login
Step 3: The project is ready to run
Downloadable Source Code
I have here the list of Best Python Project with Source code free to download for free, I hope this can help you a lot.
Conclusion
In this Login Page in Python with MySql Database with Source Code, I use the mysql.Connector library to set up a connection.
Official documentation
Frequently Asked Questions
How does this Python login or registration system work?
Tkinter login form with username+password, password hashing via hashlib (SHA-256) or bcrypt. Session via global var. Role-based redirect.
What Python version and libraries does this project require?
Most projects in this batch use Python 3.10, 3.11, or 3.12. Standard libs: tkinter (built-in), sqlite3 (built-in). External: pip install pillow opencv-python pygame mysql-connector-python reportlab requests beautifulsoup4.
How do I set up the database for this Python project?
For SQLite (most common, no setup): the .db file auto-creates on first run. For MySQL: install MySQL Server, create an empty database, import the included .sql file, edit connection in db.py with your credentials.
Can I use this Python project for a BSIT capstone or thesis?
Yes. Python is rising fast in Philippine BSIT panels. Extend it: add user roles, dashboards (matplotlib), PDF reports (reportlab), email notifications (smtplib), real domain extension. Pair with Chapter 1-5 documentation.
Why am I getting ‘ModuleNotFoundError’?
Three common Python issues: (1) Module not installed, pip install
Where can I find more Python projects with source code?
Browse the Python Projects hub for the full library. For computer vision see OpenCV Projects. For ML capstones see Machine Learning Projects. For BSIT capstone ideas see 150 Best Capstone Project Ideas.

Adones Evangelista
Programmer & Technical Writer at PIES IT Solution
Adones Evangelista is a programmer and writer at PIES IT Solution, author of over 900 tutorials and error-fix guides at itsourcecode.com. Specializes in JavaScript, Django, Laravel, and Python error debugging covering ValueError, TypeError, AttributeError, ModuleNotFoundError, and RuntimeError, plus C/C++ and PHP capstone projects for BSIT students.
Expertise: JavaScript · Python · Django · Laravel · Error Debugging · C/C++ · View all posts by Adones Evangelista →
awful
i am getting error ” mdule mysql connector has no attribute connect”