Bus Reservation System Project in Django with Source Code
Bus Reservation System Project in Python Django is a fairly simple system written in Django, SQLLite3, and Python that is intended to automate the purchase of online tickets through an easy online bus booking system.
You can manage/book reservations, client info, and passenger lists with the bus ticket reservation system’s Django admin, and book tickets easily via the Bus reservation Website.
To start creating a Bus Reservation System Project in Django, make sure that you have PyCharm Professional IDE Installed in your computer.
This Bus Reservation System Project in Django also includes a Download Source Code for free, just find the downloadable source code below and click download now.
Bus Reservation System Project Information
| About Project | Project Details | Definition |
|---|---|---|
| Project Name | Bus Reservation System Project in Django | The Bus Reservation System Project in Django is developed using Python Django, HTML, CSS, and JavaScript. This Bus Reservation System in Django is a simple web application created with Django, a Python-based web framework, for taking notes. |
| Python version (Recommended) | 3.8 Version | Python 3.8 introduces some new syntax to the language, as well as a few small modifications to existing behavior and, most importantly, a slew of performance improvements, following in the footsteps of the previous 3.7 version. |
| Programming Language Used | Python Django Language | Django is a high-level Python web framework for building safe and maintainable websites quickly. Django is a web framework built by experienced developers that takes care of a lot of the heavy lifting so you can focus on developing your app instead of reinventing the wheel. |
| Developer Name | itsourcecode.com | Free projects containing source code in Java, PHP, Python, Django, VB.Net, Visual Basic, C, C++, C#, Javascript, and other languages are available on this website. |
| IDE Tool (Recommended) | Sublime, Visual Studio, PyCharm | Sublime Text is a source code editor that is available for purchase. It comes with built-in support for a variety of programming and markup languages. Plugins, which are often community-built and maintained under free software licenses, allow users to extend the functionality of the system. Sublime Text has a Python API to help with plugins. |
| Project Type | Web Application | A web application, unlike computer-based software programs that operate locally on the device’s operating system, is application software that runs on a web server. The user uses a web browser with an active network connection to access web apps. |
| Database | SQLite | SQLite is a programming language that is used to create embedded software for devices such as televisions, cell phones, and cameras. It can handle HTTP requests with low to medium traffic. SQLite has the ability to compress files into smaller bundles with less metadata. SQLite is a temporary dataset that is used within an application to process data. |
Admin Features of Bus Reservation System Project in Django
- User – For the user, The admin can add, update, and delete user information and also the admin can change the password of the user.
- Manage Booking – For the booking, The admin can add, update, and delete booking information.
- Manage Bus – For the bus, The admin can add, update, and delete booking information.
User Features of Bus Reservation System Project in Django
- Log in – For the login, the user will log in first before he/she can use the system.
- Sign up – For the sign-up, the user will sign up first before he/she can use it to log in to the system.
- Homepage – For the homepage, you will be able to all the basic access in the whole system. Such as home, find the bus, see the booking, and log in.
- Search Bus – For the search bus, the user will be able to search the available bus.
- View Booking – For the view booking, the user will be able to view the booking details.
- Cancel Booking – For the canceled booking, the user will be able to cancel their booking.
Bus Reservation System Project in Django Steps on How to Create a Project
Time needed: 5 minutes
Here are the steps on How to create a Bus Reservation System Project in Django With Source Code
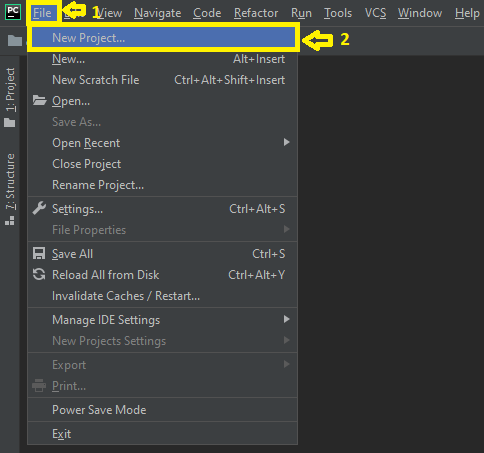
- Step 1: Open file.
First, open “pycharm professional” after that click “file” and click “new project”.

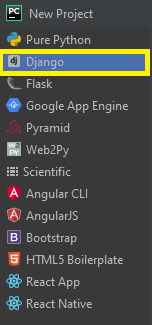
- Step 2: Choose Django.
Next, after clicking “new project“, choose “Django” and click.

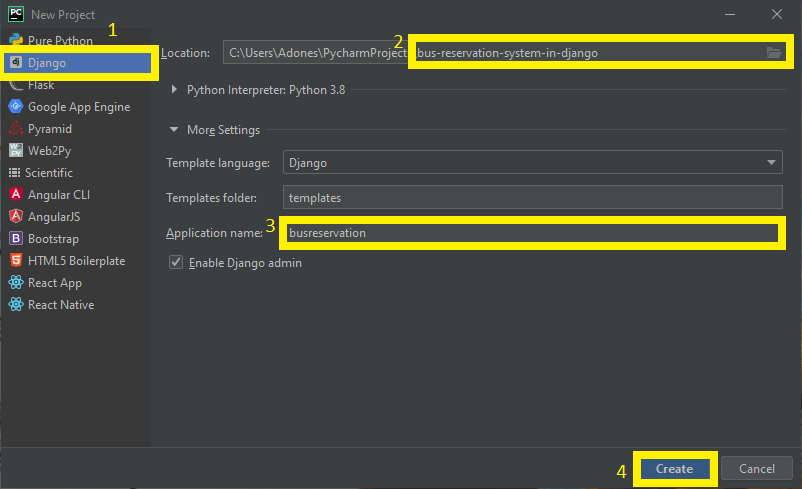
- Step 3: Select the file location.
Then, select a file location wherever you want.

- Step 4: Create an application name.
After that, name your application.

- Step 5: Click Create.
Lastly, finish creating the project by clicking the “create” button.

- Step 6: Start Coding.
Finally, we will now start adding functionality to our Django Framework by adding some functional codes.

These are the codes to add functionality for the Bus Reservation System Project in Django With Source Code
- Create the template for the homepage in the Bus Reservation System Project in Django With Source Code.
In this section, we will learn how to create templates for the homepage. To start with, add the following code in your base.html under the folder of myapp/templates/myapp files.
<!doctype html>
<html lang="en">
<head>
    <!-- Required meta tags -->
    <meta charset="utf-8">
    <meta name="viewport" content="width=device-width, initial-scale=1, shrink-to-fit=no">

    <!-- Bootstrap CSS -->
    <link rel="stylesheet" href="https://stackpath.bootstrapcdn.com/bootstrap/4.1.3/css/bootstrap.min.css"
          integrity="sha384-MCw98/SFnGE8fJT3GXwEOngsV7Zt27NXFoaoApmYm81iuXoPkFOJwJ8ERdknLPMO" crossorigin="anonymous">

    <title>Bus Reservation System</title>
</head>
<body>
<nav class="navbar navbar-expand-lg navbar-light bg-success">
    <div class="container">
        <a class="navbar-brand" href="#" style="color: white;">Vallacar Transit Incorporated</a>
        <button class="navbar-toggler" type="button" data-toggle="collapse" data-target="#navbarNavAltMarkup"
                aria-controls="navbarNavAltMarkup" aria-expanded="false" aria-label="Toggle navigation">
            <span class="navbar-toggler-icon"></span>
        </button>
        <div class="collapse navbar-collapse" id="navbarNavAltMarkup">
            <div class="navbar-nav" >
                <a class="nav-item nav-link active" href="{% url 'home' %}" style="color: white;">Home <span class="sr-only">(current)</span></a>
                <a class="nav-item nav-link" href="{% url 'findbus' %}" style="color: white;">Find Bus</a>
                <a class="nav-item nav-link" href="{% url 'seebookings' %}" style="color: white;">See Bookings</a>
                {% if request.user.is_active %}
                <a class="nav-item nav-link " href="{% url 'signout' %}" style="color: white;">Sign out</a>
                {% else %}
                <a class="nav-item nav-link " href="{% url 'signup' %}" style="color: white;">Sign Up</a>
                {% endif %}


            </div>
        </div>
    </div>
</nav>
{% block content %}
{% endblock %}
<!-- Optional JavaScript -->
<!-- jQuery first, then Popper.js, then Bootstrap JS -->
<script src="https://code.jquery.com/jquery-3.3.1.slim.min.js"
        integrity="sha384-q8i/X+965DzO0rT7abK41JStQIAqVgRVzpbzo5smXKp4YfRvH+8abtTE1Pi6jizo"
        crossorigin="anonymous"></script>
<script src="https://cdnjs.cloudflare.com/ajax/libs/popper.js/1.14.3/umd/popper.min.js"
        integrity="sha384-ZMP7rVo3mIykV+2+9J3UJ46jBk0WLaUAdn689aCwoqbBJiSnjAK/l8WvCWPIPm49"
        crossorigin="anonymous"></script>
<script src="https://stackpath.bootstrapcdn.com/bootstrap/4.1.3/js/bootstrap.min.js"
        integrity="sha384-ChfqqxuZUCnJSK3+MXmPNIyE6ZbWh2IMqE241rYiqJxyMiZ6OW/JmZQ5stwEULTy"
        crossorigin="anonymous"></script>
</body>
</html>- Create a template for the billing in the Bus Reservation System Project in Django With Source Code.
In this section, we will learn how to create templates for billing. To start with, add the following code in your bookings.html under the folder of myapp/templates/myapp files.
{% extends 'myapp/base.html' %}
{% block content %}
<h2>Booking Confirmation</h2>
<form action="{% url 'home' %}" method="post">
{% csrf_token %}
<h2>Your booking has been confirmed!</h2>
<h2>Thank you!</h2>
<h3>Bill details</h3>
<!-- Button to Open the Modal -->
<button type="button" class="btn btn-success" data-toggle="modal" data-target="#myModal">
Bill details
</button>
<!-- The Modal -->
<div class="modal" id="myModal">
<div class="modal-dialog">
<div class="modal-content">
<!-- Modal Header -->
<div class="modal-header">
<h4 class="modal-title">Modal Heading</h4>
<button type="button" class="close" data-dismiss="modal">×</button>
</div>
<!-- Modal body -->
<div class="modal-body">
<ul class="list-group list-group-flush">
<li class="list-group-item"><b>Bus name:</b> {{book.bus_name}}</li>
<li class="list-group-item"><b>Starting point:</b> {{book.source}}</li>
<li class="list-group-item"><b>Destination point:</b> {{book.dest}}</li>
<li class="list-group-item"><b>Number of seats:</b> {{book.nos}}</li>
<li class="list-group-item"><b>Price:</b> {{book.price}}</li>
<li class="list-group-item"><b>Cost:</b> {{cost}}</li>
<li class="list-group-item"><b>Date:</b> {{book.date}}</li>
<li class="list-group-item"><b>Time:</b> {{book.time}}</li>
</ul>
</div>
<!-- Modal footer -->
<div class="modal-footer">
<button type="button" class="btn btn-success" data-dismiss="modal">Close</button>
</div>
</div>
</div>
</div>
<div class="pull-right">
<button type="submit" class="btn btn-primary float-right">OK</button>
</div>
</form>
{% endblock %}- Create a template for the booking list
In this section, we will learn how to create templates for the booking list. To start with, add the following code in your bookinglist.html under the folder of myapp/templates/myapp files.
{% extends 'myapp/base.html' %}
{% block content %}
<h3>{{msg}}</h3>
<h2>List of buses</h2>
<table class="table table-striped">
    <thead style="background-color: blue;color: white;">
    <td>BOOKING ID</td>
    <td>USER NAME</td>
    <td>BUS NAME</td>
    <td>SOURCE</td>
    <td>DESTINATION</td>
    <td>NUM OF SEATS</td>
    <td>PRICE</td>
    <td>DATE</td>
    <td>TIME</td>
    <td>STATUS</td>


    </thead>

    {% for row in book_list %}
    <tr>
        <td>{{row.id}}</td>
        <td>{{row.name}}</td>
        <td>{{row.bus_name}}</td>
        <td>{{row.source}}</td>
        <td>{{row.dest}}</td>
        <td>{{row.nos}}</td>
        <td>{{row.price}}</td>
        <td>{{row.date}}</td>
        <td>{{row.time}}</td>
        <td>{{row.status}}</td>


    </tr>
    {% endfor %}
</table>
<form action="{% url 'cancellings' %}" method="post">
    <h3>Choose bus to book</h3>
    {% csrf_token %}
    <div class="col-auto">
        <label for="example-email-input" class="col-2 col-form-label">Bus ID</label>
        <div class="col-5">
            <input name='bus_id' class="form-control" type="number" id="example-email-input">
        </div>
    </div>

    <br>
    <br>
    <div class="pull-right">
        <button type="submit" class="btn btn-danger float-left">Cancel bus</button>
    </div>


    {{error}}

</form>

{% endblock %}- Create a template for the search bus
In this section, we will learn how to create templates for the search bus. To start with, add the following code in your findbus.html under the folder of myapp/templates/myapp files.
{% extends 'myapp/base.html' %}
{% block content %}
<div class="container">
        <div class="row">
            <div class="col-sm-6 mx-auto" style="margin-top: 70px">
                <h2>Find bus</h2>
                <form action="{% url 'findbus' %}" method="post">
                    {% csrf_token %}
                    <div class="form-group row">
                        <label for="example-email-input" class="col-2 col-form-label">From</label>
                        <div class="col-10">
                            <input name='source' class="form-control" type="text" id="example-email-input">
                        </div>
                    </div>
                    <div class="form-group row">
                        <label for="example-email-input" class="col-2 col-form-label">Destination</label>
                        <div class="col-10">
                            <input name='destination' class="form-control" type="text">
                        </div>
                    </div>
                    <div class="form-group row">
                        <label for="example-email-input" class="col-2 col-form-label" >Date</label>
                        <div class="col-10">
                            <input name='date' class="form-control" type="date">
                        </div>
                    </div>
                    <div class="pull-right">
                        <button type="submit" class="btn btn-success float-right">Find bus</button>
                    </div>
                    {{error}}

                </form>
            </div>
        </div>

    </div>

{% endblock %}- Create a template for the list of buses
In this section, we will learn how to create templates for the list of the bus. To start with, add the following code in your list.html under the folder of myapp/templates/myapp files.
{% extends 'myapp/base.html' %}
{% block content %}
<h3>{{msg}}</h3>
<h2>List of buses</h2>
<table class="table table-striped" >
    <thead style="background-color: blue;color: white;">
    <td>ID</td>
    <td>NAME</td>
    <td>SOURCE</td>
    <td>DESTINATION</td>
    <td>NUM OF SEATS</td>
    <td>NUM OF SEATS REM</td>
    <td>PRICE</td>
    <td>DATE</td>
    <td>TIME</td>

    </thead>

    {% for row in bus_list %}
    <tr>
        <td>{{row.id }}</td>
        <td>{{row.bus_name}}</td>
        <td>{{row.source}}</td>
        <td>{{row.dest}}</td>
        <td>{{row.nos}}</td>
        <td>{{row.rem}}</td>
        <td>{{row.price}}</td>
        <td>{{row.date}}</td>
        <td>{{row.time}}</td>


    </tr>
    {% endfor %}
</table>
<form action="{% url 'bookings' %}" method="post">
    <h3>Choose bus to book</h3>
    {% csrf_token %}
    <div class="col-auto">
        <label for="example-email-input" class="col-2 col-form-label">Bus ID</label>
        <div class="col-5">
            <input name='bus_id' class="form-control" type="number" id="example-email-input">
        </div>
    </div>
    <div class="col=auto">
        <label for="example-email-input" class="col-2 col-form-label">Number of seats</label>
        <div class="col-5">
            <input name='no_seats' class="form-control" type="number">
        </div>
    </div>
    <br>
    <br>
    <div class="pull-right">
        <button type="submit" class="btn btn-success float-left">Book bus</button>
    </div>


    {{error}}

</form>

{% endblock %}- Create a template for the login form
In this section, we will learn how to create templates for the login form. To start with, add the following code in your list.html under the folder of myapp/templates/myapp files.
{% extends 'myapp/base.html' %}
{% block content %}
<div class="container">
    <center><h2 style="margin-top: 70px; background-color: blue;color: white">Welcome to Vallacar Transit Bus Reservation</h2></center>
        <div class="row">
            <div class="col-sm-6 mx-auto" style="margin-top: 70px">
                <h2>Log in</h2>

                <form action="{% url 'signin' %}" method="post">
                    {% csrf_token %}
                    <div class="form-group row">
                        <label for="example-email-input" class="col-2 col-form-label">Username:</label>
                        <div class="col-10">
                            <input name='name' class="form-control" type="text" id="example-email-input">
                        </div>
                    </div>
                    <div class="form-group row">
                        <label for="example-email-input" class="col-2 col-form-label">Password:</label>
                        <div class="col-10">
                            <input name='password' class="form-control" type="password">
                        </div>
                    </div>
                    <div class="pull-right">
                        <button type="Submit" class="btn btn-success float-right">Sign in</button>
                    </div>

                </form>
                <p>{{error}}</p>
            </div>
        </div>

    </div>

{% endblock %}- Create a template for the registration form
In this section, we will learn how to create templates for the registration form. To start with, add the following code in your list.html under the folder of myapp/templates/myapp files.
{% extends 'myapp/base.html' %}
{% block content %}
<div class="container">
        <div class="row">
            <div class="col-sm-6 mx-auto" style="margin-top: 70px">
                <form action="{% url 'signup' %}" method="post">
                    <h2>Sign up!</h2>
                    {% csrf_token %}
                    <div class="form-group row">
                        <label for="example-email-input" class="col-2 col-form-label">Email:</label>
                        <div class="col-10">
                            <input name='email' class="form-control" type="text" id="example-email-input" required>
                        </div>
                    </div>
                    <div class="form-group row">
                        <label for="example-email-input" class="col-2 col-form-label">Username:</label>
                        <div class="col-10">
                            <input name='name' class="form-control" type="text" required>
                        </div>
                    </div>
                    <div class="form-group row">
                        <label for="example-email-input" class="col-2 col-form-label">Password:</label>
                        <div class="col-10">
                            <input name='password' class="form-control" type="text" required>
                        </div>
                    </div>
                    <div class="pull-right">
                        <button type="submit" class="btn btn-success float-right">Sign up</button>
                    </div>

                </form>
            </div>
        </div>

    </div>

{% endblock %}
Downloadable Source Code Below
Anyway, if you want to level up your programming knowledge, especially Python, try this new article I’ve made for you Best Python Projects with source code for Beginners.
But If you’re going to focus on web development using Django, you can download here from our list of Best Django Projects with source code based on real-world projects.
How To Run The Bus Reservation System Project in Django With Source Code?
1st Step: Extract/unzip the file
2nd Step: Go inside the project folder, open cmd, and type the following commands to install Django Framework and run the webserver:
- python manage.py runserver
3rd Step: Finally, open the browser and go to http://127.0.0.1:8000/
Summary
In summary, this Bus Reservation System Project in Django With Source Code can be useful to students or professional who wants to learn Python Django programming language.
This project can also be modified to fit your personal requirements. Hope this project will help you to improve your skills. Happy Coding!
- School Management System Project In Django With Source Code
- Django Login And Registration With Source Code
- CRUD App In Django With Source Code
- Todo List App Django With Source Code
Inquiries
If you have any questions or suggestions about the Bus Reservation System Project in Django With Source Code, please feel free to leave a comment below.
your css,javascript file is missing so the project are not properly workin
cbrfereencyhufmhuehxgfrtf4djhndeygr
mine is not working whats up!!!!
Admine credentials please
Guys, just use this command in console and create new admin:
python manage.py createsuperuser
The admin interface for doing operations is blank, help please?
What is the error?