
Expense Tracker in JavaScript with Source Code
The Expense Tracker in JavaScript is a simple project designed in JavaScript language using HTML and CSS platform.
This project will allow users to better track their expenditures and revenue.
The Expense tracker will show you the homepage where you can see your balance, income, expenses, and the history of expenses.
This simple mini project for Expense Tracker in JavaScript is complete and totally error free and also includes a downloadable Source Code for free, just find the downloadable source code below and click to start downloading.
Before you start to click the download now first you must click the Run Quick Scan for secure Download.
I have here a suggested list of Best JavaScript Projects with Source Code Free to download and I’m sure this can help you to improve your skills in JavaScript programming and web development as a whole.
Anyway if you want level up your knowledge in programming especially JavaScript Programming, try this new article I’ve made for you Best JavaScript Projects With Source Code For Beginners.
To start creating a Expense Tracker in JavaScript with Source Code, make sure that you have any platform in creating a JavaScript, bootstrap, and HTML installed in your computer, in my case I will use Sublime Text.
Expense Tracker in JavaScript with Source Code
Time needed: 5 minutes
Here’s the Steps on how to create a Expense Tracker in JavaScript with Source Code
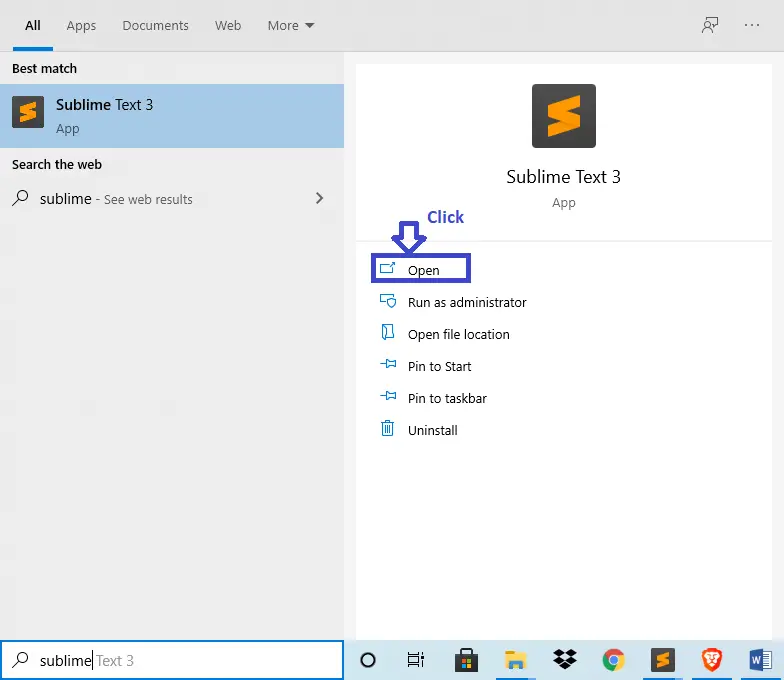
- Step 1: Open Sublime Text.
First, after installing sublime text IDE, click “open” to start.

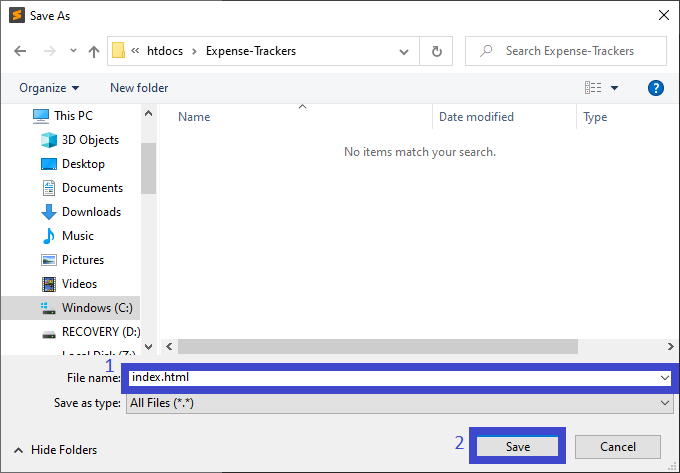
- Step 2: Create a HTML file.
Next, click “file” and select “save as” and named it “index.html“.

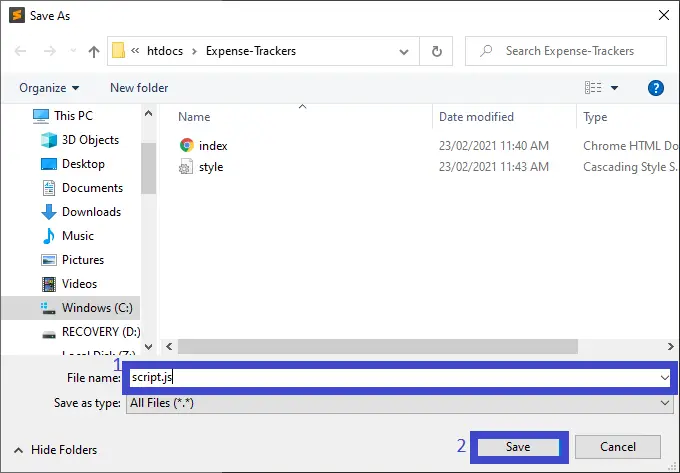
- Step 3: Create a JavaScript file.
Then, click “file” and select “save as” and named it “script.js“.
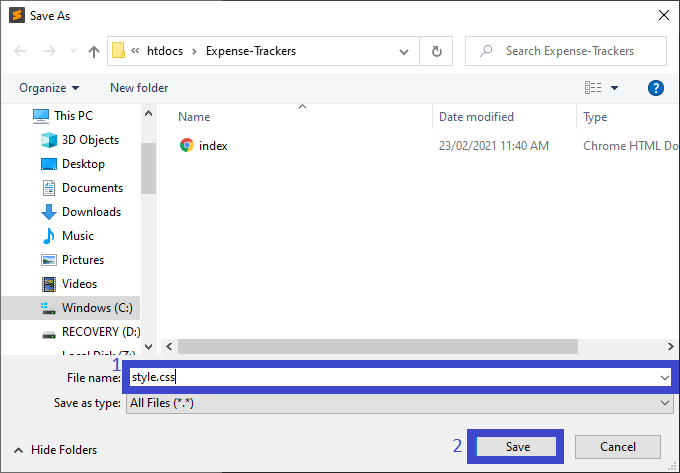
- Step 4: Create a CSS file.
Last, click “file” and select “save as” and named it “style.css“.
- Step 5: The actual code.
Finally, You are free to copy the code given below and paste to your different file created.
Code for the index.html in Expense Tracker in JavaScript
In the code given below, which is the code contains the interface of the application. This code will show the form that will be use in html.
<!DOCTYPE html>
<html>
  <head>
    <meta charset="utf-8" />
    <meta http-equiv="X-UA-Compatible" content="IE=edge" />
    <title>Itsourcecode Expense Traker</title>
    <meta name="description" content="" />
    <meta name="viewport" content="width=device-width, initial-scale=1" />
    <link rel="stylesheet" href="style.css" />
  </head>
  <body>
    <h2>Itsourcecode Expense Tracker System</h2>
    <div class="container">
      <h4>Your balance</h4>
      <h1 id="balance">₱0.0</h1>
      <div class="inc-exp-container">
        <div>
          <h4>income</h4>
          <p id="money-plus" class="money plus">+₱0.00</p>
        </div>
        <div>
          <h4>expense</h4>
          <p id="money-minus" class="money minus">-₱0.00</p>
        </div>
      </div>
      <h3>History</h3>
      <ul id="list" class="list">
      </ul>
      <h3>Add New Transation</h3>
      <form action="" id="form">
        <div class="form-control">

          <input type="text" id="text" placeholder="Please enter the name of your expenses..." />
        </div>
        <div class="form-control">
          <label for="amount"
            ></label
          >
          <input
            type="number"
            id="amount"
            placeholder="Please enter the amount you want to add..."
          />
        </div>
        <button class="btn">Add transation</button>
      </form>
    </div>

    <script src="script.js" async defer></script>
  </body>
</html>
Code for the style.css in Expense Tracker in JavaScript
In the code given below, which is the code contains the interface design of the application. This code will show the form that will be use for designing.
@import url("https://fonts.googleapis.com/css2?family=Viaoda+Libre&display=swap");

:root {
  --bg: #463333;
  --text: #fff0f0;
  --line: #ebd4d4;
  --last: #835858;
  --box-shadow: 0 1px 5px rgba(250, 250, 250, 0.2),
    0 1px 5px rgba(255, 255, 255, 0.3);
}

* {
  box-sizing: border-box;
}
body {
  font-family: "Times New Roman", cursive;
  background-color: blue;
  color: white;
  display: flex;
  flex-direction: column;
  align-items: center;
  justify-content: center;
  margin: 0;
  min-height: 100vh;
}
.container {
  margin: 30px auto;
  width: 350px;
}
h1 {
  letter-spacing: 1px;
  margin: 0;
}
h3 {
  border-bottom: 1px solid var(--line);
  padding: 10px;
  margin: 40px 0 10px;
  background-color: #00ff00;
}
h4 {
  margin: 0;
  text-transform: uppercase;
  color: white;
}
p {
  color: var(--bg);
  font-weight: bold;
}
.inc-exp-container {
  background-color: #00ff00;
  padding: 20px;
  box-shadow: var(--box-shadow);
  display: flex;
  justify-content: space-between;
  margin: 20px 0;
}
.inc-exp-container > div {
  flex: 1;
  text-align: center;
}
.inc-exp-container > div:first-of-type {
  border-right: 1px solid var(--last);
}
.money {
  font-size: 20px;
  letter-spacing: 1px;
  margin: 5px 0;
}
.money.plus {
  color: forestgreen;
}
.money.minus {
  color: crimson;
}
label {
  display: inline-block;
  margin: 10px 0;
  font-size: large;
  font-weight: bold;
  text-decoration: underline;
}
input[type="text"],
input[type="number"] {
  border: 1px solid var(--last);
  border-radius: 5px;
  display: block;
  font-size: 16px;
  padding: 10px;
  width: 100%;
}
.btn {
  cursor: pointer;
  background-color: #00ff00;
  box-shadow: var(--box-shadow);
  color: var(--bg);
  display: block;
  font-size: 16px;
  font-weight: bold;
  margin: 10px 0 30px;
  padding: 10px;
  width: 100%;
}
.btn:focus,
.delete-btn:focus {
  outline: none;
}
.list {
  list-style-type: none;
  padding: 0;
  margin-bottom: 40px;
}
.list li {
  background-color: var(--text);
  color: var(--bg);
  display: flex;
  justify-content: space-between;
  position: relative;
  padding: 10px;
  margin: 10px 0;
}
.list li.plus {
  border-right: 5px solid forestgreen;
}
.list li.minus {
  border-right: 5px solid crimson;
}
.delete-btn {
  cursor: pointer;
  background-color: var(--line);
  border: 0;
  font-size: 20px;
  line-height: 20px;
  padding: 2px 5px;
  position: absolute;
  top: 50%;
  left: 0;
  transform: translate(-100%, -50%);
  opacity: 0;
  transition: opacity 0.3s ease-in;
}
.list li:hover .delete-btn {
  opacity: 1;
}
Code for the script.js in Expense Tracker in JavaScript
In the code given below, which is the code contains the interface function of the application. This code will show the function of the form that will be use in html.
const balance = document.getElementById("balance");
const money_plus = document.getElementById("money-plus");
const list = document.getElementById("list");
const form = document.getElementById("form");
const text = document.getElementById("text");
const amount = document.getElementById("amount");
const money_minus = document.getElementById("money-minus");
const localStorageTransations = JSON.parse(localStorage.getItem("transations"));

let transations =
  localStorage.getItem("transations") !== null ? localStorageTransations : [];

//add transation
function addTransation(e) {
  e.preventDefault();
  if (text.value.trim() === "" || amount.value.trim() === "") {
    text.placeholder = "please add a text";
    text.style.backgroundColor = "#ccc";
    amount.placeholder = "please add amount";
    amount.style.backgroundColor = "#ccc";
  } else {
    const transation = {
      id: genenrateID(),
      text: text.value,
      amount: +amount.value,
    };
    transations.push(transation);
    addTransationDOM(transation);
    updateValues();
    updateLocalStorage();
    text.value = "";
    amount.value = "";
  }
}
//generate id
function genenrateID() {
  return Math.floor(Math.random() * 100000000);
}

//add transations to dom list
function addTransationDOM(transation) {
  //get sign
  const sign = transation.amount < 0 ? "-" : "+";
  const item = document.createElement("li");
  //add class based on value
  item.classList.add(transation.amount < 0 ? "minus" : "plus");
  item.innerHTML = `${transation.text} <span>${sign}${Math.abs(
    transation.amount
  )}</span> <button class="delete-btn" onclick="removeTransation(${
    transation.id
  })">x</button>`;
  list.appendChild(item);
}
//update the balance
function updateValues() {
  const amounts = transations.map((transation) => transation.amount);
  const total = amounts.reduce((acc, item) => (acc += item), 0).toFixed(2);
  const income = amounts
    .filter((item) => item > 0)
    .reduce((acc, item) => (acc += item), 0)
    .toFixed(2);
  const expense = (
    amounts.filter((item) => item < 0).reduce((acc, item) => (acc += item), 0) *
    -1
  ).toFixed(2);

  balance.innerText = `₱${total}`;
  money_plus.innerText = `₱${income}`;
  money_minus.innerText = `₱${expense}`;
}
//remove
function removeTransation(id) {
  transations = transations.filter((transation) => transation.id !== id);
  updateLocalStorage();
  init();
}

//updatelocal storage
function updateLocalStorage() {
  localStorage.setItem("transations", JSON.stringify(transations));
}

//init
function init() {
  list.innerHTML = "";
  transations.forEach(addTransationDOM);
  updateValues();
}
init();

form.addEventListener("submit", addTransation);
| ABOUT PROJECT | PROJECT DETAILS |
|---|---|
| Project Name : | Expense Tracker in JavaScript |
| Project Platform : | JavaScript |
| Programming Language Used: | php,javascript,html,css |
| Developer Name : | itsourcecode.com |
| IDE Tool (Recommended): | Sublime |
| Project Type : | Web Application |
| Database: | None |
| Upload Date: | February 24, 2021 |
Downloadable Source Code
Summary
In summary, this Expense Tracker in JavaScript with Source Code can be useful to students or professional who wants to learn web development using JavaScript programming language and it is used html and css platform.
This project can also be modified to fit your personal requirements. Hope this project will help you to improve your skills. Happy coding!
Related Articles
- To Do List Project in Python with Source Code | Video |
- Currency Converter In Python With Source Code
- Music Player In JavaScript With Source Code
- CRUD Operation In JavaScript With Source Code
- Fibonacci Series In JavaScript With Source Code
- Calculator In JavaScript Source Code
- Library System in JavaScript with Source Code
- Random Password Generator in JavaScript with Source Code
- Ecommerce in JavaScript Framework with Source Code
- JavaScript Snake Game with Source Code
Inquiries
If you have any questions or suggestions about Expense Tracker in JavaScript with Source Code, please feel free to leave a comment below.
Official documentation
Frequently Asked Questions
How does this JavaScript project work?
Built with vanilla JavaScript (no framework) or Vue/Node. HTML structure, CSS styling, JS logic via DOM manipulation + event listeners. Backend optional (Node.js or PHP). Ready to extend for BSIT capstone scope.
What JavaScript runtime or browser does this project need?
Pure frontend projects (vanilla JS, Vue, jQuery) run in any modern browser (Chrome 90+, Firefox 88+, Safari 14+, Edge 90+) – no install needed. Node.js projects need Node.js 18 LTS or 20 LTS (download from nodejs.org). Run: npm install in project folder, then npm start or node app.js.
How do I run this JavaScript project locally?
For pure HTML/CSS/JS: open index.html in your browser, or use VS Code Live Server extension for auto-reload. For Vue projects: npm install then npm run dev (Vite) or npm run serve (Vue CLI). For Node.js: npm install then npm start. For projects with backend (PHP+MySQL): place in XAMPP htdocs, start Apache + MySQL, browse to localhost/project.
Can I use this JavaScript project for a BSIT capstone or thesis?
Yes. Extend it: add user authentication (JWT for SPA, sessions for traditional), role-based access, real backend (Node.js+Express+MongoDB or PHP+MySQL), responsive design (Bootstrap/Tailwind), PDF exports (jsPDF), real-time features (Socket.IO). Pair with Chapter 1-5 documentation matching your panel’s rubric.
Why am I getting ‘Uncaught ReferenceError’ or ‘Cannot read property of undefined’?
Three common JavaScript issues: (1) Script tag placement wrong, put

Adones Evangelista
Programmer & Technical Writer at PIES IT Solution
Adones Evangelista is a programmer and writer at PIES IT Solution, author of over 900 tutorials and error-fix guides at itsourcecode.com. Specializes in JavaScript, Django, Laravel, and Python error debugging covering ValueError, TypeError, AttributeError, ModuleNotFoundError, and RuntimeError, plus C/C++ and PHP capstone projects for BSIT students.
Expertise: JavaScript · Python · Django · Laravel · Error Debugging · C/C++ · View all posts by Adones Evangelista →
Looking for similar projects or tutorials?
Search for more source code, capstone projects, or programming tutorials