Image Caption Generator with CNN & LSTM In Python With Source Code
The Image Caption Generator with CNN & LSTM In Python was developed using Python Programming with CNN and LSTM.
This Project aims to learn the concepts of a CNN and LSTM model and build a working model of an Image caption generator by implementing CNN with LSTM.
An Image Caption Generator In Python we will be implementing the caption generator using CNN (Convolutional Neural Networks) and LSTM (Long short-term memory).
The image features will be extracted from Xception which is a CNN model trained on the imagenet dataset and then we feed the features into the LSTM model which will be responsible for generating the image captions.
What is CNN?
Convolutional Neural Networks are specialized deep neural networks that can process the data that has an input shape like a 2D matrix. Images are easily represented as a 2D matrix and CNN is very useful in working with images.
CNN is basically used for image classifications and identifying if an image is a bird, a plane or Superman, etc. It scans images from left to right and top to bottom to pull out important features from the image and combines the features to classify images. It can handle the images that have been translated, rotated, scaled, and changed in perspective.
What is LSTM?
LSTM stands for Long short-term memory, they are a type of RNN (recurrent neural network) which is well suited for sequence prediction problems.
Based on the previous text, we can predict what the next word will be. It has proven itself effective from the traditional RNN by overcoming the limitations of RNN which has short-term memory.
LSTM can carry out relevant information throughout the processing of inputs and with a forget gate, it discards non-relevant information.
In this Python Project Using CNN and LSTM also includes a downloadable Python Project With Source Code for free, just find the downloadable source code below and click to start downloading.
By the way, if you are new to Python programming and don’t know what Python IDE is, I have here a list of the Best Python IDE for Windows, Linux, and Mac OS that will suit you.
I also have here How to Download and Install the Latest Version of Python on Windows.
To start executing Image Caption Generator with CNN & LSTM In Python With Source Code, make sure that you have installed Python 3.9 and PyCharm on your computer.
Image Caption Generator with CNN & LSTM In Python With Source Code: Steps on how to run the project
Time needed: 5 minutes
These are the steps on how to run Image Caption Generator with CNN & LSTM In Python With Source Code
- Step 1: Download the given source code below.
First, download the given source code below and unzip the source code.

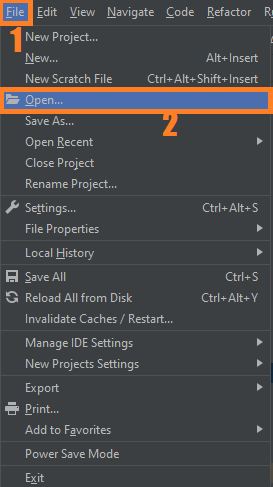
- Step 2: Import the project to your PyCharm IDE.
Next, import the source code you’ve downloaded to your PyCharm IDE.

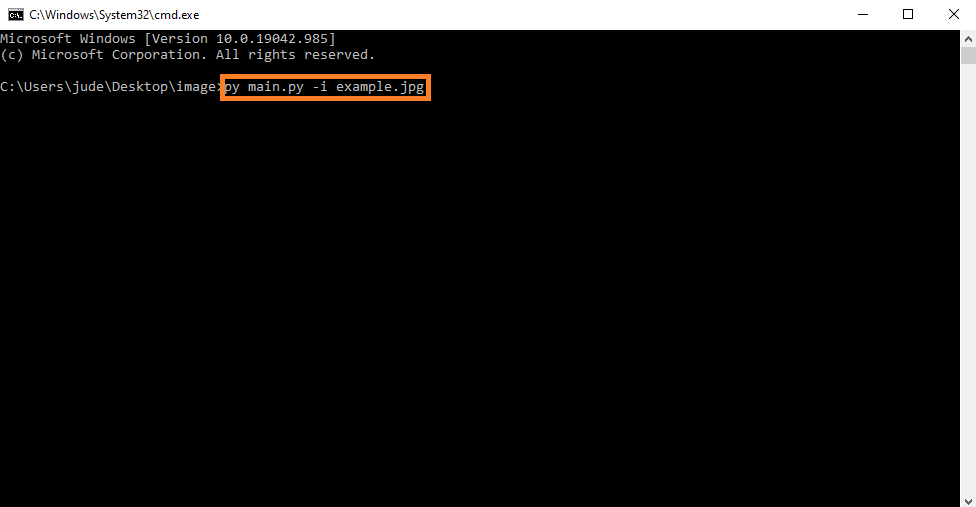
- Step 3: Run the project.
Lastly, run the project with the command “py main.py -i example.jpg”

Installed Libraries
from keras.preprocessing.text import Tokenizer
from keras.preprocessing.sequence import pad_sequences
from keras.applications.xception import Xception
from keras.models import load_model
from pickle import load
import numpy as np
from PIL import Image
import matplotlib.pyplot as plt
import argparse
Complete Source Code
from keras.preprocessing.text import Tokenizer
from keras.preprocessing.sequence import pad_sequences
from keras.applications.xception import Xception
from keras.models import load_model
from pickle import load
import numpy as np
from PIL import Image
import matplotlib.pyplot as plt
import argparse


ap = argparse.ArgumentParser()
ap.add_argument('-i', '--image', required=True, help="Image Path")
args = vars(ap.parse_args())
img_path = args['image']

def extract_features(filename, model):
        try:
            image = Image.open(filename)

        except:
            print("ERROR: Couldn't open image! Make sure the image path and extension is correct")
        image = image.resize((299,299))
        image = np.array(image)
        # for images that has 4 channels, we convert them into 3 channels
        if image.shape[2] == 4:
            image = image[..., :3]
        image = np.expand_dims(image, axis=0)
        image = image/127.5
        image = image - 1.0
        feature = model.predict(image)
        return feature

def word_for_id(integer, tokenizer):
 for word, index in tokenizer.word_index.items():
     if index == integer:
         return word
 return None


def generate_desc(model, tokenizer, photo, max_length):
    in_text = 'start'
    for i in range(max_length):
        sequence = tokenizer.texts_to_sequences([in_text])[0]
        sequence = pad_sequences([sequence], maxlen=max_length)
        pred = model.predict([photo,sequence], verbose=0)
        pred = np.argmax(pred)
        word = word_for_id(pred, tokenizer)
        if word is None:
            break
        in_text += ' ' + word
        if word == 'end':
            break
    return in_text


#path = 'Flicker8k_Dataset/111537222_07e56d5a30.jpg'
max_length = 32
tokenizer = load(open("tokenizer.p","rb"))
model = load_model('models/model_9.h5')
xception_model = Xception(include_top=False, pooling="avg")

photo = extract_features(img_path, xception_model)
img = Image.open(img_path)

description = generate_desc(model, tokenizer, photo, max_length)
print("\n\n")
print(description)
plt.imshow(img)
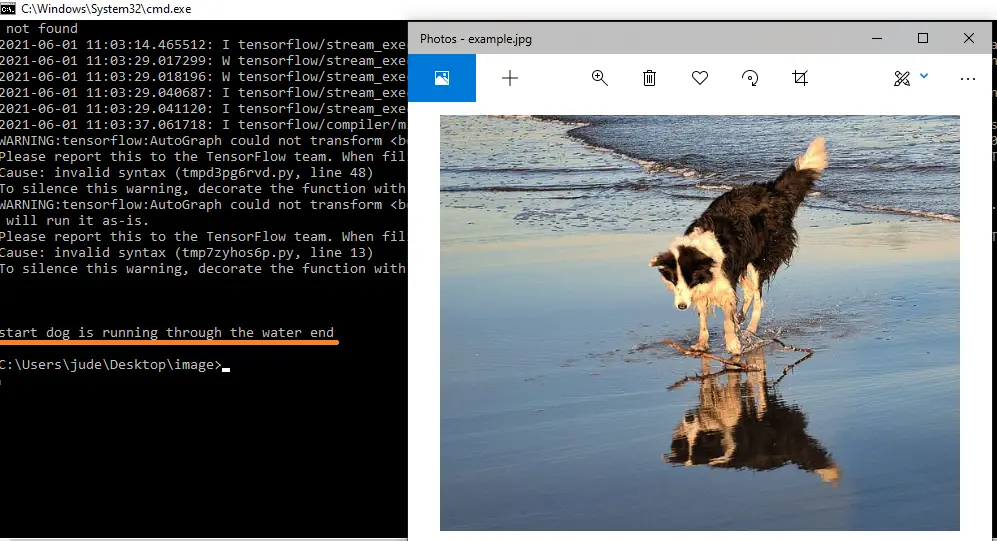
Output:

Download the Source Code below
Summary
In this advanced Python project, we have implemented a CNN-RNN model by building an image caption generator. Some key points to note are that our model depends on the data, so, it cannot predict the words that are out of its vocabulary.
We used a small dataset consisting of 8000 images. For production-level models, we need to train on datasets larger than 100,000 images which can produce better accuracy models.
Related Articles
- Code For Game in Python: Python Game Projects With Source Code
- Best Python Projects With Source Code FREE DOWNLOAD
- How to Make a Point of Sale In Python With Source Code
- Python Code For Food Ordering System | FREE DOWNLOAD
- Inventory Management System Project in Python With Source Code
Inquiries
If you have any questions or suggestions about the Image Caption Generator with CNN & LSTM In Python With Source Code, please feel free to leave a comment below.


