What is MS Word Tabs?
The MS Word tabs are composed of groups, which are labeled collections of commands that are closely related. In addition to tabs and groups, ribbons include the Application button, which displays a menu of commands for modifying a document or workspace, such as file-related commands.
Further, Tabs are like the old way of making menus. But when you change the Tab, you’ll see a different set of commands on the Ribbon instead of a list of menus.
Table of contents
- What is MS Word Tabs?
- How Many Types of Tabs are Available in MS Word
- List of Types of Tabs in MS Word
- Summary
How Many Types of Tabs are Available in MS Word
There are 11 types of MS Word 2019 tabs which include File, Home, Insert, Draw, Design, Layout, References, Mailing, Review, View and Help. Each tab has specific groups of related commands. It gives you quick access to the commonly used commands that you need to complete a task.
List of Types of Tabs in MS Word
Here is a list of the different types of Tabs in MS Word that can be found in the MS Word Ribbon. Each section that comes next starts with the name of the tab and then explains what each section on that tab does.
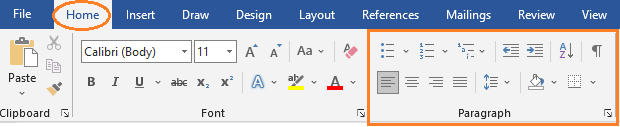
1. Home Tab in MS Word
The Home tab commands are put together in groups called Clipboard, Font, Paragraph, and Styles. There is a vertical line between these parts that you can see. Under some of these areas, there are more options that can be chosen from a drop-down menu.

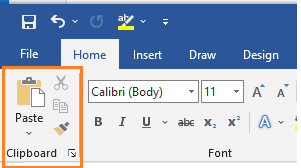
Clipboard
The Clipboard Group is the first group under the Home tab. This category includes four options: Paste, Cut, Copy, and Format Painter. Here are the option of Clipboard group:
- Paste -Paste the contents of the clipboard.
- Cut – Removes and copies information from the document to the clipboard.
- Copy – Copies information from the document for the clipboard.
- Format Painter -Formatting from another section of a document is applied.
Font
The Font group has the most basic controls for changing the text’s font, style, and color. Here are the option of Font group:
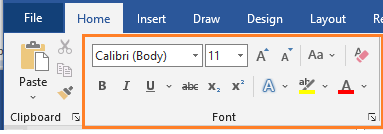
| Font | The font is changed. |
| Font Size | Chooses the size of the font. |
| Font Color | Changes the font’s coloring. |
| Increase Font Size | Changes the font size by one point. |
| Decrease Font Size | Reduces the text size by one point. |
| Clear all formatting | Removes formatting, leaving only plain text. |
| Bold | Boldens the text. |
| Italicize | Changes the text to be in italics. |
| Underline | The text is underlined. |
| Strikethrough | The text is crossed out. |
| Subscript | Small letters are typed beneath the text. e.g., 12 |
| Superscript | Small letters are typed above the text. e.g., X2 |
| Text Effects and Typography | Text effects such as outline and shadow are added. |
| Text Highlight Color | Highlights text. |
Paragraph
The Paragraph Group is concerned with the arrangement of text in a paragraph. Users can make lists, change the indentation, sort items, show paragraph formatting, align text in a paragraph, adjust line spacing, fill shapes with color, and draw borders. Below are the available commands in paragraph group.
- Bullets – Creates a list with bullets.
- Numbering – Makes a list with numbers.
- Multilevel List -Constructs an outline.
- Decrease Indent – Moves the paragraph’s indentation closer to the left edge.
- Increase Indent -Moves the paragraph’s indentation closer to the right margin.
- Sort – Organizes data in alphabetical order.
- Show/Hide Paragraph Marks – Indicates where each paragraph begins and ends.
- Align Left – Text is aligned with the left margin.
- Center – Text is centered in the document.
- Align Right– Text is aligned with the right margin.
- Line and Paragraph Spacing – Modifies the distance between lines and paragraphs.
- Shading – Changes the background color of the text.
- Borders – Creates lines surrounding text.
Styles
The styles group is found on the Home Tab, contains a collection of quick styles.
- Page Formatting Styles – Creates various styles and previews them in the text.

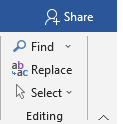
Editing
The Editing Group is located at the far right end of the Home Tab. There are three options for the Editing Group, two of which are drop-down menus. Commands in editing group includes the following:
- Find – Locates words within a document.
- Replace – Searches the document for text to replace.
- Select – Selects all or a portion of the document’s text.
- Create and Share Adobe PDF – Allows you to save the document as a PDF and share it with others.
- Request Signatures – Saves the document as a PDF and, if necessary, requests others to sign it.
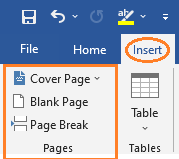
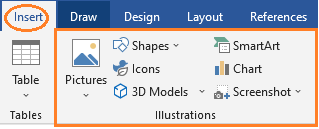
2. Insert Tab in MS Word
The Insert tab is a command where you can add pictures, shapes, pages, symbols, and other things to a document. These choices are shown with icons and text. Most of these choices have a drop-down menu where you can find more options. Pages, Tables, Illustrations, Add-ins, Media, Links, Comments, Header and Footer, Text, and Symbols are the groups of commands that make up the Insert menu.

Pages
The “Page” dialog box can quickly display by clicking on the dialog box launcher in the bottom right corner of this group. The following are the commands in Pages group:
- Cover Page – Creates a document’s cover page.
- Blank Page – Inserts a blank page anywhere specified in the document.
- Page Break – Where specified, ends the current page and moves the remaining text to the next page.
Tables
- Table -Creates a new table or inserts an existing table into the document.
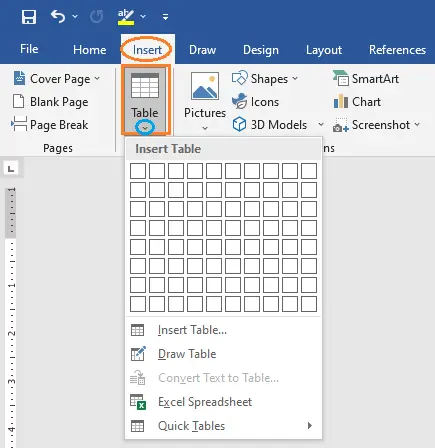
Illustrations
Illustrations group allows you to insert pictures, shapes, smart art, and charts into your document. The layout and look of your documents will be improved by these options.
Here are list of commands under Illustrations group. By clicking on the dialog box launcher in the bottom right corner of this group other option will display.
- Pictures -Inserts photos in your document.
- Shapes – Add shapes to your document..
- Icons – This function inserts icons into your document.
- 3D Models – Adds a 3D model to your document.
- SmartArt – In your document, inserts a SmartArt graph or list.
- Chart – This function generates a chart to display your data.
- Screenshot – This function inserts a screenshot into your document.
Add-ins
The Add-ins group displays any third-party add-ins you have installed.
- Get Add-ins – Allows you to extend Word’s functionality.
- My Add-ins – Inserts add-ins obtained by calling Get Add-ins.
- Online Video -Inserts a video into your document.
Links
- Link – Inserts a link for web pages in your document.
- Bookmark – Creates a specific spot in your document that can be jumped to without having to scroll.
- Cross-reference – Refers to a specific place in the document, such as a heading or table.
Comments
Comments can be added to a document that do not change the document.
- Comments – Adds notes in specific places in the document.
Header & Footer
Headers and footers are at the top and bottom of the document. They are separate from the main document and are often used to hold footnotes, page numbers, titles, and other information. The available commands in Header & Footer includes the following.
- Header – Adds repeat content to the top of every page in the document.
- Footer – Adds repeat content to the bottom of every page in the document.
- Page Number – Adds page numbers to each page of your document.
Text
The available commands in Text includes the following.
- Text Box – Adds a custom text box that draws emphasis to the text.
- Quick Parts -Inserts text or formatting that has been previously saved into a document.
- WordArt – Adds aesthetic flourishes to this box’s text.
- Drop Cap – This box’s text is enhanced with creative flourishes.
- Signature Line – The signature line is added to the document.
- Date & Time – Options for adding the date and time to the document.
- Object – Adds an additional document or chart to the current document.
Symbols
- Symbol – Adds symbols to the document, such as currency and trademark.
- Equation – Adds mathematical equations to the document.
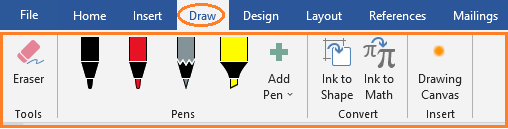
3. Draw Tab in MS Word
The Draw tab is a menu where you can draw in a Word document. The Draw tab is part of Office 365, and if it’s not on your ribbon, it may need to be added. On the Draw tab, you can choose what you want to do (draw or erase), what kind of pen tool you want to use, and if you want to draw with the trackpad.
4. Design Tab
The design tab lets you change your document’s format, background, color scheme, page borders, etc. If the Design tab is not in your ribbon and you want it to be, go to File > Options > Customize Ribbon and check the box next to Design.

Document Formatting
Document formatting is how a document is laid out on the page, how it looks and is visually organized. It includes things like font choice, font size and style like bold or italics, spacing, margins, alignment, columns, indentation, and lists.
The commands of Document Formatting group.
- Themes – Adds custom formatting to the document.
- Colors – Changes the entire color palette of the document to a color scheme of your choice.
- Fonts – Changes the font of the document.
- Paragraph Spacing – Changes the line and paragraph spacing of the document.
- Effects – Changes the overall look of objects with shading and other options.
- Set as Default – Sets the current formatting as the default for new documents.
Page background
The commands of Page background group. It is a feature of MS Word that lets you change the background of a whole document at once.
- Watermark – Adds a faint image behind the text of your document.
- Page Color – Changes the background color of the document.
- Page Borders – Adds a border around the document.
5. Layout Tab in MS Word
The Layout tab permits the user to customize the page orientation, margins, etc. The Layout options are categorized into Page Setup, Margins, and Arrangement commands.

Page Setup
Page setup is a set of rules that control how a printed page looks and is laid out.
- Margins – Sets the margin sizes for the document.
- Orientation – Changes the orientation of the document to portrait or landscape mode.
- Size – Selects the size of paper for printing.
- Columns – Splits the page into up to 13 columns.
- Breaks – Ends the current page at your desired location, and starts the remainder of the information on the next page.
- Line Numbers – Adds numbers to each line for easy reference to a specific location.
- Hyphenation – Automatically hyphenates words that extend beyond the end of a line. Hyphenation is placed at syllable boundaries.
Paragraph
The Paragraph Group focuses on arranging text in a paragraph. Users may create lists, adjust the indentation, sort items, show paragraph formatting, correctly, align text in a paragraph, adjust line spacing, add fill color in shapes, and create borders.
- Indent Left – Moves the paragraph away from the left margin.
- Indent Right – Moves the paragraph away from the right margin.
- Spacing Before – Changes how much spacing is before the selected paragraph.
- Spacing After – Changes how much spacing is after the selected paragraph.
Arrange
The following are command of Arrange group.
- Position – Moves the placement of the selected item to the desired location on the page.
- Wrap Text – Selects how the text on the page wraps around the object.
- Bring Forward – Moves the selected object forward in front of other objects.
- Send backward – Moves the selected object behind other objects.
- Selection pane – Displays a listing of all objects on the page.
- Align – Sets the alignment of the object on the page.
- Group – Joins objects together, making them appear as one object.
- Rotate – Rotates the selected image.
6. References Tab
The Reference tab is used as a hub for citations, footnotes, endnotes, tables of contents, bibliographies, and any other kind of reference in a document. When writing a research paper or a long document with many chapters, users often use the references tab. The Reference tab is organized by the following groups of commands: Table of Contents, Footnotes, Research, Citations, Captions, Index, and Table Authorities are included.

Table of Contents
- Table of Contents – Provides an overview of the document’s contents.
- Add Text – Includes an editable heading in the table of contents.
- Update Table – If changes are made to the document, this refreshes the table of contents to reflect the correct page numbers.
Footnotes
- Insert Footnote – Adds a note to the bottom of the current page.
- Insert Endnote – Adds a comment or citation to the end of the page. Used in conjunction with superscript numbers placed in the text.
- Next Footnote – Moves to the next footnote.
- Show Notes – Moves to the footnotes or endnotes of the page.
Research
- Researcher – Assists in finding information and pictures that you can cite in your document.
- Smart Lookup – Selects text in the document to search for a definition or more information online.
Citations & Bibliography
Citations & Bibliography commands are the following:
- Insert Citation – Credits a source of information.
- Manage Sources – Organizes the sources of the information cited.
- Style – Allows you to choose the citation style from APA, Chicago, or MLA.
- Bibliography – Displays a list of all cited sources.
Captions
- Insert Caption – Labels your object or picture.
- Insert Table of Figures – Adds a listing of captions for easy reference.
- Update Table – If changes are made to the table of figures, this updates the changes.
- Cross-reference – Refers to a source of information elsewhere in your document, such as a table of figures. If the source information changes, the reference is updated automatically.
Index
The following are commands in Index group.
- Mark Entry – Adds selected text to the index.
- Insert Index – Adds a list of keywords and the page number where they appear.
- Update Index – If any changes are made to the document, this updates it if necessary.
Table of Authorities
- Insert Table of Authorities – Adds a list of authorities, cases, or statutes noted in the document.
- Mark Citation – Adds selected text to the Table of Authorities.
- Update Table – If any changes are made to the document, this updates the Table of Authorities if necessary.
7. Mailings Tab in MS Word
The Mailings Tab is the one that is used the least. It lets the user merge emails, write and insert different fields, etc. On the Mailings tab, the commands are grouped as follows: Address, Start Mail Merge, Insert Fields, Preview, Merge Range, and Finish.

Create
Create group includes the following commands:
- Envelopes – Allows you to set up your printer for printing envelopes.
- Labels – Allows you to set up your printer for printing labels.
Start Mail Merge
- Start Mail Merge – Allows you to create one document, and send it to multiple recipients, personalizing it for each person.
- Select Recipients – Allows you to choose the list of people to receive the document.
- Edit Recipient List – Enables changes to be made to the recipient list.
Write & Insert Fields
- Highlight Merge Fields – Highlights specific fields in the document.
- Address Block – Adds an address block to your document.
- Greeting Line – Adds a greeting line to your document.
- Insert Merge Field – Adds a field from the recipient list, such as last name or phone number.
- Rules – Specifies rules for the merge.
- Match Fields – Defines the different fields in the recipient list.
- Update Labels – Uses information from the recipient list to update the label fields.
Preview Results
- Preview Results – Allows you to verify the mail merge information is entered correctly before finalizing the document.
- First Record – Jumps to the first recipient.
- Previous Record – Jumps to the previous recipient.
- Next Record – Jumps to the next recipient.
- Last Record – Jumps to the last recipient.
- Find Recipient – Searches for a specific recipient.
- Check for Errors – Checks the mail merge for errors before it is applied.
Finish and Acrobat
- Finish & Merge – Allows you to choose how to complete the mail merge.
- Merge to Adobe PDF – Merges the document to a PDF file, allowing you to send it digitally.
8. Review Tab in MS Word
The Review Tab allows users to proofread, add or remove comments, track changes, enable Read Aloud, verify accessibility, etc.

Proofing
Proofreading tools include checking for mistakes in spelling or grammar, putting hyphens between words, and looking up words in a thesaurus.
- Editor – Checks for spelling, grammar, and writing suggestions.
- Thesaurus – Suggests another word to use for the selected word.
- Word Count – Tells you the words, lines, and characters in the document.
Accessibility and Speech
- Check Accessibility – Checks your document to make sure it is easily legible.
- Read Aloud – Uses text-to-speech software to read the text out loud.
Language
- Translate – Translates your text into another language.
- Language – Chooses the language for proofing tools like spellcheck.
Comments
- New Comment – Adds a note to the document.
- Delete – Deletes a note from the document.
- Previous – Skips to the previous note.
- Next – Skips to the next note.
- Show Comments – Makes all comments in the document visible.
Tracking
- Track Changes – Keeps track of all changes made to the document.
- Simple Markup – Allows you to select how you want to see changes.
- Show Markup – Allows you to choose which types of markup you want to see.
- Reviewing Pane – Lists all document changes.
Ink and Resume
- Hide Ink – On touch-enabled computers, allows you to hide any drawings made with Draw or Ink.
- Resume Assistant – Shows hints from LinkedIn to update your resume.
9. View Tab in MS Word
The View tab is the command that lets the user toggle between several document views, such as viewing multiple pages, boundaries, grids, and rulers. Focus, Immersive Reader, and Zoom are now available in the View Tab’s accessibility options. Moreover, the View Tab commands are divided into the following categories: Document View, Accessibility, Show/Hide, Zoom, Window, and Macros.

Views
Views group you can quickly switch between the Normal and Master Page views of your publication.
- Read Mode – Displays the pages in book format for easier reading.
- Print Layout – Previews how the page looks if printed.
- Web Layout – Previews how the page would look if it were a website.
- Outline – Previews your document in an outline form.
- Draft – Previews your document without any formatting marks, headers, or footers.
Immersive
- Focus – Hides buttons and UI elements so you can focus on the document.
- Immersive Reader – Helps with reading skills.
Page Movement
- Vertical – Scrolls up and down to move between pages.
- Side to Side – Scrolls from side-to-side to move between pages.
Show
- Ruler – Shows a ruler on the side of the document.
- Gridlines – Shows gridlines over the document.
- Navigation Pane – Shows a side pane with a search function.
Zoom
- Zoom – Increases the viewing size of the document.
- 100% – Displays the document at actual size.
- One Page – Zooms the document so you can see the entire page.
- Multiple Pages – Zooms the document so you can see multiple pages at once.
- Page Width – Zooms the page, so the width matches the window
Window
- New Window – Opens a window of your document so you can work in multiple places.
- Arrange All – Stacks your documents so you can see them all at once.
- Split – Displays two sections of your document at one time.
- View Side by Side – Displays different documents side-by-side for comparison.
- Synchronous Scrolling – Displays two documents at the same time.
- Reset Window Position – Displays two documents side-by-side so they are equally sized on the screen.
- Switch Windows – Quickly switches to another open document window.
Macros
- Macros – Allows you to create custom macros, or choose from predefined macros, to perform a sequence of actions all at once. To run a macro, you can click the button on the Quick Access Toolbar, press the keyboard shortcut, or run it from the Macros list.
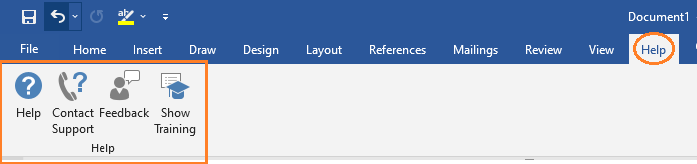
10. Help tab in MS Word
The Help tab in MS Word is the fastest and easiest way in getting help within Microsoft Office programs. On Windows, press F1 from within the program to get to it. If you’re using Word on macOS, for example, you can go to the Help menu and choose Word Help.
- Help – Gets help with Microsoft Word.
- Contact Support – Gets help from a Microsoft support agent.
- Feedback – Provides feedback to Microsoft.
- Show Training – Shows online training and learning content.
- What’s New – Showcases the latest upgrades from Microsoft.
Summary
In summary, we’ve talked about different types of Tabs in MS Word as well as what those terms mean, their parts, and their uses. Also, we learn how to use the types of MS Word Tabs. We also gain insight into why it’s important to familiarize commands with ribbon tabs in creating documents.
We hope this guide helps you as you plan to create a document in MS Word.
PREVIOUS
NEXT