Are you looking to add a stopwatch feature to your website or web application? You’ve come to the right place!
In this article, we will show you how to create a stopwatch in JavaScript.
Also, we will discuss the step-by-step process of creating a stopwatch in JavaScript.
Steps to Create a Stopwatch in JavaScript
Before we start, let’s outline the important steps to create a stopwatch in JavaScript:
- Setting Up the HTML Structure
- First, we will create the basic HTML structure for our stopwatch.
- Organizing JavaScript Logic
- This step require writing JavaScript code to make the stopwatch functional.
- Adding Event Listeners
- We will observe for exact events to start, pause, and reset the stopwatch.
- Displaying the Stopwatch
- Finally, we will update the stopwatch’s display to follow the elapsed time accurately.
Now, let’s move on to each steps and explore the implementation details.
Step 1: Setting Up the HTML Structure
To start, we we will create a simple HTML structure for our stopwatch. Open your selected text editor and create a new HTML file.
Then insert the following code in your “index.html” file:
<!DOCTYPE html>
<html lang="en">

	<head>
		<meta charset="UTF-8">
		<title>Itsourcecode Stopwatch</title>
		<link href="./style.css" rel="stylesheet">
	</head>

	<body>

		<div id='timer'>00:00:00:00</div>
		<div id='labels'>
			<span id='hh'>Hours</span>
			<span id='mm'>Minutes</span>
			<span id='ss'>Seconds</span>
			<span id='ms'>Centiseconds</span>
		</div>

		<div id='controls'>
			<button onclick='startTimer()' id='start'>Start</button>
			<button onclick='pauseTimer()' id='pause'>Pause</button>
			<button onclick='resetTimer()' id='reset'>Reset</button>
		</div>

		<script src="./script.js"></script>

	</body>
</html>
Step 2: Styling the Stopwatch
Now that we have already finished creating our HTML structure in place, let’s add some CSS styles to make the stopwatch attractive.
Create a file name style.css in your editor. Open the style tag in your HTML file and add the following CSS code:
#timer {
  width: 460px;
  font-size: 70px;
  background-color: black;
  color: red;
  padding: 25px;
  border-radius: 10px;
}
#labels {
  margin-top: -25px;
  z-index: 2;
  color: red;
  font-size: 12px;
}
#hh {margin-left: 45px; color: white; font-weight: bold;}
#mm {margin-left: 80px; color: white; font-weight: bold;}
#ss {margin-left: 70px; color: white; font-weight: bold;}
#ms {margin-left: 45px; color: white; font-weight: bold;}

#controls {
  margin-left:150px;
  margin-top: 30px;
}

button {
  width: 100px;
  height: 40px;
  float: left;
  margin-left: 50px;
  font-size: 25px;
  font-weight: bold;
  border-radius: 10px;
  box-shadow: 5px 5px 5px #888888;
}
#start    { background-color: green; color: white}

#pause  { background-color: red;  display: none; color: white}

#reset { background-color: blue; display: none;color: white}

body, button {
  font-family: 'Courier';
}
Step 3: Organizing JavaScript Logic
With the HTML and CSS already created, we can now focus on organizing the JavaScript logic for our stopwatch.
Create a new JavaScript file named “script.js” in the same directory as your HTML file.
Add the following code:
// https://developer.mozilla.org/en-US/docs/Web/JavaScript/Reference/Global_Objects/Date

// global object
T = {} ;
T.timerDiv = document.getElementById('timer');

function displayTimer() {
  // initilized all local variables:
  var hours='00', minutes='00',
  miliseconds=0, seconds='00',
  time = '',
  timeNow = new Date().getTime(); // timestamp (miliseconds)

  T.difference = timeNow - T.timerStarted;

  // milliseconds
  if(T.difference > 10) {
    miliseconds = Math.floor((T.difference % 1000) / 10);
    if(miliseconds < 10) {
      miliseconds = '0'+String(miliseconds);
    }
  }
  // seconds
  if(T.difference > 1000) {
    seconds = Math.floor(T.difference / 1000);
    if (seconds > 60) {
      seconds = seconds % 60;
    }
    if(seconds < 10) {
      seconds = '0'+String(seconds);
    }
  }

  // minutes
  if(T.difference > 60000) {
    minutes = Math.floor(T.difference/60000);
    if (minutes > 60) {
      minutes = minutes % 60;
    }
    if(minutes < 10) {
      minutes = '0'+String(minutes);
    }
  }

  // hours
  if(T.difference > 3600000) {
    hours = Math.floor(T.difference/3600000);
    // if (hours > 24) {
    // 	hours = hours % 24;
    // }
    if(hours < 10) {
      hours = '0'+String(hours);
    }
  }

  time  =  hours   + ':'
  time += minutes + ':'
  time += seconds + ':'
  time += miliseconds;

  T.timerDiv.innerHTML = time;
}
Step 4: Adding Event Listeners
To become dynamic our stopwatch, we need to add event listeners to the buttons.
Add this code in your “script.js” file as follows:
function startTimer() {
  // save start time
  T.timerStarted = new Date().getTime()
  console.log('T.timerStarted: '+T.timerStarted)

  if (T.difference > 0) {
    T.timerStarted = T.timerStarted - T.difference
  }
  // update timer periodically
  T.timerInterval = setInterval(function() {
    displayTimer()
  }, 10);

  // show / hide the relevant buttons:
  document.getElementById('start').style.display="none";
  document.getElementById('pause').style.display="inline";
  document.getElementById('reset').style.display="none";
}

function pauseTimer() {
  clearInterval(T.timerInterval); // pause updating the timer

  document.getElementById('pause').style.display="none";
  document.getElementById('start').style.display="inline";
  document.getElementById('reset').style.display="inline";
}

function resetTimer() {
  clearInterval(T.timerInterval);
  T.timerDiv.innerHTML = "00:00:00:00"; // reset timer to all zeros
  T.difference = 0;

  document.getElementById('pause').style.display="none";
  document.getElementById('start').style.display="inline";
  document.getElementById('reset').style.display="none";
}
Step 5: Displaying the Stopwatch
If you run the following code the output will be like this:
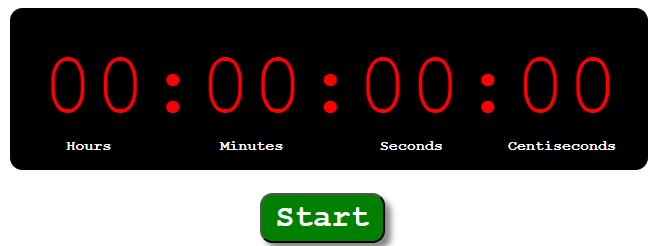
Congratulations! You have successfully created a stopwatch in JavaScript. You can test your stopwatch by opening the HTML file in a web browser.
Then, you can start, pause, and reset the stopwatch using the corresponding buttons.
FAQs
Absolutely! Feel free to change the CSS styles according to your desire. You can change the font size, colors, or even add animations to make the stopwatch more attractive.
Yes, you can extend the functionality of the stopwatch by adding milliseconds. Keep in mind that you will need to update the HTML structure, JavaScript logic, and CSS styles accordingly.
Absolutely! You can store the elapsed time in a variable or save it to a database using server-side technologies such as PHP or Node.js.
Yes, you can create multiple stopwatches by duplicating the essential HTML elements and updating the corresponding JavaScript variables and event listeners.
Conclusions
In conclusion, we have discussed the process of creating a stopwatch in JavaScript.
By following the step-by-step process in this article, you have learned how to set up the HTML structure, style the stopwatch, implement JavaScript logic, and add event listeners.
Additionally, we have discussed some common questions and provided answers to help you to resolved the possible difficulty.
Additional Resources
- How to Move Item in Array JavaScript?
- How to Get Timezone in JavaScript
- How to disable button in JavaScript
Official documentation
Quick step-by-step summary (click to expand)
- Steps to Create a Stopwatch in JavaScript. Read the ‘Steps to Create a Stopwatch in JavaScript’ section for the details and code.
- Conclusions. Read the ‘Conclusions’ section for the details and code.
- Additional Resources. Read the ‘Additional Resources’ section for the details and code.
Frequently Asked Questions
Is JavaScript still worth learning in 2026?
What is the difference between var, let, and const?
Which JavaScript version should I target in 2026?
What is the best free editor for JavaScript?
How do I run JavaScript locally vs in the browser?
What can I build with JavaScript for my BSIT capstone?

Adones Evangelista
Programmer & Technical Writer at PIES IT Solution
Adones Evangelista is a programmer and writer at PIES IT Solution, author of over 900 tutorials and error-fix guides at itsourcecode.com. Specializes in JavaScript, Django, Laravel, and Python error debugging covering ValueError, TypeError, AttributeError, ModuleNotFoundError, and RuntimeError, plus C/C++ and PHP capstone projects for BSIT students.
Expertise: JavaScript · Python · Django · Laravel · Error Debugging · C/C++
· View all posts by Adones Evangelista →