Are you having a hard time with how to add an ID to an Element using JavaScript? Well, this article is indeed for you!
In this article, you’ll be able to learn and get expert insights for adding an ID to an Element right away!
So, bear with us as we will showcase an effective method that will help you to do it.
Adding an ID to an Element in JavaScript
To add an ID to an element using JavaScript, there are multiple approaches you can take. Below are some of the most effective methods to achieve this:
✅ setAttribute()
This method is used to set the ID attribute of an element programmatically.
✅ getElementById()
This method is used to select an element by its ID.
✅ querySelector()
This method is used to select an element using a CSS selector with ID.
✅ classList.add()
This method is used to add a class with the desired ID to the element.
How to Add an ID to an Element using JavaScript?
To add an ID to an Element using JavaScript, here are a few methods and examples to do it.
1. Use the setAttribute()
The setAttribute() method enables you to set or modify the ID attribute of an element programmatically. This method is versatile and can be used to manipulate various attributes of an element, including the ID.
Syntax
element.setAttribute('id', 'yourElementID');Here’s an example:
const myElement = document.createElement('h1');
        heading.setAttribute('id', 'myHeading');
Here’s the complete example code:
<!DOCTYPE html>
<html>
<head>
<title>JavaScript Example</title>
</head>
<body>
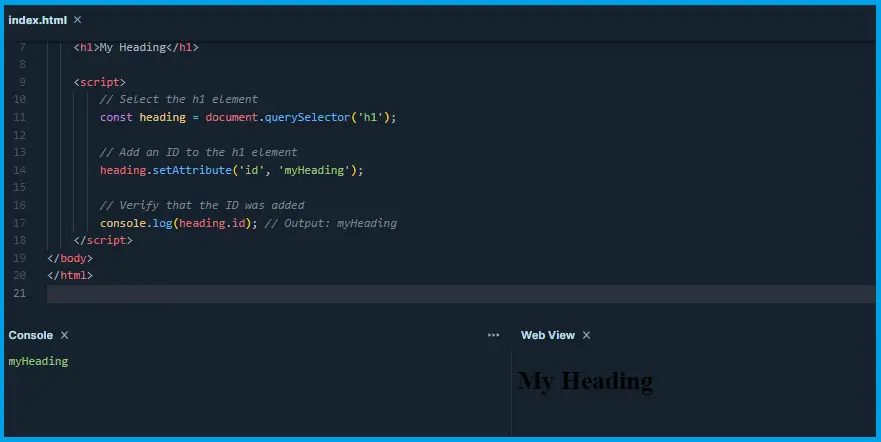
<h1>My Heading</h1>
<script>
// Select the h1 element
const heading = document.querySelector('h1');
// Add an ID to the h1 element
heading.setAttribute('id', 'myHeading');
// Verify that the ID was added
console.log(heading.id); // Output: myHeading
</script>
</body>
</html>
Output:
2. Use the getElementById()
It is one of the most straightforward methods to add an ID to an element is by using the getElementById() method. This method is available on the document object and allows you to select an element based on its unique ID.
Syntax
const element = document.getElementById('yourElementID');For example:
const myElement = document.getElementById('myDiv');
3. Use the querySelector()
The querySelector() method is a powerful tool that allows you to select an element using CSS selectors. To select an element by its ID, you can use the # symbol followed by the ID name.
Syntax
const element = document.querySelector('#yourElementID');Here’s an example:
const myElement = document.querySelector('#myDiv');
4. Use the classList.add()
If you want to add an ID to an element while also applying a CSS class, you can use the classList.add() method. This method lets you add one or more class names to an element.
Syntax:
element.classList.add('yourElementID');Here’s an example:
const myElement = document.createElement('div');
myElement.classList.add('myDiv', 'newElementID');
Conclusion
In conclusion, this article shows different methods of adding an ID to an element using JavaScript which can be accomplished using various effective methods:
The setAttribute() method allows you to set or modify the ID attribute of an element programmatically.
The getElementById() method allows you to select an element by its unique ID.
The querySelector() method allows you to select an element using a CSS selector with an ID.
The classList.add() method enables you to add an ID to an element while also applying a CSS class.
These methods provide flexibility and ease in manipulating elements and their IDs dynamically in JavaScript, making it straightforward to achieve the desired results.
We are hoping that this article provides you with enough information that help you understand on how to add ID an element using JavaScript.
You can also check out the following article:
Thank you for reading itsourcecoders 😊.
Official documentation
Quick step-by-step summary (click to expand)
- Adding an ID to an Element in JavaScript. Read the ‘Adding an ID to an Element in JavaScript’ section for the details and code.
- How to Add an ID to an Element using JavaScript. Read the ‘How to Add an ID to an Element using JavaScript?’ section for the details and code.
- Conclusion. Read the ‘Conclusion’ section for the details and code.
Frequently Asked Questions
Is JavaScript still worth learning in 2026?
What is the difference between var, let, and const?
Which JavaScript version should I target in 2026?
What is the best free editor for JavaScript?
How do I run JavaScript locally vs in the browser?
What can I build with JavaScript for my BSIT capstone?

Caren Bautista
Technical Writer at PIES IT Solution
Responsible for crafting clear, well-structured, and beginner-friendly content across the platform. Handles the writing, proofreading, and editorial review of tutorials, guides, and documentation to ensure every article is accurate, readable, and easy to follow.
Expertise: Technical Writing · Content Creation · Documentation · Editorial Writing · JavaScript · TypeScript · Python · Python Errors · HTTP Errors · MS Excel
· View all posts by Caren Bautista →