You might come across a page that doesn’t work, and it shows you a message that says “400 Bad Request” error.
This can happen when the website’s server can’t figure out what you’re asking for.
Instead of showing you the page you wanted, it shows an error 400 bad request.
Luckily, solving the 400 Bad Request problem is usually simple.
What is a “400 Bad Request” error?
A 400 Bad Request Error is a HyperText Transfer Protocol (HTTP) response status code used by web servers that indicates that the server couldn’t understand a request due to invalid syntax.
This is how a 400 Bad Request error appears in the Chrome browser:
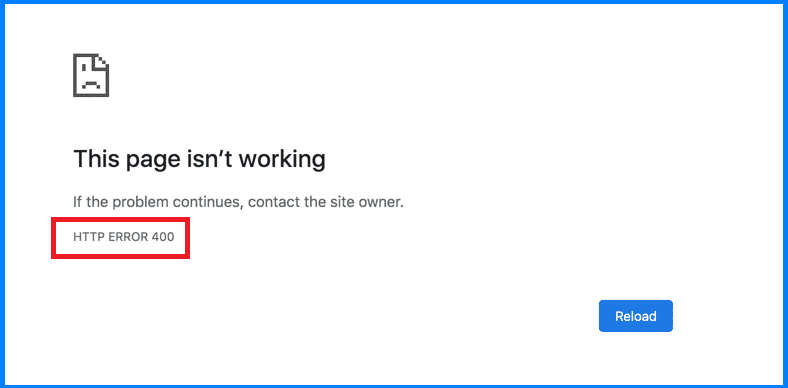
This error typically shows up as “400 Bad Request”, apart from that you may also see some variations, such as:
- 400 Bad Request. Request Header Or Cookie Too Large
- 400 – Bad Request. The request could not be understood by the server due to malformed syntax. The client should not repeat the request without modifications.
- Bad Request – Error 400
- Bad Request – Invalid URL
- Bad Request. Your browser sent a request that this server could not understand.
HTTP Error 400 - HTTP Error 400 – Bad Request
- HTTP Status 400 – Bad Request
Root causes of HTTP 400 Bad Request Error
This error can be quite annoying, as it prevents you from accessing the website without providing any useful details.
The 400 Bad Request error can be caused by several factors, the solutions can differ a bit depending on the context:
- URL String Syntax Error
The error can be triggered by a URL that is incorrectly typed, has a malformed syntax, or contains illegal characters.
- Corrupted Browser Cache & Cookies
The error can occur if there are corrupted files in the browser cache or issues with expired or corrupted browser cookies.
- DNS Lookup Cache
Problems with the DNS lookup cache can also lead to this error.
- File Size Too Large
If you attempt to upload a file that exceeds the site’s maximum file size, you might encounter a 400 error.
- Generic Server Error
Improperly configured servers can sometimes throw 400 errors.
How to fix 400 Bad Request Error?
Troubleshooting this error is simple, and it can be resolved using various methods.
Solution 1: Refresh the Page
The error might be temporary, and refreshing the page could resolve it.
Solution 2: Double-check the Address
Ensure the URL is correct and that the specific page you want to visit is spelled and typed accurately.
Since one of the most frequent causes is a 400 Bad Request error…
If the URL includes special characters, verify that they’ve been properly encoded and are valid URL characters.
Solution 3: Clear Your Browser’s Cookies and Cache
If the error is caused by corrupted or expired cookies or cache, clearing them could help.
When you clear them, you get new info from the website’s server.
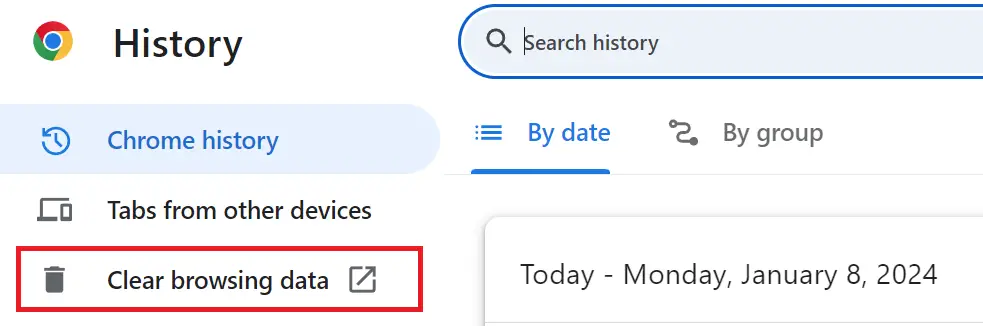
If you use Google Chrome, here’s how to clear its cache:
- Click the three dots in the top-right corner of your window. You can also use the keyboard shortcut (Ctrl + H).
- Go to History History.
- Click on Clear Browsing Data.
- A new window will appear. Choose the Time range, if you wish to erase all data, select All Time.
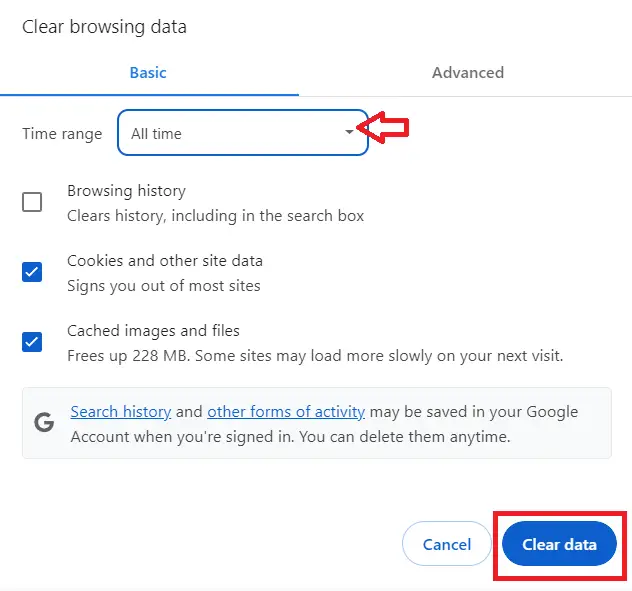
- Select what you’d like to clear- this could be browsing history, cookies, and other site data, or cached images and files.
- Then, hit the Clear Data button.
Solution 4: Disable browser extensions
Some extensions can interfere with how your browser caches web pages.
To address this issue, you should deactivate your browser’s extensions.
The procedure differs for each browser, so here’s a guide for four primary browsers – Google Chrome, Mozilla Firefox, Safari, and Microsoft Edge.
Chrome Extensions:
- Proceed to Settings
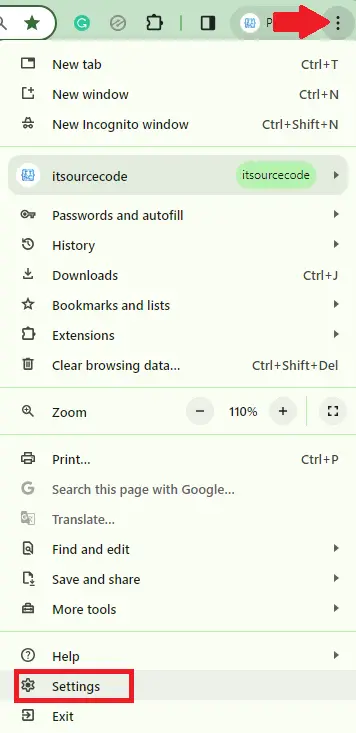
- Then click -> Extensions.
- On the Extensions page, deactivate each extension by clicking on their respective toggle switches.
For instance:
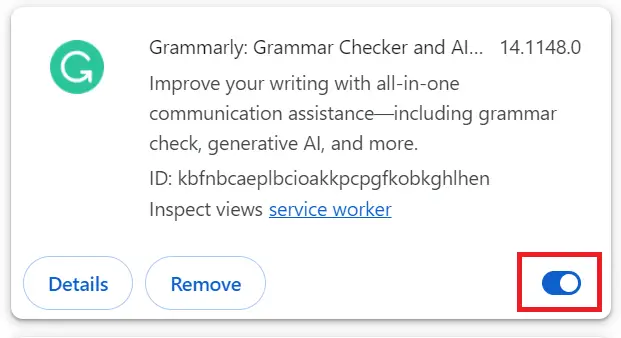
If you wish to get rid of unused or old extensions, press the “Remove” button.
Mozilla Firefox Extensions
If Firefox is your preferred browser, here’s how you can disable and re-enable extensions:
- Click the trio of lines in the top right corner of the browser.
- Select “Add-ons.”
- Choose “Extensions” from the left-hand menu.
- In the “Enabled” section, click the three dots next to a browser extension and select “Disable.”
- Repeat this for all browser extensions.
- To reactivate browser extensions, navigate to the “Disabled” section. Click on the three dots next to a browser extension and select “Enable.”
- To delete extensions, click on the three dots and choose “Remove.”
- Confirm the deletion by clicking “Remove” in the pop-up box.
Internet Explorer Extensions:
If you’re an Internet Explorer user, here’s how you can disable and re-enable extensions:
- Click the gear symbol in the top right corner of the browser.
- Choose “Manage add-ons.”
- Select “Toolbars and Extensions” from the left-hand menu.
- Click on a browser extension, select “Disable” in the bottom right corner, and confirm by clicking “Disable” in the pop-up box. Repeat this for all browser extensions.
- To reactivate an extension, click on it, select “Enable” and confirm by selecting “Enable” again.
- To remove faulty extensions, go to your computer’s “Control Panel” > “Programs” > “Programs and Features.”
- Right-click on the extension you want to delete, click “Uninstall” and confirm by clicking “Yes.”
Safari Extensions:
If you’re a Safari user, here’s how you can disable and re-enable extensions:
- Click “Safari” in your toolbar.
- Select “Preferences.”
- Navigate to the “Extensions” tab.
- Deselect the boxes next to all extensions to disable them.
- To reactivate extensions, select the boxes next to each one.
- To delete a faulty extension, click on the extension and select “Uninstall.” Choose “Show in Finder,” right-click on the extension, select “Move to Bin” and empty your computer’s trash folder.
Solution 5: Clear DNS Cache
Clearing your computer’s DNS cache can help fix the 400 Bad Request error.
Information from the web server is saved locally in a cache to speed up site loading on future visits by reducing the time it takes to look up DNS.
However, old or corrupted cache data can cause problems, including the 400 Bad Request HTTP error.
Here’s an example of how you can clear the DNS cache For Windows 11:
- Right-click on the Start menu and choose either Windows Terminal (Admin) or Command Prompt (Admin).
- In the command prompt window, type ipconfig /flushdns and hit Enter.
- A message should pop up, confirming that the DNS resolver cache has been successfully cleared.
Solution 6: Flush Your DNS
Similar to your browser cache, the DNS cache can also get outdated or corrupted.
If the issue is related to DNS Lookup Cache, flushing your DNS cache might help.
At times, a website might refresh its DNS details.
If these new details clash with the data in your cache, it could result in a 400 Bad Request error.
If you’re using Windows 10, launch the Command Prompt and enter the following command:
ipconfig /flushdnsFor Linux operating systems, you’ll need to use the Terminal for your command line.
To clear the DNS, just run this command:
sudo systemd-resolve --flush-cachesYou might also need to clear the DNS cache in your browser.
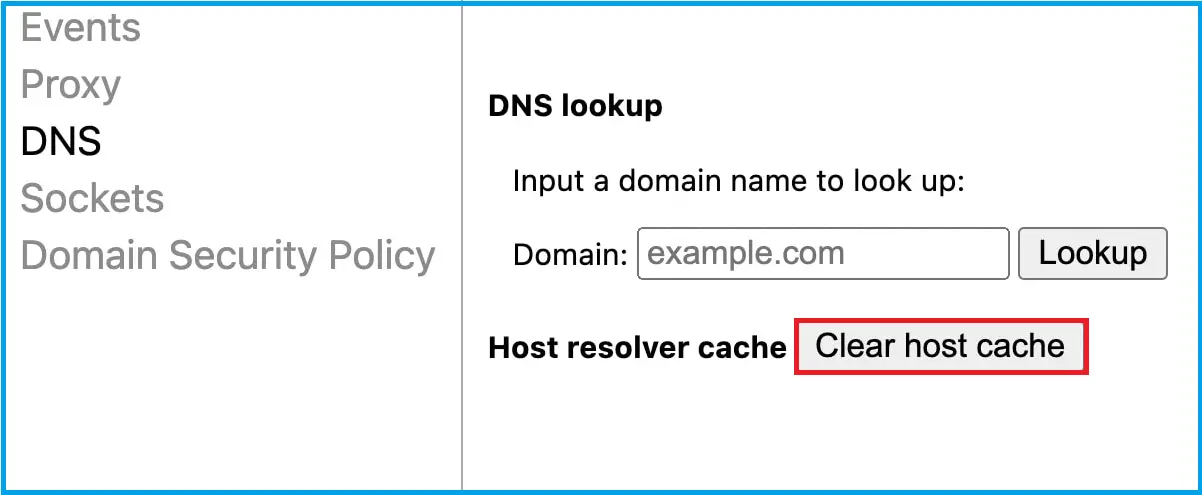
If you’re using Google Chrome, copy and paste the following line into your address bar:
chrome://net-internals/#dnsA new page will open and then click on the Clear host cache button:
Solution 7: Check for File Size
If you’re uploading a file, ensure it doesn’t exceed the site’s maximum file size limit.
Each website has a limit on the size of the file you can upload. This limit is usually set by the website’s host and typically ranges from 2 to 500 MB.
If you try to upload a file that’s larger than this limit, you’ll probably get a Bad Request error.
To check if this is the problem, try uploading a smaller file first. If that works, you’ll need to make the original file smaller or compress it.
Conclusion
The article explains the “400 Bad Request” error, which is a HyperText Transfer Protocol (HTTP) response status code used by web servers.
This error occurs when the server can’t understand a request due to invalid syntax.
The error can be caused by several factors such as URL string syntax error, corrupted browser cache & cookies, problems with the DNS lookup cache, file size too large, and generic server error.
By following the provided solutions above, you can rest assured that you’ll be able to resolve this issue.
For further learning, you can also check the following resources:
Frequently Asked Questions
What does an HTTP error status code mean?
HTTP status codes communicate request outcomes. 4xx codes mean the client did something wrong (404 not found, 403 forbidden, 429 too many requests). 5xx codes mean the server did something wrong (500 internal error, 502 bad gateway, 503 unavailable, 504 timeout). The exact code tells you where to look for the fix.
How do I fix HTTP 500 Internal Server Error?
500 means the server crashed processing your request. Three places to look: (1) Server logs (Apache error log, nginx error log, your Flask/Django console). (2) Database connection or query errors. (3) Unhandled exceptions in your application code. If you see 500 in production, check application logs first; the actual error message is usually clear.
How do I fix HTTP 502 Bad Gateway?
502 means the proxy (nginx/Apache) couldn’t reach your application server (gunicorn/uvicorn/PHP-FPM). Check: (1) Is your app server running? systemctl status gunicorn. (2) Is it listening on the port nginx expects? netstat -plnt. (3) Are there OOM crashes killing the worker? dmesg | grep -i oom. Restart the app service first as the quick fix.
What is the difference between HTTP 401 and 403?
401 Unauthorized: you’re not logged in (or your auth token is missing/expired). The fix: authenticate first. 403 Forbidden: you’re logged in but don’t have permission for this resource. The fix: check user roles/permissions. Two different fix paths despite similar-sounding names.
Where can I find more HTTP error fixes?
Browse the HTTP Errors reference hub for 35+ specific status code explanations and fixes. For backend troubleshooting see the Python Tutorial or PHP Tutorial hubs.

Caren Bautista
Technical Writer at PIES IT Solution
Responsible for crafting clear, well-structured, and beginner-friendly content across the platform. Handles the writing, proofreading, and editorial review of tutorials, guides, and documentation to ensure every article is accurate, readable, and easy to follow.
Expertise: Technical Writing · Content Creation · Documentation · Editorial Writing · JavaScript · TypeScript · Python · Python Errors · HTTP Errors · MS Excel · View all posts by Caren Bautista →