
The Shopping Cart in Python with Source Code is created using python programming language.
Shopping Cart consists of a Python Script (main.py).
However, this shopping cart python code is primarily based on Tkinter Graphical User Interface (GUI).
This system has a graphical user interface applied by using the Python programming language.
Shopping Cart Mini Project In Python: Project Information
| Project Name: | Shopping Cart Mini Project In Python |
| Language/s Used: | Python (GUI) Based |
| Python version (Recommended): | 2.x or 3.x |
| Database: | None |
| Type: | Python App |
| Developer: | IT SOURCECODE |
| Updates: | 0 |
Students, beginners, and professionals may use this Python software to create a shopping cart program in python.
This curriculum assists in the growth of basic fundamental and logic in students.
With the aid of the best example, you can learn the fundamentals of Python programming language.
In this tutorial, I will educate you on how to establish Shopping Cart, this tutorial consists of the downloadable Source Code where in you alter it to fit your requirements.
Before you start to create a Shopping Cart, make sure you have PyCharm IDE installed in your computer.
Steps on how to make a Shopping Cart in Python with Source Code
Time needed: 5 minutes
Here’s the Step on How To Make A Shopping Cart In Python with Source Code
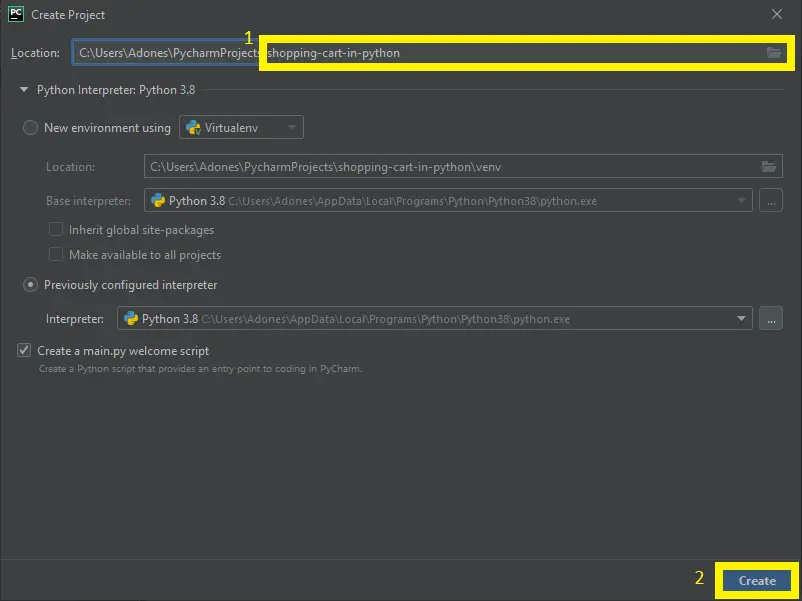
- Step 1: Create a Project Name.
First, open the PyCharm IDE and click “File” and select “New Project” and then create a project name after that click the “create” button.

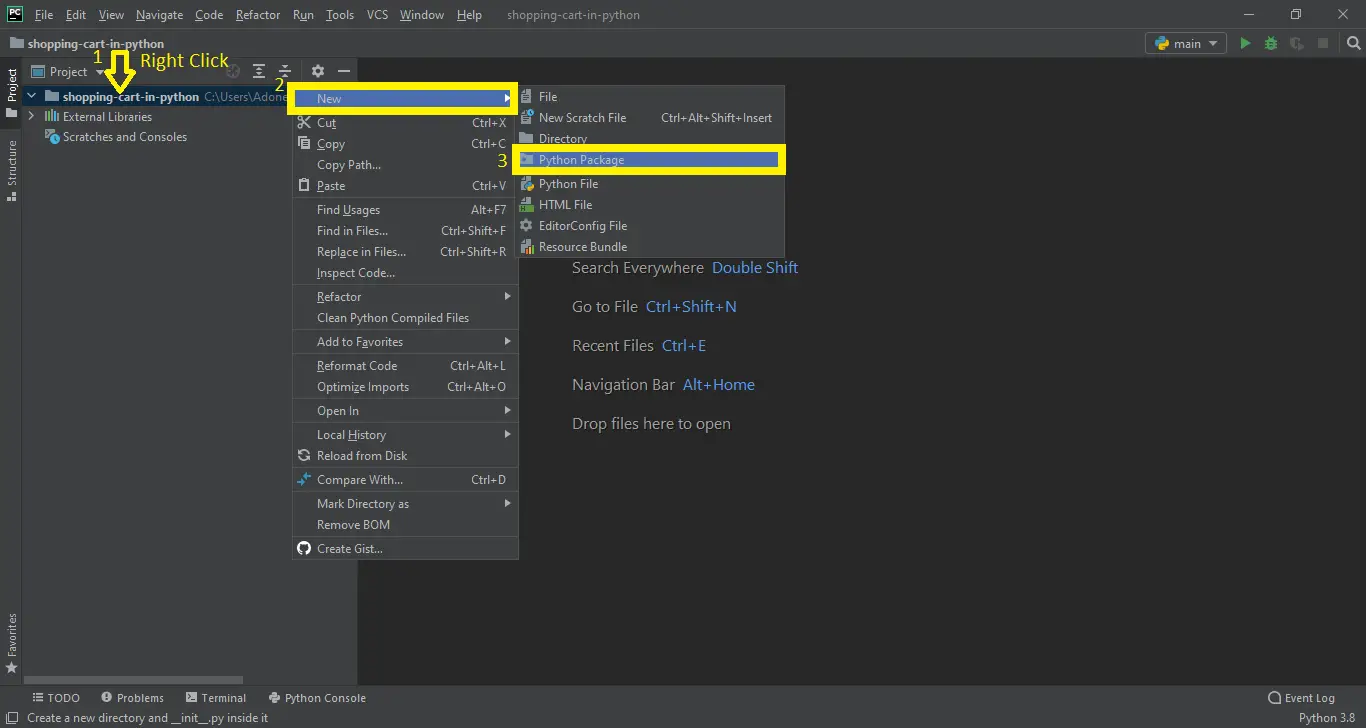
- Step 2: Create a Python File.
Next, create a project name, “right” click the project name and the click “New” after that choose “Python File“.

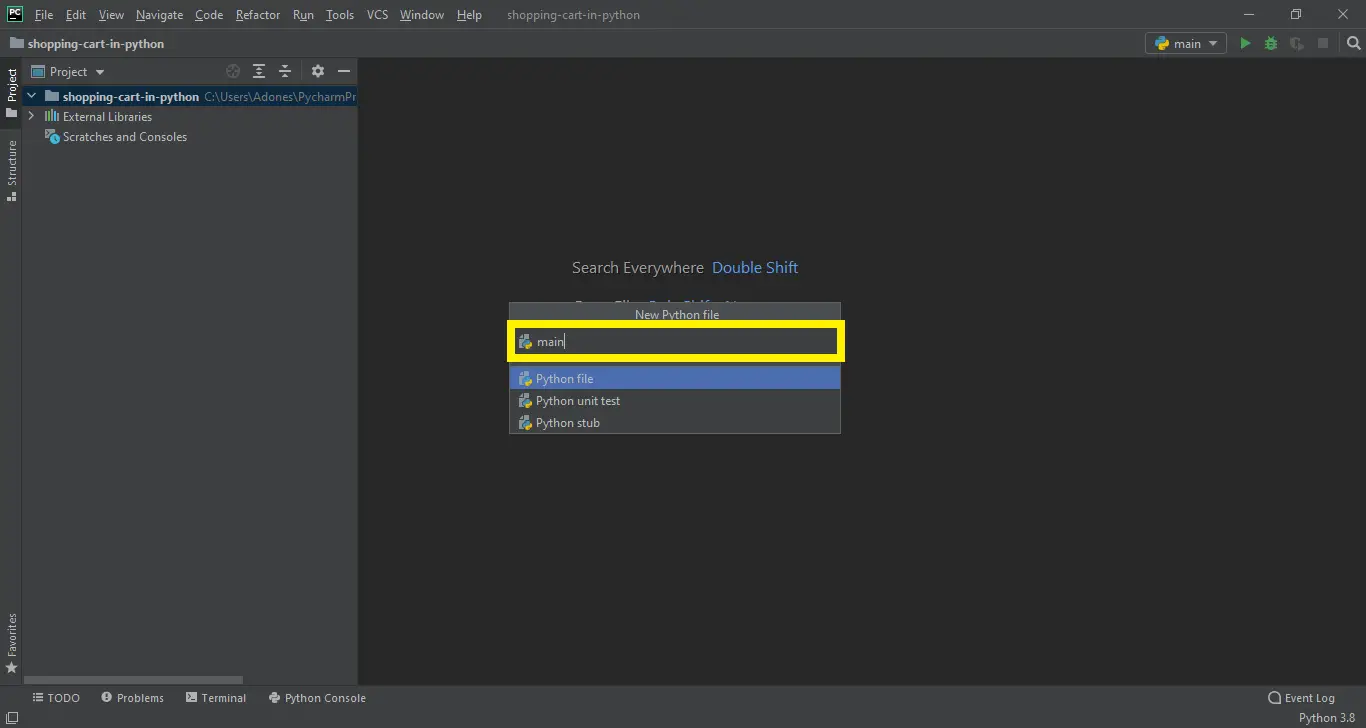
- Step 3: Name the Python File.
Last, choose Python File, name the file “shopping-cart-in-python” and then click “Enter“.
- Step 4: The actual code
Finally, you can start coding, you are free to copy the code that being provided below.
Code Explanations
1. Remove Item From Shopping Cart
Code:
 ar = tk.Button(self, text="Click to Remove \r Item", bg="green", fg="white", font='Calibri 18 bold', width=15,
                       height=5, command=lambda: [addpress()])
        ar.grid(row=3, column=5)
Explanation:
In the code given below, which is for the function to remove item button.
2. Exit Function.
Code:
 exit = tk.Button(self, text="Exit", fg="white", bg="blue", font='Calibri 18 bold',
                         command=self.master.destroy, width=15, height=5)
        exit.grid(row=4, column=5)
Explanation:
In the code given below, which is for the function of the exit button.
3. Name of Project
Code:
self.master.title("Evanz Shopping Store ||"
                          " \r Location: Brgy. Enclaro, Binalbagan, Negros Occidental || "
                          "\r Number: 09121234567")
Explanation:
In the code given below, which is for the function of the title of the system.
4. Frame Button
Code:
 asus = tk.Button(self, command=lambda:[shop("Asus-P25,000"),press()])
        image = ImageTk.PhotoImage(file="asus.gif")
        asus.config(image=image, width=200, height=200, bg="green")
        asus.image = image
        asus.grid(row=2, column=1)

        dell = tk.Button(self, command=lambda:[shop("Dell-P30,000"),press()])
        image = ImageTk.PhotoImage(file="dell-touchscreen.gif")
        dell.config(image=image, width=200, height=200, bg="green")
        dell.image = image
        dell.grid(row=2, column=2)

        headseat = tk.Button(self, command=lambda: [shop("Headseat-P500"),press()])
        image = ImageTk.PhotoImage(file="headseat.gif")
        headseat.config(image=image, width=200, height=200, bg="green")
        headseat.image = image
        headseat.grid(row=2, column=3)

        hp = tk.Button(self, command=lambda:[shop("HP-P45,000"),press()])
        image = ImageTk.PhotoImage(file="hp.gif")
        hp.config(image=image, width=200, height=200, bg="green")
        hp.image = image
        hp.grid(row=2, column=4)

        longsleeve = tk.Button(self, command=lambda: [shop("Long Sleeve-P5,000"), press()])
        image = ImageTk.PhotoImage(file="longsleeve.gif")
        longsleeve.config(image=image, width=200, height=200, bg="green")
        longsleeve.image = image
        longsleeve.grid(row=3, column=1)

        pants = tk.Button(self, command=lambda: [shop("Pants-P4,500"), press()])
        image = ImageTk.PhotoImage(file="pants.gif")
        pants.config(image=image, width=200, height=200, bg="green")
        pants.image = image
        pants.grid(row=3, column=2)

        samsung = tk.Button(self, command=lambda: [shop("Samsung-P15,000"), press()])
        image = ImageTk.PhotoImage(file="samsung.gif")
        samsung.config(image=image, width=200, height=200, bg="green")
        samsung.image = image
        samsung.grid(row=3, column=3)

        luxuryshoes = tk.Button(self, command=lambda: [shop("Luxury Shoes-P15,000"), press()])
        image = ImageTk.PhotoImage(file="shoes1.gif")
        luxuryshoes.config(image=image, width=200, height=200, bg="green")
        luxuryshoes.image = image
        luxuryshoes.grid(row=3, column=4)

        cheapshoes = tk.Button(self, command=lambda: [shop("Cheap Shoes-P1,500"), press()])
        image = ImageTk.PhotoImage(file="shoes2.gif")
        cheapshoes.config(image=image, width=200, height=200, bg="green")
        cheapshoes.image = image
        cheapshoes.grid(row=4, column=1)

        vivo = tk.Button(self, command=lambda: [shop("Vivo-P16,000"), press()])
        image = ImageTk.PhotoImage(file="vivo.gif")
        vivo.config(image=image, width=200, height=200, bg="green")
        vivo.image = image
        vivo.grid(row=4, column=2)

        rolex = tk.Button(self, command=lambda: [shop("Rolex Watch-P12,000"), press()])
        image = ImageTk.PhotoImage(file="watch1.gif")
        rolex.config(image=image, width=200, height=200, bg="green")
        rolex.image = image
        rolex.grid(row=4, column=3)

        applewatch = tk.Button(self, command=lambda: [shop("Apple Watch-P10,000"), press()])
        image = ImageTk.PhotoImage(file="watch2.gif")
        applewatch.config(image=image, width=200, height=200, bg="green")
        applewatch.image = image
        applewatch.grid(row=4, column=4)
Explanation:
In the code given below, which is for the function of the design of frame button of the system.
Downloadable Source Code
Anyway, if you want to level up your programming knowledge, especially python, try this new article I’ve made for you Best Python Projects with source code for Beginners.
But If you’re going to focus on web development using Django, you can download here from our list of Best Django Projects with source code based on real-world projects.
How To Run The Shopping Cart Program?
To run this project, you must have installed a Pycharm on your PC (for Windows). This Shopping Cart Project is free to download, Use for educational purposes only!
After downloading the project you must follow the steps below:
1st Step: Unzip the file or Extract the file
2nd Step : Double click the main.py
3rd Step: Project is ready to run
Conclusion
This Shopping Cart with Source Code is the way to enhance and broaden our competencies and logic ideas which is essential in training the python programming language which is maximum well known and most usable programming language in lots of company.
The Shopping Cart is a easy GUI primarily based application which is very smooth to recognize and use. It makes use of Tkinter module for the GUI.
Inquiries
If you have any questions or suggestions about Shopping Cart in Python with Source Code, please feel free to leave a comment below.
from PIL import Image, ImageTk……..i m getting this error.please help