
A Blog application in Django contains all the features of a Blog site like login/registering into the system, adding a blog post with title, description, and image, and editing or deleting the blog post.
In this tutorial, we will teach you How To Create A Blog In Django.
Creating A Blog In Django has an interactive UI design using which users can see what others are posting. It also has an admin panel through which all the blog posts and users can be managed.
Read/Visit is also the other programming language used in blog applications.
This Blog Application In Django also includes a downloadable Project With Source Code for free, just find the downloadable source code below and click to start downloading.
To start building a blog application with Django, make sure that you have PyCharm Professional IDE Installed apps in your computer.
| About Project | Project Details | Definition |
|---|---|---|
| Project Name | Blog Application In Django | The Blog Application In Django is developed using Python Django, HTML, CSS, and JavaScript, This Django Blog Application is a complete blogging app site for users where users can add, edit, and delete their blogs and share them with everyone in the world. |
| Python version (Recommended) | 3.8 Version | Python 3.8 introduces some new syntax to the language, as well as a few small modifications to existing behavior and, most importantly, a slew of performance improvements, following in the footsteps of the previous 3.7 version. |
| Programming Language Used | Python Django Language | Django is a high-level Python web framework for building safe and maintainable websites quickly. Django is a web framework built by experienced developers that takes care of a lot of the heavy lifting so you can focus on developing your app instead of reinventing the wheel. |
| Developer Name | itsourcecode.com | Free projects containing source code in Java, PHP, Python, Django, VB.Net, Visual Basic, C, C++, C#, Javascript, and other languages are available on this website. |
| IDE Tool (Recommended) | Sublime, Visual Studio, PyCharm | Sublime Text is a source code editor that is available for purchase. It comes with built-in support for a variety of programming and markup languages. Plugins, which are often community-built and maintained under free-software licenses, allow users to extend the functionality of the system. Sublime Text has a Python API to help with plugins. |
| Project Type | Web Application | A web application, unlike computer-based software programs that operate locally on the device’s operating system, is application software that runs on a web server. The user uses a web browser with an active network connection to access web apps. |
| Database | SQLite | SQLite is a programming language that is used to create embedded software for devices such as televisions, cell phones, and cameras. It can handle HTTP requests with low to medium traffic. SQLite has the ability to compress files into smaller bundles with less metadata. SQLite is a temporary dataset that is used within an application to process data. |
What is a blogging application?
On blogging systems, a user can publish a post, show the date it was written, and give the post a particular author.
In order to make it simpler to search for all blog entries related to a particular topic, these programs or web-based services also let users tag content with particular categories.
What is a blog and example?
A blog (short for “weblog”) is an online journal or informational website that displays the most recent updates first. It’s a place where writers discuss their perspectives on a subject.
What is the purpose of a blog?
A blog makes your website more engaging. Along with using your website to teach people about your products and services, you may include a blog section.
What are the advantages of blogs?
Blogging’s business benefits
- It increases website traffic.
- Social media can use blog content.
- It generates leads from traffic.
- It’s long-lasting.
- Blogs build links.
- It’s long-lasting.
- Share company news.
How does a blog application work?
A conversation or informational website published on the World Wide Web that consists of brief, frequently casual diary-style text updates is known as a blog (a contraction of “weblog”) (posts).
Usually, posts are shown in reverse chronological order, with the most recent one showing up at the top of the page.
Reminders
To perform this Python Django project make sure that you have knowledge of the following:
- CSS
- HTML
- Javascript
- Database Management
Features of this Blog Application in Django
- Manage Blog – This feature includes the CRUD operation in a blog or content you create like adding, editing, and deleting content of the blog.
- Login System – With this feature, the admin can log in to the system and manage all the features of the system.
In this Blog Application in Django it consist of the following Method:
- Blog – In this method which is the main method of the system.
- Media – In this method, you can find all the media that you upload in the system.
- Template – This method is the design of the system consisting of HTML, CSS, and JavaScript.
How to Create a Blog Application in Django with Source Code
Time needed: 5 minutes
Here are the steps on how to create a blog application using Django.
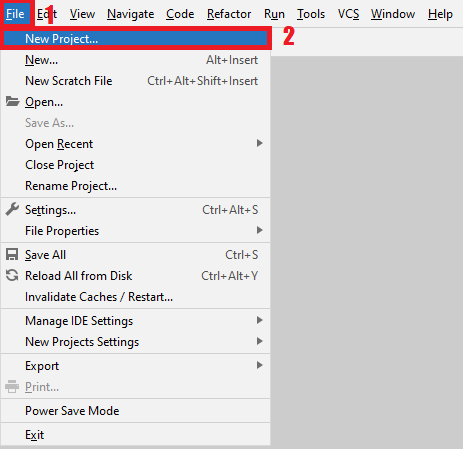
- Step 1: Open file.
First, open the “Pycharm professional” after that click “file” and click “new project“.

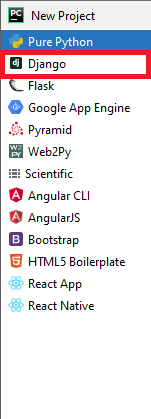
- Step 2: Choose Django.
Second, after click “new project“, choose “Django” and click.

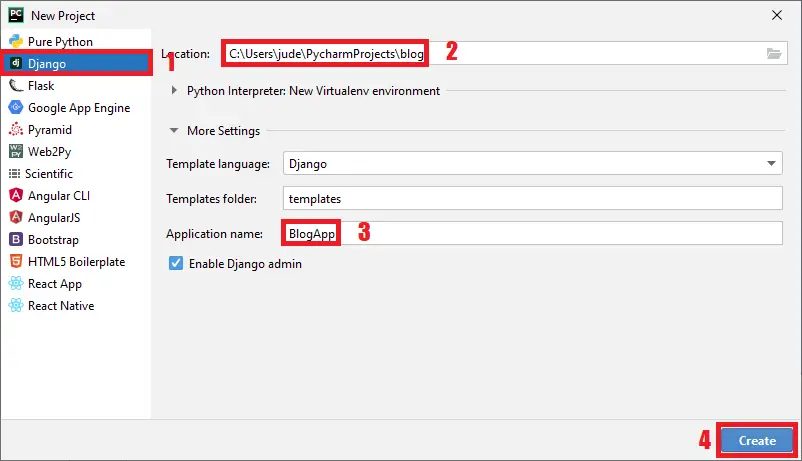
- Step 3: Select the file location.
Third, select a file location wherever you want.

- Step 4: Create application name.
Fourth, name your application.

- Step 5: Click Create.
Fifth, finish creating the project by clicking “create” button.

- Step 6: Start of coding.
you are free to copy the following codes below in the given modules and method required.
The list of modules given Below is under the “Blog” Method
- The Code Given Below Is For The “views.py” Module – you can add the following code below to your “views.py” under the “Blog” method.
from django.shortcuts import render, get_object_or_404, redirect
from django.utils import timezone
from .models import Post
from .forms import PostForm

def post_list(request):
    posts = Post.objects.filter(published_date__lte=timezone.now()).order_by('published_date')
    return render(request, 'blog/post_list.html', {'posts': posts})

def post_detail(request, pk):
    post = get_object_or_404(Post, pk=pk)
    return render(request, 'blog/post_detail.html', {'post': post})

def post_new(request):
    if request.method == "POST":
        form = PostForm(request.POST, request.FILES)
        if form.is_valid():
            post = form.save(commit=False)
            post.author = request.user
            post.published_date = timezone.now()
            post.save()
            return redirect('post_detail', pk=post.pk)
    else:
        form = PostForm()
    return render(request, 'blog/post_edit.html', {'form': form})

def post_edit(request, pk):
    post = get_object_or_404(Post, pk=pk)
    if request.method == "POST":
        form = PostForm(request.POST, request.FILES, instance=post)
        if form.is_valid():
            post = form.save(commit=False)
            post.author = request.user
            post.published_date = timezone.now()
            post.save()
            return redirect('post_detail', pk=post.pk)
    else:
        form = PostForm(instance=post)
    return render(request, 'blog/post_edit.html', {'form': form})
In this module which is the index module of the blog method.
- The Code Given Below Is For The “urls.py” Module – you can add the following code below to your “urls.py” under the “Blog” method.
from django.conf.urls import url
from django.contrib.auth import views as auth_views

from . import views

urlpatterns = [
    url(r'^$', views.post_list, name='post_list'),
    url(r'^login/$', auth_views.login, {'template_name': 'blog/login.html'}, name='login'),
    url(r'^post/(?P<pk>\d+)/$', views.post_detail, name='post_detail'),
    url(r'^post/(?P<pk>\d+)/edit/$', views.post_edit, name='post_edit'),
    url(r'^post/new/$', views.post_new, name='post_new'),
]
In this module which is the URL configuration module under blog method.
- The Code Given Below Is For The “models.py” Module – you can add the following code below into your “models.py” under the “Blog” method.
from django.db import models
from django.utils import timezone


class Post(models.Model):
    author = models.ForeignKey('auth.User', on_delete=models.CASCADE)
    title = models.CharField(max_length=200)
    text = models.TextField()
    image = models.ImageField("Image", blank=True, null=True, upload_to="images/")
    created_date = models.DateTimeField(
            default=timezone.now)
    published_date = models.DateTimeField(
            blank=True, null=True)

    def publish(self):
        self.published_date = timezone.now()
        self.save()

    def __str__(self):
        return self.title
In this module, you can find classes to be called under blog method.
I have here the list of Best Python Project with Source code free to download for free, I hope this can help you a lot.
Downloadable Source Code Below.
Anyway, if you want to level up your programming knowledge, especially Python, try this new article I’ve made for you Best Python Projects with source code for Beginners.
But If you’re going to focus on web development using Django, you can download here from our list of Best Django Projects with source code based on real-world projects.
How To Run The Blog Application In Django?
Step 1: Extract/unzip the file
Step 2: Go inside the project folder, open cmd, and type the following commands to install Django Framework and run the web server:
1.) python manage.py runserver
Step 3: Finally, open the browser and go to localhost:8000

Summary
The system is built fully in Django Framework in back-end and HTML, CSS in front-end. It has full featured user interface with all the functionalities.
This article is a way to enhance and develop our skills and logic ideas which is important in practicing the Python programming language which is the most well-known and most usable programming language in many companies.
Inquiries
If you have any questions or suggestions about the Django Blog Application, please feel free to leave a comment below.
Official documentation
Frequently Asked Questions
How does this Django management system work?
Standard Django MVT pattern: urls.py defines routes, views.py handles requests, models.py defines DB schema, templates render UI. CRUD on main entity, plus reports/dashboards. Django auth + groups for role-based access. Django admin available for back-office.
What Django and Python versions does this project require?
Most projects in this batch run on Django 4.x or 5.x with Python 3.8+. A few older projects need Django 3.2 with Python 3.7. Check the requirements.txt file for exact versions. To run any: install Python, create a virtualenv (python -m venv venv), activate it, pip install -r requirements.txt, run python manage.py migrate, then python manage.py runserver.
How do I set up the database for this Django project?
Most projects use SQLite (zero setup, auto-creates db.sqlite3 in project root on first migrate). For projects using MySQL or PostgreSQL: install the database server, create an empty database, edit settings.py DATABASES[‘default’] with your credentials, run python manage.py migrate. For sample data: python manage.py loaddata fixtures.json (if a fixture file is included) or create a superuser via python manage.py createsuperuser.
Can I use this Django project for a BSIT capstone or thesis?
Yes, but extend it. A bare CRUD app is too narrow for full capstone scope. Add: user roles via Django Groups, dashboards (Chart.js + AJAX endpoints), PDF exports (ReportLab or WeasyPrint), email notifications (Django send_mail), real domain extension (analytics, audit log, multi-branch). Pair with Chapter 1-5 documentation matching your panel’s rubric.
Why am I getting ModuleNotFoundError, OperationalError, or ‘No such table’ errors?
Three common Django startup issues: (1) ModuleNotFoundError: virtualenv not activated OR pip install -r requirements.txt skipped. (2) OperationalError: database credentials in settings.py don’t match your local MySQL/PostgreSQL. (3) ‘No such table’: you skipped python manage.py migrate. Also: if settings.py imports fail, check Python version compatibility (Django 5 needs Python 3.10+).
Where can I find more Django projects with source code?
Browse the Django Projects hub for the full library. For broader Python capstones see Python Projects (Tkinter desktop, Pygame games, OpenCV vision, ML). For PHP MVC alternatives see Laravel Projects. For BSIT capstone idea lists see 150 Best Capstone Project Ideas.

Angel Jude Suarez
Full-Stack Developer at PIES IT Solution
Focuses on Python development, machine learning, and AI integration. Has built production AI systems including OpenAI Whisper integration for medical transcription and GPT-4o-powered diagnosis assistance. Strong background in pandas, scikit-learn, and TensorFlow.
Expertise: Python · PHP · Java · VB.NET · ASP.NET · Machine Learning · AI Integration · OpenCV · Django · CodeIgniter · View all posts by Angel Jude Suarez →
Your code is not working. Please help me to resolve the problem.
What is the error?
File “C:\Users\ersag\AppData\Roaming\Python\Python310\site-packages\pytz\lazy.py”, line 3, in
from UserDict import DictMixin
ModuleNotFoundError: No module named ‘UserDict’
During handling of the above exception, another exception occurred:
Traceback (most recent call last):
File “C:\Users\ersag\AppData\Roaming\Python\Python310\site-packages\django\core\management\__init__.py”, line 327, in execute
autoreload.check_errors(django.setup)()
File “C:\Users\ersag\AppData\Roaming\Python\Python310\site-packages\django\utils\autoreload.py”, line 225, in wrapper
fn(*args, **kwargs)
File “C:\Users\ersag\AppData\Roaming\Python\Python310\site-packages\django\__init__.py”, line 16, in setup
from django.urls import set_script_prefix
File “C:\Users\ersag\AppData\Roaming\Python\Python310\site-packages\django\urls\__init__.py”, line 1, in
from .base import (
File “C:\Users\ersag\AppData\Roaming\Python\Python310\site-packages\django\urls\base.py”, line 8, in
from .exceptions import NoReverseMatch, Resolver404
File “C:\Users\ersag\AppData\Roaming\Python\Python310\site-packages\django\urls\exceptions.py”, line 1, in
from django.http import Http404
File “C:\Users\ersag\AppData\Roaming\Python\Python310\site-packages\django\http\__init__.py”, line 5, in
from django.http.response import (
File “C:\Users\ersag\AppData\Roaming\Python\Python310\site-packages\django\http\response.py”, line 13, in
from django.core.serializers.json import DjangoJSONEncoder
File “C:\Users\ersag\AppData\Roaming\Python\Python310\site-packages\django\core\serializers\__init__.py”, line 23, in
from django.core.serializers.base import SerializerDoesNotExist
File “C:\Users\ersag\AppData\Roaming\Python\Python310\site-packages\django\core\serializers\base.py”, line 6, in
from django.db import models
File “C:\Users\ersag\AppData\Roaming\Python\Python310\site-packages\django\db\models\__init__.py”, line 3, in
from django.db.models.aggregates import * # NOQA
File “C:\Users\ersag\AppData\Roaming\Python\Python310\site-packages\django\db\models\aggregates.py”, line 5, in
from django.db.models.expressions import Case, Func, Star, When
File “C:\Users\ersag\AppData\Roaming\Python\Python310\site-packages\django\db\models\expressions.py”, line 7, in
from django.db.models import fields
File “C:\Users\ersag\AppData\Roaming\Python\Python310\site-packages\django\db\models\fields\__init__.py”, line 11, in
from django import forms
File “C:\Users\ersag\AppData\Roaming\Python\Python310\site-packages\django\forms\__init__.py”, line 6, in
from django.forms.boundfield import * # NOQA
File “C:\Users\ersag\AppData\Roaming\Python\Python310\site-packages\django\forms\boundfield.py”, line 4, in
from django.forms.utils import flatatt, pretty_name
File “C:\Users\ersag\AppData\Roaming\Python\Python310\site-packages\django\forms\utils.py”, line 6, in
from django.utils import timezone
File “C:\Users\ersag\AppData\Roaming\Python\Python310\site-packages\django\utils\timezone.py”, line 10, in
import pytz
File “C:\Users\ersag\AppData\Roaming\Python\Python310\site-packages\pytz\__init__.py”, line 32, in
from pytz.lazy import LazyDict, LazyList, LazySet
File “C:\Users\ersag\AppData\Roaming\Python\Python310\site-packages\pytz\lazy.py”, line 5, in
from collections import Mapping as DictMixin
ImportError: cannot import name ‘Mapping’ from ‘collections’ (C:\Program Files\Python310\lib\collections\__init__.py)
During handling of the above exception, another exception occurred:
Traceback (most recent call last):
File “C:\Users\ersag\AppData\Roaming\Python\Python310\site-packages\pytz\lazy.py”, line 3, in
from UserDict import DictMixin
ModuleNotFoundError: No module named ‘UserDict’
During handling of the above exception, another exception occurred:
Traceback (most recent call last):
File “F:\Python\Blog-Application-In-Django-Source-Code\Blog Application In Django Source Code\manage.py”, line 22, in
execute_from_command_line(sys.argv)
File “C:\Users\ersag\AppData\Roaming\Python\Python310\site-packages\django\core\management\__init__.py”, line 371, in execute_from_command_line
utility.execute()
File “C:\Users\ersag\AppData\Roaming\Python\Python310\site-packages\django\core\management\__init__.py”, line 340, in execute
_parser = self.fetch_command(‘runserver’).create_parser(‘django’, ‘runserver’)
File “C:\Users\ersag\AppData\Roaming\Python\Python310\site-packages\django\core\management\__init__.py”, line 216, in fetch_command
klass = load_command_class(app_name, subcommand)
File “C:\Users\ersag\AppData\Roaming\Python\Python310\site-packages\django\core\management\__init__.py”, line 36, in load_command_class
module = import_module(‘%s.management.commands.%s’ % (app_name, name))
File “C:\Program Files\Python310\lib\importlib\__init__.py”, line 126, in import_module
return _bootstrap._gcd_import(name[level:], package, level)
File “”, line 1050, in _gcd_import
File “”, line 1027, in _find_and_load
File “”, line 1006, in _find_and_load_unlocked
File “”, line 688, in _load_unlocked
File “”, line 883, in exec_module
File “”, line 241, in _call_with_frames_removed
File “C:\Users\ersag\AppData\Roaming\Python\Python310\site-packages\django\core\management\commands\runserver.py”, line 10, in
from django.core.servers.basehttp import (
File “C:\Users\ersag\AppData\Roaming\Python\Python310\site-packages\django\core\servers\basehttp.py”, line 17, in
from django.core.wsgi import get_wsgi_application
File “C:\Users\ersag\AppData\Roaming\Python\Python310\site-packages\django\core\wsgi.py”, line 2, in
from django.core.handlers.wsgi import WSGIHandler
File “C:\Users\ersag\AppData\Roaming\Python\Python310\site-packages\django\core\handlers\wsgi.py”, line 8, in
from django.core.handlers import base
File “C:\Users\ersag\AppData\Roaming\Python\Python310\site-packages\django\core\handlers\base.py”, line 7, in
from django.urls import get_resolver, set_urlconf
File “C:\Users\ersag\AppData\Roaming\Python\Python310\site-packages\django\urls\__init__.py”, line 1, in
from .base import (
File “C:\Users\ersag\AppData\Roaming\Python\Python310\site-packages\django\urls\base.py”, line 8, in
from .exceptions import NoReverseMatch, Resolver404
File “C:\Users\ersag\AppData\Roaming\Python\Python310\site-packages\django\urls\exceptions.py”, line 1, in
from django.http import Http404
File “C:\Users\ersag\AppData\Roaming\Python\Python310\site-packages\django\http\__init__.py”, line 5, in
from django.http.response import (
File “C:\Users\ersag\AppData\Roaming\Python\Python310\site-packages\django\http\response.py”, line 13, in
from django.core.serializers.json import DjangoJSONEncoder
File “C:\Users\ersag\AppData\Roaming\Python\Python310\site-packages\django\core\serializers\__init__.py”, line 23, in
from django.core.serializers.base import SerializerDoesNotExist
File “C:\Users\ersag\AppData\Roaming\Python\Python310\site-packages\django\core\serializers\base.py”, line 6, in
from django.db import models
File “C:\Users\ersag\AppData\Roaming\Python\Python310\site-packages\django\db\models\__init__.py”, line 3, in
from django.db.models.aggregates import * # NOQA
File “C:\Users\ersag\AppData\Roaming\Python\Python310\site-packages\django\db\models\aggregates.py”, line 5, in
from django.db.models.expressions import Case, Func, Star, When
File “C:\Users\ersag\AppData\Roaming\Python\Python310\site-packages\django\db\models\expressions.py”, line 7, in
from django.db.models import fields
File “C:\Users\ersag\AppData\Roaming\Python\Python310\site-packages\django\db\models\fields\__init__.py”, line 11, in
from django import forms
File “C:\Users\ersag\AppData\Roaming\Python\Python310\site-packages\django\forms\__init__.py”, line 6, in
from django.forms.boundfield import * # NOQA
File “C:\Users\ersag\AppData\Roaming\Python\Python310\site-packages\django\forms\boundfield.py”, line 4, in
from django.forms.utils import flatatt, pretty_name
File “C:\Users\ersag\AppData\Roaming\Python\Python310\site-packages\django\forms\utils.py”, line 6, in
from django.utils import timezone
File “C:\Users\ersag\AppData\Roaming\Python\Python310\site-packages\django\utils\timezone.py”, line 10, in
import pytz
File “C:\Users\ersag\AppData\Roaming\Python\Python310\site-packages\pytz\__init__.py”, line 32, in
from pytz.lazy import LazyDict, LazyList, LazySet
File “C:\Users\ersag\AppData\Roaming\Python\Python310\site-packages\pytz\lazy.py”, line 5, in
from collections import Mapping as DictMixin
ImportError: cannot import name ‘Mapping’ from ‘collections’ (C:\Program Files\Python310\lib\collections\__init__.py)
What python version did you used?