
This tutorial will unfold the mystery about Offset function of Excel which syntax and arguments will be provided. As well as a guide on how to use it. Along with, images for better learning.
The OFFSET function may be a bit tricky to get, so let’s go over a short technical explanation first and then we will cover a few of the most efficient ways to use OFFSET in Excel.
Now let’s define what is offset function…
What is offset function in Excel
The Excel offset function returns a range of cells. This returns the specified number of rows and columns where the initial range is specified.
The OFFSET formula returns a reference to a range that is offset from a starting cell or a range of cells by a specified number of rows and columns.
Excel offset formula
The syntax of this function is as follows:
=OFFSET(reference, rows, cols, [height], [width])
Required Arguments
- Reference — it is a cell or range which is adjacent to the offset. This is the starting point of the formula.
- Rows — It is the number of rows to be moved either up or down. If the number is positive the movement of the formula is from the starting reference, hence if negative it is from above the starting reference.
- Columns — It is the number of columns you want o move from the starting point. The column could be positive or negative.
Optional Arguments
- Height — The number of rows to be returned.
- Width — The number of columns to be returned.
Example
The table below displays the return value and description of the given formula. This will give a little overview of the next section which will be explained in detail.
| Formula | Description | Result |
|---|---|---|
| =OFFSET(I2,3,-1,1,1) | Displays the value in cell L3. | drews |
| =SUM(OFFSET(I2:L2,3,-2, 3, 3)) | Sums the range I2:L2 | 260 |
| =OFFSET(D3, -3, -3) | Returns an error, because the reference is to a non-existent range on the worksheet. | #REF! |
How to use offset function in Excel
Now let’s consider the following example of how this function works.
The example we discussed a moment ago demonstrates the simplest usage of OFFSET & SUM. Now, let’s look at these functions from another angle and see what else they can do.
A dynamic OFFSET & SUM Function
This time a dynamic offset and Sum formula works on constantly updating worksheet, especially on the financial aspect and if you want to have the SUM formula automatically select the newly added rows.
Let’s say we have the same sample data below, so most probably the row will be added just above the Sum formula and you want to count the value of the income automatically once there is a value inserted.
Hence, you can decide what you prefer to sum values manually every time there is new data added or use the offset function to automatically do the work.
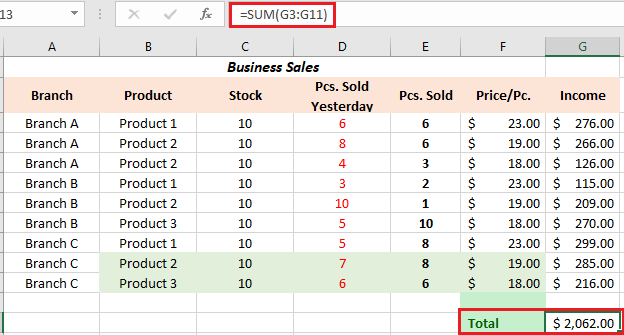
When we work on this you must decide what parameters to use in Offset function since the first range to sum will be directed in the Sum Formula. Then we will get the last cell of the range.
Reference– the cell containing the total, G3 in our case.Rows– the cell right above the total, which requires the negative number -1.Cols– it’s 0 because you don’t want to change the column.
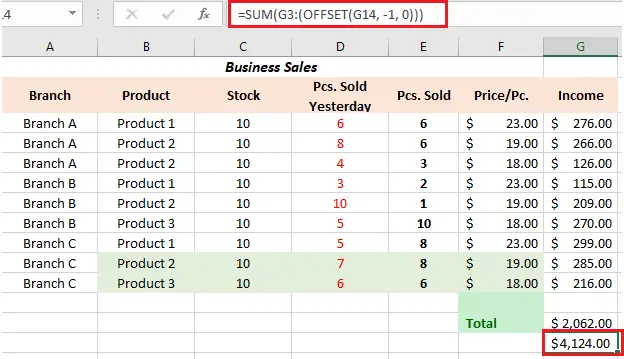
So here is the syntax of the SUM & Offset function:
=SUM(first cell:(OFFSET(cell with total, -1,0)
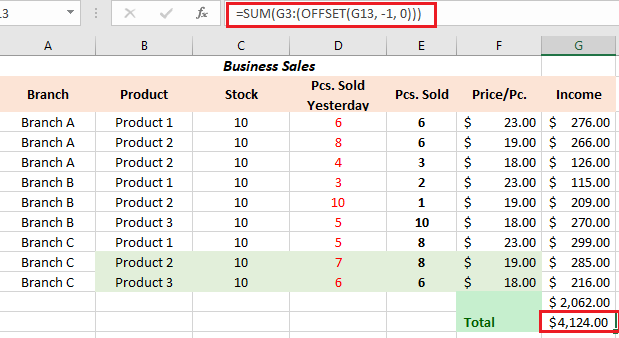
Squeezed for the above example, the formula looks as follows:
=SUM(G3:(OFFSET(G13, -1, 0)))
So the image below shows how offset functions work seamlessly.
Using OFFSET function with AVERAGE, MAX, MIN
This time it is the same way when we calculate the average of income, of the last n days, weeks or years even in finding the maximum and minimum values.
The only advantage of using offset function it will continue to calculate even if there are changes in data. Along with the formula is different in the first function name.
Observed the formula given below:
=AVERAGE(OFFSET(B1,COUNT(B:B)-E1+1,0,E1,1))
=MAX(OFFSET(B1,COUNT(B:B)-E1+1,0,E1,1))
=MIN(OFFSET(B1,COUNT(B:B)-E1+1,0,E1,1))
The benefit of using the offset function on the other function such as Average(B5:B8) or Max(B2:B8) is you don’t have to code it again when another data or row is added, wherein the worksheet is automatically updated.
Subsequently, no matter how rows and data are inserted or removed in a worksheet, this function will execute consistently after the specified number in the last cells of the column.
Offset Function in Excel things to remember
- So the rows and cols arguments are always based on the upper-left cell when an OFFSET formula returns a range of cells.
- This offset function does not alter the cells or ranges, rather it only returns the reference.
- The #REF! error will return if the rows and cols move a reference over the edge of the spreadsheet.
- Offset function reference argument requires to contain a cell or range of adjacent cells, otherwise, the formula will return the #VALUE! error.
- This function is working and collaborate with other Excel function that accepts the range or cell reference in their arguments.
Conclusion
In conclusion, this offset function of excel is a great helps when the worksheet only needs to return reference without moving the cells. However, this function is volatile which means, the more complex and larger the worksheets it will run slowly.
I hope now you know the answer on what is offset function of Excel. If you have missed the other Excel functions feel free to visit our tutorials. Thank you for reading!

Glay Eliver
Programmer & Technical Writer at PIES IT Solution
Glay Eliver is a programmer and writer at PIES IT Solution, author of over 600 tutorials at itsourcecode.com. Specializes in JavaScript tutorials, Microsoft Office how-tos (Excel, Word, PowerPoint), and Python error debugging covering ImportError, TypeError, AttributeError, ModuleNotFoundError, and JavaScript ReferenceError. Authored several of the site’s highest-traffic Excel and MS Office reference articles.
Expertise: JavaScript · MS Excel · MS Word · MS PowerPoint · Python · Python ImportError · Python TypeError · Python AttributeError · ModuleNotFoundError · JavaScript ReferenceError · Pygame · View all posts by Glay Eliver →