
This tutorial will explain the Autosum of excel, this accompanied by shortcuts, examples and locating the button of the Autosum function. We will indicate also how efficient this function is.
You will discover how this function automatically sums rows and columns, visible cells, and selected ranges of cells in one attempt and know why Autosum does not work.
For your information, this function is one of the most used and famous functions in Microsoft Excel. If you want to know the top 10 functions and formulas of excel check it out.
Interestingly, that is why you can find it in the ribbon to easily locate and utilize the function. Hence if you to know more about Autosum go over the following section of this tutorial.
What is autosum for excel?
The Autosum function is accessible by a keyboard shortcut ALT + = and it will automatically sum up the value horizontally and vertically.
For a financial analyst performing calculations all day long, even a small increase in speed for one function can add up to a lot of time saved over the course of a day, week, or year.
Apart from this function is critical in industries such as the field of banking and analytics. Hence keyboard shortcuts are known for all of this.
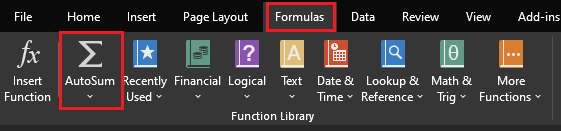
Where is autosum button excel
The Autosum button can be found in 2 locations in Excel.
- Home tab > Editing group > AutoSum:

- Formulas tab > Function Library group > AutoSum:


How to use autosum in excel
Using Autosum in Excel can automatically create a Sum formula adding a single range of cells, columns or rows every time you need it.
Thus, to use this function here are the following steps you can refer:
1. Select a cell next to the numbers you want to sum:
Sum column: just select the cell directly below the last value in the column.
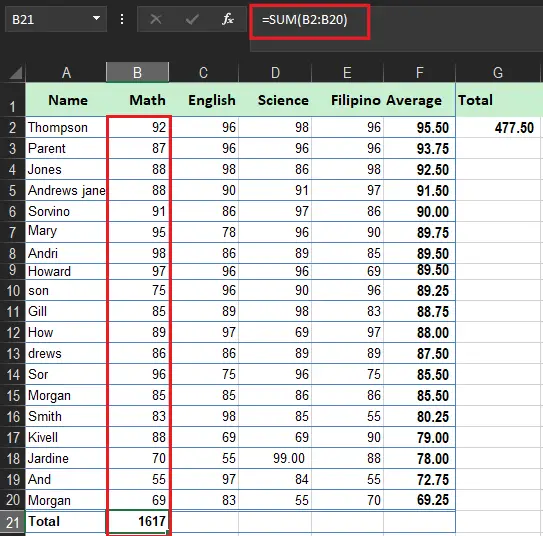
Sum rows: select the cell to the right of the last number in the row.

2. Click the Autosum in the Home tab or Formula tab. Once the function is clicked the result will be displayed and the added cells are highlighted.
3. Most of the Excel sum functions select the correct range for the sum. It is very rare to select the incorrect range but if this happens just manually type the preferred range in a formula. Moreover, you can drag the cursor to the range of cells you want to sum.
4. Press the Enter key to complete the formula.
How to use autosum in excel with other functions
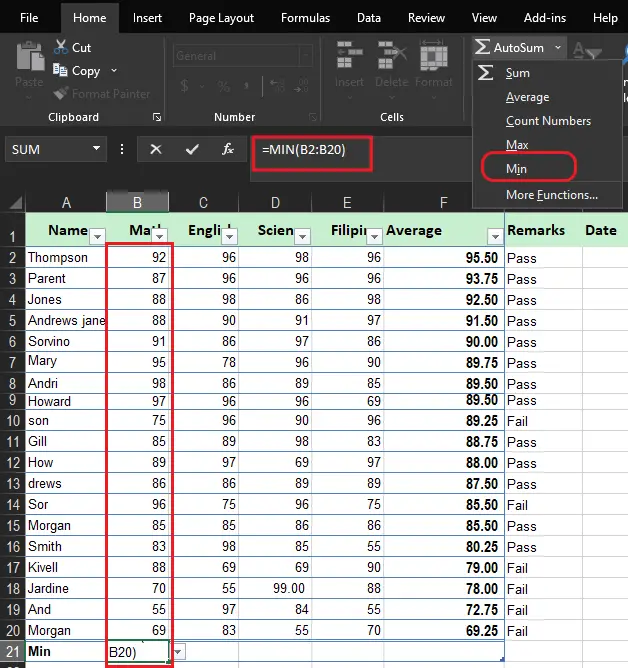
Autosum function is not limited to adding ranges of cells but it can also collaborate with other Excel functions, such as the following:
- COUNT – This counts the number of cells that contain numeric values.
- AVERAGE – This return the mean or average of numbers or values of cells.
- MAX – This return the largest value.
- MIN -This return the smallest value.
This time select a value where you want to display the result of your chosen formula. Click the Autosum dropdown list and select your preferred function.
For instance, this is how you can get the smallest value in column B:
However, if you want more functions from Autosum functions, Excel will open the Insert Function dialog box. It is the same when you click the Insert Function button on the Formulas tab or the fx button on the Formula bar.
Excel autosum shortcut
If you prefer to manipulate your Autosum on a keyboard rather than hard coding Excel provides a keyboard shortcut wherein it can save your working perspective.

In executing this shortcut just press the equal sign while holding the Alt key. This will insert the sum formula in selected cells like you press the Autosum button in the ribbon or in the formulas tab.
Conclusion
In conclusion, Autosum in Excel is a very easy-to-use and time-saving function. As you knew this is critical to every industry in time-saving shortcuts for financial analysis.
Thank you for reading! 😉

Glay Eliver
Programmer & Technical Writer at PIES IT Solution
Glay Eliver is a programmer and writer at PIES IT Solution, author of over 600 tutorials at itsourcecode.com. Specializes in JavaScript tutorials, Microsoft Office how-tos (Excel, Word, PowerPoint), and Python error debugging covering ImportError, TypeError, AttributeError, ModuleNotFoundError, and JavaScript ReferenceError. Authored several of the site’s highest-traffic Excel and MS Office reference articles.
Expertise: JavaScript · MS Excel · MS Word · MS PowerPoint · Python · Python ImportError · Python TypeError · Python AttributeError · ModuleNotFoundError · JavaScript ReferenceError · Pygame · View all posts by Glay Eliver →