How to Create a Bouncing Ball in VB.net
This tutorial is all about How to Create a Bouncing Ball in VB.net Programming Language.
In this tutorial, I’m going to teach you how to create an animated ball in VB.Net.
With this, the ball moves and bounces in every side of the Form. And it also beeps when it reaches the sides.
What is Visual Basic’s purpose?
The third-generation programming language was created to aid developers in the creation of Windows applications. It has a programming environment that allows programmers to write code in.exe or executable files.
They can also utilize it to create in-house front-end solutions for interacting with huge databases. Because the language allows for continuing changes, you can keep coding and revising your work as needed.
However, there are some limits to the Microsoft Visual Basic download. If you want to make applications that take a long time to process, this software isn’t for you.
That implies you won’t be able to use VB to create games or large apps because the system’s graphic interface requires a lot of memory and space.
Furthermore, the language is limited to Microsoft and does not support other operating systems.
What are the most important characteristics of Visual Basic?
Microsoft Visual Basic for Applications Download, unlike other programming languages, allows for speedier app creation. It has string processing capabilities and is compatible with C++, MFC, and F#.
Multi-targeting and the Windows Presentation Framework are also supported by the system, allowing developers to create a variety of Windows apps, desktop tools, metro-style programs, and hardware drivers.
Let’s begin in How to Create a Bouncing Ball in VB.net:
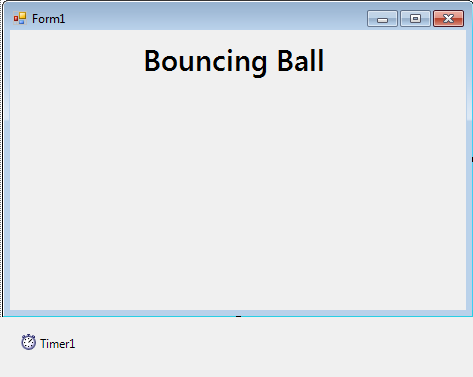
Open the Visual Basic and create a new Windows Form Application. Add the timer and the Label which is the title of the Project. It will look like this.
After setting up the Form, double click the Timer to fire the Timer_Tick event handler. After that, declare all the variables that are needed.
[vbnet]
Private bSize As Integer = 8 'FRACTION OF BALL SIZE
Private move_Size As Integer = 4 'FRACTION OF CLIENT AREA
Private btmp As Bitmap
Private bPositionX As Integer
Private bPositionY As Integer
Private bRadiusX As Integer
Private bRadiusY As Integer
Private bMoveX As Integer
Private bMoveY As Integer
Private bBitmapWidth As Integer
Private bBitmapHeight As Integer
Private btmpWidthMargin As Integer
Private btmpHeightMargin As Integer
[/vbnet]
In the Timer_Tick method, set the movement of the ball.
[vbnet]
Private Sub Timer1_Tick(ByVal sender As System.Object, ByVal e As System.EventArgs) Handles Timer1.Tick
'SET A VARIABLE TO OBTAIN THE GRAPHICS OBJECT.
Dim grafx As Graphics = CreateGraphics()
'DRAW THE BALL IN THE FORM.
grafx.DrawImage(btmp, _
CInt(bPositionX - bBitmapWidth / 2), _
CInt(bPositionY - bBitmapHeight / 2), _
bBitmapWidth, bBitmapHeight)
grafx.Dispose()
'SET THIS TO INCREAMENT THE POSITION OF THE BALL BY ITS DISTANCE TO MOVED BOTH X AND Y AXIS.
bPositionX += bMoveX
bPositionY += bMoveY
'SET THE REVERSE THE DIRECTION OF THE BALL WHEN IT HITS TO THE BOUNDARY.
If bPositionX + bRadiusX >= ClientSize.Width _
Or bPositionX - bRadiusX = ClientSize.Height _
Or bPositionY - bRadiusY <= 90 Then
bMoveY = -bMoveY
Beep()
End If
End Sub
[/vbnet]
After setting up the movement of the ball, create a class control that overrides the OnResize method. OnResize method increases the resize event and it occurs when the control is resized.
[vbnet]
Protected Overrides Sub OnResize(ByVal ev_arg As EventArgs)

Dim grafx As Graphics = CreateGraphics()

'CLEAR ANY DRAWINGS.
grafx.Clear(BackColor)

'SET A VARIBLE THAT HOLDS THE RADIUS OF THE BALL
'AND SET THE WIDTH OR THE HIEGHT OF IT TO A FRACTION WHICHEVER IS LESS TO THE CLIENT AREA.
Dim dbl_Radius As Double = Math.Min(ClientSize.Width / grafx.DpiX, _
ClientSize.Height / grafx.DpiY) / bSize

'SET THE HIEGHT AND WIDTH OF THE BALL.
bRadiusX = CInt(dbl_Radius * grafx.DpiX)
bRadiusY = CInt(dbl_Radius * grafx.DpiY)
grafx.Dispose()

'SET THE DISTANCE THAT THE BALL MOVES INTO 1 PIXEL OR THE BALL SIZE WHICHEVER IS GREATER.
'THIS MEANS THAT THE DISTANCE OF THE BALL MOVES EACH TIME IS PROPORTIONAL TO ITS SIZE,
'WHICH IS ALSO PROPORTIONAL TO THE SIZE OF THE CLIENT AREA.
'THE BALL SLOWS DOWN WHENEVER THE CLIENT AREA IS SHRUNK
'AND THE BALL SPEEDS UP WHEN IT IS INCREASED.
bMoveX = CInt(Math.Max(1, bRadiusX / move_Size))
bMoveY = CInt(Math.Max(1, bRadiusY / move_Size))

'SET THE VALUE OF THE BALL'S MOVEMENT SERVES AS THE MARGIN AROUND THE BALL,
'THAT DETERMINES THE ACTUAL SIZE OF BITMAP ON WHICH THE BALL IS DRAWN.
'SET THE DISTANCE OF THE BALL MOVES IS EQUAL TO THE SIZE OF THE BITMAP,
'WHICH ALLOWS THE PREVIOUS BALL'S IMAGE TO BE ERASED BEFORE THE NEXT IMAGE IS DRAWN
btmpWidthMargin = bMoveX
btmpHeightMargin = bMoveY

'TO FIND OUT THE ACTUAL SIZE OF THE BITMAP ON WHICH THE BALL IS DRAWN
'PLUS THE MARGINS TO THE BALL'S DIMENSIONS.
bBitmapWidth = 2 * (bRadiusX + btmpWidthMargin)
bBitmapHeight = 2 * (bRadiusY + btmpHeightMargin)
'CREATE A NEW WIDTH AND HEIGHT OF THE BITMAP.
btmp = New Bitmap(bBitmapWidth, bBitmapHeight)
'OBTAIN THE GRAFIX OBJECT SHOWN BY THE BITMAP.
grafx = Graphics.FromImage(btmp)
'CLEAR THE EXISTING BALL AND DRAW A NEW BALL.
With grafx
.Clear(BackColor)
.FillEllipse(Brushes.Green, New Rectangle(bMoveX, _
bMoveY, 2 * bRadiusX, 2 * bRadiusY))
.Dispose()
End With

'RESET THE POSITION OF THE BALL TO THE CENTER OF THE CLIENT AREA.
bPositionX = CInt(ClientSize.Width / 2)
bPositionY = CInt(ClientSize.Height / 2)
End Sub
[/vbnet]
After creating a method, go back to the Design Views ,double click the Form and start the timer in the first load of the Form.
[vbnet]
Private Sub Form1_Load(ByVal sender As System.Object, ByVal e As System.EventArgs) Handles MyBase.Load
Timer1.Start()
End Sub
[/vbnet]
You can the download the complete source code on your computer.
Download HERE
Readers might read also:
If you have any questions or suggestions in How to Create a Bouncing Ball in VB.net, please feel free to leave a comment below.
Official documentation
Frequently Asked Questions
What does this VB.NET tutorial cover?
Focused VB.NET language or library tutorial showing a single concept with working code. Use as a building block when assembling a larger system.
What Visual Studio and SQL Server versions does this VB.NET project require?
Most projects use VB.NET WinForms on .NET Framework 4.5+ with SQL Server 2012 Express or higher. To run: install Visual Studio 2019 / 2022 (Community is free) with the ‘Desktop development with .NET’ workload, install SQL Server Express + SSMS, open the .sln file, build, run.
How do I set up the database for this VB.NET project?
Open SQL Server Management Studio (SSMS) and connect to your SQL Server (e.g. localhost\SQLEXPRESS). Right-click Databases, choose Restore Database OR New Database then import the included .sql script. Update the connection string in App.config (or in code-behind Module) with your server name + credentials. Rebuild and run.
Can I use this VB.NET project for a BSIT capstone or thesis?
Yes, VB.NET is one of the most accepted languages by Philippine BSIT panels. Extend it: add role-based access (admin/staff/customer login redirect), Crystal Reports or RDLC reports, dashboards with Chart control, audit log, multi-branch support. Pair with Chapter 1-5 documentation matching your panel’s rubric.
Why am I getting ‘connection error’ or ‘cannot find SQL Server’?
Three common VB.NET issues: (1) Connection error: SQL Server isn’t running. Open SQL Server Configuration Manager and verify SQL Server (SQLEXPRESS) service is started. (2) Wrong server name in connection string. Try .\SQLEXPRESS, (local)\SQLEXPRESS, or your machine name. (3) Login failed: SQL Server is set to ‘Windows-only’ authentication. Switch to Mixed Mode in SSMS Server Properties, Security.
Where can I find more VB.NET projects with source code?
Browse the VB.NET Projects hub for the full library. For C# WinForms alternatives see C# Projects. For ASP.NET web alternatives see ASP.NET Projects. For BSIT capstone idea lists see 150 Best Capstone Project Ideas.