
How to Apply Shear Effects to a Text in VB.Net
This tutorial is all about How to Apply Shear Effects to a Text in VB.Net. This is the continuation of my last topic which is “How to Apply “Block Effects” to a Text in VB.Net“.
This time, I’m going to add another text effect which is the “Shear”. With the use of “Shear”, you can slide the text from left to right or right to left.
At the same time, you can adjust the slide effects of the text whatever sliding position you like.
What is Visual Basic’s purpose?
The third-generation programming language was created to aid developers in the creation of Windows applications. It has a programming environment that allows programmers to write code in.exe or executable files.
They can also utilize it to create in-house front-end solutions for interacting with huge databases. Because the language allows for continuing changes, you can keep coding and revising your work as needed.
However, there are some limits to the Microsoft Visual Basic download. If you want to make applications that take a long time to process, this software isn’t for you.
That implies you won’t be able to use VB to create games or large apps because the system’s graphic interface requires a lot of memory and space.
Furthermore, the language is limited to Microsoft and does not support other operating systems.
What are the most important characteristics of Visual Basic?
Microsoft Visual Basic for Applications Download, unlike other programming languages, allows for speedier app creation. It has string processing capabilities and is compatible with C++, MFC, and F#.
Multi-targeting and the Windows Presentation Framework are also supported by the system, allowing developers to create a variety of Windows apps, desktop tools, metro-style programs, and hardware drivers.
Let’s begin:
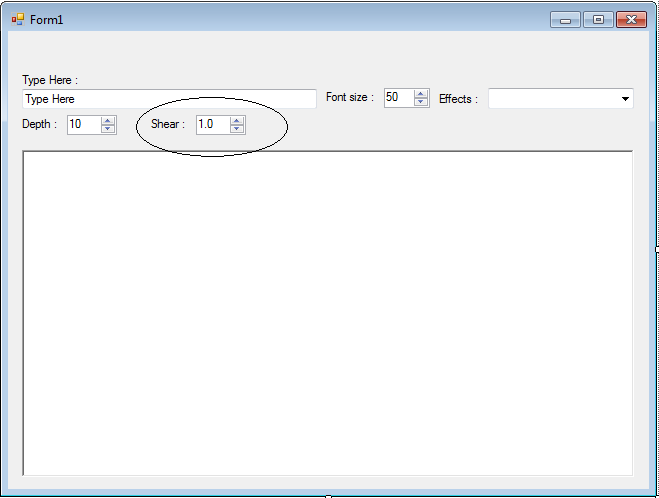
First, open the file of “How to Apply “Shear Effects” to a Text in VB.Net”. After that, add new “NumericUpDown” and name it “nudShear”. It will look like this.
Then, go to the Solution Explorer and click the code view. After that, do the following code in creating a sub procedure for the “Shear” effects.
[vbnet]
Private Sub draw_shear_text()
Dim text_size As SizeF
Dim grafx As Graphics
Dim fore_brush As Brush = Brushes.Blue
Dim fnt As New Font("Microsoft Sans Serif", NumericUpDown1.Value, FontStyle.Regular)
Dim tranform As Matrix
Dim location_x, location_y As Single

'CREATE THE GRAPHICS OBJECT IN THE PICTUREBOX.
grafx = PictureBox1.CreateGraphics()
'CLEAR THE GRAPHICS OBJECT
grafx.Clear(Color.White)

'SET THE REQUIRE SIZE TO DRAW THE TEXT.
text_Size = grafx.MeasureString(TextBox1.Text, fnt)

'ELIMINATE THE REDUNDANT CALCULATION AFTER GETTING THE LOCATION.
location_x = (PictureBox1.Width - text_size.Width) / 2
location_y = (PictureBox1.Height - text_size.Height) / 2

'REPOSITION THE ORIGIN OF THE GRAPHICS OBJECT (0,0) TO THE (location_x,
' location_y) POINT.
grafx.TranslateTransform(location_x, location_y)

'SPECIFY THE AMOUNT TO TRANSFORM THE CURRENT GRAPHICS OBJECT TO A SHEAR TEXT.
tranform = grafx.Transform
tranform.Shear(nudShear.Value, 0)
grafx.Transform = tranform

'MAIN TEXT DRAWN.
grafx.DrawString(TextBox1.Text, fnt, fore_brush, 0, 0)
End Sub
[/vbnet]
Update the “effectlist” sub procedure. Add the item in the ComboBox which is “Shear”.
[vbnet]
Private Sub effectlist()
With ComboBox1.Items
.Clear()
.Add("Reflect")
.Add("Block")
.Add("Shear")
End With
End Sub
[/vbnet]
Update the “draw_text” sub procedure. Add another condition which is “Shear”. The function of this condition is when the value of a ComboBox is changed, the effect of the text will be changed too.
[vbnet]
Private Sub draw_text()
If ComboBox1.SelectedItem Is Nothing Then
effectlist()
ComboBox1.SelectedIndex = 0
End If
Select Case ComboBox1.SelectedItem.ToString()
Case "Reflect"
Draw_Reflect_Text()
nupDepth.Enabled = False
nudShear.Enabled = False
Case "Block"
draw_block_text()
nupDepth.Enabled = True
nudShear.Enabled = False
Case "Shear"
draw_shear_text()
nupDepth.Enabled = False
nudShear.Enabled = True
End Select
End Sub
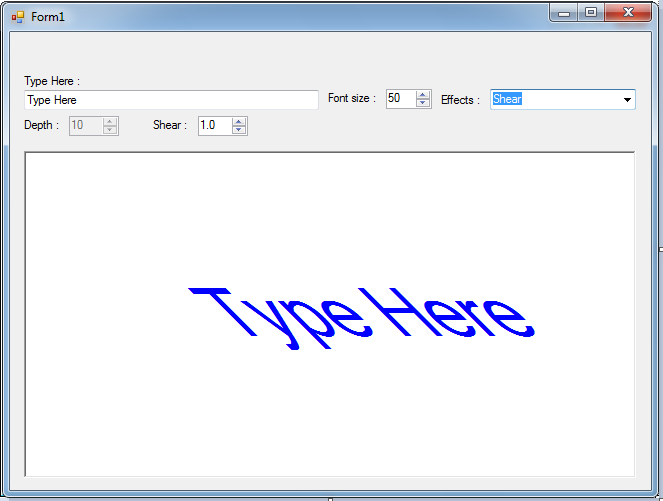
[/vbnet]Add the "nudShear.ValueChanged” for the events of the “UIChanged” sub procedure. With this, when the value of “nudShear” is changed, the slide of the text will be changed too. And it will look like this.
[vbnet]
Private Sub UIChanged(ByVal sender As System.Object, ByVal e As System.EventArgs) _
Handles TextBox1.TextChanged, NumericUpDown1.ValueChanged, PictureBox1.MouseHover, _
ComboBox1.SelectedValueChanged, nupDepth.ValueChanged, nudShear.ValueChanged

If NumericUpDown1.Value = 0 Then
NumericUpDown1.Value = 50
End If
draw_text()

End Sub
[/vbnet]
Output:
Download the complete sourcecode here
Readers might read also:
Technology stack and requirements
To run this VB.NET project, you need the following on your development machine:
- Visual Studio 2019 or later. The free Community Edition is enough for building, debugging, and running the project.
- .NET Framework 4.7.2 or higher. Most Windows 10 and 11 systems have it preinstalled through Windows Update.
- MySQL Server 8.0 or MSSQL Express 2019. Choose whichever your capstone panel prefers; both work with VB.NET data adapters.
- MySQL Connector/NET or SqlClient library. Add via NuGet Package Manager inside Visual Studio.
- Crystal Reports (optional). Required only if the project generates printable reports; install the runtime redistributable.
Installing the source code
The download link contains a ZIP archive with the full solution. Extract and set up in five steps:
- Extract the archive to a folder outside Program Files (avoids permission issues).
- Open the .sln file in Visual Studio. It loads the full solution with all forms and modules.
- Restore NuGet packages. Right-click the solution then Restore NuGet Packages if prompted.
- Import the database. Locate the .sql file in the archive and import via phpMyAdmin (MySQL) or SQL Server Management Studio.
- Update the connection string in App.config or module code to match your local database name, user, and password.
How to use this project for your BSIT capstone
This VB.NET project maps cleanly to standard BSIT capstone documentation. Suggested chapter alignment:
- Chapter 1 (Introduction). Discuss the problem the system solves in real-world context. Cite Philippine business or academic use cases where a manual process could be replaced.
- Chapter 2 (Review of Related Literature). Compare this system’s features against 5-10 similar published projects. Cite journals like IJERT or IEEE Access for academic-standard sources.
- Chapter 3 (Methodology). Include Use Case Diagram, Data Flow Diagram, Entity Relationship Diagram, and Activity Diagram covering all major workflows in the system.
- Chapter 4 (Results and Discussion). Screenshot each module of the running system with a caption explaining what data it processes and which user role interacts with it.
- Chapter 5 (Conclusion and Recommendations). Identify features that could be added in a Version 2, such as web dashboard, mobile app, or REST API export.
Modules typical of How to Apply Shear Effects to a Text
- Master data. CRUD forms for the primary entities the system manages, with search and filter.
- Transaction processing. Data entry forms for the day-to-day operations the system automates.
- Reports. Formatted printable output summarizing activity per day, per user, or per category.
- User management. Login with role-based permissions (Admin, Encoder, Viewer).
- Backup and restore. Export database to a .sql or .bak file and restore when needed.
Common enhancements for capstone review
- Modernize the UI. Add Bunifu or Guna UI controls for a more polished, modern appearance.
- Add printable receipts. Integrate a printer preview form with page-setup options.
- Multi-user concurrency. Ensure the database handles simultaneous writes without lost-update errors.
- Web version. Rewrite the front-end in ASP.NET Core or React for a modern deployment path.
Official documentation
Frequently Asked Questions
What does this VB.NET tutorial cover?
Focused VB.NET language or library tutorial showing a single concept with working code. Use as a building block when assembling a larger system.
What Visual Studio and SQL Server versions does this VB.NET project require?
Most projects use VB.NET WinForms on .NET Framework 4.5+ with SQL Server 2012 Express or higher. To run: install Visual Studio 2019 / 2022 (Community is free) with the ‘Desktop development with .NET’ workload, install SQL Server Express + SSMS, open the .sln file, build, run.
How do I set up the database for this VB.NET project?
Open SQL Server Management Studio (SSMS) and connect to your SQL Server (e.g. localhost\SQLEXPRESS). Right-click Databases, choose Restore Database OR New Database then import the included .sql script. Update the connection string in App.config (or in code-behind Module) with your server name + credentials. Rebuild and run.
Can I use this VB.NET project for a BSIT capstone or thesis?
Yes, VB.NET is one of the most accepted languages by Philippine BSIT panels. Extend it: add role-based access (admin/staff/customer login redirect), Crystal Reports or RDLC reports, dashboards with Chart control, audit log, multi-branch support. Pair with Chapter 1-5 documentation matching your panel’s rubric.
Why am I getting ‘connection error’ or ‘cannot find SQL Server’?
Three common VB.NET issues: (1) Connection error: SQL Server isn’t running. Open SQL Server Configuration Manager and verify SQL Server (SQLEXPRESS) service is started. (2) Wrong server name in connection string. Try .\SQLEXPRESS, (local)\SQLEXPRESS, or your machine name. (3) Login failed: SQL Server is set to ‘Windows-only’ authentication. Switch to Mixed Mode in SSMS Server Properties, Security.
Where can I find more VB.NET projects with source code?
Browse the VB.NET Projects hub for the full library. For C# WinForms alternatives see C# Projects. For ASP.NET web alternatives see ASP.NET Projects. For BSIT capstone idea lists see 150 Best Capstone Project Ideas.