What are Loops in TypeScript?
loops in TypeScript are a control structure that allows you to execute a block of code multiple times until a certain condition is met.
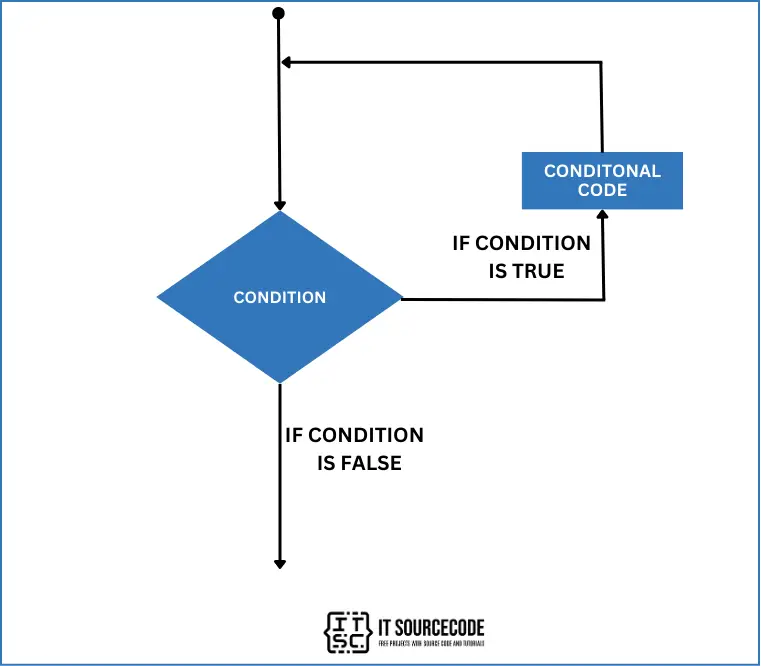
Here’s what a loop usually looks like in many programming languages:
Types of Loops in TypeScript
TypeScript gives you different kinds of loops to use when you need to repeat code.
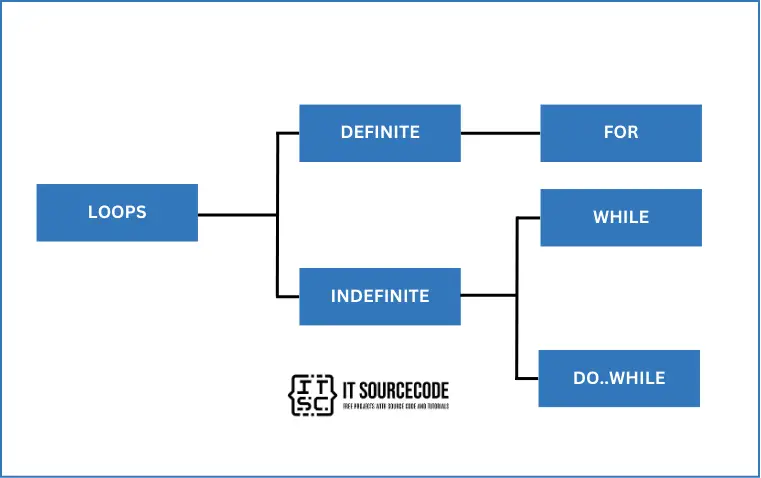
Definite Loop
A Definite Loop is a kind of loop in coding where you know how many times it will run. This number is usually decided by a certain rule or a fixed count.
You often use this type of loop when you already know how many times you need a piece of code to repeat.
The for loop is a type of definite loop.
for loop
As we mentioned, the for loop is a type of definite loop that has a control structure that lets you repeat a block of code a certain number of times.
Syntax:
for (initial value, condition, step increment)Here’s a further explanation of how the for loop works:
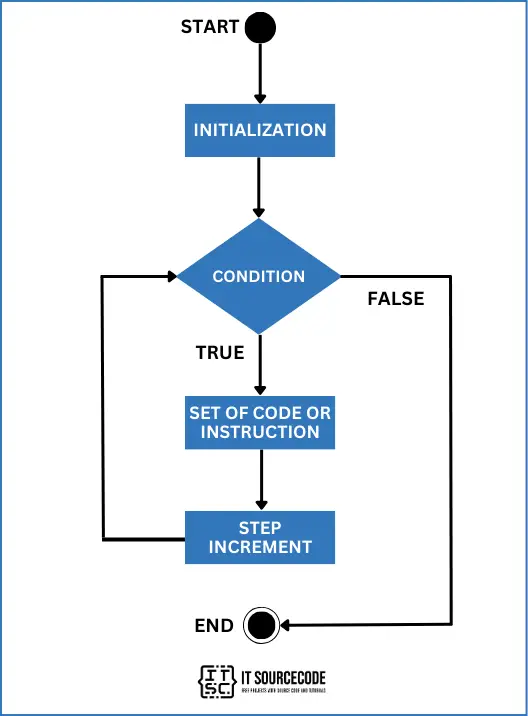
- Initialization:
Before the loop starts, you have to set up a variable. This is usually a counter variable.
For example:
let i = 0;- Condition:
Condition is a test that checks if the loop should continue. If the condition is true, the loop will keep going. If it’s false, the loop will stop.
For example:
i < 10;- Final Expression
Final Expression is a piece of code that runs after each loop. It’s often used to update the counter variable.
For example:
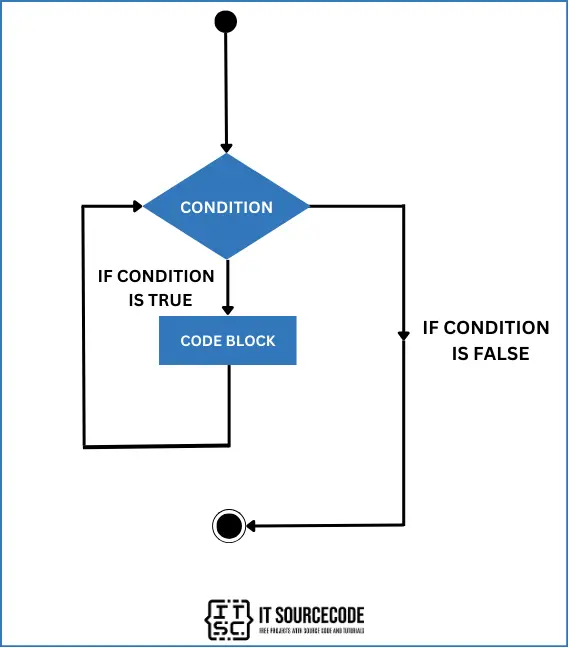
i++For loop Flowchart in TypeScript
Example:
Let’s take a look at the example code below.
for (let i = 0; i < 5; i++) {
    console.log("Hello, welcome to Itsourcecode!");
}
Output:
Hello, welcome to Itsourcecode!
Hello, welcome to Itsourcecode!
Hello, welcome to Itsourcecode!
Hello, welcome to Itsourcecode!
Hello, welcome to Itsourcecode!
Indefinite Loop
An Indefinite Loop is a kind of loop in programming where we don’t know the exact number of times the loop will run.
It keeps going until a certain condition is met, which is often based on the results of the code inside the loop.
We can create indefinite loops using the following loops:
while loop
A while loop in TypeScript is a tool that allows you to keep doing a set of actions as long as a specific rule remains true.
Here’s a further explanation of how the while loop works:
With each cycle of the loop, it first checks the condition. If the condition is true, it performs the actions in the loop. If the condition is false, it stops the loop.
Syntax:
while(condition) {
   // statements if the condition is true
}
while loop Flowchart in TypeScript
Example:
Let’s take a look at the example code below.
let i = 0;
while (i < 10) {
    console.log(i);
    i++;
}
Output:
0
1
2
3
4
5
6
7
8
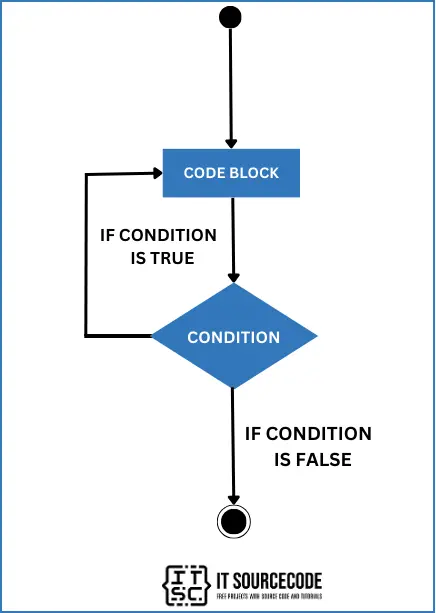
9do…while loop
A do…while loop in TypeScript is a control structure that allows you to repeat a block of code as long as a certain condition is true.
Unlike a while loop that checks the condition before running the block of code, a do…while loop checks the condition after running the block of code.
This means that the block of code in a do…while loop will always run at least once.
Syntax:
do {
   //statements
} while(condition)
do…while loop Flowchart in TypeScript
Example:
Let’s take a look at the example code below.
let i = 5;
do {
    console.log(i);
    i++;
} while (i < 10);
Output:
5
6
7
8
9
Before we proceed let me show you the example code that shows the difference between a while loop and a do…while loop in TypeScript:
// Initialize count to 6
let count = 6;

// While loop
console.log("Starting while loop");
while (count < 5) {
    console.log("Count is: " + count);
    count++;
}
console.log("Finished while loop\n");

// Reset count to 6
count = 6;

// Do...while loop
console.log("Starting do...while loop");
do {
    console.log("Count is: " + count);
    count++;
} while (count < 5);
console.log("Finished do...while loop");
As you can see in our example above, the while loop will not run at all because the condition count < 5 is not met (since count is initialized to 6).
On the other hand, the do…while loop will run once even though the condition is not met. This is because in a do…while loop, the condition is checked after the code block has been executed.
Here’s the output:
Starting while loop
Finished while loop

Starting do...while loop
Count is: 6
Finished do...while loop
I hope that the given example demonstrates the key difference between while and do…while loops.
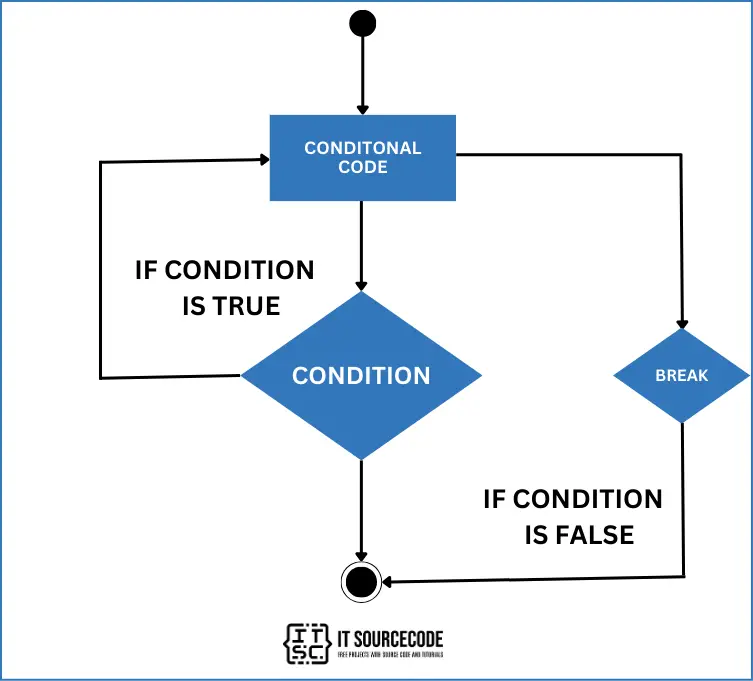
The break Statement
The break statement in TypeScript is used to stop the execution of a loop or a switch statement.
It allows you to exit a loop or a switch statement midway when a certain condition occurs.
The break statement transfers the control to the very next statement after the loop, switch, or labeled block.
You can use the break statement inside the for, while, and do…while statements.
Syntax:
breakThe break Statement Flowchart
Example
Here’s an example of how to use the break statement inside a for loop:
let subjects = [
    { Subjectname: 'Programming', grade: 90 },
    { Subjectname: 'Software Development', grade: 95 },
    { Subjectname: 'Web Development', grade: 99 }
];

for (var i = 0; i < subjects.length; i++) {
    if (subjects[i].grade == 99) break;
}

console.log(subjects[i]);
As you can see, the loop searches for the subjectname whose grade is 99 and terminates the loop once the subjectname is found by using the break statement.
Output:
{ Subjectname: 'Web Development', grade: 99 }Moreover, the break statement can also be used in a switch statement.
Let’s look at the example:
let subjects = [
    { Subjectname: 'Programming', grade: 90 },
    { Subjectname: 'Software Development', grade: 95 },
    { Subjectname: 'Web Development', grade: 99 }
];

let discount = 0;
let subject = subjects[1];

switch (subject.Subjectname) {
    case 'Programming':
        discount = 5;
        break;
    case 'Software Development':
        discount = 10;
        break;
    case 'Web Development':
        discount = 15;
        break;
}

console.log(`There is a ${discount}% discount on ${subject.Subjectname}.`);
Output:
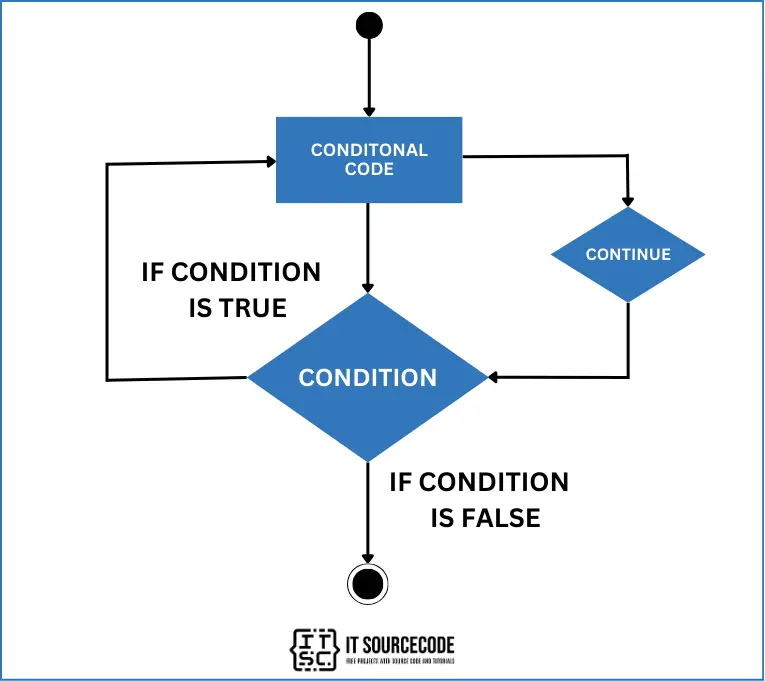
There is a 10% discount on Software Development.The continue Statement
The continue statement in TypeScript is like a skip button in a loop.
It lets you jump over one loop cycle and move straight to the next one.
You can use it in for, while, and do…while loops.
But remember, continue doesn’t stop the whole loop, it just skips one cycle.
The continue Statement Flowchart
Example
Here’s an example with a for loop:
for (let i = 0; i < 15; i++) {
if (i % 3 !== 0) continue; // if i is even, skip the rest of the loop
console.log(i); // this will only run for odd  numbers
}
In our example with a for loop, the continue statement skips the loop cycle when i is an odd number.
So, it only prints out odd numbers.
Output:
0
3
6
9
Now, let’s take a look at the example with a while loop:
let i = 0;
while (i < 15) {
i++;
if (i % 3 !== 0) continue; // if i is even, skip the rest of the loop
console.log(i); // this will only run for odd  numbers
}
Just like the for loop example, this while loop only prints out odd numbers because the continue statement skips the cycle when i is an even number.
Output:
3
6
9
12
15
Conclusion
Sometimes, you might need to run a piece of code multiple times. Typically, code runs from top to bottom, one line after another.
However, programming languages have special tools that allow you to choose more complex paths through your code.
One of these tools is a loop, which lets you run a line of code, or a block of code, repeatedly.
I hope that this tutorial has helped you gain a clear understanding of what loops are in TypeScript and the different types of loops available.
If you have any questions or inquiries, please don’t hesitate to leave a comment below.