The Student Result Management System in Django created based on python, Django, and SQLITE3 Database.
The Student Result Management System is an all-encompassing that is used to generate grades, manage student, manage student classes, manage subjects, manage password and manage result.
We created a backend and frontend for students and admin users in this framework, and students can use it to scan for results and import them in pdf format.
To start creating a Student Result Management System Project in Python Django, makes sure that you have PyCharm Professional IDE Installed in your computer.
This Student Result Management System in Django Framework, Also includes a Download Source Code for free, just find the downloadable source code below and click download.
Checkout the link below for the other related articles.
- Student Management System Project in Android Source Code
- Student Management System Project Report
- Student Management System Project in Python with Source Code
- Student Management System Project In C++ with Source Code
- University Management System In PHP FREE Download
- Student Management System Project in ASP.net with Source Code
| About Project | Project Details |
|---|---|
| Project Name | Student Result Management System Project in Django |
| Python version (Recommended) | 3.8 Version |
| Programming Language Used | Python Django Language |
| Developer Name | itsourcecode.com |
| IDE Tool (Recommended) | Sublime, Visual Studio, PyCharm |
| Project Type | Web Application |
| Database | SQLite |
Admin Features
- Login Page – The page where the system administrator enters their system credentials in order to gain access to the system’s administrative side.
- New Student Classes Page-This is the page where an administrator can add a new student classes.
- Classes List – The page with a list of student classes that can be navigated to update or delete a classes.
- New Subject Page – The page to which an administrator can add new subject.
- Subject List – The page with a list of subject that can be navigated to update or delete a subject.
- New Student Page – The page to which an administrator can add new student.
- Student List – The page with a list of student that can be navigated to update or delete a student information.
- New Result Page – The page to which an administrator can add new result.
- Result List – The page with a list of result that can be navigated to update or delete a subject.
Student Result Management System in Django Steps on How to Create a Project
Time needed: 5 minutes
Here’ are the steps on how to create a Student Result Management System in Django with Source Code.
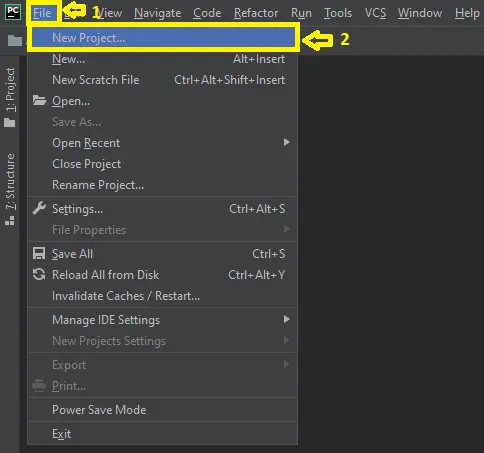
- Step 1: Open file.
First , open “pycharm professional” after that click “file” and click “new project”.

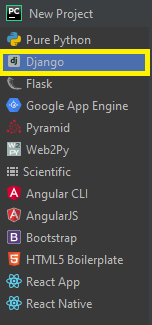
- Step 2: Choose Django.
Next, after click “new project“, choose “Django” and click.

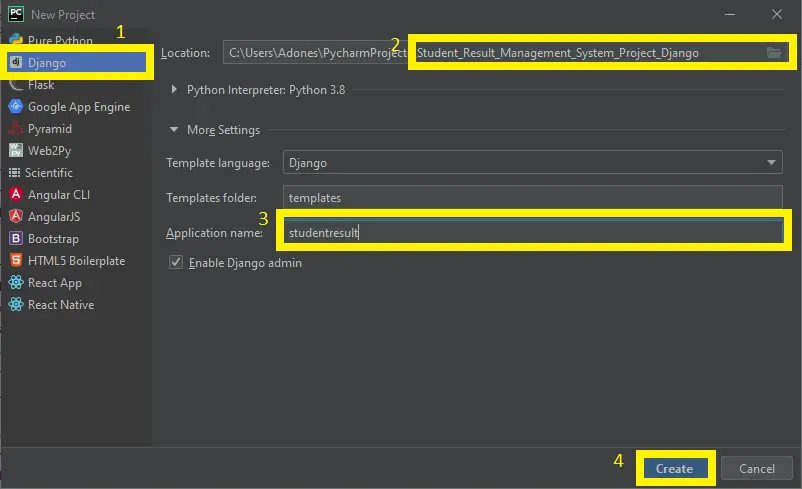
- Step 3: Select file location.
Then, select a file location wherever you want.

- Step 4: Create application name.
After that, name your application.

- Step 5: Click create.
Lastly, finish creating project by clicking “create” button.

- Step 6: Start Coding.
Finally, we will now start adding functionality to our Django Framework by adding some functional codes.
Functionality and Codes
- Create template for the sidebar
In this section, we will learn on how create a templates for the sidebar. To start with, add the following code in your sidebar_nav.html under the folder of /templates/.
<div class="sidebar-nav">
    <ul class="side-nav color-gray">
        <li class="nav-header">
            <span class="">Main Category</span>
        </li>
        <li>
            <a href="{% url 'dashboard:dashboard' %}"><i class="fa fa-dashboard"></i> <span>Dashboard</span> </a>

        </li>

        <li class="nav-header">
            <span class="">Appearance</span>
        </li>
        <li class="has-children">
            <a href="#"><i class="fa fa-file-text"></i> <span>Student Classes</span> <i class="fa fa-angle-right arrow"></i></a>
            <ul class="child-nav">
                <li><a href="{% url 'student_classes:create_class' %}"><i class="fa fa-bars"></i> <span>Create Class</span></a></li>
                <li><a href="{% url 'student_classes:class_list' %}"><i class="fa fa fa-server"></i> <span>Manage
                            Classes</span></a></li>

            </ul>
        </li>
        <li class="has-children">
            <a href="{% url 'subjects:subject_list' %}"><i class="fa fa-file-text"></i> <span>Subjects</span> <i class="fa fa-angle-right arrow"></i></a>
            <ul class="child-nav">
                <li><a href="{% url 'subjects:create_subject' %}"><i class="fa fa-bars"></i> <span>Create
                            Subject</span></a></li>
                <li><a href="{% url 'subjects:subject_list' %}"><i class="fa fa fa-server"></i> <span>Manage
                            Subjects</span></a></li>
                <li><a href="{% url 'subjects:create_subject_combination' %}"><i class="fa fa-newspaper-o"></i>
                        <span>Add Subject Combination </span></a></li>
                <a href="{% url 'subjects:subject_combination_list' %}"><i class="fa fa-newspaper-o"></i>
                    <span>Manage Subject Combination </span></a>
        </li>
    </ul>
    </li>
    <li class="has-children">
        <a href="{% url 'students:student_list' %}"><i class="fa fa-users"></i> <span>Students</span> <i class="fa fa-angle-right arrow"></i></a>
        <ul class="child-nav">
            <li><a href="{% url 'students:student_create' %}"><i class="fa fa-bars"></i> <span>Add Students</span></a></li>
            <li><a href="{% url 'students:student_list' %}"><i class="fa fa fa-server"></i> <span>Manage
                        Students</span></a></li>

        </ul>
    </li>
    <li class="has-children">
        <a href="#"><i class="fa fa-info-circle"></i> <span>Result</span> <i class="fa fa-angle-right arrow"></i></a>
        <ul class="child-nav">
            <li><a href="{% url 'results:declare_result' %}"><i class="fa fa-bars"></i> <span>Add Result</span></a></li>
            <li><a href="{% url 'results:result_list' %}"><i class="fa fa fa-server"></i> <span>Manage
                        Result</span></a></li>

        </ul>
    <li><a href="{% url 'dashboard:change_password' %}"><i class="fa fa fa-server"></i> <span> Admin Change
                Password</span></a></li>

    </li>
</div>- Create template for the subject list
In this section, we will learn on how create a templates for the subject list. To start with, add the following code in your subject_list.html under the folder of subject/templates/subject.
{% extends 'base.html' %}

{% block main_page_title %}
{{ main_page_title }}
{% endblock main_page_title %}

{% block breadcumb %}
<li><a href="{% url 'subjects:subject_list' %}">{{ panel_name }}</a></li>
<li class="active">{{ panel_title }}</li>
{% endblock breadcumb %}

{% block panel_title %}
{{ panel_title }}
{% endblock panel_title %}

{% block panel %}
{% include 'includes/manage_panel_top.html' %}
{% for object in object_list %}
<tr role="row" class="odd">
    <td class="">{{ object.id }}</td>
    <td>{{ object.subject_name }}</td>
    <td>{{ object.subject_code }}</td>
    <td>{{ object.subject_creation_date }}</td>
    <td>{{ object.subject_update_date }}</td>
    <td>
        <a href="{% url 'subjects:update_subject' object.id %}" class="btn btn-primary"><i class="fa fa-edit" title="Edit Record"></i>
        </a>
        <a href="{% url 'subjects:delete_subject' object.id %}" class="btn btn-danger"><i class="fa fa-trash" title="Delete Record"></i>
        </a>

    </td>
</tr>
{% endfor %}
{% include 'includes/manage_panel_bottom.html' %}
{% endblock panel %}


{% block javascript_code %}
<script>

</script>
{% endblock javascript_code %}- Create template for the student form
In this section, we will learn on how create a templates for the student form. To start with, add the following code in your student_form.html under the folder of students/templates/students.
{% extends 'base.html' %}

{% block main_page_title %}
{{ main_page_title }}
{% endblock main_page_title %}

{% block breadcumb %}
<li><a href="{% url 'subjects:subject_list' %}">{{ panel_name }}</a></li>
<li class="active">{{ panel_title }}</li>
{% endblock breadcumb %}

{% block panel_title %}
{{ panel_title }}
{% endblock panel_title %}

{% block panel %}
{% include 'includes/manage_panel_top.html' %}
{% for object in object_list %}
<tr role="row" class="odd">
    <td class="">{{ object.id }}</td>
    <td>{{ object.subject_name }}</td>
    <td>{{ object.subject_code }}</td>
    <td>{{ object.subject_creation_date }}</td>
    <td>{{ object.subject_update_date }}</td>
    <td>
        <a href="{% url 'subjects:update_subject' object.id %}" class="btn btn-primary"><i class="fa fa-edit" title="Edit Record"></i>
        </a>
        <a href="{% url 'subjects:delete_subject' object.id %}" class="btn btn-danger"><i class="fa fa-trash" title="Delete Record"></i>
        </a>

    </td>
</tr>
{% endfor %}
{% include 'includes/manage_panel_bottom.html' %}
{% endblock panel %}


{% block javascript_code %}
<script>

</script>
{% endblock javascript_code %}
Downloadable Source Code Below.
Anyway, if you want to level up your programming knowledge, especially python, try this new article I’ve made for you Best Python Projects with source code for Beginners.
But If you’re going to focus on web development using Django, you can download here from our list of Best Django Projects with source code based on real-world projects.
How To Run The Student Result Management System Project in Django?
- Step 1: Extract/unzip the file
- Step 2: Go inside the project folder, open cmd and type the following commands to install Django Framework and run the webserver:
- pip install -r requirements.txt
- python manage.py migrate
- python manage.py runserver
- Step 3: Finally, open the browser and go to http://127.0.0.1:8000/
Summary
In summary, the Student Result Management System in Django can be useful to students or professional who wants to learn python programming language.
This project can also be modified to fit your personal requirements. Hope this project will help you to improve your skills. Happy Coding!
Inquiries
If you have any questions or suggestions about Student Result Management System in Django with Source Code, please feel free to leave a comment below.


