
This Django online shop created based on python, Django, and SQLITE3 Database.
The Online Shopping that will assist a online store or store in providing an online ordering system for their customers.
The system has two user interfaces: one for the admin user and the other for the client, or the system’s website.
The knowledge about the items is stored on the server in a relational database management system (RDBMS) (store).
The specifics of the items are pulled from the database for the consumer to see depending on their menu selections, and the database of all goods is updated at the end of each purchase.
This Django Online Shopping is an easy project for beginners to learn how to build a web-based python Django project.
We will provide you with the complete source code and database for the python project so that you can easily install it on your machine and learn how to program in Python Django.
To start creating a Online Shopping Project in Python Django, makes sure that you have PyCharm Professional IDE Installed in your computer.
This Online Shopping in Django Framework, Also includes a Download Source Code for free, just find the downloadable source code below and click download now.
Check out the link below for more articles about this topic.
- Activity Diagram for Online Shopping System
- Online Shopping System Project in Laravel with Source Code
- ER Diagram for Online Shopping System
- Use Case Diagram for Online Shopping System
- Sequence Diagram for Online Shopping System | UML
- Class Diagram for Online Shopping System
- Sequence Diagram for Online Shopping Cart
- Use Case Diagram for Online Shopping Cart | UML
- Class Diagram for Online Shopping Cart
About Project Details
| About Project | Project Details |
|---|---|
| Project Name | Online Shopping Project in Python Django |
| Python version (Recommended) | 3.8 Version |
| Programming Language Used | Python Django Language |
| Developer Name | itsourcecode.com |
| IDE Tool (Recommended) | Sublime, Visual Studio, PyCharm |
| Project Type | Web Application |
| Database | SQLite |
Admin Features
- Dashboard – For the admin dashboard, you will be able to all the basic access in the whole system. Such as summary of products, orders, and the likes.
- Manage Products – The admin has access to the product management information system. He can add, update and delete the product.
- Manage Orders – As the main functions of the admin, the admin can accept or reject the order from the customers on a case to case basis.
- Manage Customer– The admin can manage the customer’s account. Admin can add, update and Block customer in the system.
- Login and Logout – By default one of the security features of this system is the secure login and logout system.
Customer Features
- Login Page – Customer enter their website credentials on this page to gain access to all of the website’s features.
- Register Page– The page where new customer created their login credentials for the website.
- Home Page– When customer visit the website, this is the system’s default page. This page shows the products for sale in the store, or by entering a keyword in the search box above the products.
- Contact Us – On the contact us, the frontend customer can submit an inquiry to the admin of the system.
- Feedback – On the feedback, the frontend user can submit feedback to the admin of the system.
- Customers Profile – In the frontend, the customer can register and update their profile. In short, this system has a customer management system feature.
- Product View Page – The page on which the product’s specific information is shown, as well as the page on which the customer adds the product to his or her cart.
- Cart List Page– The page that lists the items that customer have chosen. This is the page where the customer can complete the order checkout process.
- My Order Page – The page that lists the customer’s orders.
- Paypal Payments – This Online Shopping in Django has a payment method that uses Paypal Payments.
- Tracking Order – This Online Shopping has the ability to track the order of the customer.
Online Shopping Project in Python Django Steps on How to Create a Project
Time needed: 5 minutes
Here are the steps on how to create a Online Shopping in Django with Source Code.
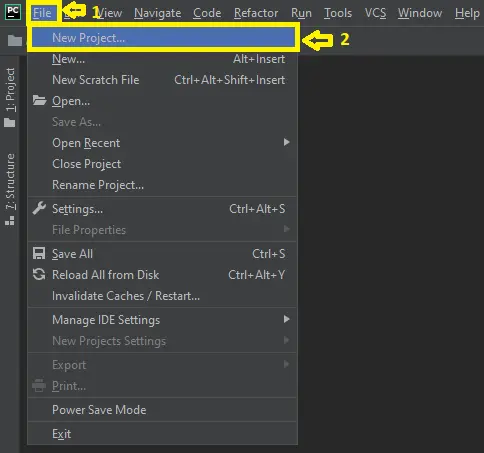
- Step 1: Open file.
First , open “pycharm professional” after that click “file” and click “new project”.

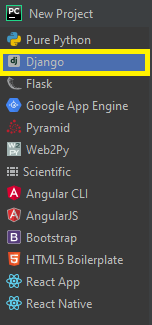
- Step 2: Choose Django.
Next, after click “new project“, choose “Django” and click.

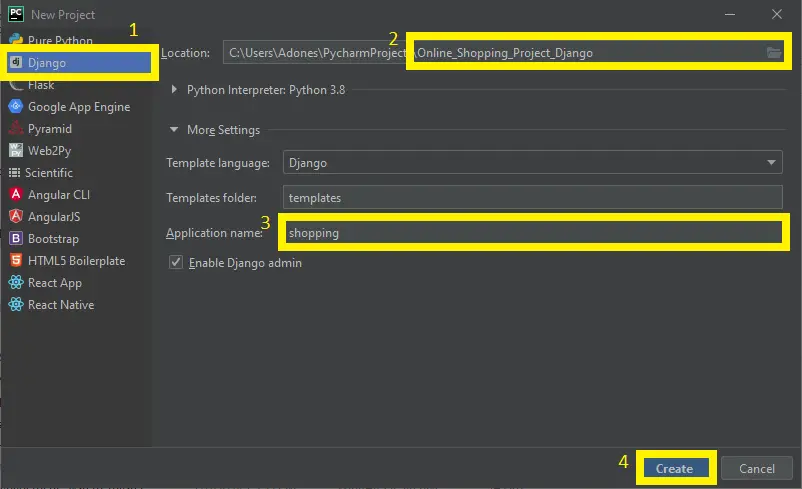
- Step 3: Select file location.
Then, select a file location wherever you want.

- Step 4: Create application name.
After that, name your application.

- Step 5: Click create.
Lastly, finish creating project by clicking “create” button.

- Step 6: Start Coding.
Finally, we will now start adding functionality to our Django Framework by adding some functional codes.

Functionality and Codes
- Create template for the customer homepage
In this section, we will learn on how create a templates for the customer homepage. To start with, add the following code in your customer_base.html under the folder of /templates/ecom.
<body>
<div id="navbar">
    <div class="container">
        <div class="row row1">
            <ul class="largenav pull-right">

                <li class="upper-links"><a class="links" href="/my-order">Orders</a></li>
                <li class="upper-links"><a class="links" href="/my-profile">Profile</a></li>
                  <li class="upper-links"><a class="links" href="/logout">Logout</a></li>
                <li class="upper-links dropdown"><a class="links" href="">More</a>
                    <ul class="dropdown-menu">
                      <li class="profile-li"><a class="profile-links" href="/send-feedback">Send Feedback</a></li>
                        <li class="profile-li"><a class="profile-links" href="/contactus">Contact Us</a></li>
                        <li class="profile-li"><a class="profile-links" href="/aboutus">About Us</a></li>
                    </ul>
                </li>
            </ul>
        </div>
        <div class="row row2">
            <div class="col-sm-2">
                <h2 style="margin:0px;"><a style="text-decoration:none; color:white;" href="/"><span class="largenav">Online Shopping </span></a></h2>
            </div>

            <div class="navbar-search smallsearch col-sm-8 col-xs-11">
              <form  action="/search" method="get">
                <div class="row"> <input class="navbar-input col-xs-11" type="search" placeholder="Search for Products, Brands and more" name="query" id="query">
                  <button class="navbar-button col-xs-1" type="submit">
                    <svg width="15px" height="15px">
                            <path d="M11.618 9.897l4.224 4.212c.092.09.1.23.02.312l-1.464 1.46c-.08.08-.222.072-.314-.02L9.868 11.66M6.486 10.9c-2.42 0-4.38-1.955-4.38-4.367 0-2.413 1.96-4.37 4.38-4.37s4.38 1.957 4.38 4.37c0 2.412-1.96 4.368-4.38 4.368m0-10.834C2.904.066 0 2.96 0 6.533 0 10.105 2.904 13 6.486 13s6.487-2.895 6.487-6.467c0-3.572-2.905-6.467-6.487-6.467 "></path>
                    </svg>
                  </button>
                </div>
              </form>
            </div>


            <div class="cart1 largenav col-sm-2"> <a class="cart-button" href="/cart"> <svg class="cart-svg " width="16 " height="16 " viewBox="0 0 16 16 ">
                        <path d="M15.32 2.405H4.887C3 2.405 2.46.805 2.46.805L2.257.21C2.208.085 2.083 0 1.946 0H.336C.1 0-.064.24.024.46l.644 1.945L3.11 9.767c.047.137.175.23.32.23h8.418l-.493 1.958H3.768l.002.003c-.017 0-.033-.003-.05-.003-1.06 0-1.92.86-1.92 1.92s.86 1.92 1.92 1.92c.99 0 1.805-.75 1.91-1.712l5.55.076c.12.922.91 1.636 1.867 1.636 1.04 0 1.885-.844 1.885-1.885 0-.866-.584-1.593-1.38-1.814l2.423-8.832c.12-.433-.206-.86-.655-.86 " fill="#fff "></path>
                    </svg> Cart <span class="item-number ">{{ product_count_in_cart }}</span> </a> </div>
        </div>
    </div>
</div>
<!-- content start-->
{% block content %}

{% endblock content %}
<!-- content end-->
<br><br><br>
<footer>
  <p>
    <a id="ftr" href="#" class="fa fa-facebook"></a>
    <a id="ftr" href="#" class="fa fa-whatsapp"></a>
    <a id="ftr" href="#" class="fa fa-instagram"></a>
    <a id="ftr" href="#" class="fa fa-twitter"></a>
  </p>

  <br>
</footer>
<script>
$(document).ready(function(){

function openNav() {
document.getElementById("mySidenav").style.width = "70%";

document.body.style.backgroundColor = "rgba(0,0,0,0.4)";
}

function closeNav() {
document.getElementById("mySidenav").style.width = "0";
document.body.style.backgroundColor = "rgba(0,0,0,0)";
}


});
</script>

</body>
</html>
- Create template for the cart
In this section, we will learn on how create a templates for the cart. To start with, add the following code in your cart.html under the folder of /templates/ecom.
{% extends 'ecom/homebase.html' %}
{% load static %}
{% block content %}


<head>
  <link href="//netdna.bootstrapcdn.com/bootstrap/3.0.0/css/bootstrap.min.css" rel="stylesheet" id="bootstrap-css">
  <script src="//netdna.bootstrapcdn.com/bootstrap/3.0.0/js/bootstrap.min.js"></script>
  <script src="//code.jquery.com/jquery-1.11.1.min.js"></script>
<style media="screen">
  .button {
  display: inline-block;
  border-radius: 4px;
  background-color: #f4511e;
  border: none;
  color: #FFFFFF;
  text-align: center;
  font-size: 28px;
  padding: 20px;
  width: 200px;
  transition: all 0.5s;
  cursor: pointer;
  margin: 5px;
}

.button span {
  cursor: pointer;
  display: inline-block;
  position: relative;
  transition: 0.5s;
}

.button span:after {
  content: '\00bb';
  position: absolute;
  opacity: 0;
  top: 0;
  right: -20px;
  transition: 0.5s;
}

.button:hover span {
  padding-right: 25px;
}

.button:hover span:after {
  opacity: 1;
  right: 0;
}

.button2 {
  background-color: white;
  color: black;
  border: 2px solid #008CBA;
}

.button2:hover {
  background-color: #008CBA;
  color: white;
}

</style>

</head>
<br><br><br><br>

<div class="container">
  <div class="panel panel-primary">
    <div class="panel-heading" style="background-color: #ff6600;">
      <h6 style="text-align:center;" class="panel-title">My Cart</h6>
    </div>
    <table class="table table-hover" id="dev-table">
      <thead>
        <tr>
          <th>Name</th>
          <th>Image</th>
          <th>Price</th>
          <th>Description</th>
          <th>Remove From Cart</th>

        </tr>
      </thead>
      {% for p in products %}
  {% if p %}

      <tr>
        <td> {{p.name}}</td>
        <td> <img src="{% static p.product_image.url %}" alt="Profile Pic" height="40px" width="40px" /></td>
        <td>{{p.price}}</td>
        <td>{{p.description}}</td>

        <td><a class="btn btn-danger btn-xs" href="{% url 'remove-from-cart' p.id  %}"><span class="glyphicon glyphicon-trash"></span></a></td>

      </tr>
      {%else%}
      <br><br><br>
      <h1>no products</h1>
      {% endif %}
      {% endfor %}
    </table>
  </div>
</div>
<br><br><br>
<div style="text-align: center;">
  <button class="button button2">Total {{total}}</button>
  <a href="/customer-address"><button class="button" ><span>Purchase </span></button></a>
</div>


<br><br><br><br><br>
{% endblock content %}
- Create template for the payment
In this section, we will learn on how create a templates for the payment. To start with, add the following code in your payment.html under the folder of /templates/ecom.
{% extends 'ecom/customer_base.html' %}
{% load static %}

{% block content %}
<head>

</head>
<style media="screen">

.panel-title {display: inline;font-weight: bold;}
.checkbox.pull-right { margin: 0; }
.pl-ziro { padding-left: 0px; }
</style>
<br><br>
<marquee scrolldelay="50">ITS FAKE PAYMENT PAGE. WE DONOT STORE YOUR DATA</marquee>
<marquee scrolldelay="50">ITS JUST FOR DEMO</marquee>
<br><br>
<div class="container" style="text-align:center; padding-left:300px;">
    <div class="row">
        <div class="col-xs-12 col-md-4" style="height:500px; width:600px;">
            <div class="panel panel-default">
                <div class="panel-heading">
                    <h3 class="panel-title">
                        Payment Details
                    </h3>
                    <div class="checkbox pull-right">
                        <label>
                            <input type="checkbox" />
                            Remember
                        </label>
                    </div>
                </div>
                <div class="panel-body">
                    <form role="form" method="post">
                    <div class="form-group">
                        <label for="cardNumber">
                            CARD NUMBER</label>
                        <div class="input-group">
                            <input type="text" class="form-control" id="cardNumber" placeholder="Valid Card Number"
                                required autofocus />
                            <span class="input-group-addon"><span class="glyphicon glyphicon-lock"></span></span>
                        </div>
                    </div>
                    <div class="row">
                        <div class="col-xs-7 col-md-7">
                            <div class="form-group">
                                <label for="expityMonth">
                                    EXPIRY DATE</label>
                                <div class="col-xs-6 col-lg-6 pl-ziro">
                                    <input type="text" class="form-control" id="expityMonth" placeholder="MM" required />
                                </div>
                                <div class="col-xs-6 col-lg-6 pl-ziro">
                                    <input type="text" class="form-control" id="expityYear" placeholder="YY" required /></div>
                            </div>
                        </div>
                        <div class="col-xs-5 col-md-5 pull-right">
                            <div class="form-group">
                                <label for="cvCode">
                                    CV CODE</label>
                                <input type="password" class="form-control" id="cvCode" placeholder="CV" required />
                            </div>
                        </div>
                    </div>
                    </form>
                </div>
            </div>
            <ul class="nav nav-pills nav-stacked">
                <li class="active"><a href="#" style="background-color: #ff6600;"><span class="badge pull-right">{{total}}</span> Final Payment</a>
                </li>
            </ul>
            <br/>
            <a href="/payment-success" class="btn btn-primary btn-lg btn-block" role="button">Pay</a>
        </div>
    </div>
</div>


{% endblock content %}
Downloadable Source Code Below.
Anyway, if you want to level up your programming knowledge, especially python, try this new article I’ve made for you Best Python Projects with source code for Beginners.
But If you’re going to focus on web development using Django, you can download here from our list of Best Django Projects with source code based on real-world projects.
How To Run The Online Shopping in Django?
- Step 1: Extract/unzip the file
- Step 2: Go inside the project folder, open cmd and type the following commands to install Django Framework and run the webserver:
- pip install -r requirements.txt
- python manage.py migrate
- python manage.py runserver
- Step 3: Finally, open the browser and go to http://127.0.0.1:8000/
Summary
In summary, this Online Shopping in Django with Source Code can be useful to students or professional who wants to learn python programming language.
This project can also be modified to fit your personal requirements. Hope this project will help you to improve your skills. Happy Coding!
Inquiries
If you have any questions or suggestions about Online Shopping Project in Django with Source Code, please feel free to leave a comment below.
Official documentation
Frequently Asked Questions
How does this Django ecommerce system work?
Frontend: product catalog with categories, search, cart (session-based), checkout. Backend: order management, payment gateway integration (Stripe, PayPal, Razorpay via django-stripe / django-paypal). Admin: product CRUD, order fulfillment, reports.
What Django and Python versions does this project require?
Most projects in this batch run on Django 4.x or 5.x with Python 3.8+. A few older projects need Django 3.2 with Python 3.7. Check the requirements.txt file for exact versions. To run any: install Python, create a virtualenv (python -m venv venv), activate it, pip install -r requirements.txt, run python manage.py migrate, then python manage.py runserver.
How do I set up the database for this Django project?
Most projects use SQLite (zero setup, auto-creates db.sqlite3 in project root on first migrate). For projects using MySQL or PostgreSQL: install the database server, create an empty database, edit settings.py DATABASES[‘default’] with your credentials, run python manage.py migrate. For sample data: python manage.py loaddata fixtures.json (if a fixture file is included) or create a superuser via python manage.py createsuperuser.
Can I use this Django project for a BSIT capstone or thesis?
Yes, but extend it. A bare CRUD app is too narrow for full capstone scope. Add: user roles via Django Groups, dashboards (Chart.js + AJAX endpoints), PDF exports (ReportLab or WeasyPrint), email notifications (Django send_mail), real domain extension (analytics, audit log, multi-branch). Pair with Chapter 1-5 documentation matching your panel’s rubric.
Why am I getting ModuleNotFoundError, OperationalError, or ‘No such table’ errors?
Three common Django startup issues: (1) ModuleNotFoundError: virtualenv not activated OR pip install -r requirements.txt skipped. (2) OperationalError: database credentials in settings.py don’t match your local MySQL/PostgreSQL. (3) ‘No such table’: you skipped python manage.py migrate. Also: if settings.py imports fail, check Python version compatibility (Django 5 needs Python 3.10+).
Where can I find more Django projects with source code?
Browse the Django Projects hub for the full library. For broader Python capstones see Python Projects (Tkinter desktop, Pygame games, OpenCV vision, ML). For PHP MVC alternatives see Laravel Projects. For BSIT capstone idea lists see 150 Best Capstone Project Ideas.

Adones Evangelista
Programmer & Technical Writer at PIES IT Solution
Adones Evangelista is a programmer and writer at PIES IT Solution, author of over 900 tutorials and error-fix guides at itsourcecode.com. Specializes in JavaScript, Django, Laravel, and Python error debugging covering ValueError, TypeError, AttributeError, ModuleNotFoundError, and RuntimeError, plus C/C++ and PHP capstone projects for BSIT students.
Expertise: JavaScript · Python · Django · Laravel · Error Debugging · C/C++ · View all posts by Adones Evangelista →
NOT FOUND
File “C:\lib\importlib\__init__.py”, line 126, in import_module
return _bootstrap._gcd_import(name[level:], package, level)
File “”, line 1050, in _gcd_import
File “”, line 1027, in _find_and_load
File “”, line 1004, in _find_and_load_unlocked
ModuleNotFoundError: No module named ‘widget_tweaks’
To solve that error type this command: pip install django-widget-tweaks
done thank you but now i have another error:
(1)\Online_Shopping_Project_Django>pip install -r requirements.txt
ERROR: Could not open requirements file: [Errno 2] No such file or directory: ‘requirements.txt’
Step 1: pip install virtualenv
Step 2: virtualenv env
Step 3: cd env/Scripts
Step 4: activate
Step 5: cd ../..
Step 6: pip install django
Step 7: python manage.py makemigrations
Step 8: python manage.py migrate –run-syncdb
Step 9: python manage.py createsuperuser
Step 10: python manage.py runserver
Step 11: Type this in your browser or chrome: http://127.0.0.1:8000/
AGAIN I GOT ERROR:
(venv) C:\Users\dhrut\Downloads\Online_Shopping_Project_Django (1)>python manage.py makemigrations
(venv) C:\Users\dhrut\Downloads\Online_Shopping_Project_Django (1)>python manage.py migrate-run-syncdb
C:\python.exe: can’t open file ‘C:\\Users\\dhrut\\Downloads\\Online_Shopping_Project_Django (1)\\manage.py’: [Errno 2] No such file or directory
Hello, i solved all errors but now i got the connectivity issues:
System check identified some issues:
WARNINGS:
ecom.Customer: (models.W042) Auto-created primary key used when not defining a primary key type, by default ‘django.db.models.AutoField’.
HINT: Configure the DEFAULT_AUTO_FIELD setting or the EcomConfig.default_auto_field attribute to point to a subclass of AutoField, e.g. ‘django.db.models.BigAutoField’.
ecom.Feedback: (models.W042) Auto-created primary key used when not defining a primary key type, by default ‘django.db.models.AutoField’.
HINT: Configure the DEFAULT_AUTO_FIELD setting or the EcomConfig.default_auto_field attribute to point to a subclass of AutoField, e.g. ‘django.db.models.BigAutoField’.
ecom.Orders: (models.W042) Auto-created primary key used when not defining a primary key type, by default ‘django.db.models.AutoField’.
HINT: Configure the DEFAULT_AUTO_FIELD setting or the EcomConfig.default_auto_field attribute to point to a subclass of AutoField, e.g. ‘django.db.models.BigAutoField’.
ecom.Product: (models.W042) Auto-created primary key used when not defining a primary key type, by default ‘django.db.models.AutoField’.
HINT: Configure the DEFAULT_AUTO_FIELD setting or the EcomConfig.default_auto_field attribute to point to a subclass of AutoField, e.g. ‘django.db.models.BigAutoField’.
it is not an error. But if you run it there is no error.
ohk done thank you so muchh
sorry, but again i have a question that what’s the admin’s username and password?
what’s the admin’s username and password?
Follow this steps and it is include for creating the admin in online shopping.
Step 1: pip install virtualenv
Step 2: virtualenv env
Step 3: cd env/Scripts
Step 4: activate
Step 5: cd ../..
Step 6: pip install django
Step 7: python manage.py makemigrations
Step 8: python manage.py migrate –run-syncdb
Step 9: python manage.py createsuperuser
Step 10: python manage.py runserver
Step 11: Type this in your browser or chrome: http://127.0.0.1:8000/
Bonjour s’il vous plait pouvez vous m’aider a changer la devise des prix d’article j’aimerais les mettre en Euro.
Merci d’avance