In this tutorial, we will know how to insert rows with its shortcut in Excel.
Adding or inserting rows in Excel is easy if you know to do the shortcut. Basically, most of the users working with excel, insert blank rows very quickly. Since they are using keyboard shortcuts instead of using insert command in Home tab.
What is Insert Row in Excel?
Basically, rows are the horizontal lines or cells in Excel worksheets. Horizontal rows are numbered with numeric values such as 1, 2, 3.
Inserting rows in excel is basically adding a new row to the worksheet. Luckily to ease the time and effort in adding or inserting rows, Excel provides shortcuts.
The reason behind is just by pressing a single key or combination helps to shorten the process.
For instance, on working with your grading sheets, you noticed that another student’s grade is missing. Therefore inserting blank rows is best to do.
As we go on you will see how this shortcut helps effectively in users’ tasks. The good thing is you don’t need to memorize because as time goes by you tend to learn it.
Consider this tutorial Modifying Rows and Columns to know more about rows and columns.
Shortcut of Insert Row in Excel
And now we gather here the top 3 keyboard shortcut to insert a row in excel, they are listed below:
Ctrl+plus sign (+) or Ctrl+Shift+plus sign (+)Insert dialog boxALT+I+R
Chose the shortcut which easy to apply and work on your requirements. Whenever you are done add a new row, you can repeat the last task by pressing F4.
Shortcut of Insert Row in Excel Ctrl+Shift+plus sign (+)
1. Select the row using the shortcut SHIFT+SPACEBAR where you want to add a new blank row.
2. Then Press the shortcut CTRL+SHIFT+PLUS SIGN (+), and the new blank row will be inserted above the selected row.

Insert Dialog Box
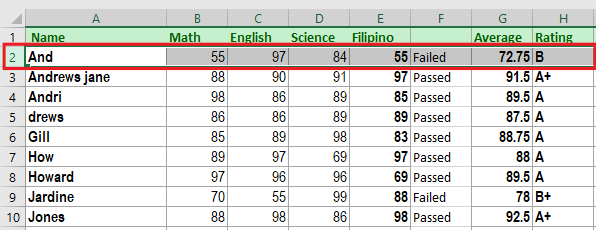
Using the same data above, we are going to insert a row using Insert dialog box. Along with the use of shortcut method.
The following steps listed below are to consider in inserting row with the use of insert dialog box.
Step 1: Select any cell of the row. Press the keys CTRL+PLUS SIGN (+) or CTRL+SHIFT+PLUS SIGN (+). The keys of each shortcut must be pressed together.
The Insert Dialog box opens with both of these shortcuts. The succeeding image shows the result of using the shortcut.
Note:
The keyboard shortcut CTRL+PLUS SIGN (+) is working if the keyboard has a numeric pad on the right section. On the other hand, the CTRL+SHIFT+PLUS SIGN (+) is working on all types of keyboards.
If you select the entire before executing the shortcut keys it will add row automatically. However, if you select a cell this will display Insert dialog box, –follow step 1.
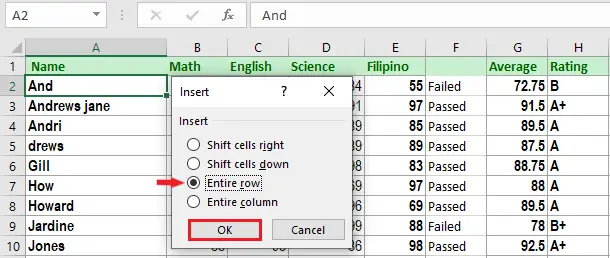
Step 2: Then the insert dialog box displays the following options:
- Shift cells right: This shifts the content of the selected cell to the cell on the next right.
- Shift cells down: This shifts the content of the selected cell to the next following cell.
- Entire row: This inserts a new row above the row of the selected cell.
- Entire column: This inserts a new column to the nearest left of the selected cell.
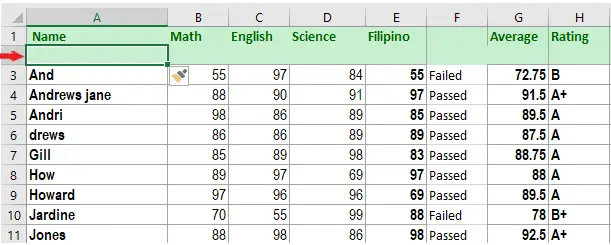
Since we want to insert an Excel row at the top of the first row, we will click Insert “Entire Row”. Hence the new row is inserted as shown below.
And now, let’s try another quick insertion of row…
ALT+I+R
- First, click on any cell within the row above to which you want to add the new blank row.
- Then, Press
ALT+I+Rthen you get the row you want to insert on the selected cell above.
How to Insert Multiple Row in Excel Shortcut?
In inserting multiple rows in Excel it is important to select row or rows quickly.
So here are the ways to select multiple rows in Excel:
- In selecting only one row, just click the heading or cell in that row then press SHIFT + SPACEBAR.
- After you select the entire row, you can select multiple rows, just hold your press in SHIFT + down arrow.
- To select multiple adjacent rows, select the first row heading and then Shift-click the last row heading or drag over the row headings using a mouse.
Now let’s try these steps to insert multiple rows using the keyboard shortcut.
- Select multiple rows using one of the methods above.
- Press Ctrl + Shift + plus sign (+) on your keyboard. Then Excel will insert the same number of rows you selected.
Note: To easily insert multiple rows make sure to select the entire rows first.
Conclusion
In conclusion, this topic about Insert Row Shortcut In Excel will give you the idea that there is a quick and easy way in manipulating rows in your worksheet.
Keep in mind that whenever you add rows, it is added above the selected rows, this is default and we can’t change the default setting.
It’s done now! I hope you now know which shortcut suits you the best. Thank you for reading 🙂